Leaderboard


Popular Content
Showing content with the highest reputation on 09/21/2020 in all areas
-
4 points
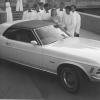
70 Landau Coupe Special
Grabber70Mach and 3 others reacted to Caseyrhe for a post in a topic
Took her out for a spin today with no major issues!! A couple of rattles need to be located/fixed, get the front end aligned, new exhaust, and she’ll be good to go. -
2 points
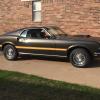
GT500 Restomod
Grabber70Mach and one other reacted to bigmal for a post in a topic
I have mine under the spoiler so it doesn’t stand out unless directly behind -
1 pointJust ask them a serious question, what is it about the Democrat party that makes you support and vote for them? Is it the one million abortions per year, the fact that they support the criminals over the law, that they support illegal aliens over citizens? How obtuse must one be to follow those maroons?
-
1 point

Life’s Challenges
Caseyrhe reacted to Grabber70Mach for a post in a topic
Thoughts and prayers for you and your wife during this time. -
1 pointThanks, that's a possibility though I'd have to buy a rectangular pair. This is what I was thinking about mounting in the airdam. 4" diameter I also have these on hand, 3.25 diameter. Final shape achieved & primed. I'll wet sand the entire thing next with 320 grit and re-prime. Once I get everything smooth I'll spray with some KBS rust seal and SEP. Hopefully that will add a layer of chip protection to the fiberglass.
-
1 point
Brown lights
Grabber70Mach reacted to prayers1 for a post in a topic
Had a good cruise last night, about 200 cars up and down the street. Now gave an 8 ga alternator wire. Last night with headlight on it read 13.5 . The drive home at night was about an hour, read 13.5. Without likes it’s 14+. Checked wires when I got home, none were hot, either was the alternator, should I change the Alternator wire from 8 to 4 gauge? Someone on the Facebook Cruise page posted my car -
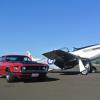
1 point

GT500 Restomod
mwye0627 reacted to Ridge Runner for a post in a topic
https://images.app.goo.gl/nPmLeBVCCb8i7PNq9 -
1 pointOur prayers are still with you all.All the best wishes Phil
-
1 point
70 Landau Coupe Special
Grabber70Mach reacted to Caseyrhe for a post in a topic
Got to work on the car last Sat am, installed the new proportioning valve, bled brakes. Took new proportioning valve off, filed top of block, installed new cooper washer, bled brakes and FINALLY all looks good. Good pedal and brakes stop rear brakes. First test drive coming soon!! -
1 pointHi Vic, Now that the weather is cooling off I will be back working on the Mustang between trips to southern Virginia where my wife & I purchased a house. The house is just west of Martinsville in Virginia which we are going to renovate to use as our house when we retire in 2 years, & we will sell the house we are currently living in here in NJ. Here is a pic of the house. The house sits on 1 acre of land & there is enough room to put up a 2 car garage to the left of the carport. I have to get more welding gas before I can weld in the sub frame connectors.
-
1 point

1970 Convertible Restoration
Grabber70Mach reacted to Vicfreg for a post in a topic
Hi all. Back working on the car, after spending most the summer travelling/working in Canada/Quarantining... Back in NC for a couple weeks, and trying to get some mini-projects out of the way. I am headed over to Mike's (Latoracing) who has kept a watchful eye on my car over the past months, while putting some finishing touches on it. I plan on hanging the doors on the car, so Mike can have his beautifully welded door braces back. To get ready for that, I pulled the doors out of storage, I had stripped the contents off the doors and had them media blasted and epoxy primed. Over last day or so, I put some Boom Mat in the doors, installed new window regulators, window guides, internal bump stops, and the door latch on both doors. I also replaced some of the worn parts on the window guides and rear bump stops. I also put new gaskets on the bolt in window mounts. This is all a lot easier to do when the door is off of the car. First 3 pics Old window guide spacers. Note that taper faces to the center of the guard. New bushings from NPD. Refurbished window guide with new bushings and new gasket. Next pic - door where you can see Boom Mat and window regulator. The two bolts and the oval plate at the latch end of the door hold in the rear bump stop. The door has a slotted hole in it to allow up and down movement. I always start with the stop pushed all the way down. The oval plate will need to be painted body color, so don't lose these when you take your door apart. (There are also smaller oval plates used for the rear window regulators on coupes and convertibles) Next set of pics - the rear window stop has a felt pad on it to keep the window from scratching when going up and down. One of mine was missing, the other was worn out. I couldn't find an exact replacement, but I found some in the NPD Catalog for earlier year Mustangs. They are slightly longer, so a quick cut with the hacksaw solved that problem. Mine were riveted in, you can see the rivets in the picture with the rear stop flipped over. So, I drilled out the rivets. The window felt kit came with a couple large staples, which I did not use, due to less than great results by the installer (me) in previous attempts with these type of stapled installs. So, I used 3M double sided body tape instead. I double stacked it and compressed it in my vice. I have used this tape to hold body parts on for later model cars, so I am sure it will last here. Last project was to drill a hole and put in a riv-nut to mount my 1969 Sport Mirrors. I had 2 existing holes that were much too close for the approx 7" distance between the new mounting hole. My car had these on both doors. The front "riv-nut" that was existing on both doors was actually a rubber/composite insert, which was easy to remove. I got a sport mirror mounting kit from NPD that had the correct screws and riv-nut. So, measure twice, drill once, and had a new hole (17/64") for the 1/4" riv-nut. I use riv-nuts a lot they are great for flush mounting stuff where you can't have a screw/bolt-nut combination. A while back, I got myself a riv-nut driver attachment for my DeWalt 20v drill. It works great. You progressively work your way tighter by using the clutch setting on the drill, until the riv-nut doesn't rotate anymore. If you go too far, you will deform the metal. Mine worked with the clutch setting on 10-11. It makes a nice, flush connection if done properly. I have included a pic of the adaptor if anyone is interested. Mine came with a bunch of dies that are for all your common machine screws and 1/4 -20 fasteners. It also has the equivalent metric sized dies. The only thing I am not really happy with is the "gasket" for the mirrors, that I got from NPD. If anyone has a mirror gasket that doesn't look like it is "squished" out on the sides, I would appreciate the info. The window project is a great weekend/weeknight project to do, which will give you better window operation in the end. Don't forget to use lubricant (lithium grease) when you do the final assembly. Vic -
1 pointGetting closer
-
1 point
Life’s Challenges
Grabber70Mach reacted to Caseyrhe for a post in a topic
Prayers have been answered and we got some great news today. Stage one, cell doesn’t appear to have any blood vessels through it, and lymph nodes looked normal. Next is choose between a lumpectomy with centralized radiation or a mastectomy. Lymph nodes would be removed during either procedure and then more thoroughly checked. Dr was so awesome and took the time to explain what we are dealing with, what happens next, options on how to proceed, genetic test available to help with that decision as well as benefit Erin, and then preventive measures to help insure another cell doesn’t pop up. Sue was so relieved as I and we can now focus on what it actually is, in lieu of the unknown. Thank you for all your thoughts and prayers! -
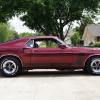
1 point
70 Landau Coupe Special
Grabber70Mach reacted to Caseyrhe for a post in a topic
Pulled a late one last Friday night. Tranny in and all ready to fire. Fired it up Sunday, good to go after I get it registered for the streets. -
1 pointWe finally got to enjoy the moment of hearing the motor crank for the first time! What a great moment! IMG_7306.MOV
-
1 pointThanks for the support. Lots of time with my son. Could not ask for a better project to spend quality time with him!