

69NC
-
Content Count
116 -
Joined
-
Last visited
-
Days Won
1
Everything posted by 69NC
-
I have the AAW wiring kit. The diagram is fine, but I'm an electral engineer so reading wiring diagrams is second nature. Overall It's a good kit. I'm installing a lot of customizations so the AAW harness is good as it has plenty of extra circuits. It came with new tail light sockets, and the correct headlight switch. The only thing missing is the convertible top wiring, so I'll have to create that myself.
-
It would be no different than the wires along since there's nothing that they are connected to. But if you looking in the engine bay it would look totally stock with the regulator and the wires. It really depends on the look you want.
-
Why not gut a regulator. Then hook the wires up to your now dummy regulator. It will look stock.
-
I Installed Tinman's subframe connectors. I had to trim the seat pans here is a link to my installation http://www.theracg.com/wp-content/uploads/2012/12/MG_9508.jpg http://www.theracg.com/2012/10/seat-pans-and-the-subframe-connector/
-
Glad you got it working! Can't wait to hear what the issue was.
-
They are also avail from pretty much any of the suppliers CJ pony has them Single nut with the bolt: http://www.cjponyparts.com/fender-to-rocker-panel-bolt-nut-1965-1970/p/HW220/ Or just the nuts: http://www.cjponyparts.com/fender-to-cowl-nut/p/359613S/
-
Bob, A few questions. if you hook up the break in tach, it's under the hood? where as the auto meter tach has wires running to the dash area? Do you have the filter cap in place? if it is missing, or bad there could be noise that is confusing the tach (Not as likely as you have no movement, and not a bouncing tach) http://image.cpsimg.com/sites/carparts-mc/assets/classroom/images/ignitiondiagram.gif if you have a test light, or a volt/ohm meter you check that you have tach wired in correct (Like is mentioned above) if you can get the tach to work under the hood, then check that the wires running to the dash don't have any breaks/opens An easy way to check the pulses is to unplug the high tension lead to the distributor cap and and ground it. Then hook up the volt meter set to AC, between ground and the neg terminal on the coil. when you crank the engine you should see some voltage reading (this is caused as the points open a close grounding our the coil). If you move the voltage probe from the neg side of the coil to the pos side, you should not see any voltage as it should remain at 12 V DC (remember the volt meter is on AC, so it is expecting to see a cycle in the voltage) A test light will flash on the neg side, and be on steady on the pos side Do you have a pertonix ignitor? I have seen them cause problem with some Tachs If you want more help, you can contact me directly. PM for info. This is completely aside, and please don't take this wrong, but I see a bit irony in that you have the handle of RPM, and you have a tach problem :D
-
Looks great!
-
Sorry Bob. I meant 69fstback, I think that's the original poster.
-
Cool, than you only need a 5 or 10 amp fuse to protect it. I'd get rid of the cotter pin, it's one small accidental short away from a fire.
-
The whole circuit for a 69 mustang is probably only 30 - 50 Amps I think the factory alternator was only 35 or 40 amps. I assume that you wired the power side of the fan relays directly to your battery, and are only using the fuse panel to switch them on? In which case you only need a few amps. The cotter pin will handle 100 amps or more, so if you get a short in your fan circuit, you could fry the wiring harness. Here is a simple example of how to wire up a fan. the orange wire in the diagram is the one that goes to the fuse panel, and it will only draw a few amps to activate the relay.
-
I'm pretty sure that will handle a lot more than 20 Amps. Though you now have a fusible link to your wiring harness.
-
I would replace the panel, you will end up doing far less body work and not have bondo. I went with Dynacorn and had little trouble fitting the parts. Like was stated above do one panel at a time to make sure you have original parts (door striker panels, the tail panel, roof, etc..) in place to align to and measure and clamp, I like clecos to hold the panel in place. Measure and align several times before you weld. redoing/tweaking when clamped is easy, don't rush to welding Mine's a convertible, but if you want to see the steps I took to replace the rear quarters, you can read my blog entry: http://www.theracg.com/2013/12/install-the-new-rear-quarters/
-
While test fitting my grille, I found out that in my box of stuff from the PO, I had sport lamps but no brackets. It turns out that the brackets are not reproduced, well part of it is, but not both parts. So just like the drip pans for my convertible, I decided to make my own brackets. Thought others may have run across this too. Like all parts I cannot find, it starts with cardboard: After several rounds of trial fitting, it begins to take shape Once it looks and fits well, I transfer it to metal Then the cutting and shaping starts: more trimming, and few touch ups with the die grinder Starting to look like everything fits: Everything bolts up and grille sits where it should. Just needs some finish up and painting, should be good to go.
-
 Do a search it's been done before. If you Google for chip foose overhauling he did a mustang convertible. They look nice but will require a lot of metal work.
 -
Plus one for Virginia classic. I got the boss 302 ones. They fit really well. Also get new gaskets.
-
Go with the full quarters it gives you access to get at the rest of the convertible drip rails. I had to do the same work. The quarters were easy to fit. Plus I knew I had gotten at All trust areas. I have a write up on it on my blog if you want to see some pictures an what I did.
-
I hope they catch the person who stole your friends car. Or maybe better that they recover the car with it having rolled on the theif.
-
Warning about Doug's Header for Coyote Swap
69NC replied to TurtleRacing's topic in 1969-70 Technical Forum
I have set it to just under 4 degrees down, measured at the intake ports on the heads (With the intake removed). to get it there i had to raise the transmission tunnel about 1.75" a lot of that is due to the t-56 being a large transmission. -
You were making good time down the Hiway ;)
-
Warning about Doug's Header for Coyote Swap
69NC replied to TurtleRacing's topic in 1969-70 Technical Forum
Thanks, i have not ordered exhaust yet, and am undecided. I hear you on change. As you know shoving a 21st century motor in a 46 year old car, is all about chagne. And lots of opportunity for creative engineering :D -
Warning about Doug's Header for Coyote Swap
69NC replied to TurtleRacing's topic in 1969-70 Technical Forum
Good thing they come uncoated (and i have not sent them off yet). if i do need to cut them down, it wil be easy to weld back together. Guess I get to reinstall them and check how much they impact ground clearance. Turtle Racing: I are you planning on running 3" all they way back or reducing to 2.5"? -
Warning about Doug's Header for Coyote Swap
69NC replied to TurtleRacing's topic in 1969-70 Technical Forum
Mustangs to fear also make a set. maybe you should give them a call, and see how far their headers hang down. -
Warning about Doug's Header for Coyote Swap
69NC replied to TurtleRacing's topic in 1969-70 Technical Forum
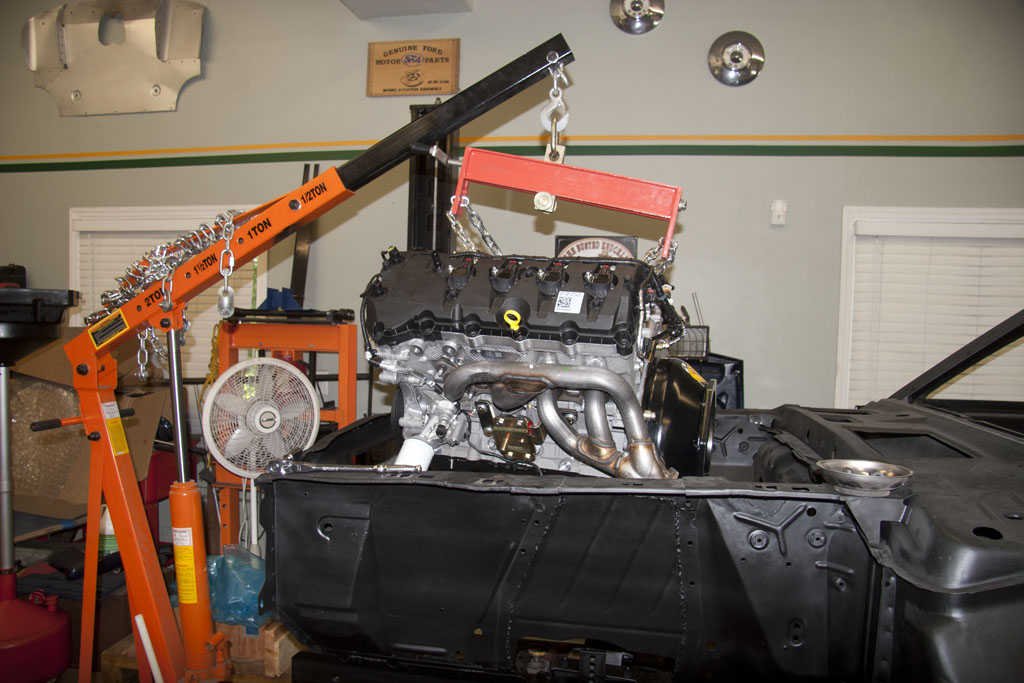
Turtle Racing, Not sure if it's because you're using the Tremec 5 spd... I'm installing the Tremec T-56 6 speed, and while I do agree they hang down some, I'm not seeing them hang down as far as you are. I have the Rod and Custom front suspension, and you can see in the photo below that the headers are about level with the Engine crossmember. The photo at the bottom shows that I had to raise the transmission tunnel about 1.75 inches to get the tranny up high to have my drive line angle within 4 degrees. Maybe that moved everythign up enough for me. I did have to do some fitment (Read dimple the header) around the motor mounts, and I had to trim one ear off the transmission. but other than they fit well, and hug the block close, leaving room for other parts. -
HELP! Brakes Dragging After OEM Disc Conversion
69NC replied to TeamPontiac79's topic in 1969-70 Technical Forum
For drum brakes there is a residual pressure valve that is usually in the distribution block, which may have been replaced by a portioning valve to adjust between the disks on frint and the drums in hte rear. I would also check for this. Also if you had drums in the front andother thing to check is if they did change out to remove the residual pressure valve form the front. If not, then the fronts may be what are draging as disks do not need any residual pressure.
