

latoracing
-
Content Count
1,077 -
Joined
-
Last visited
-
Days Won
47
Reputation Activity
-

 latoracing got a reaction from rangerdoc in Whats your favorite wheel for a Mach 1
Ok, I'm going to be different.
I really like the way these look on a rather stock appearing Mach. '69 or '70, 15" to 17" (depending on size preference). Old school, yet contemporary.
The really good thing about different wheels, they bolt on and can be changed easily.
-
 latoracing got a reaction from Ridge Runner in 1970 Grabber Green Project
Got my elbow the other day, cut all the 2" stuff back off and installed 2ea. 28 degree elbows to help with the clutch linkage area clearance. Did some custom cutting and tacked them in place.
This side didn't want to come out, even with the head removed. I had to unbolt the motor mount and raise the block up to side the header out the top, fun. Once it was out and taken apart, the outboard tubes were welded together.
I welded the other section together and cleaned up all the welds with scotch-brite. Some of the areas will be impossible to clean once the header is all assembled, so this needed to be done before final assembly. Once all tack welded together, with the purge running, the main collector was welded in place. The tubes were welded to the flanges and everything was left to cool off. The inside part of the header flange will be welded the next time I get a free moment, and these are all but finished. I had a few people asking about back purging, so I did a quick example and a little explaining. Back purging a tube with argon protects the molten puddle on the inside of the tube while welding. I am welding mainly 18ga (.049") 304 /321 stainless steel. There is a thread on Pro Touring .com http://www.pro-touring.com/threads/92168-The-art-of-purge-welding(-back-purging) that gives a better description, if you want to go into more depth. I welded two scrap sections of tubing together, one open, one purged, then cut them in half. Obviously the one on the left is without argon. As the weld puddle gets exposed to oxygen the weld "sugars" up, gets puffy and contaminated. (there's more to it ,but it is a general idea) The reason that I do not want this inside my headers is this defect can lead to cracking of the weld when it is heat cycled, plus it disrupts airflow. Having to wait on the purge to do it's job, and having to work around a inlet hose is annoying, but well worth the trouble. -
 latoracing got a reaction from AlexissRet in Price Matching
I have been wanting to experiment with modifying a distributor, and not wanting to pay a bunch for it. I wanted a Mallory CNC alum. type, and at the local auto parts store, it retails for more than $400.00. On line searching revels $315.00 at Summit, and a few vendors, including Jeg's at $289.00. Saw that Jeg's priced matched online prices, so more searching. One had the same part at $220.00, another at $199.00, Amazon had it at $76.48 with free shipping. Copied the URL, stuck it in the price match section at Jeg's, it will be here in a few days. I didn't think they would go that low, especially since they can't be making any money with that price. The funny thing is, Amazon was out of stock. I have never used that feature, but you had better believe, I will from now on.
Anyone else have a "can't believe" purchase with Price Matching?
-

-
 latoracing got a reaction from SWPruett in 1970 Grabber Green Project
Can't do the side pipes, just not the "look" I am after on this build lol. I am still looking at doing a rocker exit though, more to come on that issue.
As time is always an issue, it has taken a little bit to get the rest of the parts cut and tacked together. The routing stayed fairly close to the original model.
Much like the passenger side, everything has decent clearance and the tubes were in the 2" variance range. Also much like the passenger side, it doesn't come out in one piece, the shock tower is the main obstacle, but I will live with them. The headers would be MUCH simpler if they were not part of the equation, but easy is boring lol. I am in the process of welding all these segments together, then back onto the car for the 2-1 segment. -
latoracing reacted to Mach1 Driver in Is it necessary to reinforce shock towers
Prayers, I've been looking at welders too and don't usually find good things to say about Eastwood:
This from The Garage Journal, Re: Eastwood MIG Welder 135 Amp Item #12011 I bought an Eastwood with the idea of "Teaching myself how to weld" I wasn't at all happy with it. It wasn't this exact model, it was a 220 Volt machine. The build quality wasn't great and performance was pretty poor. Erratic wire feed speed, ground clamp was pretty week and the gun just felt pretty cheap in my hand.
What I thought was just my inability to weld and inexperience was proven wrong when a good friend who is an experienced welder broke a bracket on his utility trailer while at my house and he attempted to use my welder to fix it. He had a hard time just geting a quality weld with it.
I will say that Eastwoods "No Hassle" return policy was exactly that. They took it back with me only saying I didn't like it.
I bought a Miller 190 and found out that you do actually get what you pay for. If you can wait until you can afford to spend more I would strongly suggest waiting and buying a higher quality welder. Many people rate these as best: Miller, Lincoln, ESAB, Hobart (and from the price its easy to say you get what you pay for). -
 latoracing got a reaction from mwye0627 in 1970 Convertible Restoration
After the usual weld, sand, beat with a hammer, repeat as necessary... then a little block sanding with some 80 grit, this quarter panel has been given a new lease on life.
There are just a few high / low areas that I want to tune up, then finish off all the little spot welds on the lower pinch weld area. On to the other side.
-
latoracing got a reaction from SWPruett in 1970 Grabber Green Project
Took the afternoon to chop up some tubing.
Half way done with cutting and tacking the driver's side components. So far so good.
-
latoracing got a reaction from SWPruett in Mach 1 resto in Australia
Welcome to the site MAC, you have some nice looking toys.
Hate that you were deceived, but once your done, it will be exactly what you want, the way you want it.
Once it is finished, you'll have tough decisions to make... do I drive the Mustang or the Charger...
-
latoracing reacted to Midlife in Spammers - What are they after?
I say we infect them with Zika! Turnaround is fair play...
-
 latoracing got a reaction from Machspeed in Radiator Support Assembly Replacement
Yes. There are very few pieces on my build that are not Dynacorn.
-
latoracing reacted to Machspeed in Radiator Support Assembly Replacement
Mike, this is precisely what I was looking for. Thank you!
-
latoracing got a reaction from SWPruett in 1970 Grabber Green Project
Thanks for all the complements gents, I do appreciate it.
Picked me up a new present from me to me. It isn't new, but I have used it quite often over the past 12 years. They didn't have a need for it at work, as I was the only one who actually ever used it and it is not for "production". Got it to the house today, it is a Di Acro model 24 box and pan brake, needs a little TLC as it has been in storage for a while, but I will put it to good use. Yea tools!!!
-
latoracing got a reaction from SWPruett in 1970 Convertible Restoration
Less wire with the same voltage doesn't "fill" the puddle as quickly. (Look at it as leaning out a air/fuel ratio)Turning up the wire speed with the same voltage requires the arc to melt more filler wire in the same amount of time, makes the weld colder. If you can literally feel the MIG wire pushing into the weld puddle, way too "rich".
Set up a part and try different wire and heat settings. Do some experiments to see the differences of less/more wire and how it affects your weld. Be safe welding overhead, 3rd degree buns are not fun! (Ask me how I know :) )
-
 latoracing got a reaction from Rcodenewf in 1970 Convertible Restoration
Due to gravity, the more wire you melt in the weld puddle, the more chance you have of it dripping out of the hole. I'm not suggesting a lot less wire, just enough to make it hotter than you would normally weld. The welding shied gas is another issue, as it is heaver than air. For up side down welds I will turn up the flow rate by 5psi to help. Keeping your nozzle extremely close to the puddle really helps. Get some scrap and try it. With my Miller (running .030" wire) I usually weld thin metal on 2 for amps and 3.5 for wire speed. Up side down, I turn the wire speed down to 3 (if that makes any since)
-
 latoracing got a reaction from Robertaluch in 1970 Convertible Restoration
As I have been working on getting this chassis ready for bracing yesterday, I needed a way to keep the poor thing a little more stable. With the rocker out of it makes it impossible to hold it still without welding something in it's place. So instead of welding / fastening a temporary brace in the car, I chose to just temp install the parts that will be installed. Interesting concept, but at least I'll know that they will fit. The car came with some replacement pieces that could be used, like the inner rocker. This part came from the factory on the long side in order to make all the tabs and connecting flanges manually. Starting with the given point of 22" for the rear wheel well area to the seat belt hole, I made the appropriate tabs out of the extra material and bent them in their proper direction and angle. The Weld and Sealant manual is a good reference for the direction of the tabs, not so much on the size or location. I seem to be doing a lot of inner rocker installs as of lately, practice makes perfect lol
Fitting it in the rear torque box area and over the floor reinforcement piece required a little persuasion as the rear of the car was moved up, kinda neat how much it moves vertically. Getting the inner rocker to fit correctly took a bunch of clamps and some strategic hammer blows to get it situated. Surprisingly enough, it went in and was level (measuring level at the middle top portion) just like the other side. The old part does have surface rust that will be taken care of before it is welded in place.
When I built the table, the second crossmember was measured and placed to align with the front of the torque boxes for a good reference point. Using a square to transfer the area of the inner rocker to be trimmed and for tabs was as simple as lining up the front of the tube and transferring the mark on the part.
The mark I made on the inner rocker was the outside of the forward torque box, so the thickness of the front of the box (I allowed .125") for the bend radius plus the metal thickness. This is another place that the factory makes tabs on the inside of the rocker to have more attachment points, I go a little bit farther and cap the end of the "tube" for more strength. This inner rocker is not tapered up towards the front torque box, which might have to be another modification. I needed to see how the torque box was going to align due to this fact. Prepping the area by grinding down the PO's leftover spot weld remnants (thanks whoever took it apart, you did a great job lol) the outer portion of the torque box popped right in place. Using a couple 18R vise grips to hold it up I installed the inner rocker on it's outboard side. (not in the picture)
I did test fit the outer rocker before any of this was attempted, it fit fairly well. It is going to need some clamping in order to be dimensionally correct, but will work nicely. Once all these pieces are happy in their new positions (sheet metal screwed together) I can get the doors on this and continue getting the chassis braced and properly supported. So far, so good
-
 latoracing got a reaction from JamesTodo in 1970 Convertible Restoration
As I have been working on getting this chassis ready for bracing yesterday, I needed a way to keep the poor thing a little more stable. With the rocker out of it makes it impossible to hold it still without welding something in it's place. So instead of welding / fastening a temporary brace in the car, I chose to just temp install the parts that will be installed. Interesting concept, but at least I'll know that they will fit. The car came with some replacement pieces that could be used, like the inner rocker. This part came from the factory on the long side in order to make all the tabs and connecting flanges manually. Starting with the given point of 22" for the rear wheel well area to the seat belt hole, I made the appropriate tabs out of the extra material and bent them in their proper direction and angle. The Weld and Sealant manual is a good reference for the direction of the tabs, not so much on the size or location. I seem to be doing a lot of inner rocker installs as of lately, practice makes perfect lol
Fitting it in the rear torque box area and over the floor reinforcement piece required a little persuasion as the rear of the car was moved up, kinda neat how much it moves vertically. Getting the inner rocker to fit correctly took a bunch of clamps and some strategic hammer blows to get it situated. Surprisingly enough, it went in and was level (measuring level at the middle top portion) just like the other side. The old part does have surface rust that will be taken care of before it is welded in place.
When I built the table, the second crossmember was measured and placed to align with the front of the torque boxes for a good reference point. Using a square to transfer the area of the inner rocker to be trimmed and for tabs was as simple as lining up the front of the tube and transferring the mark on the part.
The mark I made on the inner rocker was the outside of the forward torque box, so the thickness of the front of the box (I allowed .125") for the bend radius plus the metal thickness. This is another place that the factory makes tabs on the inside of the rocker to have more attachment points, I go a little bit farther and cap the end of the "tube" for more strength. This inner rocker is not tapered up towards the front torque box, which might have to be another modification. I needed to see how the torque box was going to align due to this fact. Prepping the area by grinding down the PO's leftover spot weld remnants (thanks whoever took it apart, you did a great job lol) the outer portion of the torque box popped right in place. Using a couple 18R vise grips to hold it up I installed the inner rocker on it's outboard side. (not in the picture)
I did test fit the outer rocker before any of this was attempted, it fit fairly well. It is going to need some clamping in order to be dimensionally correct, but will work nicely. Once all these pieces are happy in their new positions (sheet metal screwed together) I can get the doors on this and continue getting the chassis braced and properly supported. So far, so good
-
latoracing reacted to Ridge Runner in Front frame rail complete assembly fixture
I have two ,both in use at the moment .A third ...or fourth or fifth would do nicely
-
latoracing got a reaction from Ridge Runner in 1970 Grabber Green Project
My project has been collecting dust for the past couple of weeks. I needed to pay it a little bit of attention to get some welding done. I gathered up all the little pieces parts that I needed for my back purging "kit" in order to get these tubes properly joined. I had an old regulator lying around (actually new in a box...) and brought home another bottle of Argon that will basically be vented to atmosphere. A few 1/4" barbed hose fittings and a 1/4" ball valve, along with my 1 3/4" I.D. cap (welded it up several weeks ago) and the purge was ready to go.
Filling the stainless tubes full of argon helps keep the inside of the tubes nice, and the welds much stronger. With the cap connected to the hose, and a piece of tape over the "square" end of the tube, a small hole is cut in the tape to keep the pressure down. I was running between 4 to 5 PSI to displace the oxygen in the tube. Allowing the argon to flow for a few minutes ensures a complete purge, and it's ready to fry. Welding each section of tubing really didn't take that long. I haven't welded smallish round tube in a while, so it took me a little bit to get back in the swing of things. I was using 308 .030" stainless filler wire for all the weld joints, 1/16" tungsten, 60 amps, pulsed. Once the tubes were cool enough, a little red scotchibrite was used to clean the HAZ and inspect my welds (as I had missed a few places... oops...) Once all the tubes were fully welded up I needed a way to purge multiple tubes while welding collectors on and the flange attachment areas. I grabbed a piece of 2 1/2" square 3/16" wall tube and transfer punched the flange attachment holes on to it. These holes were drilled 3/8-16tpi and openings were cut for the tube openings. I made two plates to cap the ends, one with a piece of 1 3/4" tube to connect my cap to and welded them in place. The flange was bolted back on the car, and the tubes installed. Once everything was in place, the front tubes were tacked to the flange, and the collector was also tacked in place. Checking one more time on the car with all the tubes in place, just to make sure, it was removed, which is not fun. (I had to remove the head to get it back out, weeeee...) Bolted back on the manifold, everything was welded to stay. I think the people whom I bought these parts from lied to me. The header flange acts like it is 303 Stainless, it didn't weld very well at all. 303 has sulfur in it, which is helpful for machining, but sucks to weld. The welds do not flow and they are quite undercut because of the non flowing condition. They will be ok, but I hate finding out material composition that way. The header was removed from the manifold again, to remove the tape, then bolted back down. The rear tubes were put in place, ready for the next time I get to work on it. These tubes will not be welded to the flange just yet, as the 2" secondary tubes have to be butt welded to the collectors. (can't get all the way around them) The collector will be welded in place, then all this goes back on the car. More tube cutting / fitting to come.... -
latoracing got a reaction from SWPruett in 1970 Grabber Green Project
Took a brake from prepping the convertible to get this header completely welded. I was so close, I just had to get it finished lol. Once I got it removed from the car (that was fun) it went back on the manifold. The first section of tube (first one I cut) was welded to the mid collector. Once it was all welded up, the second tube was welded up, then the main collector was slid in place, tacked and permanently attached.
Once the collector was all welded up, the tubes were welded to the header flange. I used a larger filler rod along with adding a lot of filler material to the weld, they came out much better. I let everything cool down, then removed the assembly from the manifold to weld the inside of the tubes to the header flange. A little shaping of the tube to get it fit nice and snug, they were all fried. I added just a little bit extra filler wire to ensure a nice flat gasket surface, once the welds are ground flat.
I'll get all this cleaned up and put back on the car for the upcoming exhaust portion. Now all I have to do is make one like this for the other side. There are a few loose ends I have to tie up before I can get the legos back out. One down, one to go...
-
 latoracing got a reaction from SweellTrex in 1970 Grabber Green Project
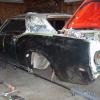
I rolled my new project out of the storage lot, and took it home to start bringing it back to life. I bought the car back in January of this year, and have been gathering parts in order to make it a reality instead of an idea.
This is a true Graber Special, Marti report and all, also know as a "poor mans" Boss 302. This one had a 302 2v, auto, manual drum, and power steering. I told my Wife when I bought it, that I purchaced a rolling roof with a title. She had not seen it since its purchace and was questioning my sanity after rolling it off the trailer. I have started with worse, and at least this project is fairly well "rust free" (ha-ha). It will stay Grabber Green, but the build will be a G-Machine theme. I am waiting on Street and Track to come out with their new rear suspension later this year, to see what they come up with.
I am going to try out Dynacorn sheet metal on this build, and see if it fits any better than some of the other ti-chen stampings offered by other vendors. The full quarters look good out of the box, hope they don't require a bunch of fitting (cutting in half, beating, re building,ect...). Been there, done that. I did go ahead and get the Goodmark mini tubed inner fenders to use, I could have widened some regular ones, which would have been cheeper in the long run.
I would like to be able to build these cars on a regular basis, so this one is going to be sort of an extream advertisment. I am not going to jump into a business venture quite yet, but ease into it, if it works. Playing with rusty old cars has been part of my life, and I enjoy most every aspect of it. Well see where it goes.
The only part of the build I have not decided on is to build it as a 1970, or 69ish Boss 302? I have always wanted a G coded 69, and could make one, just not so sure yet. Any way, here are a couple of pics as I dig into what is left of this body, and this is the way I bought it, less work for me? My Wife is still wondering...
-
latoracing got a reaction from SWPruett in 1970 Grabber Green Project
Spent a few minutes cutting and fitting the remaining two pieces of pipe for the "2 into 1" portion of my header. Once I had the first piece trimmed to fit where I wanted, it was tack welded in place.
The second piece was a lot easier as the first piece held everything in place. Once it was trimmed, it was tacked in place as well.
I stuck my under floor convertible pan supports in place, knowing that the pipes were going to run right into them, so those will not be going on the car, it should be OK without them. I would rather have the headers the way they are anyway. I'll get them back off the car and completely weld them up (some day...)
-
latoracing reacted to fvike in What is the proper stance?
If you go DAAAAAYYYUUUMM!! when you see it, it has the right stance.
-
latoracing got a reaction from SWPruett in 1970 Convertible Restoration
Got the pan all screwed in place, without a bunch of drama. Working mainly from the bottom side, I could verify how everything was fitting up, and how many gaps needed to be closed. Once happy with the fitment, I outlined the areas that will need to be drilled / punched for the welds and removed the pan. Back on the saw horses I laid out the patterns in their perspective areas. As this is a convertible, I went a little bit tight on the weld spacing, for a little better connection.
With the holes located, they were punched on the edges, and drilled in the middle areas, all with 1/4" tools.
Now I have a bunch of cleaning and scuffing to do to get ready for some SPI primer. One step closer to getting this in the car for good.
-
latoracing got a reaction from Ridge Runner in 1970 Convertible Restoration
Due to some rust issues in the top portion of the passenger side torque box area, the PO had removed a section of the toe board and left the crunchy hole in the torque box lid. Those needed to be patched, so some filler pieces were made and shaped into small patches. These were welded in place, and prepped to be covered up.
With that all ground flush and primed, a patch for the toe board was made, welded in place, and ground smooth.
There were a few other areas that needed a little fixing up, and some pin holes to weld shut, which all came out nice. I had wanted to get the floor in the car over the weekend, but it didn't happen the way I planned (which is actually a very good thing), but it went in this afternoon.
This particular pan went in and fits like a glove. Very little issues, and no prying, nice and neat. I will get it screwed in place, starting at the tunnel and working outward. This is starting to look like a car again, YEA!!!