

Wycked69
-
Content Count
466 -
Joined
-
Last visited
Everything posted by Wycked69
-
That's a good question for which I can not correctly answer. On the other hand, I would have to think in order for the paint to adhere to the metal properly, they would have had some form of primer applied. Even if it was sparse / minimal.
-
Thanks Ridge, yes I did those. It was my first shot at it and I even impressed myself. I learned some things while doing the instrument side that helped on the clock panel. To me, the clock panel is most difficult and especially the recessed part where the emblem lays. I actually did the clock panel twice as I had problems in the recessed area. You have to be careful not to get an air bubble trapped in there while forming the impression. I have another set to do for a friend in a couple months when he's ready and maybe I can take some step by step photo's then. I think its important to have the part properly cleaned and prepped. I only applied etching primer to the back side of the panels and left the front side bare metal where I then applied the recommended 3M DiNOC primer. I also applied the edge sealer in areas where the edges of the DiNOC would end. The rest is just taking your time and not rushing anything. I used whole sheets and trimmed as I went along.
-
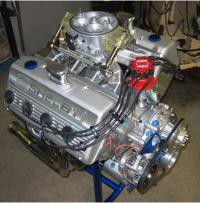
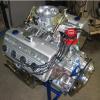
I agree with Barnett and its what I've always done, whether its Taylor, Ford Racing, MSD, and Even Pertronix, its best to use the cut to length wires and route them as you wish. I use the Taylor plug wire clamps to route them around the valve covers. Here's a couple photo's of the 429 I did for my brother where I used cut to length wire wires and Taylor plug wire clamps to route them around the valve covers
-
I've bought the "off the shelf" hinge rebuild kit but have found all to often the hinge itself was so neglected that the replacement bushings in the rebuild kit fit poorly. The last set of OEM hinges I rebuilt I set up in a mill and reamed the hinge hole oversize. I machined new oversized bushings and pressed them in, reamed the I.D. for the new pin and assembled them. Overkill by some standards but I like a firm OEM hinge. Just my preference
-
I use Valvoline VR1 I've been told that Schaeffer's is an excellent oil but I have not been able to find it locally.
-
7 or 8 years ago, I had my tach and speedo for my 68 redone by the tachman. The workmanship was excellent. I was very pleased with the work but he was an absolute a**hole to me on the phone. I gave him no reason to explode and go off on me. When I called, he simply answered the phone very agitated and all I asked was if he received my instruments that I shipped to him 2 weeks earlier and understood from my enclosed letter what I wanted done. He was screaming at me telling me he could get some work done if people would quite calling him. I bit my tongue and told him to call me when he could be more civil and hung up. A week later I get an email my parts are done and that I needed to contact him with payment information. I called and gave him the information. Never an apology or mention of how he was to me on the phone. I have seen him chime in a few times since then on some of the forums chastising people who commented how they were treated by him. He was quite disrespectful. I find it difficult to do business with someone who's disrespectful.
-
Dave, there is a guy in Illinois who sells the die cut pieces of the 3-M DiNOC for the door panel inserts (both for original bezels and the aftermarket as there is a slight difference), the console insert, and the radio bezel. My brother bought the complete set of inserts and they fit perfect !!. Send me a PM and I'll send you his name and email address.He had an ebay website at one time but I don't know if he still does. As for the instrument cluster and clock panels, that has to be done using a sheet of Di- NOC which I have done myself and posted these photos before.
-
Rick, have you ever given any thought to reproducing the stainless roof rail weather strip molding/retainer for the 69 and 70 sports roof? Oddly enough, they are reproduced for the 67 - 68 FB but nothing is reproduced for the 65 - 66 FB or the 69 - 70 sports roof. I also think people would pay decent money for a quality set of 69 grill molding. Especially the thin and wide pieces on the left and right
-
its your car, you have every right to change your mind as much as you want. My brother's rimblow wheel was restored by Rimblow Buddy. It was amazing. I on the other hand, am convinced I can do mine myself.
-
Before or after writing your post but BEFORE you click the post tab, simply; 1. Click the "More Reply Options" tab 2. Click the "Browse" tab and search the photo or file in your computer that you want to post in your reply and select "open" 3. Click the 'Attach This File" tab to attach the file or photo 4. Repeat steps 2 and 3 above to add additional files or photos 5. When finished, click "Add Reply" I believe that's all you need to do
-
I also agree with Rick's post above ^^^^
-
The original drop bracket design left a lot to be desired. Just looking at it and knowing its function tells you that problems can be expected. All the stress and pull of the PS cylinder will eventually cause it to flex and can eventually pull from the frame rail. A few years ago I saw this modification (see attached photos) where an additional bracket was added to support the load imposed on the drop bracket by the PS cylinder. Its welded to the drop bracket but bolted to the torque box to frame rail gusset. I've actually made and installed this added bracket a couple times and it makes a huge difference.
-
If it starts and runs when energized at the solenoid with the hand starter switch but not when the key is used to start it, My first guess would be it sounds to me as if you getting voltage to the coil with the key in the run position but not when its in the start position. I've not wired in an MSD with a 6AL box so I cant advise what was disrupted when installing the MSD components.
-
AMAZING !. I would really like to see a video of this car
-
I've got the hidden antenna in my 68 and it works perfectly fine. I have it setting up on top of the glove box liner where it cant be seen. But Danno is correct, the more its exposed, the better the signal reception. I personally don't like the stock antenna, not just the appearance but it tends to get in the way of the car covers, etc.
-
You can see by the attached photo's the "neutral safety switch" and mounting location. It also also operates the back up light switch on a C4
-
I find it hard to believe that one owns a "Trunk Monkey". Best I have found regardless of thief or tow truck https://www.youtube.com/watch?v=Rx6WB5YJia8
-
The AMK kits are as close to concourse you can get.
-
You can also check out "Right Stuff" detailing out of Columbus Oh. They have a pretty nice set up that will work with you original emergency brake cable system. http://www.getdiscbrakes.com/zdcrd02z Which brings me to a couple of things you need to consider when converting rear drum to disc. Emergency Brake: Many of the conversion kits do not mention or advise how you go about installing/using your emergency brake system. Many don't always make provision for this and you will wind up having to fabricate some things (more than you may wish) Brake Lines: Your drum brakes were plumbed with hard line right up to the wheel cylinder. Your disk brakes will most likely require a flexible line between the caliper and the hard line. You may have to fabricate a bracket for mounting the flex line where it will connect to a hard line. Master Cylinder: Your master cylinder will have to be changed to match your brake set up. If all four wheels are now going to be a disc brake setup, you will need a disc/disc master cylinder. This also means your original "combo" valve arrangement may have to be changed as well to match your brake configuration. Al this being said, rear disk brakes do not do much more than provide for an appearance versus increased stopping power. Unless you are into some serious racing, I doubt you would notice any difference in stopping power. I'm not an expert, just a "been there - done that" type of opinion.
-
1970 fastback interior rear trim bits missing
Wycked69 replied to DOZX's topic in 1969-70 Technical Forum
I've not seen this made as a repo. Check this link as it should be a photo of what your looking for: http://www.ebay.com/itm/Mustang-Fastback-Rear-Seat-Trim-use-with-Non-Fold-Down-fits-69-70-RH-/161411590353?hash=item2594e168d1&vxp=mtr I may have an original set on my shelves somewhere. Send me a PM if your interested and I'll look for them this weekend -
See if any of the attached helps. Since your car was not wired or equipped with a factory tach, you will only have 3 wires coming off the alternator. FIELD > which runs through the 3-pin connector of the wiring harness over to your voltage regulator to the "F" terminal BATTERY> which also runs through the 3-pin connector of the alternator harness and connects to the +side (battery side) of the starter solenoid on the fender apron. GND > This is ground and will also run through the 3-pin connector
-
Well I can chime in here on several of these as we have installed them on my brothers 69. Ford tooling hood with shaker cut out.: The hood fit pretty dang good surprisingly. Its top profile follows the fender top profile pretty good considering. We had to spend a little time fixing one corner that was from shipping damage. The shaker cut out is laser cut from a full hood. It's not a separate stamping. Its pretty damn close. As mentioned before, this hood is a late 69 hood as the cut outs underneath are "oval". Aside from the common blocking that's always needed, it seems a pretty good fit. Full Quarter Panel: We have also installed both left and right full Dynacorn quarters. There's a little rework to do but they fit pretty good. The pockets for the side scoop needed reworked. location of the cutouts for the quarter panel lights are not consistant (they definately do these as a secondary operation after the quarter is formed) his varied by 3/4" of an inch in location when compared to each other. We also had to fix the bumper relief on the passenger side as it was 5/16" shorter than the driver side. Stood out when you fit the bumper. All in all, it was not so bad for an aftermarket. Deck Lid: All I can say is "eewww". The fit is pretty crappy Everywhere. front to back, its like it was warped. We sent it back and got another. It sucked just as bad. We borrowed my son in-law's repo dynacorn deck lid. Same thing. they all were different. We wound up totally reworking the dynacorn deck lid in just about every way you can imagine. All the gaps needed attention. I strongly suggest reworking an original one even if the lower lip is rusted through. cut new metal and replace it. You have far less time than reworking the dynacorn deck lid. Full front Frame Rail / Shock tower assembly: My brother purchase both driver/passenger side Dynacorn pre-fabricated front frame rails / shock tower/apron assemblies with reinforced shock towers. I give these the best fit of anything. We did have to message the area where they meet the firewall but these were assembled surprisingly well and impressed me with their dimensional correctness.
-
Randy, I ran in to this situation sometime back and seem to recall that switch we all buy today has the additional wires because it was used for the cougar as well as the Shelby (sequential turn signals)
-
Repairing a faulty rim blow switch is possible.
Wycked69 replied to Kris's topic in 1969-70 Technical Forum
I agree, best thing I've read as well regarding the rim blow switch. If he had some photos to include with his instructions, he could sell a few to the frustrated owners of rim blow wheels. -
We bead blasted my brothers lower metal dash last summer. It cleaned up well with no damage or concern for the textured. (It looked quite nice). We cleaned it well and put a couple light coats of SEM lacquer primer (gray). We used the SEM rattle cans from NPD and painted a couple light coats of the SEM Lacquer Satin Black (NPD# VP-946) followed by one light coat of the SEM Lacquer Charcoal Black Metallic (NPD# VP-4464). I was impressed with the final outcome.
