Jayru 17 Report post Posted July 4, 2012 Would a tubular UCA fix the problem? Wouldn't the stock arm become weak cutting into it like that? Quote Share this post Link to post Share on other sites
stangme428 33 Report post Posted July 4, 2012 Would a tubular UCA fix the problem? Wouldn't the stock arm become weak cutting into it like that? A upper control arm design that did not have the dome bulge and was somewhat flat at the ball joint would work. But, we are going to see what we can come up with. What dome material we do remove we will weld a flat piece to replace it. Quote Share this post Link to post Share on other sites
Jayru 17 Report post Posted July 4, 2012 Just trying to understand - So the dome is only there because the balljoint normally sits in it like a pocket right? But since you have the wedge, it takes it out of the pocket and allows you to cut the dome off? I was thinking you were cutting into the front of the control arm itself. Quote Share this post Link to post Share on other sites
stangme428 33 Report post Posted July 5, 2012 Just trying to understand - So the dome is only there because the balljoint normally sits in it like a pocket right? But since you have the wedge, it takes it out of the pocket and allows you to cut the dome off? I was thinking you were cutting into the front of the control arm itself. Jayru you are Correct ... We are flattening the dome as needed... Not cutting into the control arm.... Quote Share this post Link to post Share on other sites
Jayru 17 Report post Posted July 5, 2012 Jayru you are Correct ... We are flattening the dome as needed... Not cutting into the control arm.... Thanks! Sorry, ate too much BBQ today and it was clouding my thought process, lol. Happy 4th! Quote Share this post Link to post Share on other sites
stangme428 33 Report post Posted July 5, 2012 Thanks! Sorry, ate too much BBQ today and it was clouding my thought process, lol. Happy 4th! Cool np.. BBQ sounds good... Have a good 4th.. :biggrin: Quote Share this post Link to post Share on other sites
stangme428 33 Report post Posted July 6, 2012 ok -- the modification of the upper control arm worked!! the wheel is free.... we used an air tool cutting wheel to remove metal from the upper control arm, to gain clearance for the 18" GT4 wheel. the amount of metal removed is very minimal, we are checking into the best way to strengthen the area. deciding on how much more to clearance also, is 1/8 enough, do you need 1/2" etc. in my opinion the more the better... but without sacrificing strength, so we will cut a bit more and place a flat piece of metal of the same thickness over the new opening. also, if you notice in the pic, the 4 bolt ball joint bolts have double nuts and are quite long. we will be inverting the outer most bolts, the tire hits on the back of the rear most bolt at full turn, and the wheel hits the front most bolt at full turn. of-course this is without the tie rods connected, so we should hit a stop before this happens. also looking for the correct open lug nuts for the wheel.... good stuff!!:biggrin: Quote Share this post Link to post Share on other sites
stangme428 33 Report post Posted July 11, 2012 in the previous post we mentioned we would be inverting the outer most upper control arm bolts due to the tire being able to hit the rear most outer ball joint bolt and the wheel hitting the front most out ball joint bolt... now.. again.. this may never happen due to turning stop settings on the TCP rack etc.. but... SURPRISE :w00t: the outer most bolts are bent.. how they were bent, when they were bent.. it hasnt been driven since 99 upon install... who knows... either way.. we will be picking up some 8.8 bolts and reusing the special wedge nuts included in the kit. the good news .. it looks like the driver side install bolts are not bent.. never a dull moment... we did get the end cap on... wow new ones are hard to get on to cover the wheel bearings.. :thumbup1: we are awaiting the new upper and lower ball joint caps.. then we will button everything up, install the new brake lines with the kit and also new brake lines from the distribution block... Quote Share this post Link to post Share on other sites
stangme428 33 Report post Posted July 25, 2012 ok... work work work.... and i went to mustang week in SC for a day or two .. not much to update.. i finally found a fuel filler neck to work with the 70 tank and Shelby rear panel... yes .. the 70 filler neck does work with the 70 22 gal tank and Shelby tail light panel... imagine that.. i purchased a power master 140a alternator that... according to what i read has a smaller case housing (close to 87-93 type) and reduced current rating 140a than the 200a alt i picked up from Jeff's bronco graveyard.. well.. i was correct .. the housing was smaller but, the enclosed bearing on the back of the alternator extended almost a 1/2" farther than my current unit... so.. sending it back to Jegs.. picked up some lower ball joint covers from CJ pony parts, seems they no longer carry the upper ball joint covers even though you can order them off their website, i ended up ordering the upper ball joint covers from NPD. ordered a battery box and associated wiring from Jegs, once installed i should have all to complete the electrical wiring... ill install a inertia switch later on .... still finishing up: brembo brake install AAW wiring install TCP tie rod ends... ordering the billet tie rod sleeve at some point and looks like a new bump steer kit... hope everybody is staying cool!!!! man is it hot out! :sweatdrop: Quote Share this post Link to post Share on other sites
bnickel 10,004 Report post Posted July 30, 2012 ok... work work work.... and i went to mustang week in SC for a day or two .. not much to update.. i finally found a fuel filler neck to work with the 70 tank and Shelby rear panel... yes .. the 70 filler neck does work with the 70 22 gal tank and Shelby tail light panel... imagine that.. i purchased a power master 140a alternator that... according to what i read has a smaller case housing (close to 87-93 type) and reduced current rating 140a than the 200a alt i picked up from Jeff's bronco graveyard.. well.. i was correct .. the housing was smaller but, the enclosed bearing on the back of the alternator extended almost a 1/2" farther than my current unit... so.. sending it back to Jegs.. picked up some lower ball joint covers from CJ pony parts, seems they no longer carry the upper ball joint covers even though you can order them off their website, i ended up ordering the upper ball joint covers from NPD. ordered a battery box and associated wiring from Jegs, once installed i should have all to complete the electrical wiring... ill install a inertia switch later on .... still finishing up: brembo brake install AAW wiring install TCP tie rod ends... ordering the billet tie rod sleeve at some point and looks like a new bump steer kit... hope everybody is staying cool!!!! man is it hot out! :sweatdrop: so what are you going to do with the Pro-Motorsports bump steer kit? I only ask because if you want to sell it I might like to buy it from you, if the price is right. Quote Share this post Link to post Share on other sites
stangme428 33 Report post Posted July 30, 2012 (edited) so what are you going to do with the Pro-Motorsports bump steer kit? I only ask because if you want to sell it I might like to buy it from you, if the price is right. bnickel, sounds good ill let you know when i do... ill pm you a price this week.:thumbup1: added pics of kit... Edited August 6, 2012 by stangme428 Quote Share this post Link to post Share on other sites
bnickel 10,004 Report post Posted July 30, 2012 bnickel, sounds good ill let you know when i do... ill pm you a price this week.:thumbup1: Sweet!!! yeah just let me know Quote Share this post Link to post Share on other sites
Jayru 17 Report post Posted July 31, 2012 Brakes look awesome (especially behind those wheels)! Sharp. Quote Share this post Link to post Share on other sites
stangme428 33 Report post Posted August 3, 2012 Brakes look awesome (especially behind those wheels)! Sharp. thanks Jayru..... hope to make some progress this weekend!!:thumbup1: Quote Share this post Link to post Share on other sites
stangme428 33 Report post Posted August 5, 2012 (edited) wooo hooo!! progress!! while the pic may look redundant ... its not.. this is with the front back on the ground with BOTH wheels installed GT4 18x9 with 275/35-18's. yes they fit, the tires and the wheels. The Vintage Venom kit is installed and has no clearance problems at all, the A arm ball joint recess modification we thought we needed, was not needed at all...clearance from top of A arm ball joint hump to wheel... better than 1/8th inch. good friends and food this weekend hanging out around the garage! completed this weekend: TCP manual rack centering (3 turns lock to lock) tied rods installed (ordering bump steer kit) vintage venom brembo kit replaced upper ball joint boots replaced upper ball joint bolts grade 8 (bent when originally installed.. i have no idea) replaced lower ball joint boots purchased new sway bar end links...(stripped nut when re-installing passenger side) test fit front brake line stainless steel kit what didnt work this weekend: headers!!! sway bar end link passenger side.. so we basically finalized the TCP manual rack install, bremo kit, test fitted the ceramic coated headers... ill be ordering a set of the sanderson headers ASAP .... also went over the stainless steel brake line kit for the front, i will be ordering the rear stainless steel kit soon. was great to see her back on the ground, now i need to order some 275/35-18 Nitto 555 tires for the rear to complete the tire/wheel install. more pics to come... Edited August 6, 2012 by stangme428 Quote Share this post Link to post Share on other sites
stangme428 33 Report post Posted August 29, 2012 (edited) ok... after following Rip Rock build for a bit, i ordered a set of Sanderson FC4 headers from Summit Racing and the 2bbl copper flange adapters from centuryperformance.com i had some summit bucks that ended up being free shipping and century had the lowest price on the flange adapters as well as shipping.. and summit was out of stock until 9/10... initial thoughts... hand made... some flash on them as others have noted.. clean as can be on the tubes outside.. they need to be coated it looks like... and some clean up work internal at the pipe merge/collector needs to happen. feel heavy duty.. and the collector flange's are nice and thick.. they come with a angled collector and flange bolts, which i didnt see mentioned in ANY documentation... maybe i missed it.. anyway.. we will test fit this weekend and see how it goes... the hooker ceramic coated long tubes are up on craigs list... edit-- also picked up some proforged billet aluminum tie rod sleeves 105-10035 from summit Edited August 29, 2012 by stangme428 Quote Share this post Link to post Share on other sites
stangme428 33 Report post Posted September 1, 2012 (edited) hope all that have labor day off are having a good weekend! Sanderson FC4 headers: some progress so far this weekend, we did a test fit on the sanderson FC4 headers and they fit without any problems, we may need to dimple the second tube on drivers side at the very back of the shock tower, where the Boss 302 mod wrap around shock tower support has been welded in. but, other than that they clear the D shaft from the TCP rack without any problems and also looks like plenty of clearance on the passenger side. man these things have big primary tubes 1 7/8" into 3" collector. the collector adapter supplied looks like it steps down from the collector 3" mount to a 2 1/4 weldable piece.. so, we will need to modify to mate to the 3" exhaust when the time comes. also, the copper flange adapter for the 2bbl heads has not arrived yet, i spoke with a tech at century performance, since i have aftermarket AUS heads, not sure if they are needed... Taylor NHRA approved battery box kit: The Taylor battery box kit was an interesting install, one of those items that you think would take 30 minutes turned into a couple of hours... for us anyway... to be NHRA approved the threaded bar needed to mount through the frame, so we figured out the best positioning on the passenger side trunk, but the factory spare tire mount was causing the box to not mount flush, so we tried drilling out the spot welds... aaaahh... no go, drilled, cut and a few holes later we had it off. then Andy broke out the welder, welded up the holes with a backing plate under neath, cleaned and sealed with some rubberized undercoating, drilled the holes to go through the frame, bolted it up and installed a yellow top for a test fit and temp routed the positive cable... good progress!!! more to follow!! :punk: Edited September 1, 2012 by stangme428 Quote Share this post Link to post Share on other sites
stangme428 33 Report post Posted September 2, 2012 (edited) useless pics... but couldn't stand it... we gave her a bath yesterday.. lol..:w00t: motivation is what it is.... :thumbup1: also finished installing the 70 fuel filler neck, need a better way to secure to the fiberglass panel, plan is to reinforce with aluminum behind the filler neck area and also where the license plate bolts in and use nuts, bolts etc..:thumbup1: good news the hotrod flat black paint didn't water spot, we did use a shami on it... she looked good in the sun... Edited September 2, 2012 by stangme428 Quote Share this post Link to post Share on other sites
Mike65 476 Report post Posted September 2, 2012 Looks nice cleaned up out in the sun.:thumbup1: How does it steer with the manual rack?. Quote Share this post Link to post Share on other sites
stangme428 33 Report post Posted September 2, 2012 Looks nice cleaned up out in the sun.:thumbup1: How does it steer with the manual rack?. does fine rolling in and out of the garage, considering its way out of alignment.. its having a hard time settling once rolled around.. doing research on the alignment.. seems the most info is on this forum... Quote Share this post Link to post Share on other sites
Rip Rock 13 Report post Posted September 3, 2012 Looks good stangme428!! What kind of motor mounts are you using? Wish I would of got the tcp man/rack. Love the work so far! Quote Share this post Link to post Share on other sites
stangme428 33 Report post Posted September 3, 2012 (edited) Looks good stangme428!! What kind of motor mounts are you using? Wish I would of got the tcp man/rack. Love the work so far! Rip Rock I used the Ron Morris adjustable motor mounts.. But only moved the motor back some. We tried dropping the motor down a 1/2" but the oil pan hit. Your new mods with the front trans am style air deflector and brake cooling look great.:thumbup1: Edited September 3, 2012 by stangme428 Quote Share this post Link to post Share on other sites
Rip Rock 13 Report post Posted September 3, 2012 Rip Rock I used the Ron Morris adjustable motor mounts.. But only moved the motor back some. We tried dropping the motor down a 1/2" but the oil pan hit. Your new mods with the front trans am style air deflector and brake cooling look great.:thumbup1: Thanks man!! Makes sence why I had to pound more on the headers than you. I moved the motor down and back a lot. Look forward to the rest of your build! Quote Share this post Link to post Share on other sites
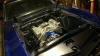
stangme428 33 Report post Posted September 14, 2012 (edited) a little progress on the alternator- i am awaiting a spherical rod end setup to mount on the back of the alt and bolt to the head. so with triangulation from the bracket to the bottom and the bracket to the top of the head, hopefully it will hold. also replacing the test bolt with a nice stainless bolt that matches the rest of the kit. set the champion 3 row radiator back in and the new upper radiator clamp i ordered from NPD does not fit, its to short.. after looking at my order, its for 390-428 setup... called NPD they said send it back if we dont modify to work. luckily i found my original and we will test fit it this weekend. hope to get more done this weekend... :punk: NOTE to self... clean up the engine compartment!!!! Edited September 14, 2012 by stangme428 Quote Share this post Link to post Share on other sites
stangme428 33 Report post Posted September 16, 2012 ah... progress.. its cooling off down south so the humidity is tolerable.. more progress on Saturday.. baby steps. installed the starter, need to take a pic to show it did happen..:biggrin: installed radiator -- duh realized how it was mounted and installed it correctly, part from NPD fit without only slight modification to rubber final route and mount of main -8AN fuel line, with new route along frame and radiator support wired year one / auto meter gauges installed new sway bar end links removed AC lines getting closer :blink: :clap: Quote Share this post Link to post Share on other sites