

MustangGT
-
Content Count
270 -
Joined
-
Last visited
Everything posted by MustangGT
-
Several of the vendors were giving out different versions. The problem was they were 'controlled' and were restricted to one per person/credential. Some of the gang I traveled with had two credentials -- I am going to ask them about getting one for ya. I will shoot ya a pic of the ones they gave out and you can tell which you want (if I can get one).
-
Left the house with 128 miles showing on the odometer (new Dakota VHX gauges) after completly tearing down and rebuilding the car [every nut/bolt/screw was removed and reinstalled]. Pulled into the driveway with 3,061 on the odometer. 7 days 7 cities. No major problems with the car -- one hell of a way to break in a new build. Had to do oil change on the road - engine builder wanted it changed at 500 miles. Did have a couple of screws back out and one of the lower dash bolts fell out. Need to tidy them up. Had some cooling issues - would get hot (220+ degrees) waiting in the long, long, long, lines to get into some of the venues. May need to switch out flex fan or something. Turned on heater in car to help cool her off. Now I want to build something else for the tour next year :tank:
-
Starts in Charlotte, NC on 7Jum and ends in the Wisconsin Dells, WI on the 14th. It is usually the first full week in June. The tour next year will start in the Wisconsin Dells -- it always starts in the city it ended in the previous year. <table align="left" border="1"><tbody><tr><td>Saturday, June 7 </td><td>Charlotte, NC </td><td>zMAX Dragway-Charlotte Motor Spdwy</td><td>9am - 7pm </td></tr><tr><td>Sunday, June 8</td><td>Knoxville, TN</td><td>Chillhowee Park</td><td>Noon - 7pm</td></tr><tr><td>Monday, June 9</td><td>Charleston, WV</td><td>Downtown (Kanawha Blvd) </td><td>Noon - 7pm</td></tr><tr><td>Tuesday, June 10</td><td>Norwalk, OH</td><td>Summit Motorsports Park</td><td>Noon - 7pm</td></tr><tr><td>Wednesday, June 11</td><td>Crown Point, IN</td><td>Lake County Fairgrounds</td><td>Noon - 7pm</td></tr><tr><td>Thursday, June 12 </td><td>Bettendorf, IA </td><td>The Isle Casino</td><td>Noon - 7pm</td></tr><tr><td>Friday, June 13</td><td>Wisconsin Dells</td><td>Chula Vista Resort </td><td>Noon - 7pm</td></tr></tbody></table> <table align="left" border="1" height="10" width="3"><tbody></tbody></table>
-
I did a coin flip and this year the Hot Rod Power Tour won. Next year -- maybe I will need to switch things up.
-
PM sent.
-
Anyone going for the Long Haul? Or coming out to the City stop events along the way.
-
power steering hose supplier for correct fitting hoses
MustangGT replied to bobh67's topic in 1969-70 Technical Forum
+1 on http://www.chockostangclassicmustang.com -- he will know exactly what you need and will have it. Check out his site and give him a call. -
Underdash wiring harness and gauges
MustangGT replied to KipDurran's topic in 1969-70 Technical Forum
+ 4 on the Midlife harness repair. My harness was a little hacked and had some burnt (well close to it). He restored and I couldn't be happier. Top notch. I recommend you cancel the order and send your harness to Midlife -- save a ton-O-cash to use on other cool parts. -
Another vote for silicone Dot 5! Pedal feel is different but worth it - not having to worry as much about the moisture.
-
I tried 2 of those before just giving up and then painting mine. The chrome was flaking off or had too much black splattered off of it. I even contacted the importer and asked about the quality control in Taiwan - be acknowledged there were issues and the odds of getting a 'perfect' one was almost nil. So I gave up. Painting them isn't all that bad. I hit it with flat black, then dried for 3 days. Masked off the inner bezel and painted the argent. Once that was good and dry I used a Silver paint pen to do the thin lines. While I am very happy with it -- it isn't 100% perfect but in order to tell you would have to plant you face fairly close to it to see it. My 2 cents.
-
I have searched the Internetzzz and came up empty (sorta). Anyone know of a source for the Radio Antenna Connector for the stock radio? Also, a Crimper to install the new connector. I bought a new antenna and tried using the wrong tool to crimp it and well...lets just say it didn't go so good. I checked my local Radio Shack and came up empty (well almost I did see on-line Model: 274-709). It looks like it would work -- but I don't want to get and then be disappointed. Any hints/tips would be appreciated.
-
E-mail sent.
-
Ditto the above -- did it on a set and they look great.
-
Ditto on the Dakota Digital setup. Nice having the tach integrated with the rest of instruments. The Dakota setup comes self contained (lens and gauge) so install into panel is EZ. The wiring, although not difficult, is a pain -- but a pain well worth it. P.S. - Don't let the Dakota Digital name fool you --- they make a set of analog looking gauges. Which is what I went went.
-
Left side Dearborn - 9Jan69
-
For the best price on Alloy Metal - you can't beat (Pete) coralsnake68@hotmail.com -- I have ordered all of my wiring from him and he beats all of the big boys. The wiring is perfect and fits like a glove.
-
Put "Tin Man" on mine (welded). With the underside painted they look like they were there from the beginning. They huge the underside nicely.
-
Why can't I have a barn with stuff like that? I would even be happy with double the miles :-)
-
PM sent.
-
Which bracket are you talking about? Is it this one? Or is the the little "Z" shaped bracket?
-
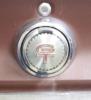
Sorry for the delay. Here are a few pics - one with Key on and Key off and close up of speedo and rpm. They install super easy - lining up perfectly into the old mounts. The speedo & RPM gauge is a single unit.
-
Carbon Blue is what I got -- got them from RPC. Was the best price, 717.25, I could find when I ordered them. I skipped the digital clock since I thought it looked too modern. I would have jumped all over the new analog looking clock - but rebuilt a stock one instead. Maybe some day but for now I am very happy with the look and functionality of the gauges. Will try and get pics this weekend.
-
I did pull the trigger -- will post some pics. The install is relatively painless - except cutting/splicing into the dash harness made me cringe. Also, deciding where to mount the "black box" was a brain twister. Ended up mounting it behind the dash on the left hand side using velcro.
-
PM sent about door glass.
-
I used a heat gun (cheap one from China Freight) and putty knife. Once the thick stuff was off I used thinner and a green scrub pad then doing a final once over with a thinner soaked shop towel. Worked like a champ. Just work in small areas and don't try and eat the whole elephant in one bite and it will go fairly quick.