


69RavenConv
-
Content Count
2,545 -
Joined
-
Last visited
-
Days Won
44
Posts posted by 69RavenConv
-
-
Cleaned up the molding and painted it silver. Buffed and polished the visor brackets as best I could.
-
5 hours ago, danno said:I am now want to change my bulbs to LEDs. I cannot see where you specify the part number of the bulb you used and where you got it.
Danno, I got them on eBay. Sorry, I searched my archives but could not find any record of the seller or part number. I bought them 5 or 6 years ago so they probably aren't around any more anyway.
However, you want to search for white 194 or T-10 LED bulbs. Look for the style in the picture below. As noted above, the 5050 chips are brighter than the 2825. I think I got the 2825 and they are ok but slightly on the dim side. You may want to buy a few of each and compare.
Here's a link to some I might try if I were buying today.

-
Late 69 Metuchen plate
76A - Convertible, standard interior
TOPS - Black top, plastic rear window
2A - Black standard interior
W - ? May be a qualifier for the paint
YELLOW - Exterior paint color
PS - Power steering
PT - Power top
-
21 hours ago, Kris said:I’ve heard quite a few people say not to use body filler on it which is why I was thinking epoxy. Did you drill out the existing stud rivets and just used regular pop rivets?
Yes, I am sure there are better materials to use - the good news is it doesn't have to be pretty, just functional. Because my tack strip was toast, I did what I needed to remove it. I'm pretty sure I used pop rivets to attach the home-made replacement but it's been a long time ago and I was improvising as I went along so the details are lost. I'll check my archives, I may have taken some pictures. I remember being pleasantly surprised that it all worked when I was done - I wasn't sure it would.
I think you and aslanefe have a better approach with epoxy based fillers
-
I did not rebuild my frame but I repaired damage a long time ago. My memory is fuzzy but I recall I used body filler to fill the worst of the pitting in the aluminum and I pop riveted a piece of plastic side molding to replace the tack strip. I don't think there were any replacement tack strips available back then but I found a piece of molding at the auto parts store that was very similar. It held the staples and has served me well for many years so I guess it's ok.
-
Easy preliminary check it to unplug your fans and see if anything changes.
Relays are always a good idea, even on a bone stock car, but they won't make up for an undersized alternator.
Mach1 Driver reacted to this -
Stay safe and keep the Mach I ready to bug out :)
-
Charleton Heston - The Omega Man - makes a get away in a Mary Tyler Moore look-alike Mustang.

-
Great looking Honda! I've been seeing a lot of those lately - passed one on the road the other day and there's one in a Ford pickup commercial on TV.
-
I always assumed Ford routed the heater hose this way to better gauge/utilize engine temperature at the choke. Imagine driving 55 mph down the road in Minneapolis in January and how long it would take to open a non-electric choke without the hose.
-
21 hours ago, rmarks said:The 1969 Autolite 4300 carb had the fuel filter screwed into the carb itself. See pic:
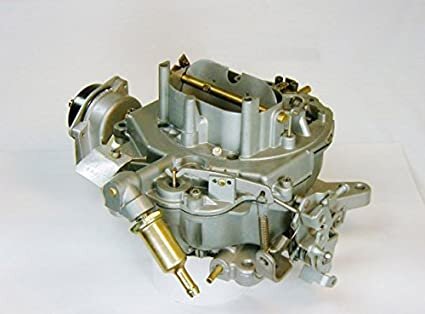
Yep, that's it!
-
On 8/12/2020 at 8:32 AM, rays69mach1 said:The system is 2,5 inch dia. stainless steel with stock exhaust manifolds.
I've got the same exhaust on my 302 vert except inexpensive turbo mufflers. The drone around 2500 RPM is bad, even in a topless car. Do you have any drone issues? I might be interested in your muffler setup.
-
I want to say the OEM filter was located at the input to the carburetor. It was a metal (brass?) fitting with a screen-type filter element inside. Maybe an inch or two long that threaded between the hard fuel line and the carb body - badically part of the carb like Redstang said (welcome to the site!).
But it's been years since I looked my original 2100 and my memory is getting old. I inserted an aftermarket filter between the pump and my Holley carb years ago.
-
This is a very cool mod and I'm constantly amazed at the ingenuity out there. My vert has the cable control on the driver's mirror and when the passenger side is off, I simply ask the wife to move it a little this way...a little more...oops, too much, back a little...that's good...down a little...no back up...
-
Those vinyl top parts can be very hard to find, Ford didn't make a lot. good luck and welcome to the site!
-
I've got a folder full of old receipts going back many years, too. Lots of places no longer around. I guess it's inevitable.
-
On 7/22/2020 at 3:57 PM, G-Dub said:Thanks! No shade thrown but, I hope it doesn't take me that long! I'll probably always tinker and improve but I'd like to be behind the wheel again sooner than later!
No offense taken - it took me a while to find a place with the space where I could work on it.
General restoration rule-of-thumb - make your best time and money estimates. Then triple them. :)
-
On 7/23/2020 at 9:14 PM, Brian Conway said:My vision ? Running in the mid 8's in the 8th mile. Not impossible or unrealistic but probably unlikely. Brian

That's a cool pic Brian. Ya know, I've read your very knowledgeable posts for years and still never pictured you on a drag strip. (Head-slap) dude's got a 428!
-
On 7/21/2020 at 4:54 PM, TexasEd said:"A car that looks period correct for 1969 but might have subtle improvements for performance, reliability, or comfort."
That's very close to mine. Back when I started out a long time ago, I thought I'd keep it all original. Even bought some bias ply tires. Then I figured a plain-jane F-code was boring, so I went with some period correct mods - stuff you could have done back in the early 70's. I had a set of vintage Ansen Sprints, an Edelbrock F4-B intake, and even a vintage Holley 600.
Then I added some invisible modern stuff - Pertronix and headlight relays, LEDs for all the interior and dash lights. Mini-starter. Used a retro roller cam just to up the cost of the engine rebuild :)
Now that I've driven it for a few years, disk brakes and a T5 on are on the list to make it more fun on the road.
Never used the bias ply tires. They're dry rotting away in my shop with, like, 100 miles wear on them :)
-
Welcome to the forum G-dub. I've owned my convertible since 1974 so I can relate to your story. I started fixing mine up around 1985 and finished around 2011, LOL!
-
It is a bit of an honor system. You say "I have a classic that I take really good care of and don't drive a lot, so I should get a price break" and they say "Do you have a daily driver that you take to work in rush hour and during blizzards while your classic is safe in the garage?". That's kind of the unspoken agreement which seems fair to me.
-
2 hours ago, TexasEd said:I also get the starburst effect from all the small pits and scratches. I was looking into a new windshield but when I bought a paint correction kit for my truck I saw they had windscreen polishing compounds and pads so I bought some. I plan on trying a test area on my windshield.
Has anyone done this?
I will probably still get a new one eventually that has tint (All my class is clear, no tint at all).
I bought a bag of cerium oxide windshield polish a while ago but have not tried it. Most comments on the web say it doesn't work very well but I may give it a try before I go to the work of removing the windshield.
-
Thanks, makes sense
-
Thanks for the feedback guys, sounds like NPD is the way to go. Curious about the setting blocks, too - that's a generous offer MTF but is it something I could buy or make easily without using up your stock? I vaguely recall some sort of spacers at the base of the windshield when I put it in years ago but I could be mistaken. Reusable?
Did you guys use the butyl strip or urethane? I did the old school butyl back in the day, which I'm inclined to do again but I could be talked into urethane if it makes sense.


How to refinish these brackets/moulding 70 convert
in 1969-70 Technical Forum
Posted · Report reply
Powder coating sounds like a great idea. My visor brackets are a little beat up and pitted as well - years of near-misses when engaging the clamp left a mark or two :)