

kllerbee
-
Content Count
26 -
Joined
-
Last visited
-
So bright........I cant see:rockon: looks great!
-
machine finish. This reminds me of the old ...."Tastes great"......"Less filling" commercials
-
1969 Glue-in glass vs. 1970 bolt in
kllerbee replied to 69RavenConv's topic in 1969-70 Technical Forum
I wanted to say thanks to all, this is very informative and definately helped with my "dilema". -
I see, that makes more sense than buying 4 new windows. Then I can just do the colibri universal kits and use the crank type switches. I feel better now, that makes it much more affordable. Thanks.
-
Thanks all for the info, there are a lot of of different solutions to ponder. But I think I will end up going with bolted. Just better than glue. Kind of sucks because I have the 69 type, but it is what it is. Not sure what I will go with for power windows, so many options. Probably with what I can afford at the time. Pak, not sure if you saw these. http://electric-life.com/shopdisplayproducts.asp?id=24&cat=Replacement+Switches
-
Wow, I bet its at least $100,000 when she gets done. WAY out of my league.
-
Hey all I am looking at power windows, locks, maybe deck lid but im running into something I have not seen before. The kits say that if you are putting it in a 69 you have to put in "70 bolted style glass" for the door windows. Since I dont have a 70, not sure what they mean? Possibly bolts actually holding window in mechanism? I didnt realize windows had changed between 69 and 70. Did the glass change or just the mechanism? Could some one enlighten me? :helpsmilie:thanks........B. Nevermind, found it. Bolt on. I cant believe they were glued in 69. No wonder they changed them.
-
My 69 Vert Project...Let The Games Begin
kllerbee replied to flight96's topic in Project Progress Forum
:thumbup: car looks great:clap: -
Your welcome jonnybee, they may seem spendy but are well worth it. That mullet could only be topped by David Spade in the movie "Joe Dirt". Kevin cut it off though. I had one for a while, but wrap it around a crawler wheel or in a drill and :surrender:!
-
Glad I could help. You may have to do it a few times until your belts get cozy.:001_smile:
-
My 69 Vert Project...Let The Games Begin
kllerbee replied to flight96's topic in Project Progress Forum
Sweet! I cant wait to see it. I hope you can sleep tonight! -
Well when a belt is tight and squeaks I put candle wax on them. Sounds crazy but it works. Just take one of your wifes favorite candles out to the garage :dots:and gently press it to the belts while at idle. Make sure you press on the belt at a pulley so there are no accidents. It doesnt take much. And watch your fingers on the fan. Dont ask me why I added that.
-
The videos can be found at www.eastwood.com and search "paintucation" I bought the 7 dvd set but if you are just doing pannel replacement they do have a video just on that. All of the dvds are very informative.
-
How can I boost octane w/o breakign the bank?
kllerbee replied to 1BAD351's topic in 1969-70 Technical Forum
Making your own is an option. I have not tried this but I know others that have successfully. http://running_on_alcohol.tripod.com -
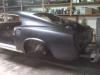
I have to say I am extremely happy with how my sheetmetal came together. I would also say that I am very fortunate that before I started this, I watched a "how to" video series called paintucation by Kevin Tetz. In the body pannel replacement video (that I have watched about 40 times) he did the step by step replacement on a 70 mach 1. I highly recomend this series to anyone contemplating doing this for the first time as I know, had I not watched this video I would have had different results. Knowledge is also a tool.