Cupid 10 Report post Posted May 23, 2011 I heart this car.:tt1: She's purty.:001_wub: Quote Share this post Link to post Share on other sites
Grabber70Mach 107 Report post Posted May 24, 2011 :drool::yes::drool::yes::drool: Really amazing job you did on the car, you should really be proud of all the work you did. Quote Share this post Link to post Share on other sites
Grabber70Mach 107 Report post Posted May 24, 2011 :drool::yes::drool::yes::drool: Really amazing job you did on the car, you should really be proud of all the work you did. Quote Share this post Link to post Share on other sites
RogerC 136 Report post Posted May 24, 2011 Wow! that's some bright red! Quote Share this post Link to post Share on other sites
RogerC 136 Report post Posted May 24, 2011 Wow! that's some bright red! Quote Share this post Link to post Share on other sites
Cruzzar 22 Report post Posted May 24, 2011 (edited) Pakrat, here a post I responded to a while back http://www.1969stang.com/mustang/forum/showthread.php?t=5977&highlight=cruzzar and another http://forums.vintage-mustang.com/vintage-mustang-forum/600952-can-i-convert-my-70-mirrors-power.html picture of the rt. side mirror bracket. This conversion would be very easy if you could come up with the rt. side housing that has the two mounting holes like the driver's side instead of having to make the bracket. Edited May 24, 2011 by Cruzzar Quote Share this post Link to post Share on other sites
Cruzzar 22 Report post Posted May 24, 2011 (edited) Pakrat, here a post I responded to a while back http://www.1969stang.com/mustang/forum/showthread.php?t=5977&highlight=cruzzar and another http://forums.vintage-mustang.com/vintage-mustang-forum/600952-can-i-convert-my-70-mirrors-power.html picture of the rt. side mirror bracket. This conversion would be very easy if you could come up with the rt. side housing that has the two mounting holes like the driver's side instead of having to make the bracket. Edited May 24, 2011 by Cruzzar Quote Share this post Link to post Share on other sites
Cruzzar 22 Report post Posted May 24, 2011 02Lightning, here is a link to my cold/ram air build. http://www.1969stang.com/mustang/forum/showthread.php?t=6529&highlight=cruzzar Quote Share this post Link to post Share on other sites
Cruzzar 22 Report post Posted May 24, 2011 02Lightning, here is a link to my cold/ram air build. http://www.1969stang.com/mustang/forum/showthread.php?t=6529&highlight=cruzzar Quote Share this post Link to post Share on other sites
Cruzzar 22 Report post Posted May 24, 2011 Stangme428, here's two more badgings on my car. These both read 427 POWERED BY FORD. I had a buddy of mine CNC this insert for the Mach I, no clock, panel above the glove box and another painted badging for the rear. The motor is a Dart (windsor) block, 427 cu.in. Quote Share this post Link to post Share on other sites
Cruzzar 22 Report post Posted May 24, 2011 Stangme428, here's two more badgings on my car. These both read 427 POWERED BY FORD. I had a buddy of mine CNC this insert for the Mach I, no clock, panel above the glove box and another painted badging for the rear. The motor is a Dart (windsor) block, 427 cu.in. Quote Share this post Link to post Share on other sites
Pakrat 1,043 Report post Posted May 24, 2011 So did you end up keeping the turn signals functional? Let's see some interior pics too!!! Quote Share this post Link to post Share on other sites
Pakrat 1,043 Report post Posted May 24, 2011 So did you end up keeping the turn signals functional? Let's see some interior pics too!!! Quote Share this post Link to post Share on other sites
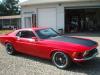
Cruzzar 22 Report post Posted May 25, 2011 Pakrat, the turn signal lights in the guage cluster that I made, the ones in the mirrors as well as the stock front and rear are all operational. Here are some more pics. of the interior. I retrofitted the stock AC vents and installed a Vinatage Air heat/cool unit. Center counsel is out of a '87 T-bird turbo coupe modified to fit the Mustang tunnel. It has the controls for elect. windows, electric mirrors and the Air Rides. The seats are also out of the T-bird and each has the inflatable lumbar support. I made and upholstered the door panels, installed Infinity speakers where the window mechanisms use to be (has electric windows), just barely enough clearance for the window to get by. I made the center counsel extension for the back set area, it allows me a pathway underneath it for my wireing for my Air Ride controls. Installed a roll bar with shoulder strap brackets and inertial reel for seatbelts in back seat arm rests. Last pics are of car setting ride height and in the weeds. Uploaded with ImageShack.us Uploaded with ImageShack.us Quote Share this post Link to post Share on other sites
Cruzzar 22 Report post Posted May 25, 2011 Pakrat, the turn signal lights in the guage cluster that I made, the ones in the mirrors as well as the stock front and rear are all operational. Here are some more pics. of the interior. I retrofitted the stock AC vents and installed a Vinatage Air heat/cool unit. Center counsel is out of a '87 T-bird turbo coupe modified to fit the Mustang tunnel. It has the controls for elect. windows, electric mirrors and the Air Rides. The seats are also out of the T-bird and each has the inflatable lumbar support. I made and upholstered the door panels, installed Infinity speakers where the window mechanisms use to be (has electric windows), just barely enough clearance for the window to get by. I made the center counsel extension for the back set area, it allows me a pathway underneath it for my wireing for my Air Ride controls. Installed a roll bar with shoulder strap brackets and inertial reel for seatbelts in back seat arm rests. Last pics are of car setting ride height and in the weeds. Uploaded with ImageShack.us Uploaded with ImageShack.us Quote Share this post Link to post Share on other sites
Pakrat 1,043 Report post Posted May 25, 2011 Looking great from all angles! :thumbup1: Quote Share this post Link to post Share on other sites
Pakrat 1,043 Report post Posted May 25, 2011 Looking great from all angles! :thumbup1: Quote Share this post Link to post Share on other sites
Tstrick5565 10 Report post Posted August 13, 2011 Hey cruzzar I pulled a pair of thunderbird seats too and am wondering how you mounted them up to the car...I had planned to put the stock tracks on em but it seems like the power track is an integral part of em...so whatd you do to get em mounted?? Quote Share this post Link to post Share on other sites
Tstrick5565 10 Report post Posted August 13, 2011 Hey cruzzar I pulled a pair of thunderbird seats too and am wondering how you mounted them up to the car...I had planned to put the stock tracks on em but it seems like the power track is an integral part of em...so whatd you do to get em mounted?? Quote Share this post Link to post Share on other sites
Cruzzar 22 Report post Posted August 15, 2011 (edited) You probably already figured out that the 6 way power assembly has to be removed because it makes the seat too tall unless your are really vertically challenged. During my rebuild I reduced the height of the seat support assembly by about 3/4". In regards to mounting the seat (if I can remember) I think I had to drill out the 4 rivets that held the power assembly to the bottom of the seat framework. These 4 rivet holes almost matched the holes in the stock seat tracks. The front to back distance for these holes was off a little bit but the side to side was exactly the same as stock. I tapped these rivet holes to accept allen head bolts. I slotted the front hole in each of the tracks and they bolted right up. Turn your seats upside down and take some quick measurements to verify these diemesions. I also rebuilt my tracks by grinding off the rivet on the top track, cleaning them up (bead blasted), welding a 1/4" nut on the top track where the rivet use to be, painting them and reassembling useing a 1/4" bolt just long enough to limit the track movement like the rivet did. Here's some pics, you can see the elongated hole in the track assembly. Uploaded with ImageShack.us Uploaded with ImageShack.us Edited August 15, 2011 by Cruzzar Quote Share this post Link to post Share on other sites
Cruzzar 22 Report post Posted August 15, 2011 (edited) You probably already figured out that the 6 way power assembly has to be removed because it makes the seat too tall unless your are really vertically challenged. During my rebuild I reduced the height of the seat support assembly by about 3/4". In regards to mounting the seat (if I can remember) I think I had to drill out the 4 rivets that held the power assembly to the bottom of the seat framework. These 4 rivet holes almost matched the holes in the stock seat tracks. The front to back distance for these holes was off a little bit but the side to side was exactly the same as stock. I tapped these rivet holes to accept allen head bolts. I slotted the front hole in each of the tracks and they bolted right up. Turn your seats upside down and take some quick measurements to verify these diemesions. I also rebuilt my tracks by grinding off the rivet on the top track, cleaning them up (bead blasted), welding a 1/4" nut on the top track where the rivet use to be, painting them and reassembling useing a 1/4" bolt just long enough to limit the track movement like the rivet did. Here's some pics, you can see the elongated hole in the track assembly. Uploaded with ImageShack.us Uploaded with ImageShack.us Edited August 15, 2011 by Cruzzar Quote Share this post Link to post Share on other sites
Junior2561 10 Report post Posted August 15, 2011 looks awesome! Quote Share this post Link to post Share on other sites
Junior2561 10 Report post Posted August 15, 2011 looks awesome! Quote Share this post Link to post Share on other sites
zach69grande 25 Report post Posted August 16, 2011 is that the spectre kit? did you make the radiator cover? Quote Share this post Link to post Share on other sites
zach69grande 25 Report post Posted August 16, 2011 is that the spectre kit? did you make the radiator cover? Quote Share this post Link to post Share on other sites