


stangs-R-me
-
Content Count
989 -
Joined
-
Last visited
-
Days Won
22
Posts posted by stangs-R-me
-
-
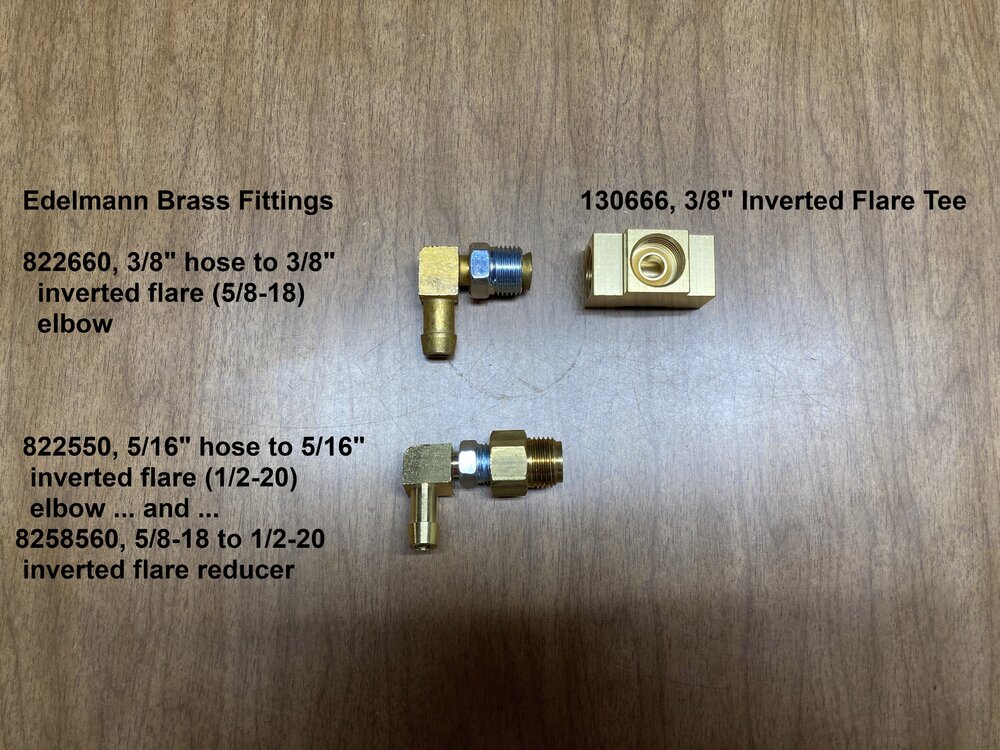
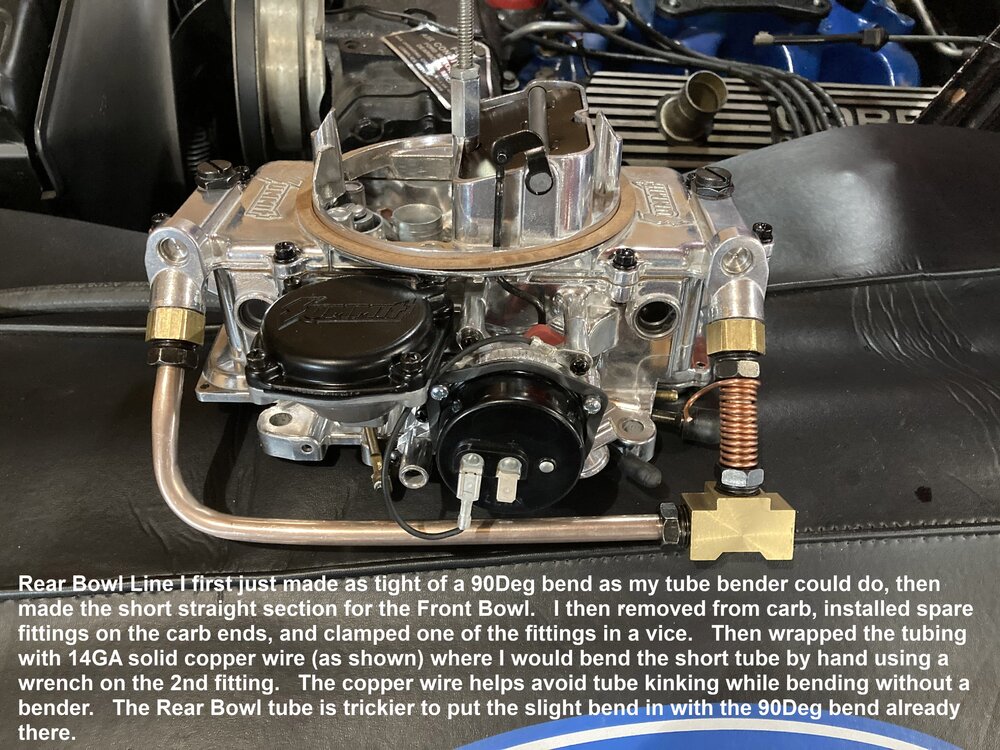
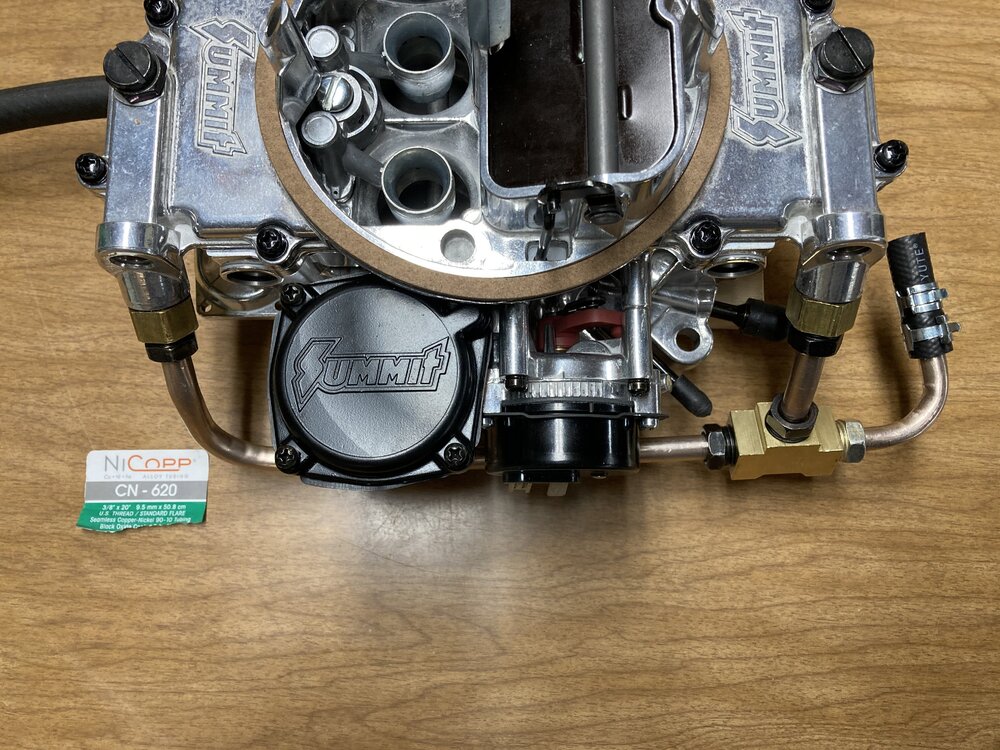
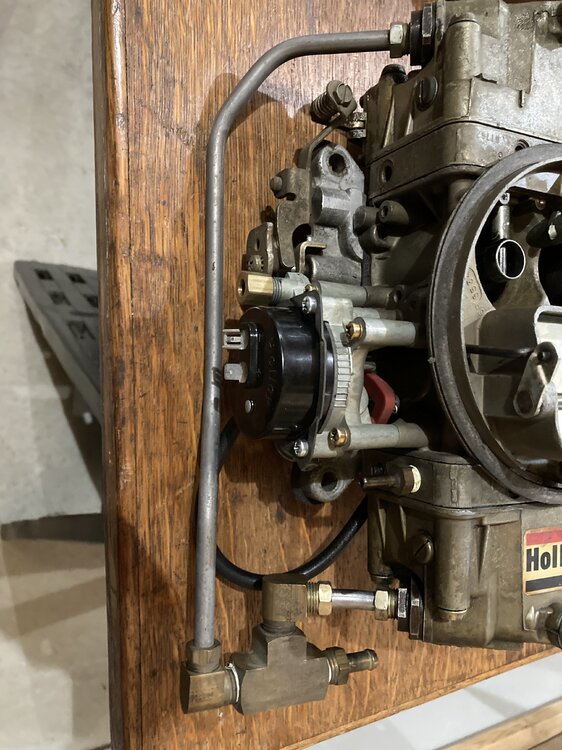
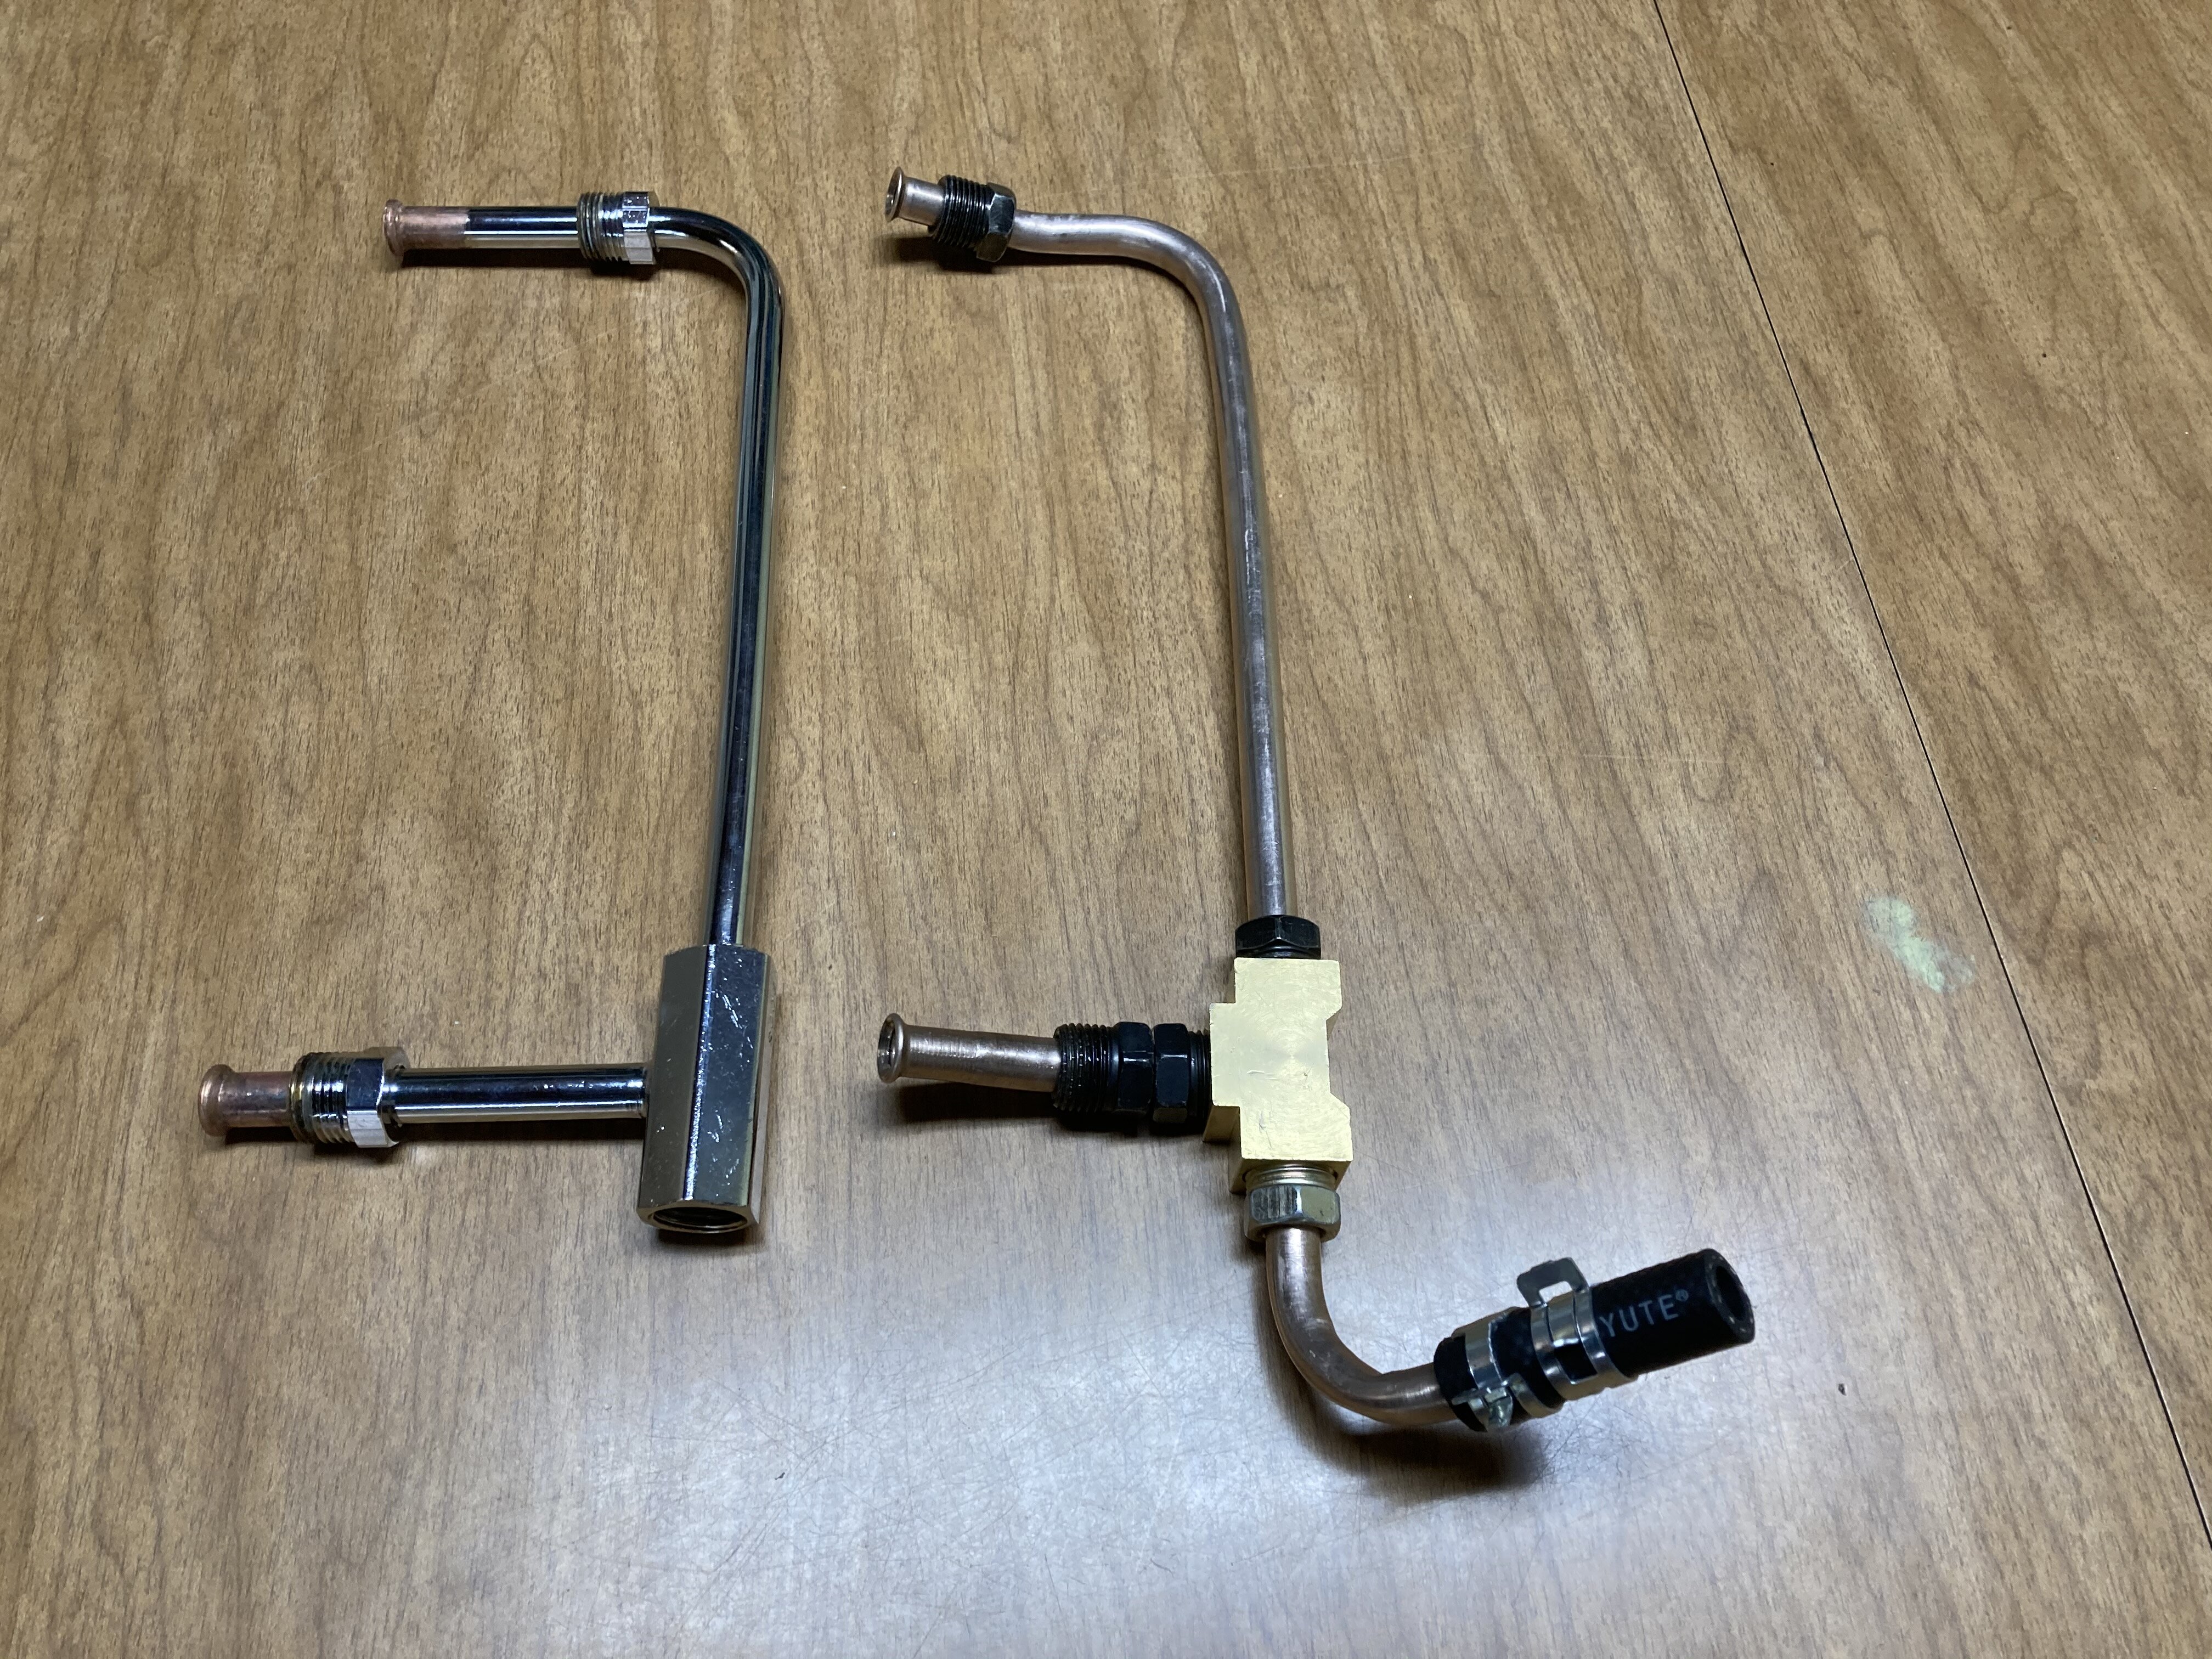
The rest of the Edelmann brass fittings arrived today so I thought I should post a picture of the two elbow options I was going to use. As they shipped a lone 130666 TEE that arrived on Saturday separate from the rest of the order that arrived today, I was impatient and made my own bent 3/8" tube elbow as shown in the 01/05 post.
The fittings below would also work with the chrome fuel line assembly included with the Summit carb if you don't have clearance issues like I did with the heater hose.
Doug
-
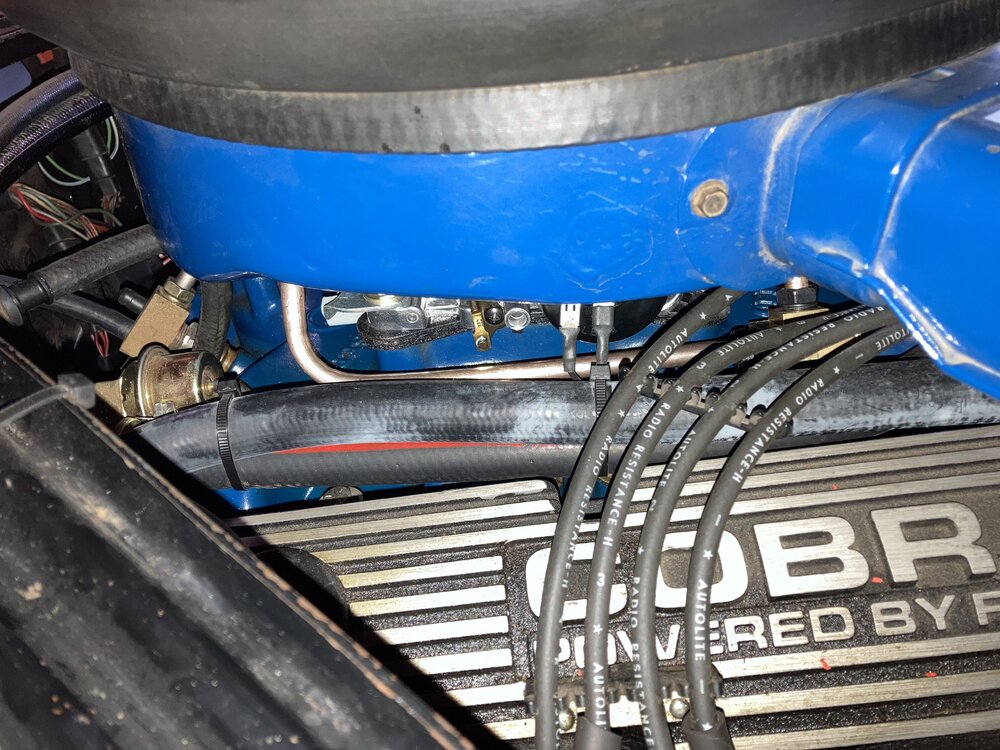
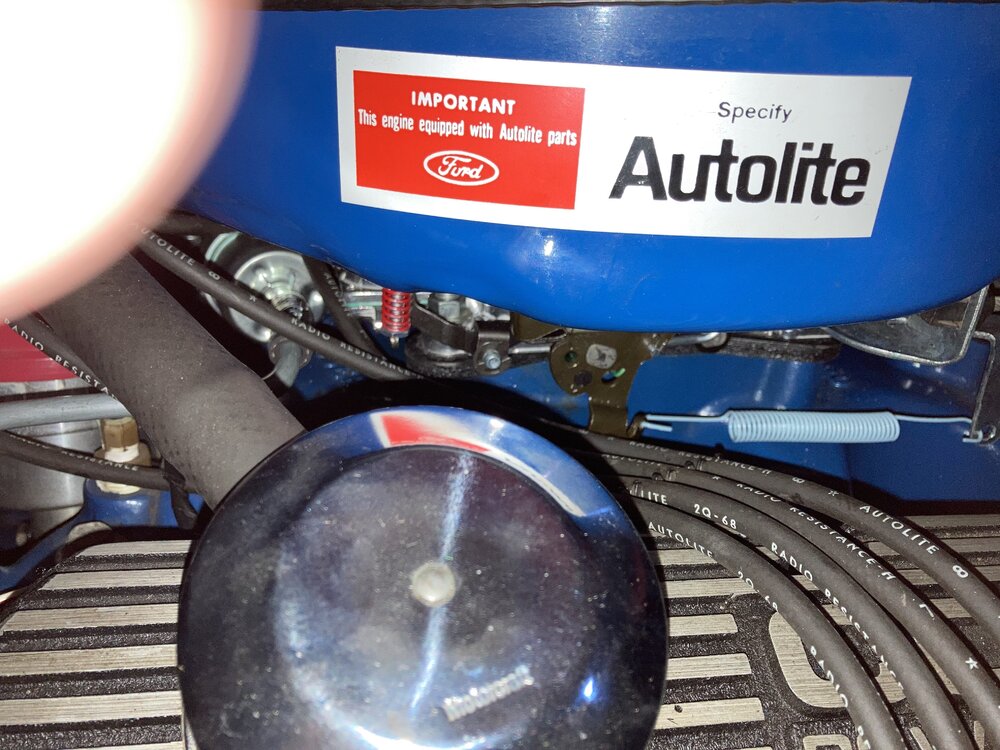
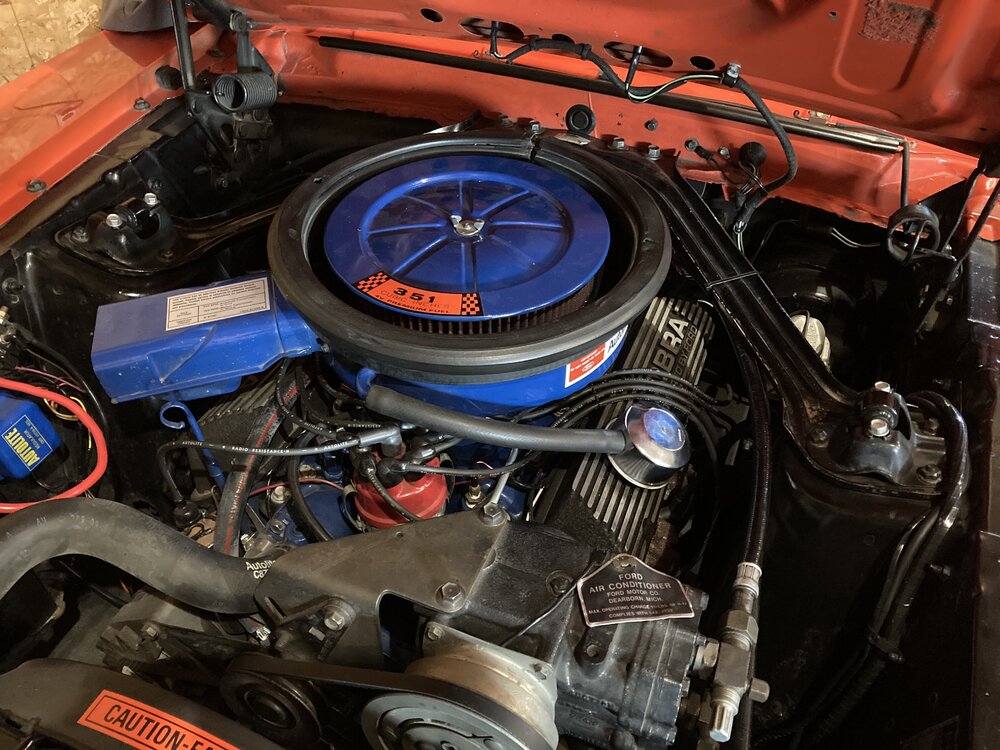
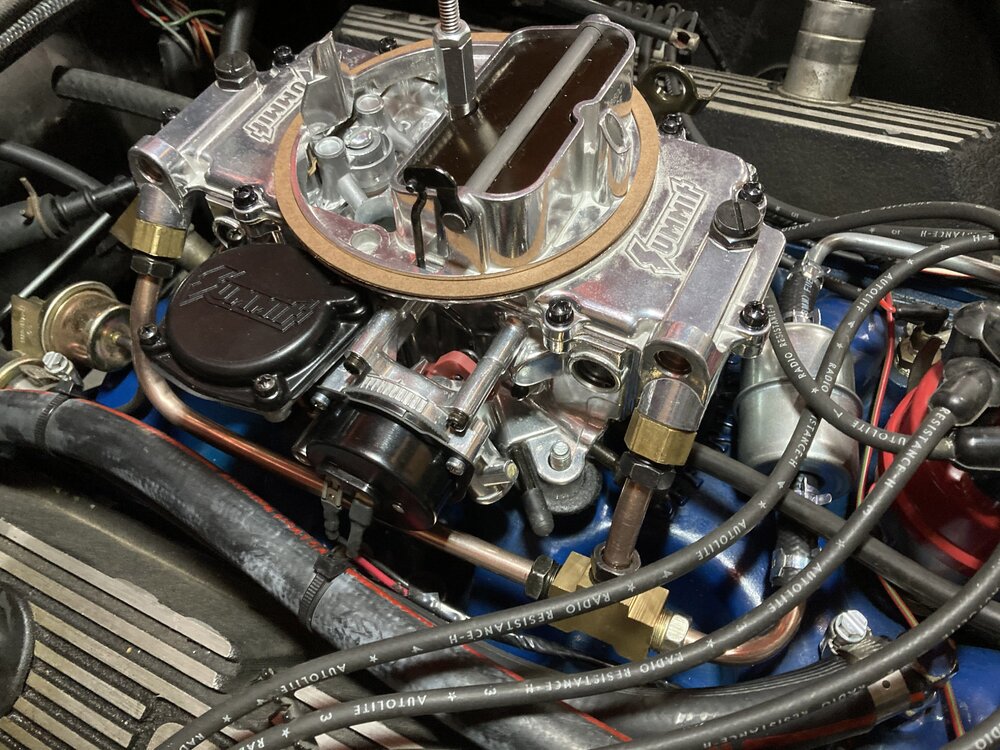
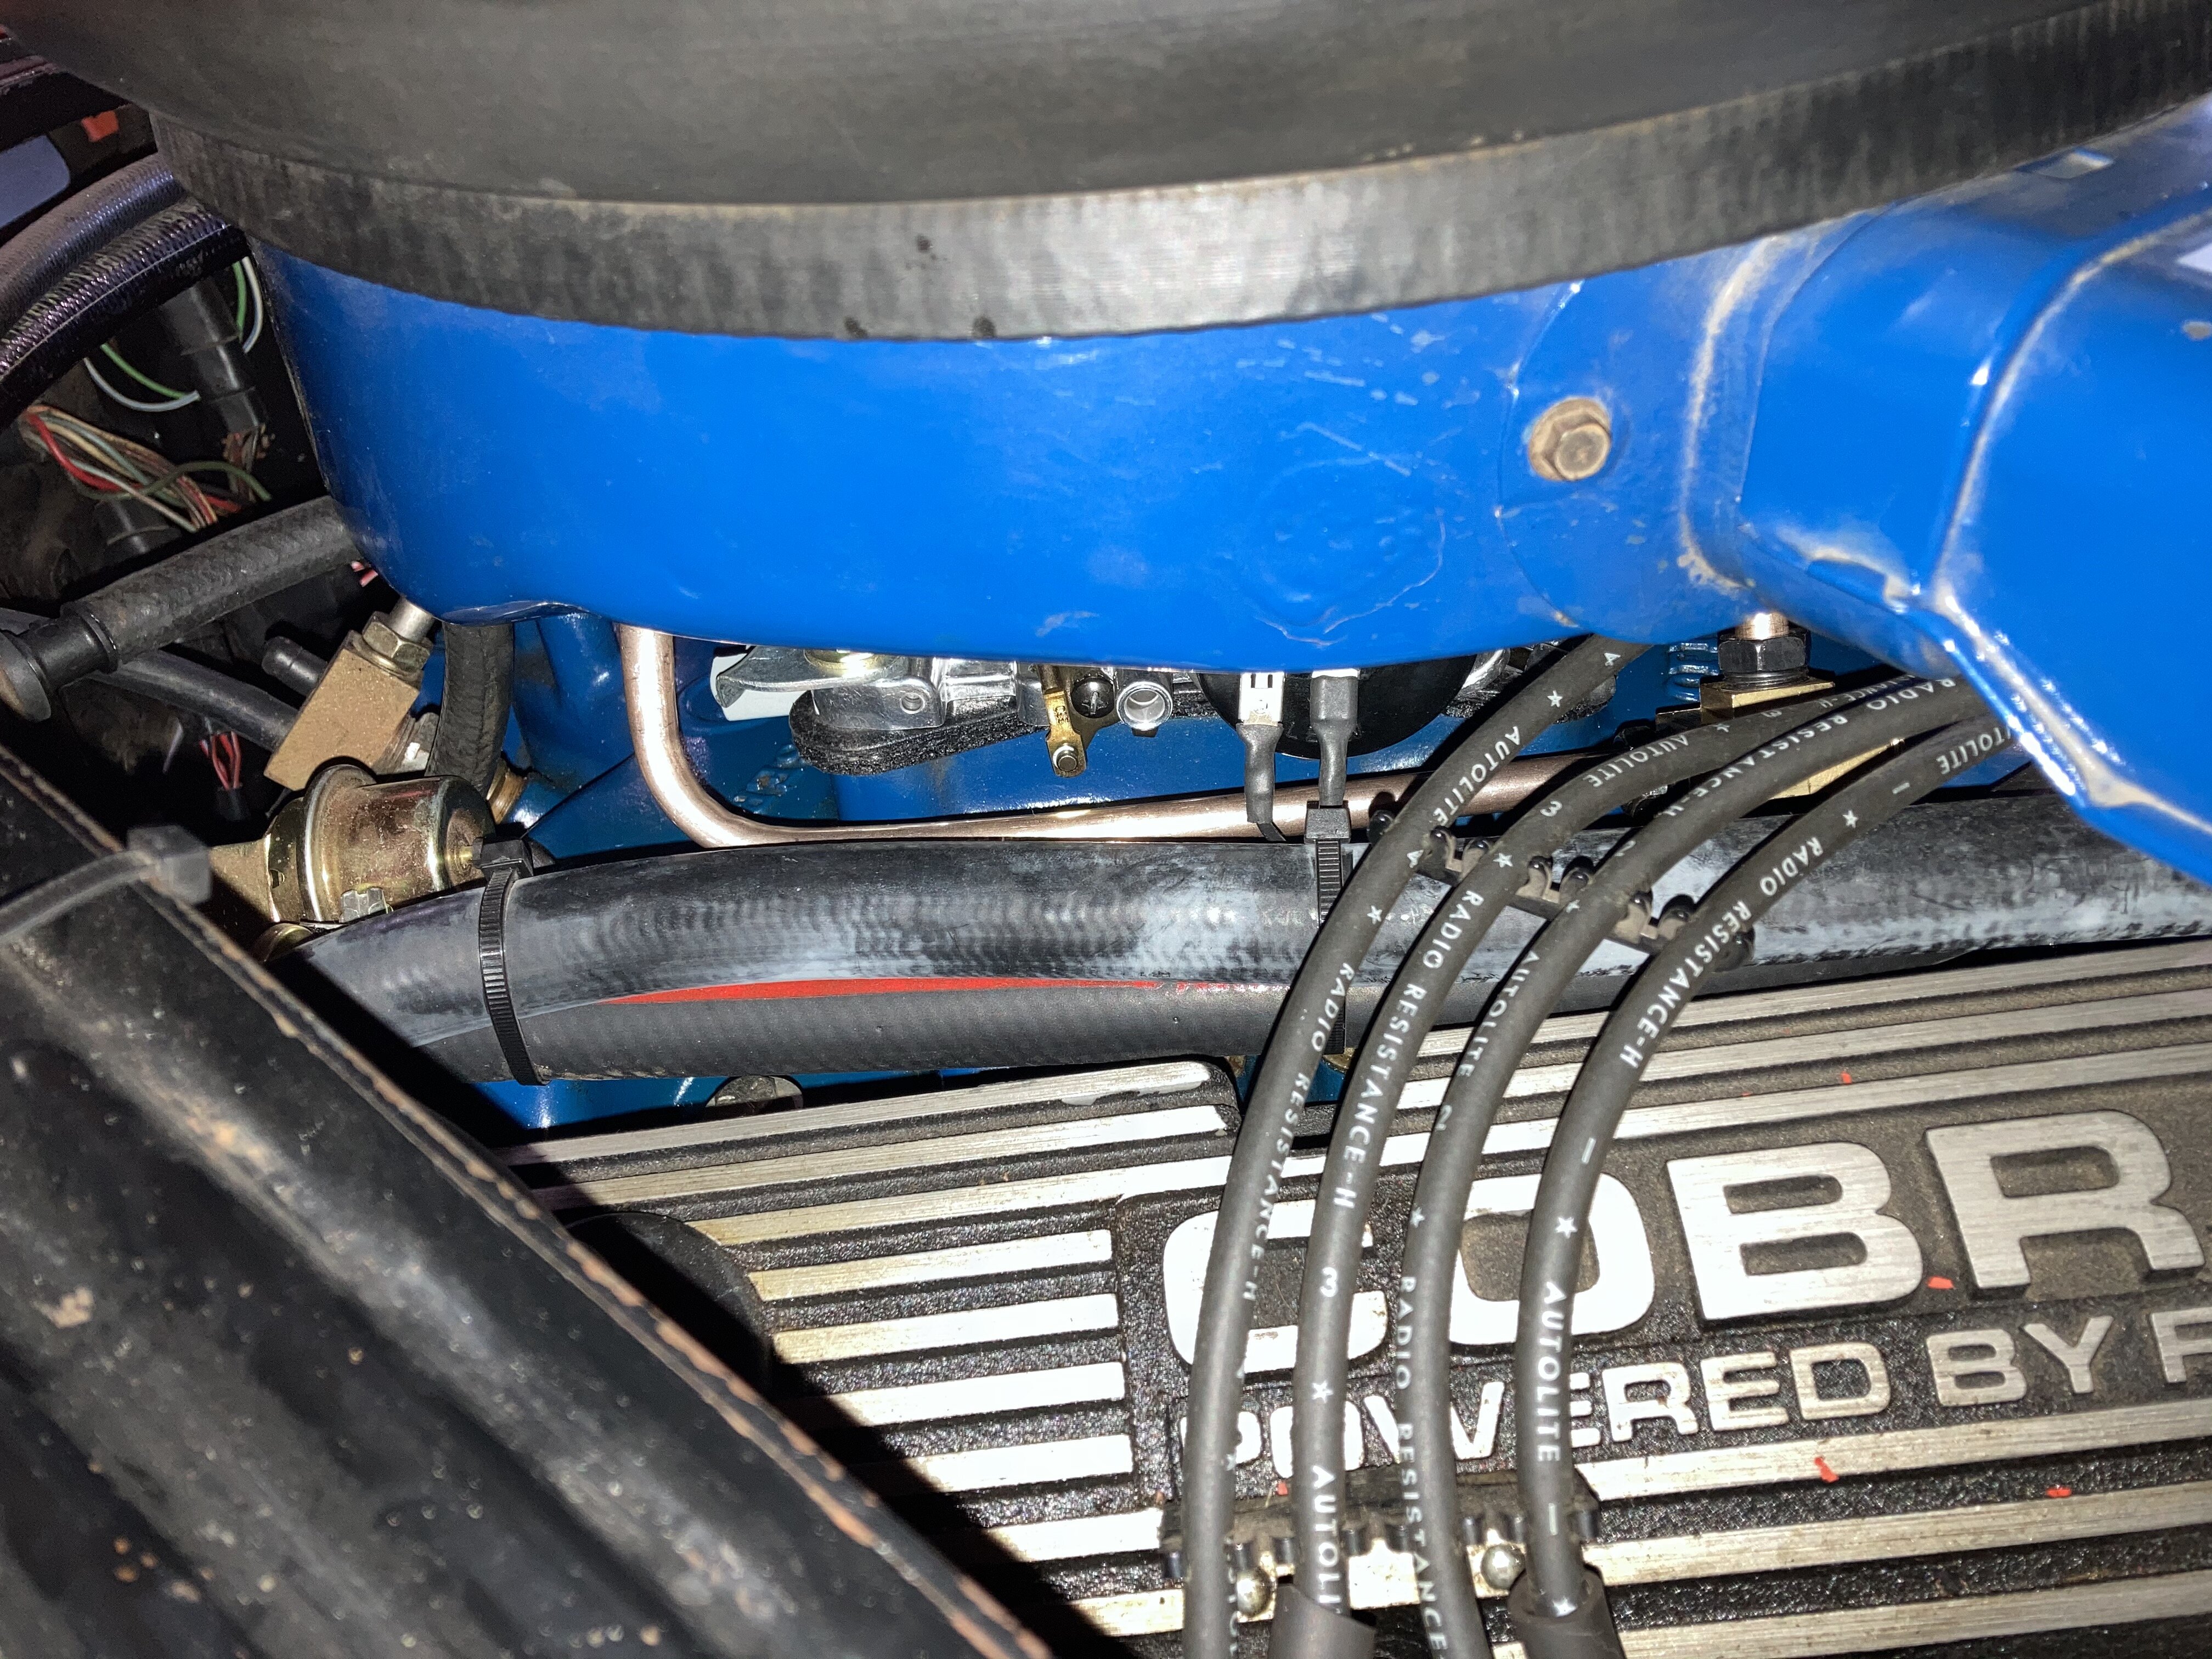
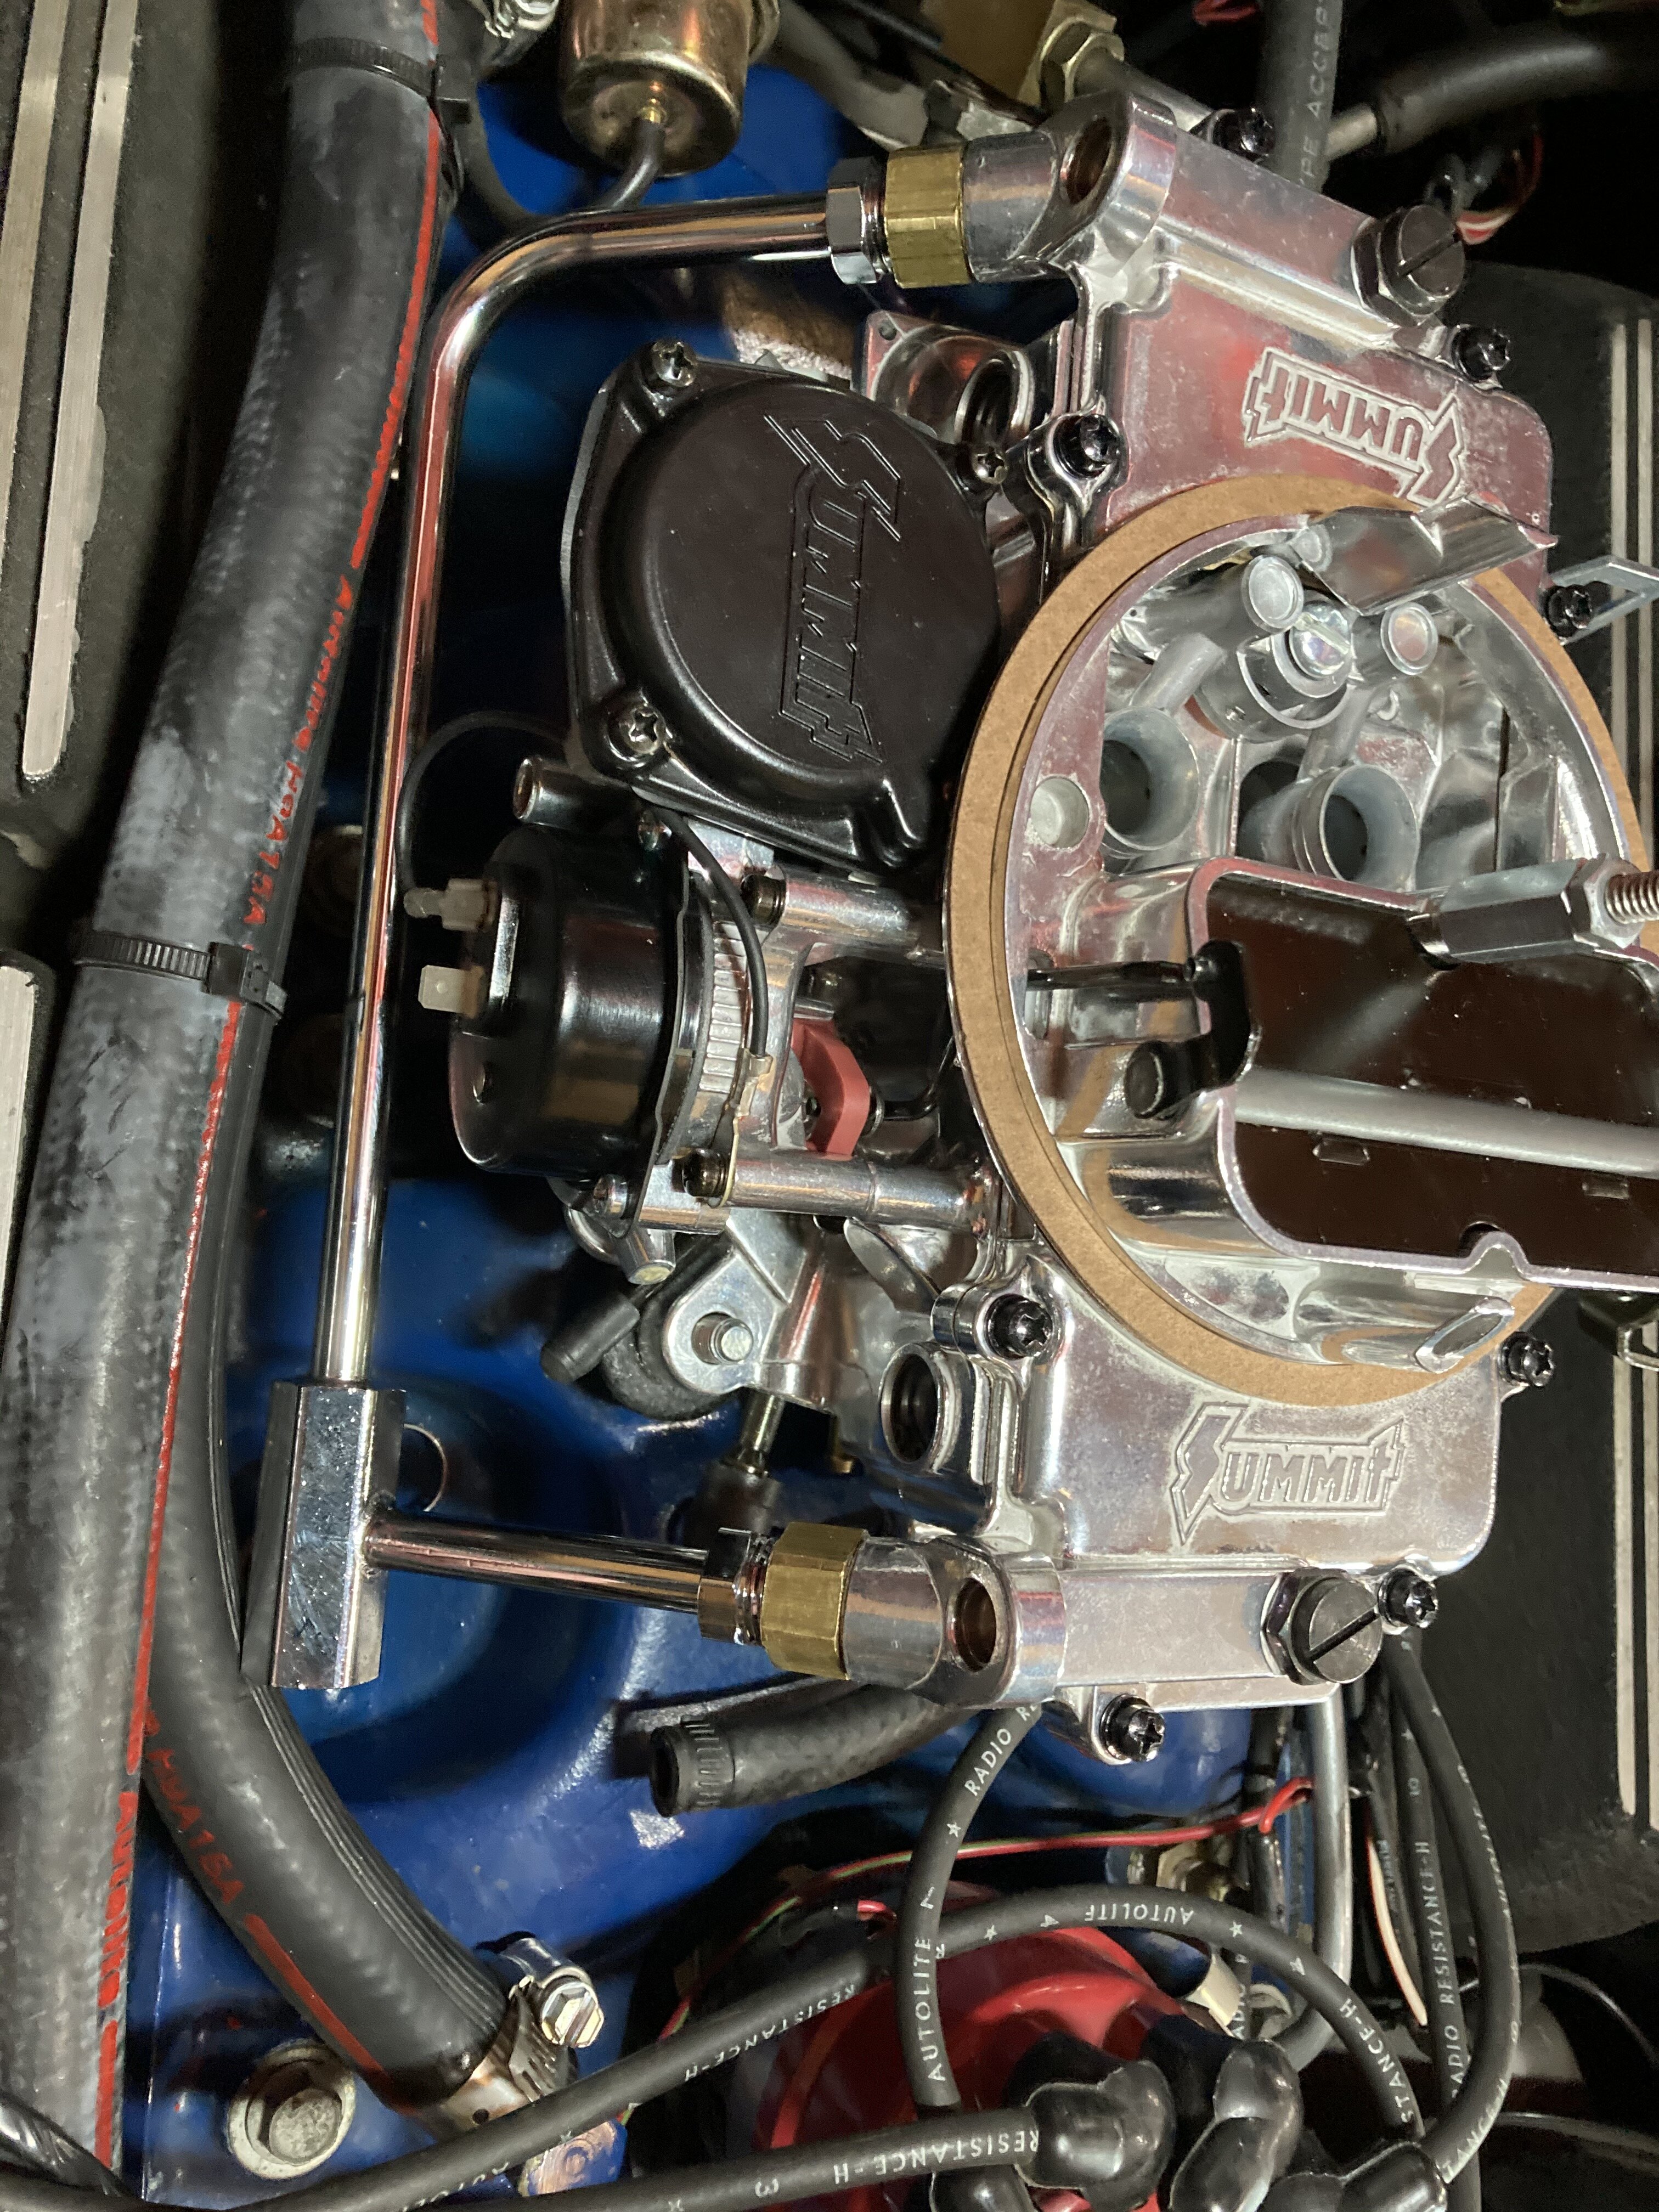
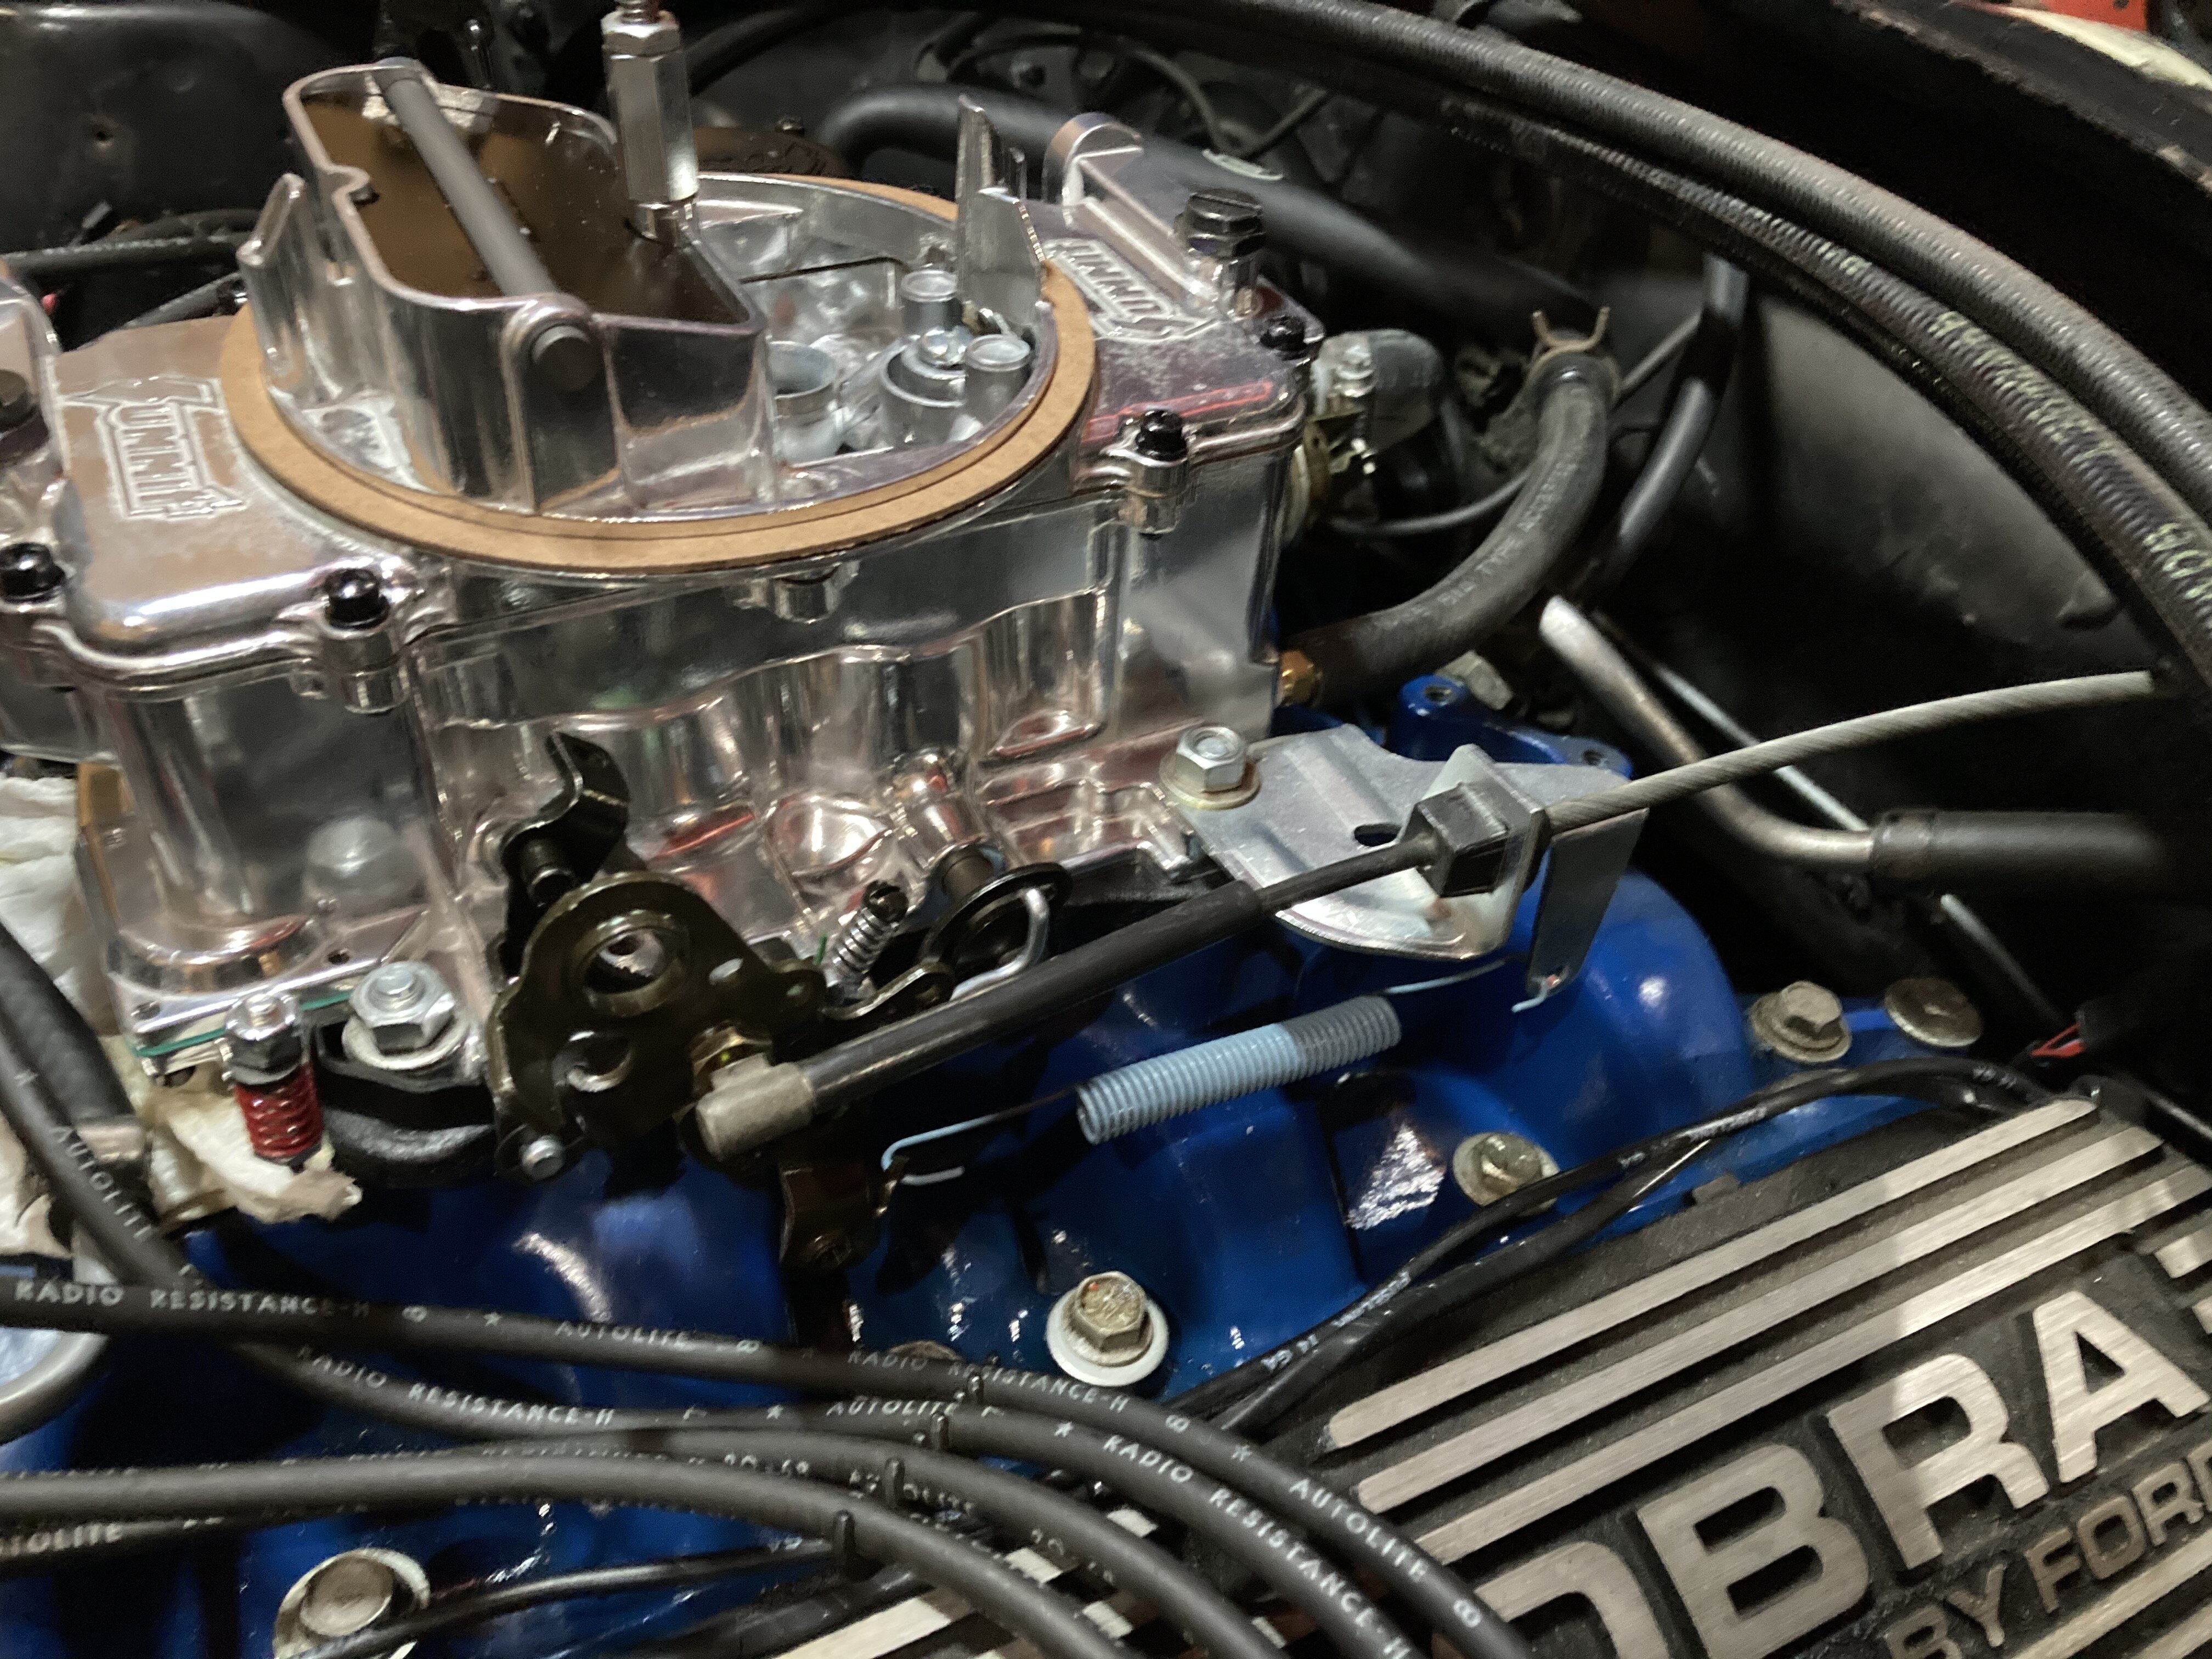
Final pics with air cleaner installed ... now I just need to wait for Spring (or unseasonably warm weekend between now and then) to start it up and see how it runs.
I do have the Electric Choke hooked up to the alternator Stator terminal, just as I did with the Holley. Summit states 12V is mandatory (as I believe the Holley Choke Kit literature stated as well), but the choke on the Holley worked just fine on stator voltage. I then removed both choke caps to compare and they appear to be IDENTICAL including the thickness & width of the flat choke coil spring.
Doug
 Grabber70Mach reacted to this
 -
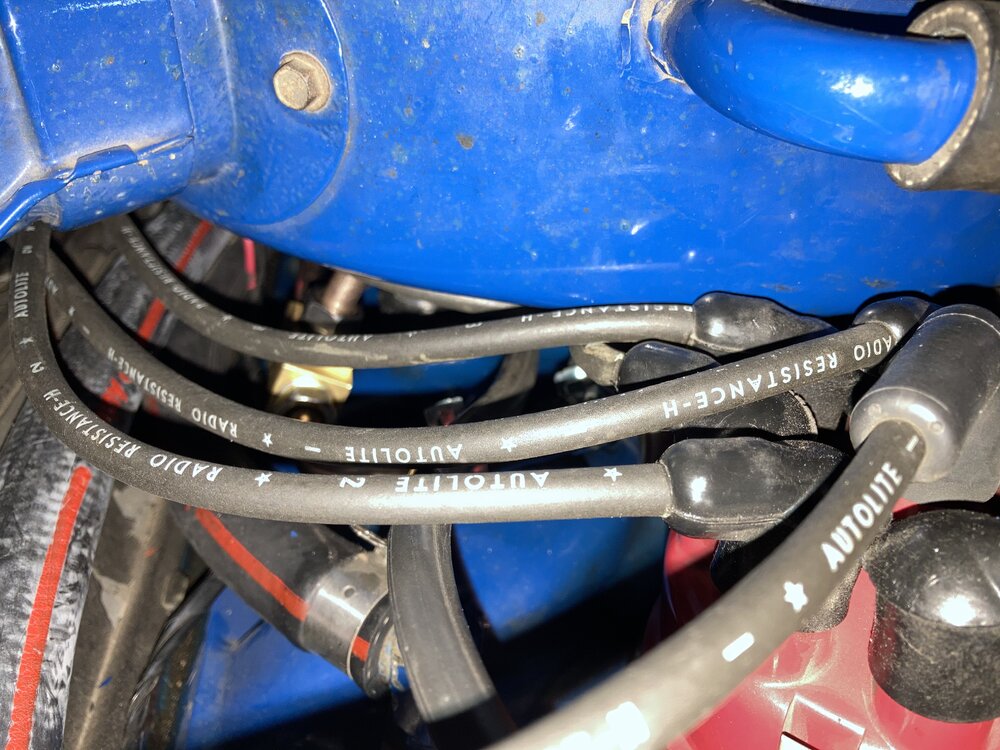
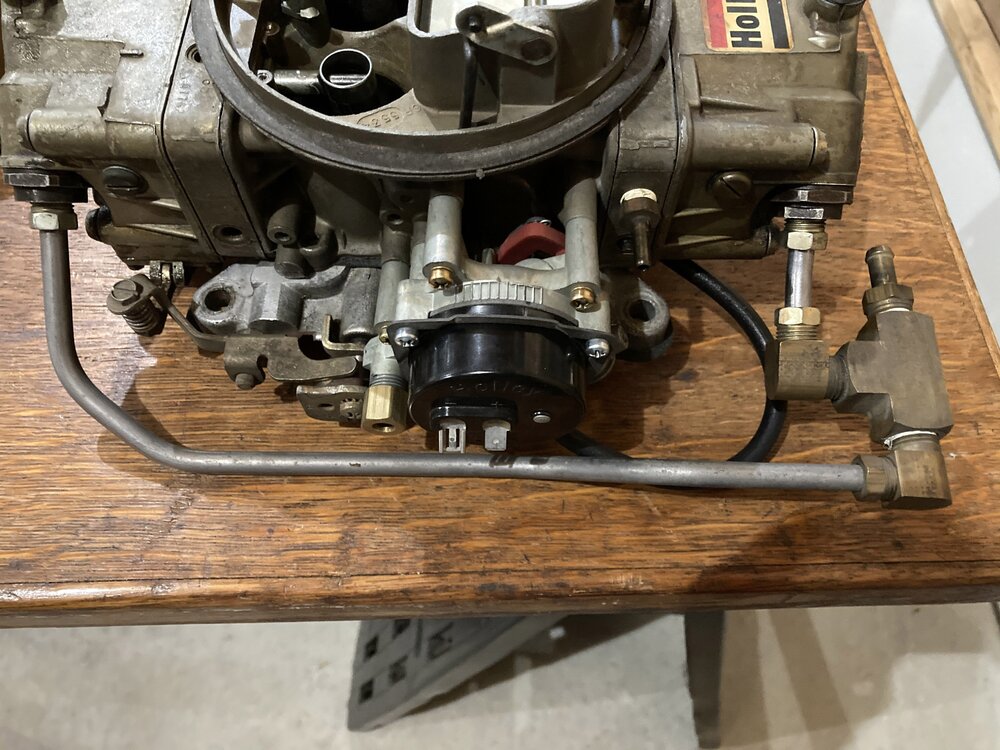
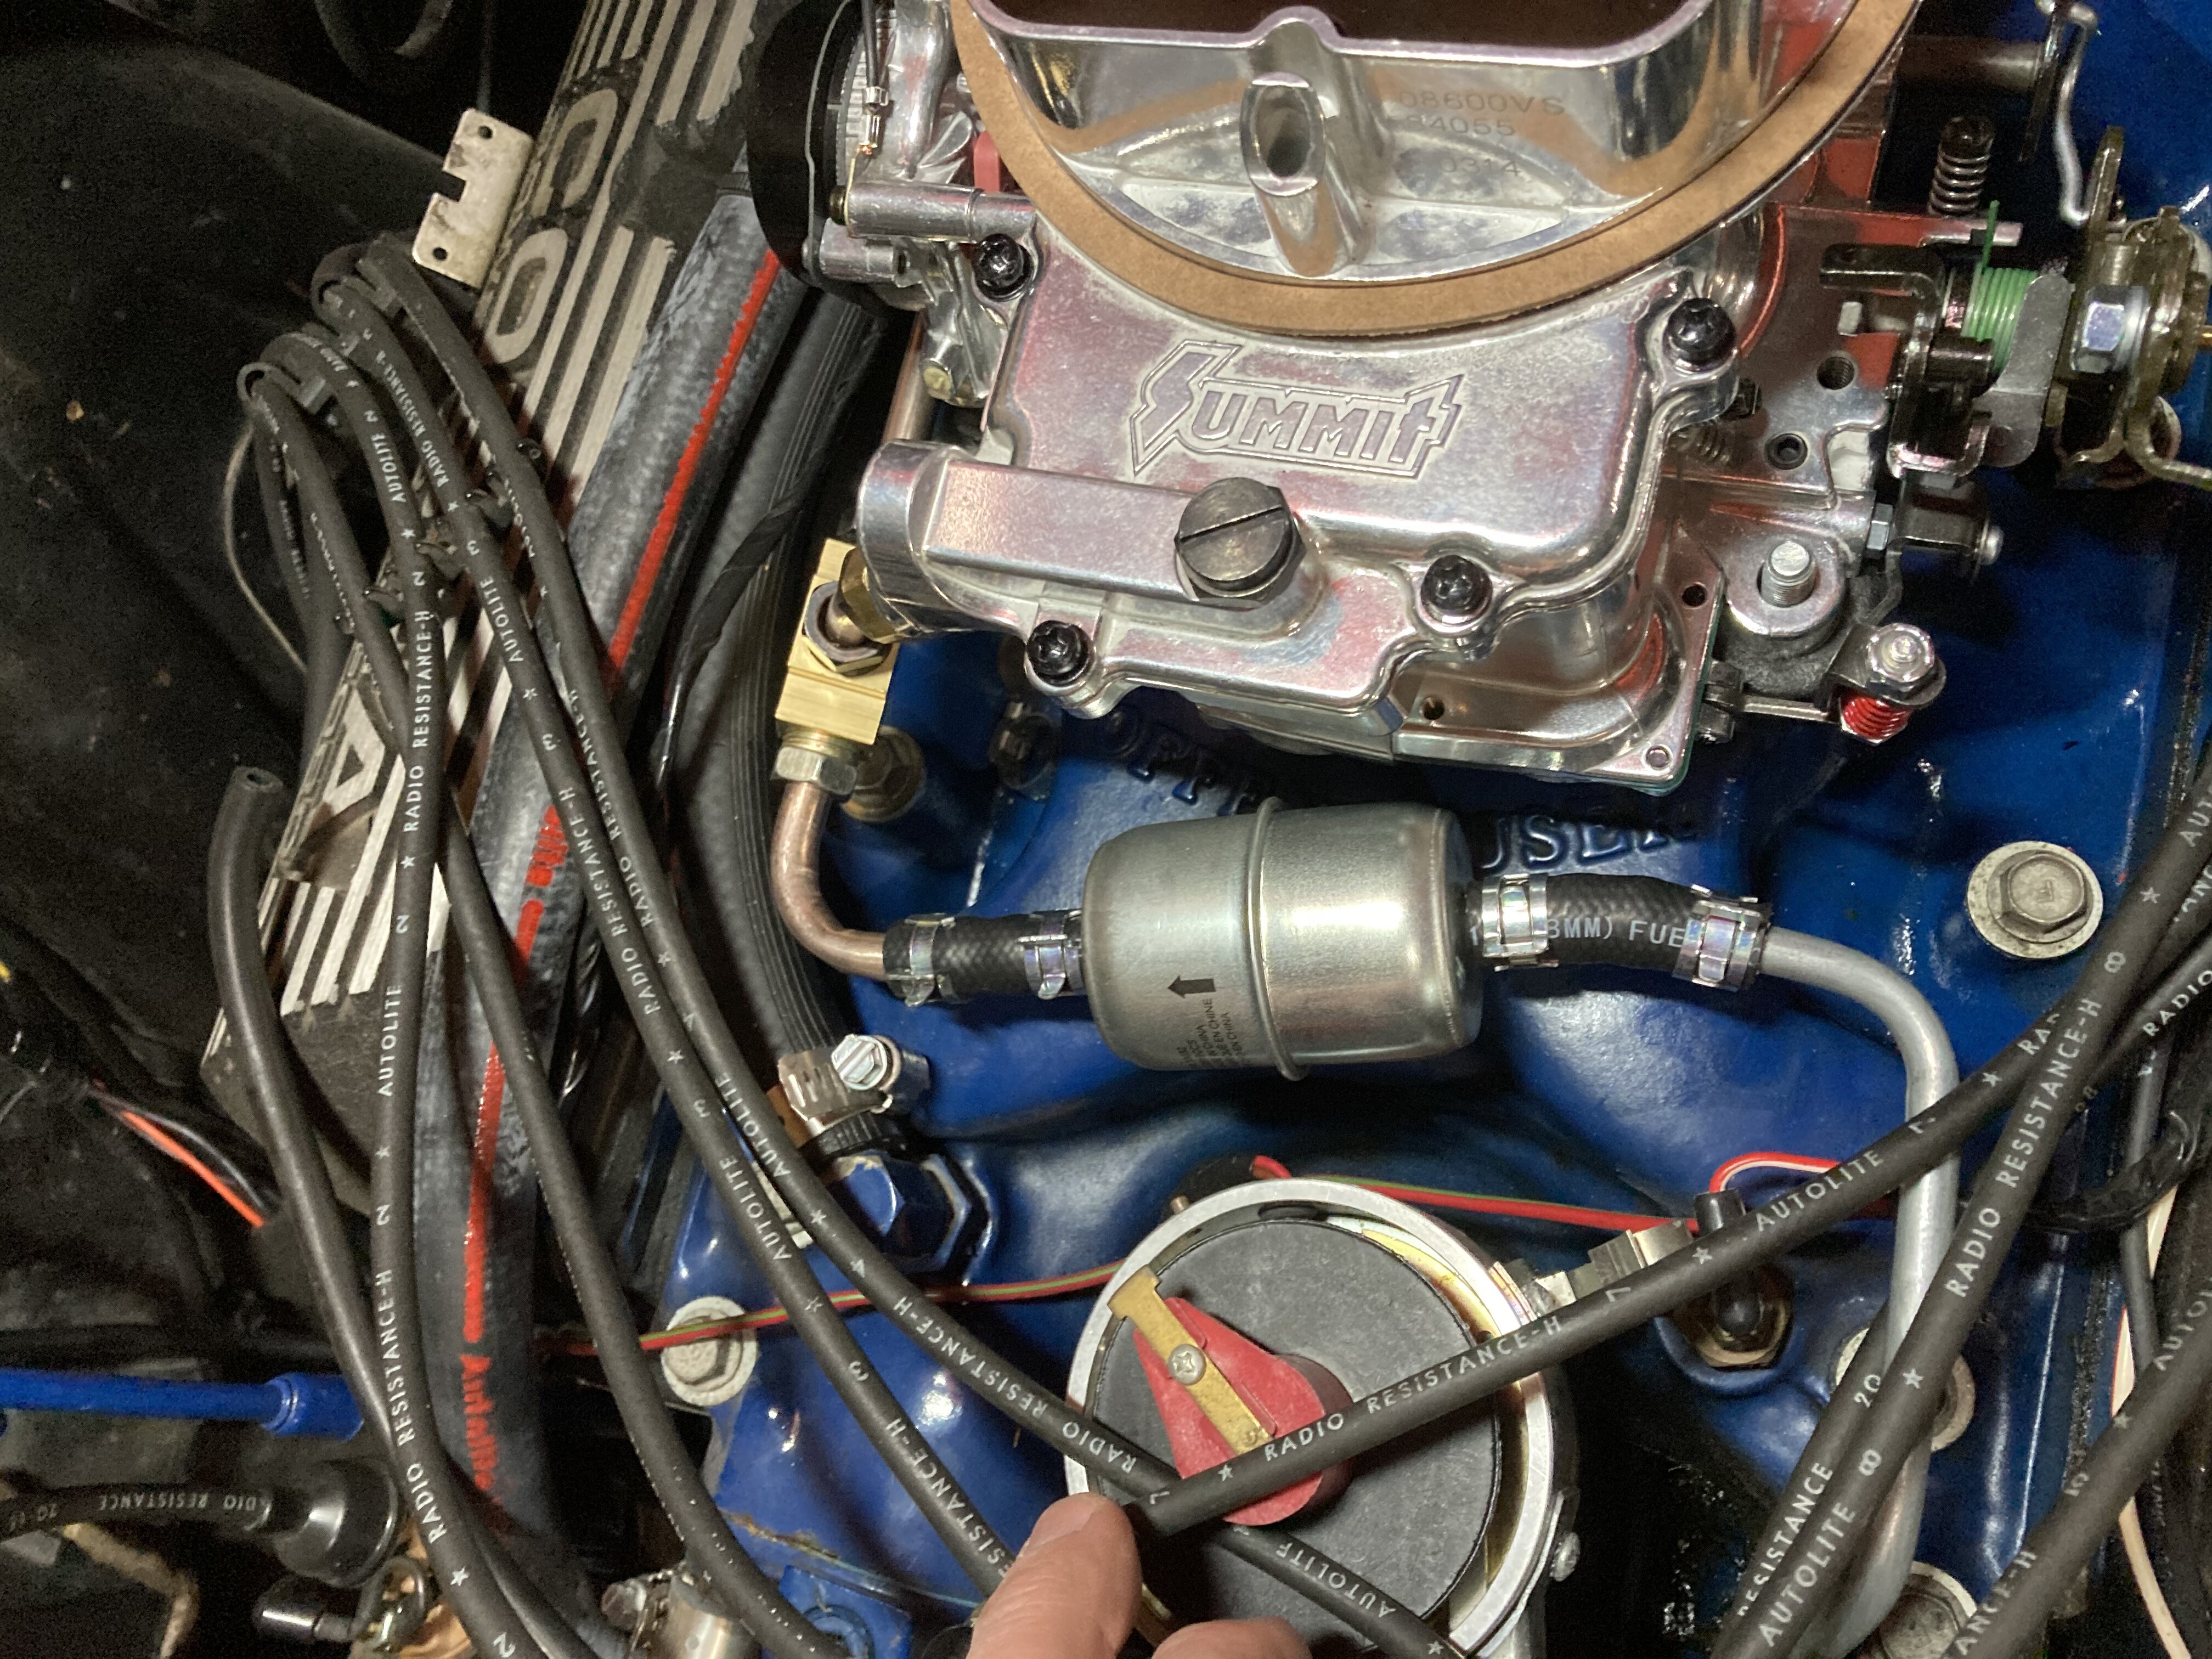
Here is a pic of the original Holley 5/16" custom fuel line I made years ago and the 3/8" version for the Summit Carb that did not go too well, including a kink in the short line to the front fuel bowl. I think my final version in the previous post is much simpler and cleaner looking. I also wanted the spark plug wires routed ABOVE the fuel line which I achieved as well.
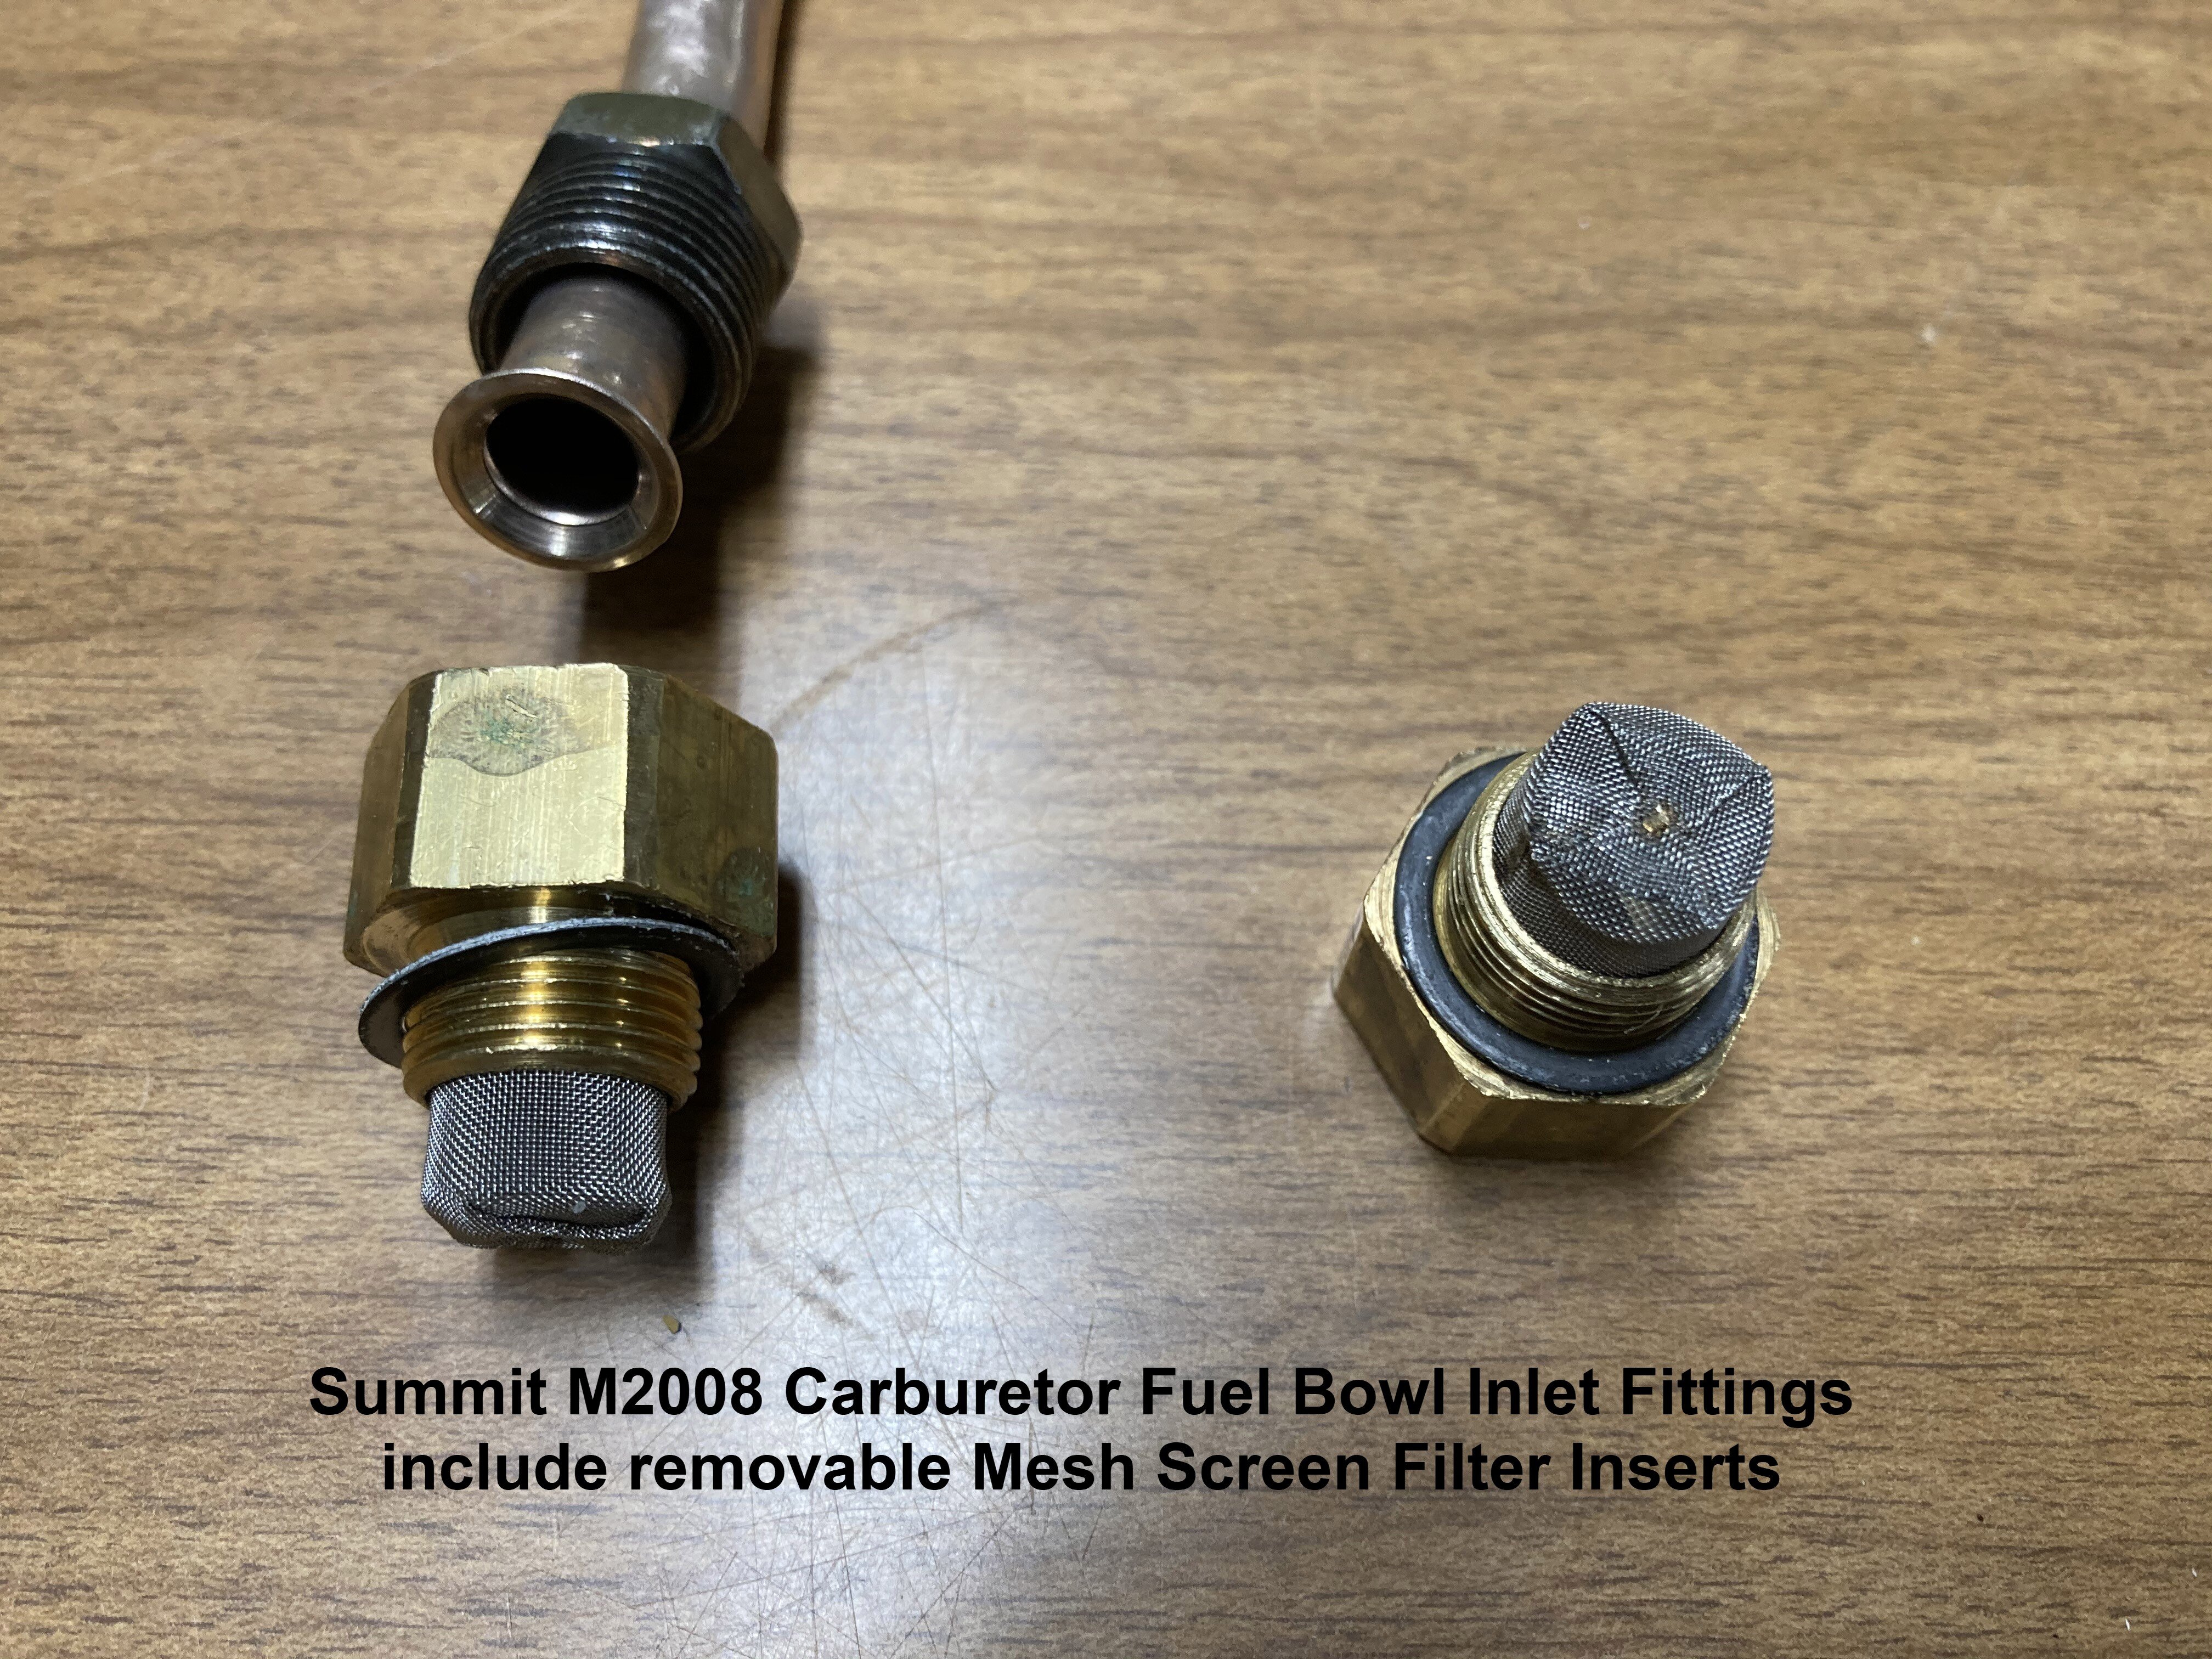
I did not have a fuel filter on the Holley Install because it had the nice porous bronze filters in the fuel inlets. The Summit Carb just has wire mesh screens in the inlets and the installation guide recommends an external fuel filter, so I found the WIX on NPD's site and was really glad I was able to make it look like it actually belongs there.
Doug

-
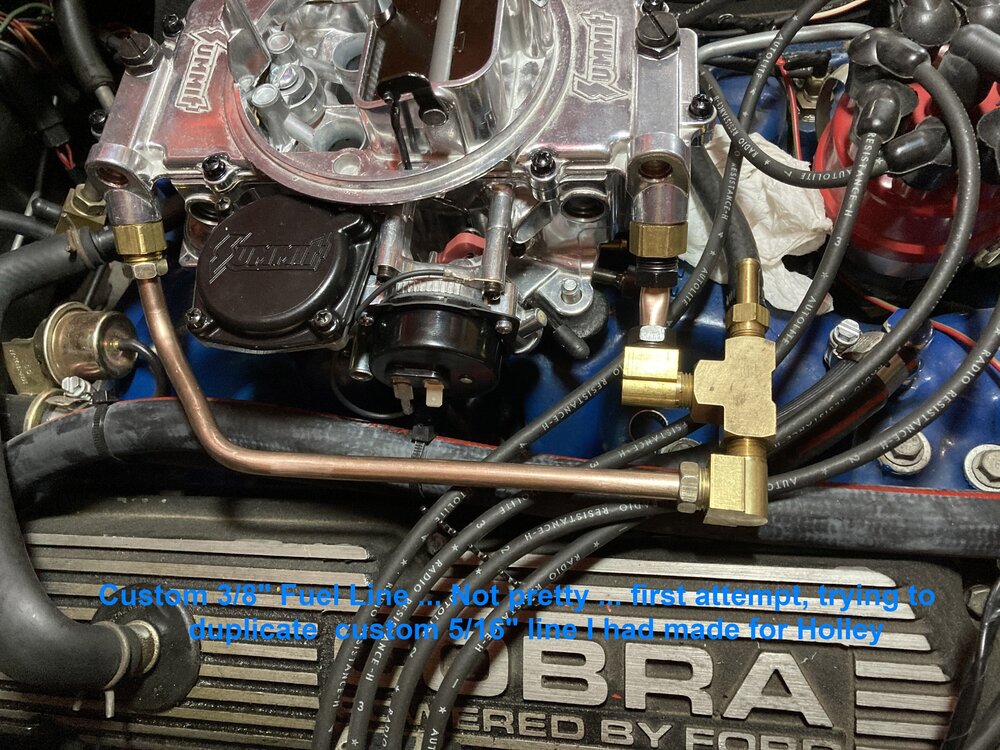
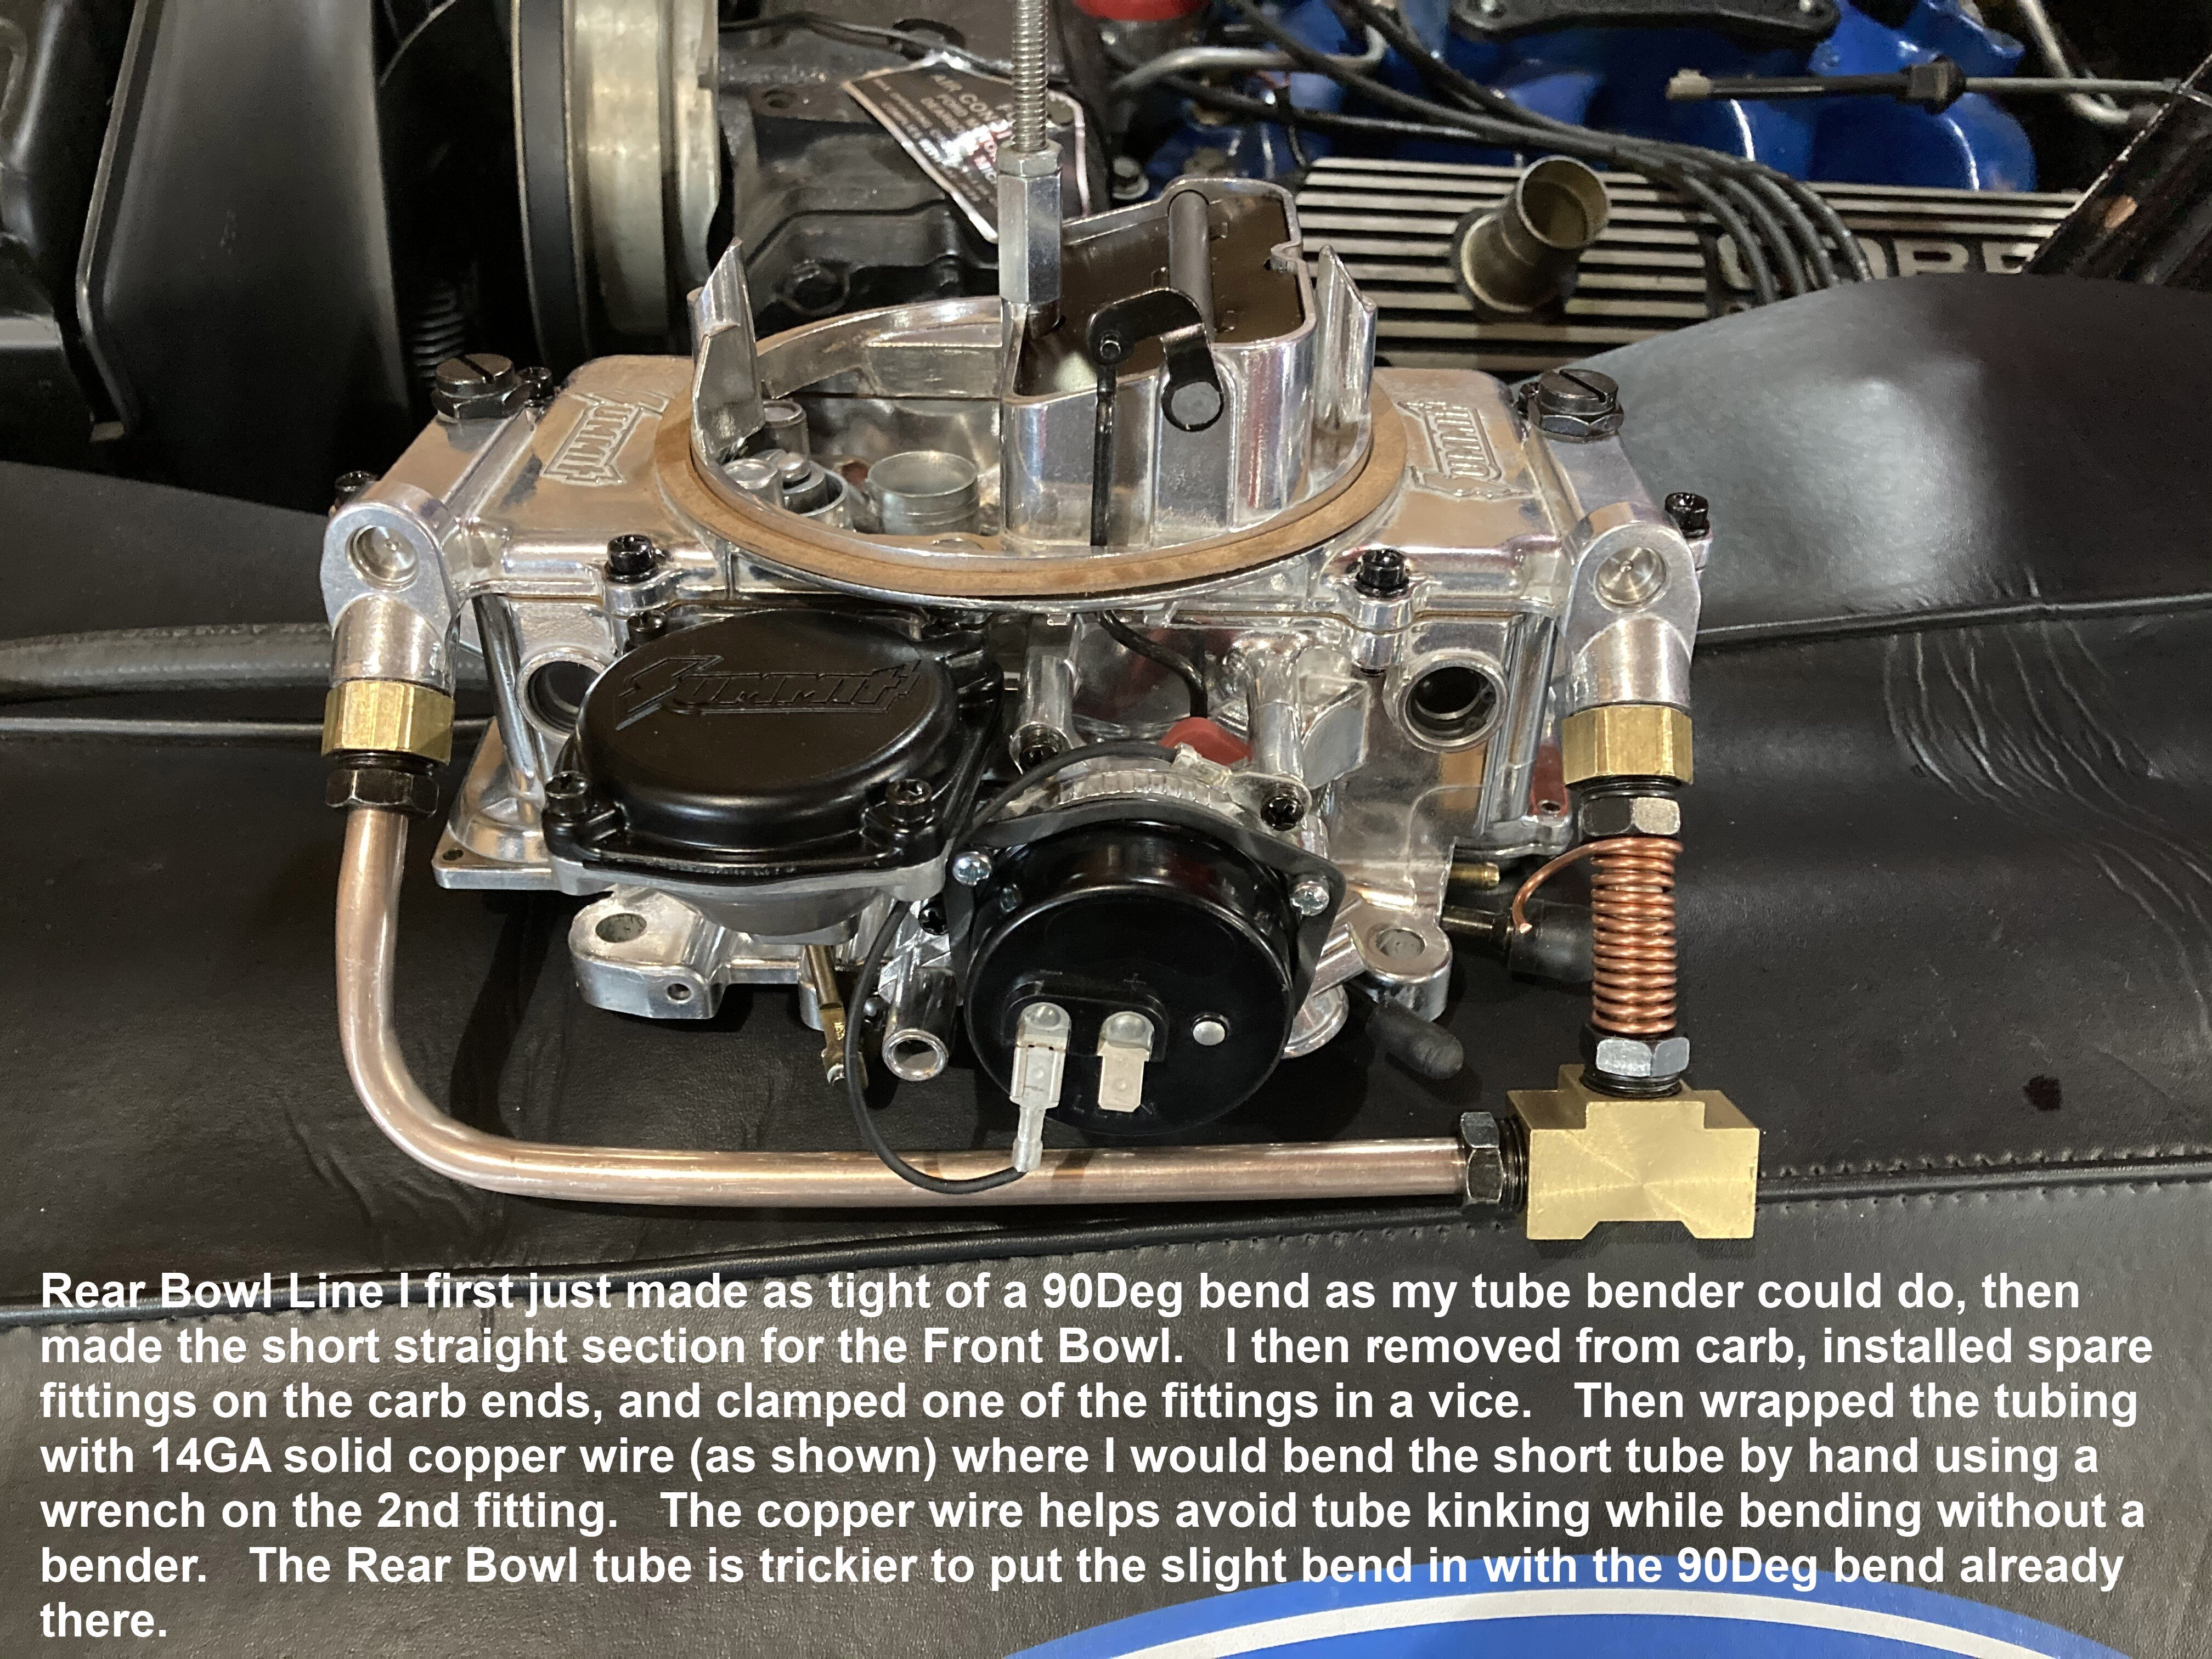
SECOND STEP ... FUEL LINE.
The chrome fuel line that came with the Summit Carb has too long of drops at the carb inlets so it would be up against the stock heater hose routing to the intake fitting (as you can see in the 2ND PIC). Also read a few reviews on the Summit site stating this tube was pretty cheaply made, so I did not want to try and modify it to better fit and have it end up leaking. That and I always try for a mostly stock look, so I avoid CHROME as much as I can.
So I bought ...
(2) 20" lengths of 3/8" Ni-Copp Copper-Nickel tubing **
(1) Edelmann 130666, 3/8" Inverted Flare 5/8-18 Brass Tee
(2) Edelmann 121006, 3/8" 5/8-18 Steel Tube Nuts (ended up with 1 spare)
(1) WIX 33032, 5/16" 20 Micron Inline Fuel Filter
These last 4 items are for pressure testing tube assy with air pressure in a bucket of water prior to final installation:
(2) Edelmann 123600, 3/8" 5/8-18 Brass Unions
(2) Edelman 120600, 3/8" 5/8-18 Inverted Flare Plug
** Really only needed ONE length of tubing, but my my 1st attempt did not go the way I wanted it to go, so once the smoke cleared I had a 12" piece of tubing and one tube nut left over. So if you get only ONE length of tubing, you will need 3 extra nuts (121006 or equiv.).
I had ordered Edelmann Hose Barb to Male Inverted Flare Swivel Inlet Elbows 822550 (5/16-5/16") & 822660 (3/8-3/8") as well as a reducer for the 5/16" size (258560) in case I could not get the 5/16" fuel line to sneak over the 3/8" hose stem.
However, they had not arrived yet so being impatient I instead successfully made a 3/8" bent tube elbow (95-100 Deg bend) as you see in the pictures. I really thought this would be too long of a 90Deg drop putting me into the side of the distributor and is why I ordered the 90Deg fittings. But as you can see from the pics, not only was I able to sneak the 5/16" hose over my slight bubble flare on the end of my custom 3/8" tube elbow, it also made the WIX filter fit between the carb & distributor near perfect.
Oh and the Fuel Pump to Carb Fuel line is a stock replacement for 1969 351W 4BBL, tweaked just a bit on the end to point in front of the carb.
Doug


-
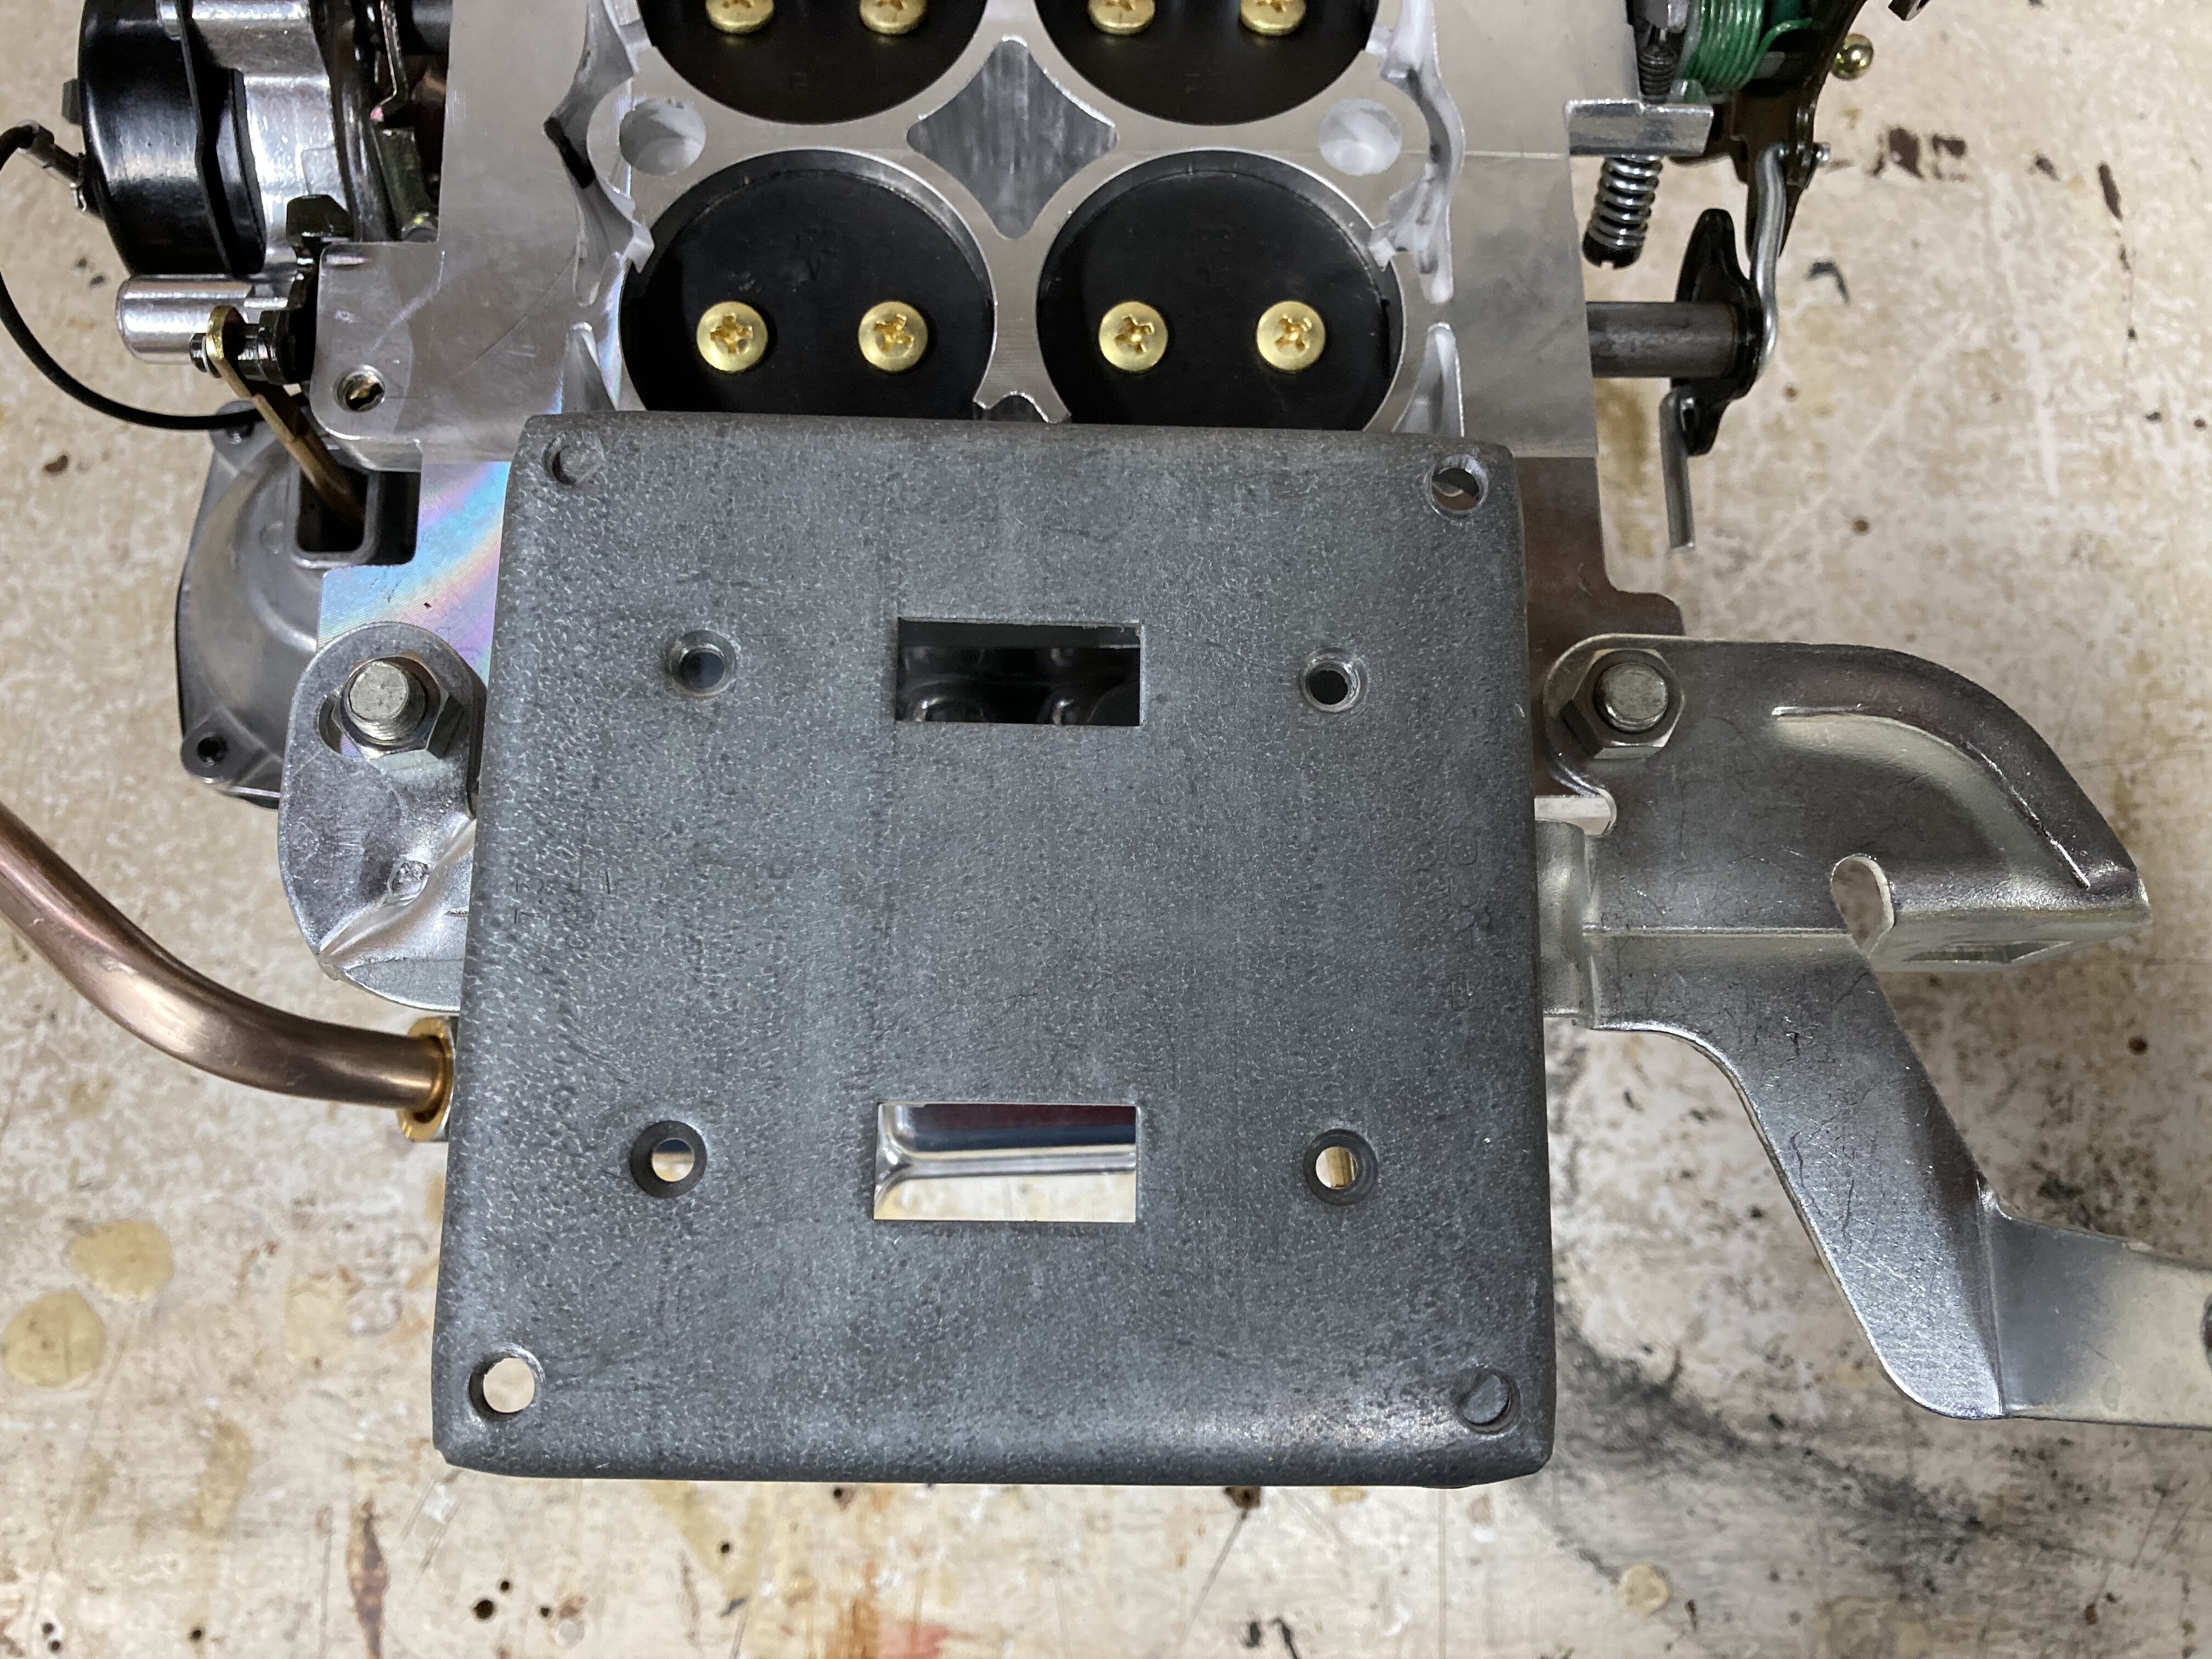
On 12/31/2020 at 10:45 AM, Mach1 Driver said:I like you're use of the electrical box cover ;)
Gotta use what you've got laying around ... it being the perfect width and depth needed plus as a bonus already galvanized !!
Was a little concerned that it was thinner steel than the bracket was made out of (0.068" vs 0.101"), plus the section of the bracket that I removed was ribbed but once finished it is stiff enough for the purpose. Where the stiffness of the thicker steel and ribbed areas matter in this throttle cable bracket is at the cable mount & the tab that the spring attaches to, which my mod does not have any effect on.
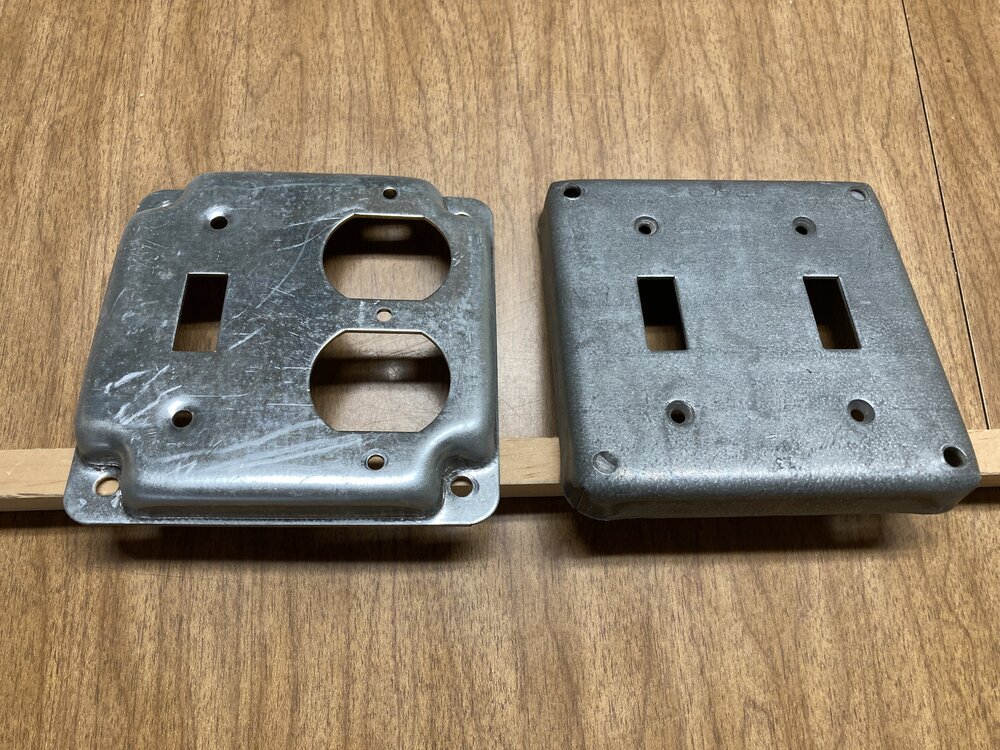
Another thing is the new RACO brand box covers are formed differently than the old ones ... there is now a bit of a lip around the outside edge where the old one was straight. The new style cover is made out of the same steel thickness and definitely makes for a nicer looking electrical box cover ... the lip that this new style cover would leave on each end of the steel strip could easily be flattened out before welding. Just thought this fact should be mentioned if anyone is planning on duplicating this mod, see comparison pic below.
-
I had started a thread asking about repro O.E. ford 4BBL Throttle Cable Brackets, which started to morph into a thread about modding one to mount on one of these Summit carbs. Instead of continuing with that thread, I figured it would be best to start clean with a NEW thread on all that needs to be done to install this series of carburetors on a 1969 or 1970 Mustang / Cougar.
I'm installing the 600 CFM Vacuum Secondary version (M08600VS) on my 1969 mustang with 351W and Offenhauser 360Deg Equa-Flow Dual Plane Intake. I'd guess the installation would be very similar on any 1969-70 Ford V8 that uses a square hole throttle cable & bracket that mounts to the rear carb studs.
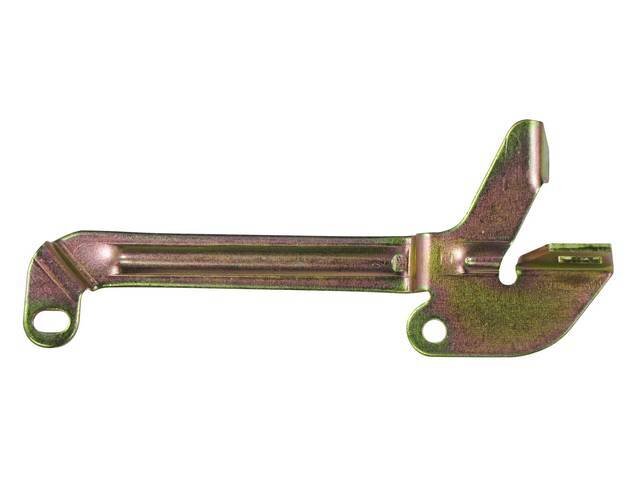
FIRST STEP ... Modding an O.E. Ford or reproduction 4BBL Throttle Cable Bracket to fit the back end of this carb.
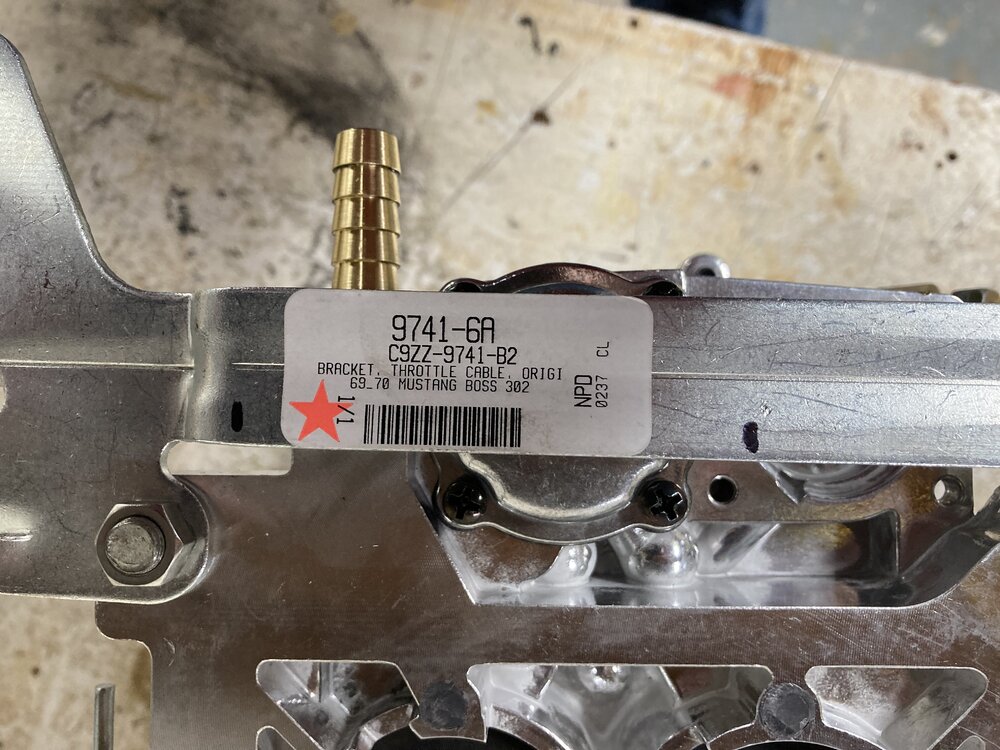
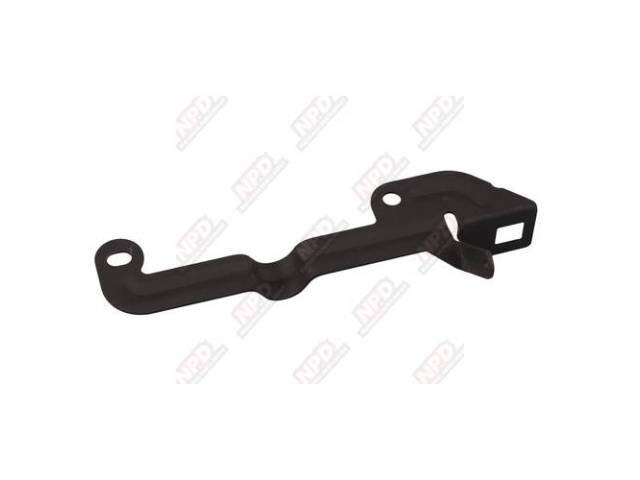
In my case, I bought the Clear Zinc Plated '69-70 Boss 302 bracket from NPD (9741-6A). The '69-70 302,351 & 390 with 4BBL (NPD 9741-5A) could also be used, but I bought the Boss one because they sell for the same price and it was plated and the other one appears to be bare steel, plus I was hoping maybe it had a little more "drop" in the section that goes under the rear of the carb.
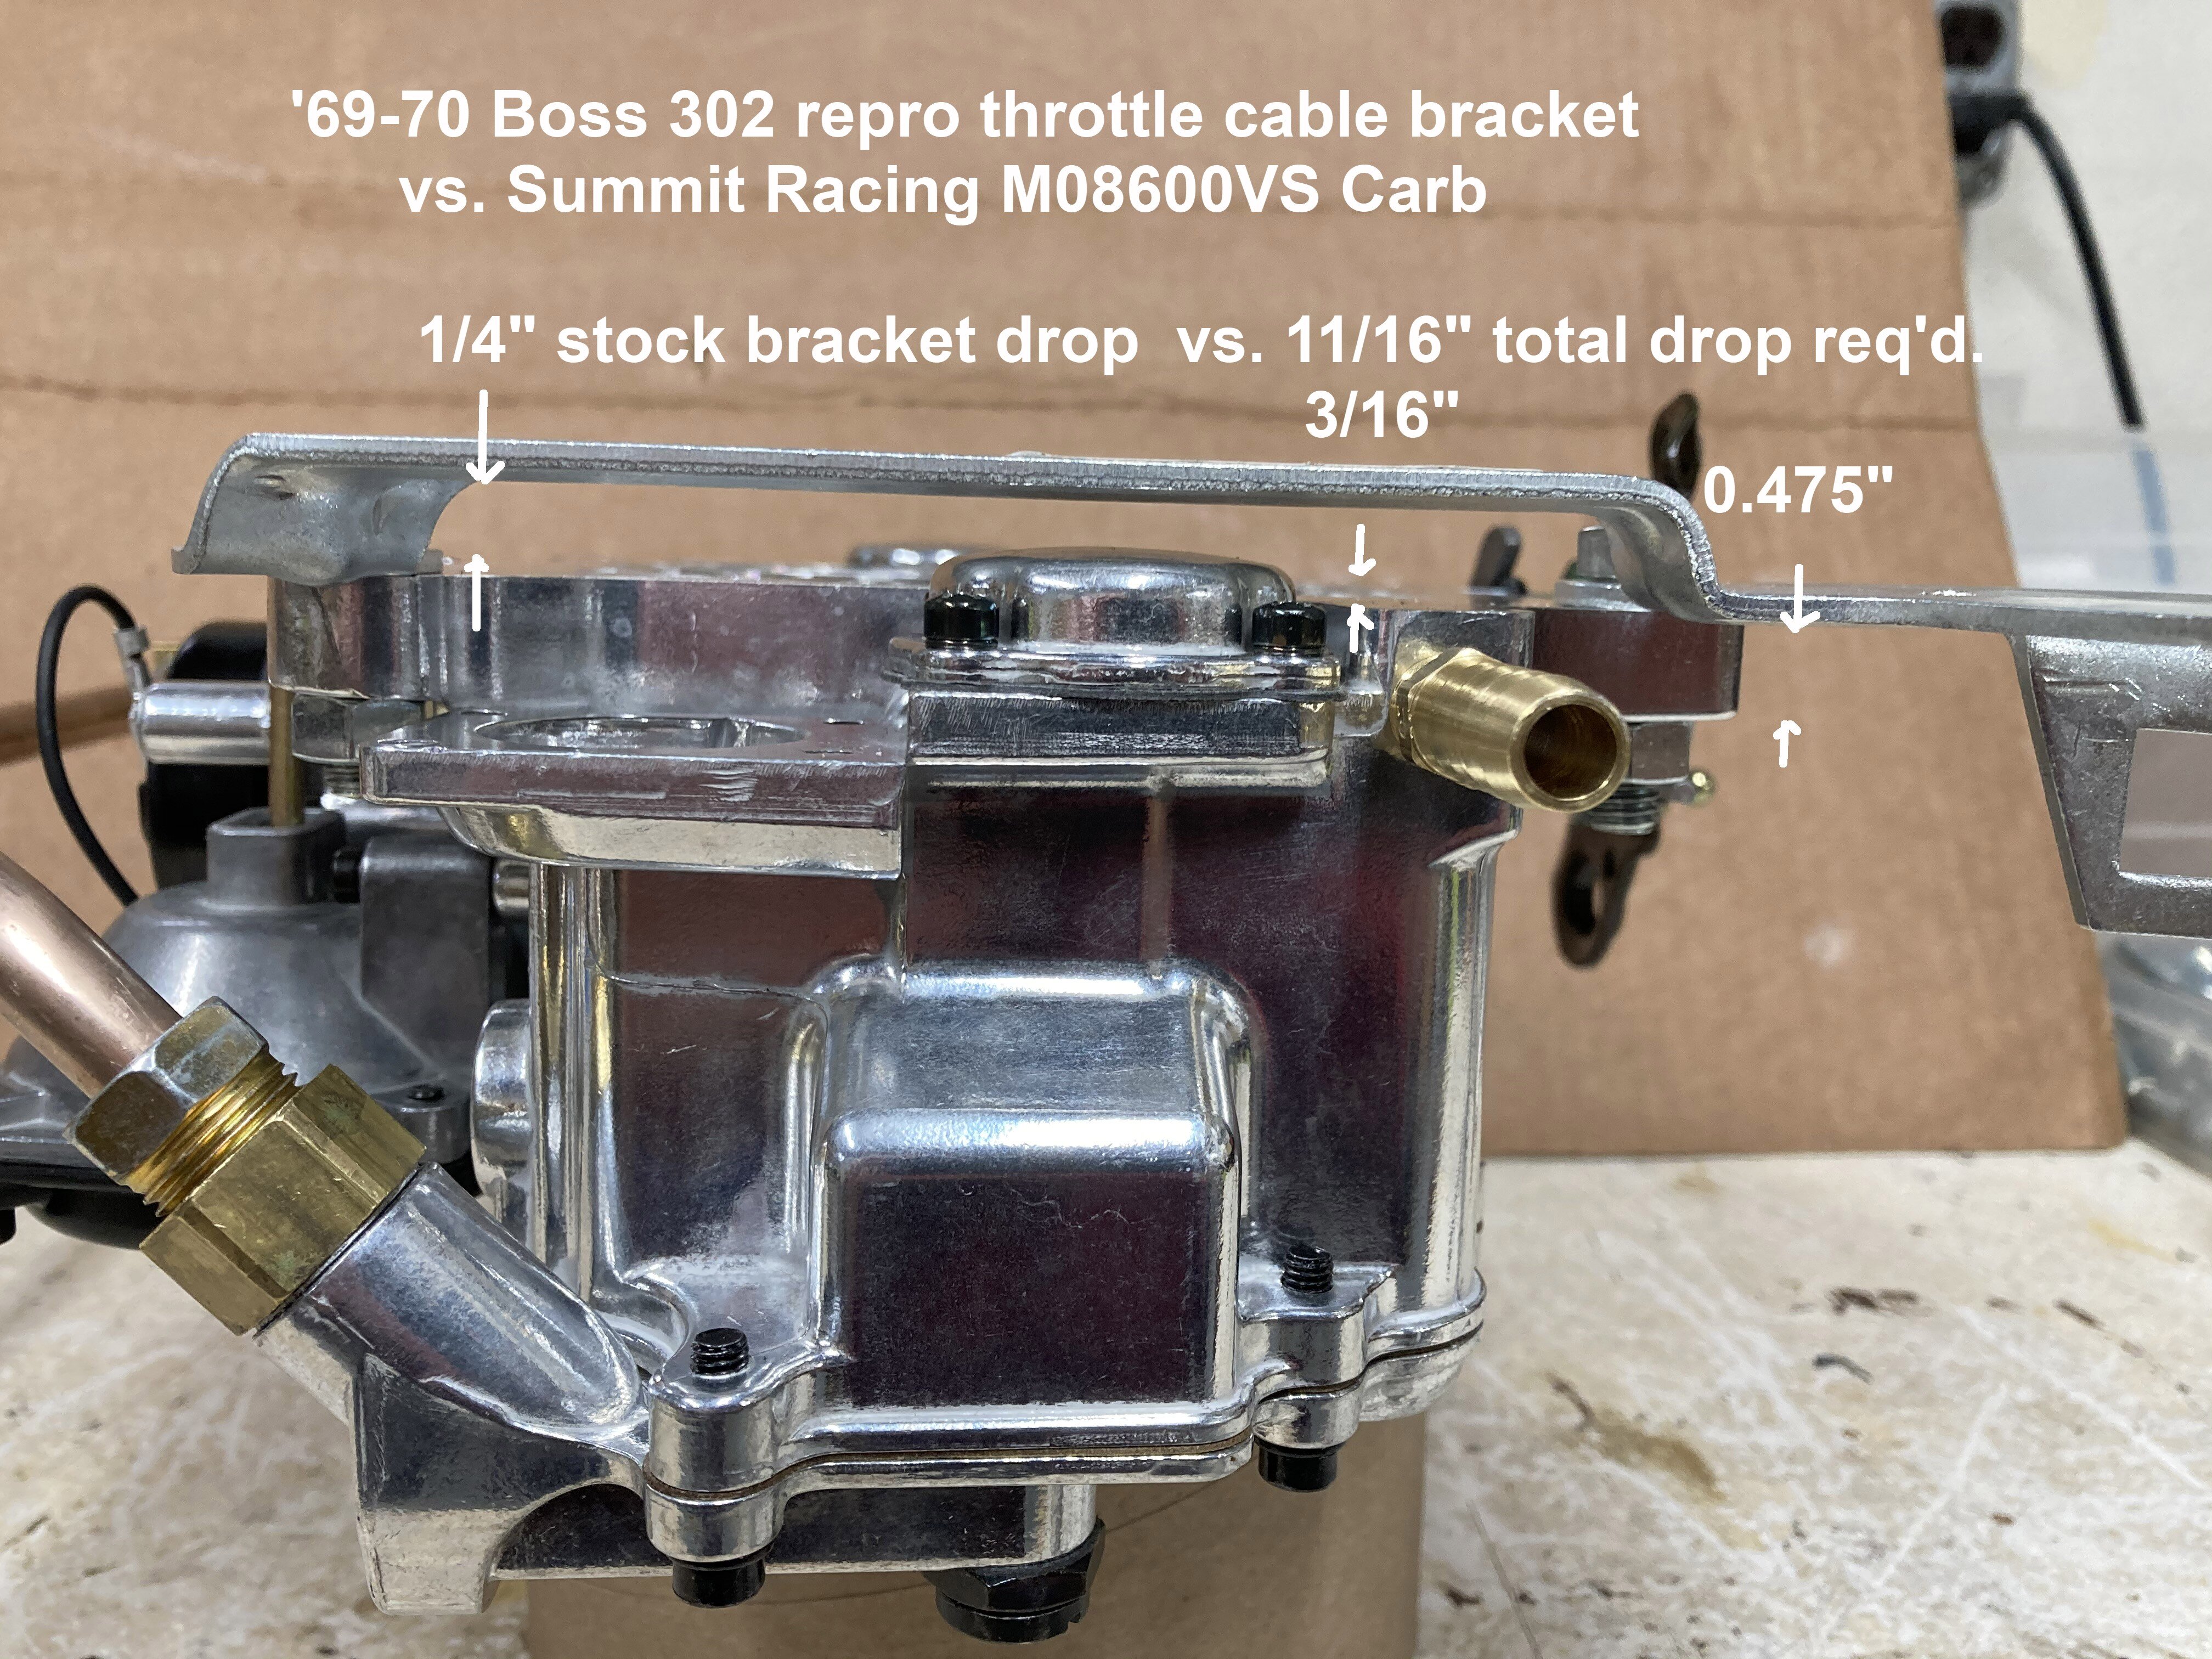
Well, the Boss 302 bracket only has 1/4" of drop to it and the Summit carb needs at least 11/16" so it needed to be modded to fit.
The 12/26/20 post in the original thread has pics of how I planned to mod the bracket: '69-70 O.E. 4BBL Carb Accelerator Cable Brackets ... - 1969-70 Technical Forum - 69stang.com and 1969stang.com The 1969 and 1970 Mustang Supersite
MODDING the BRACKET:
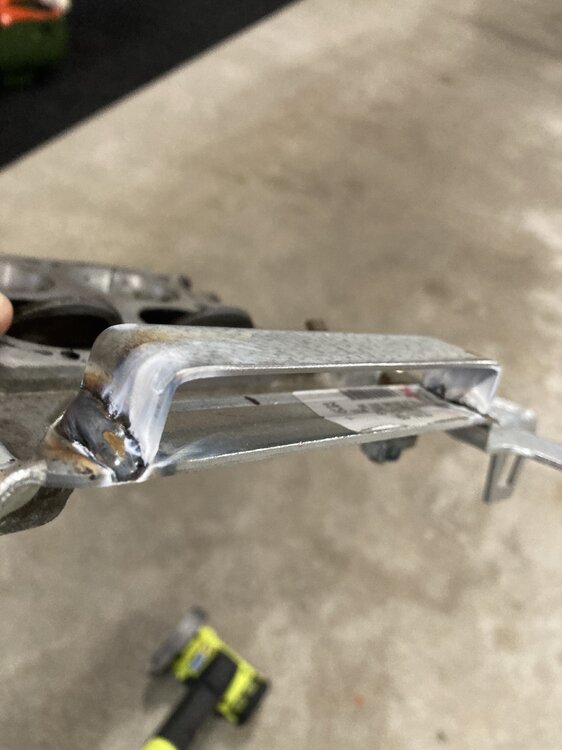
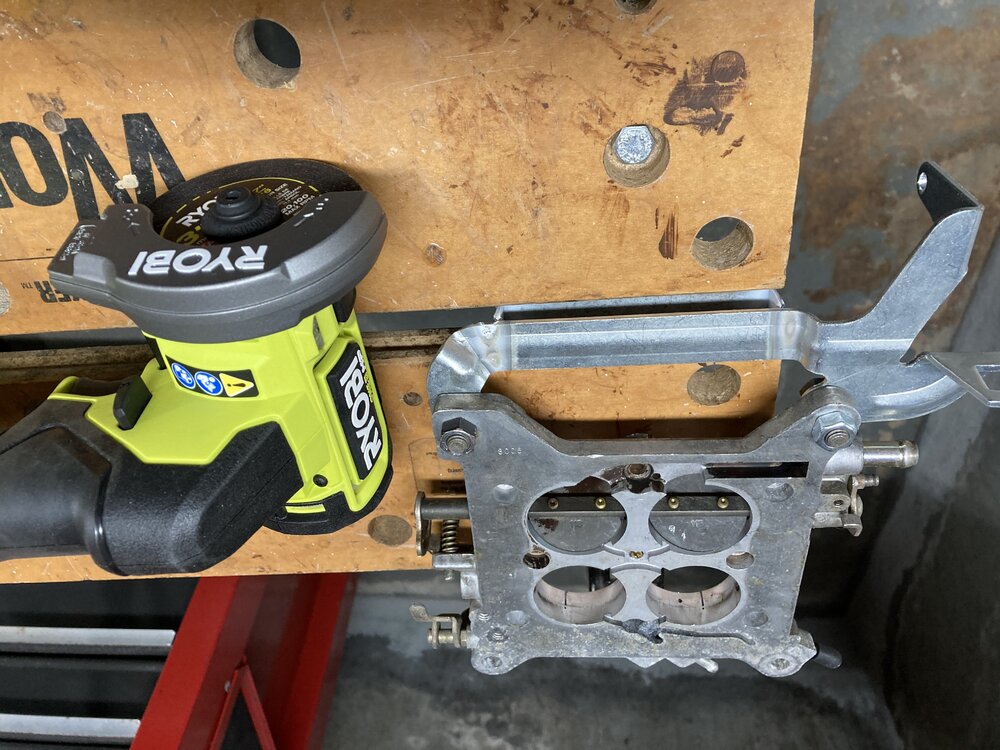
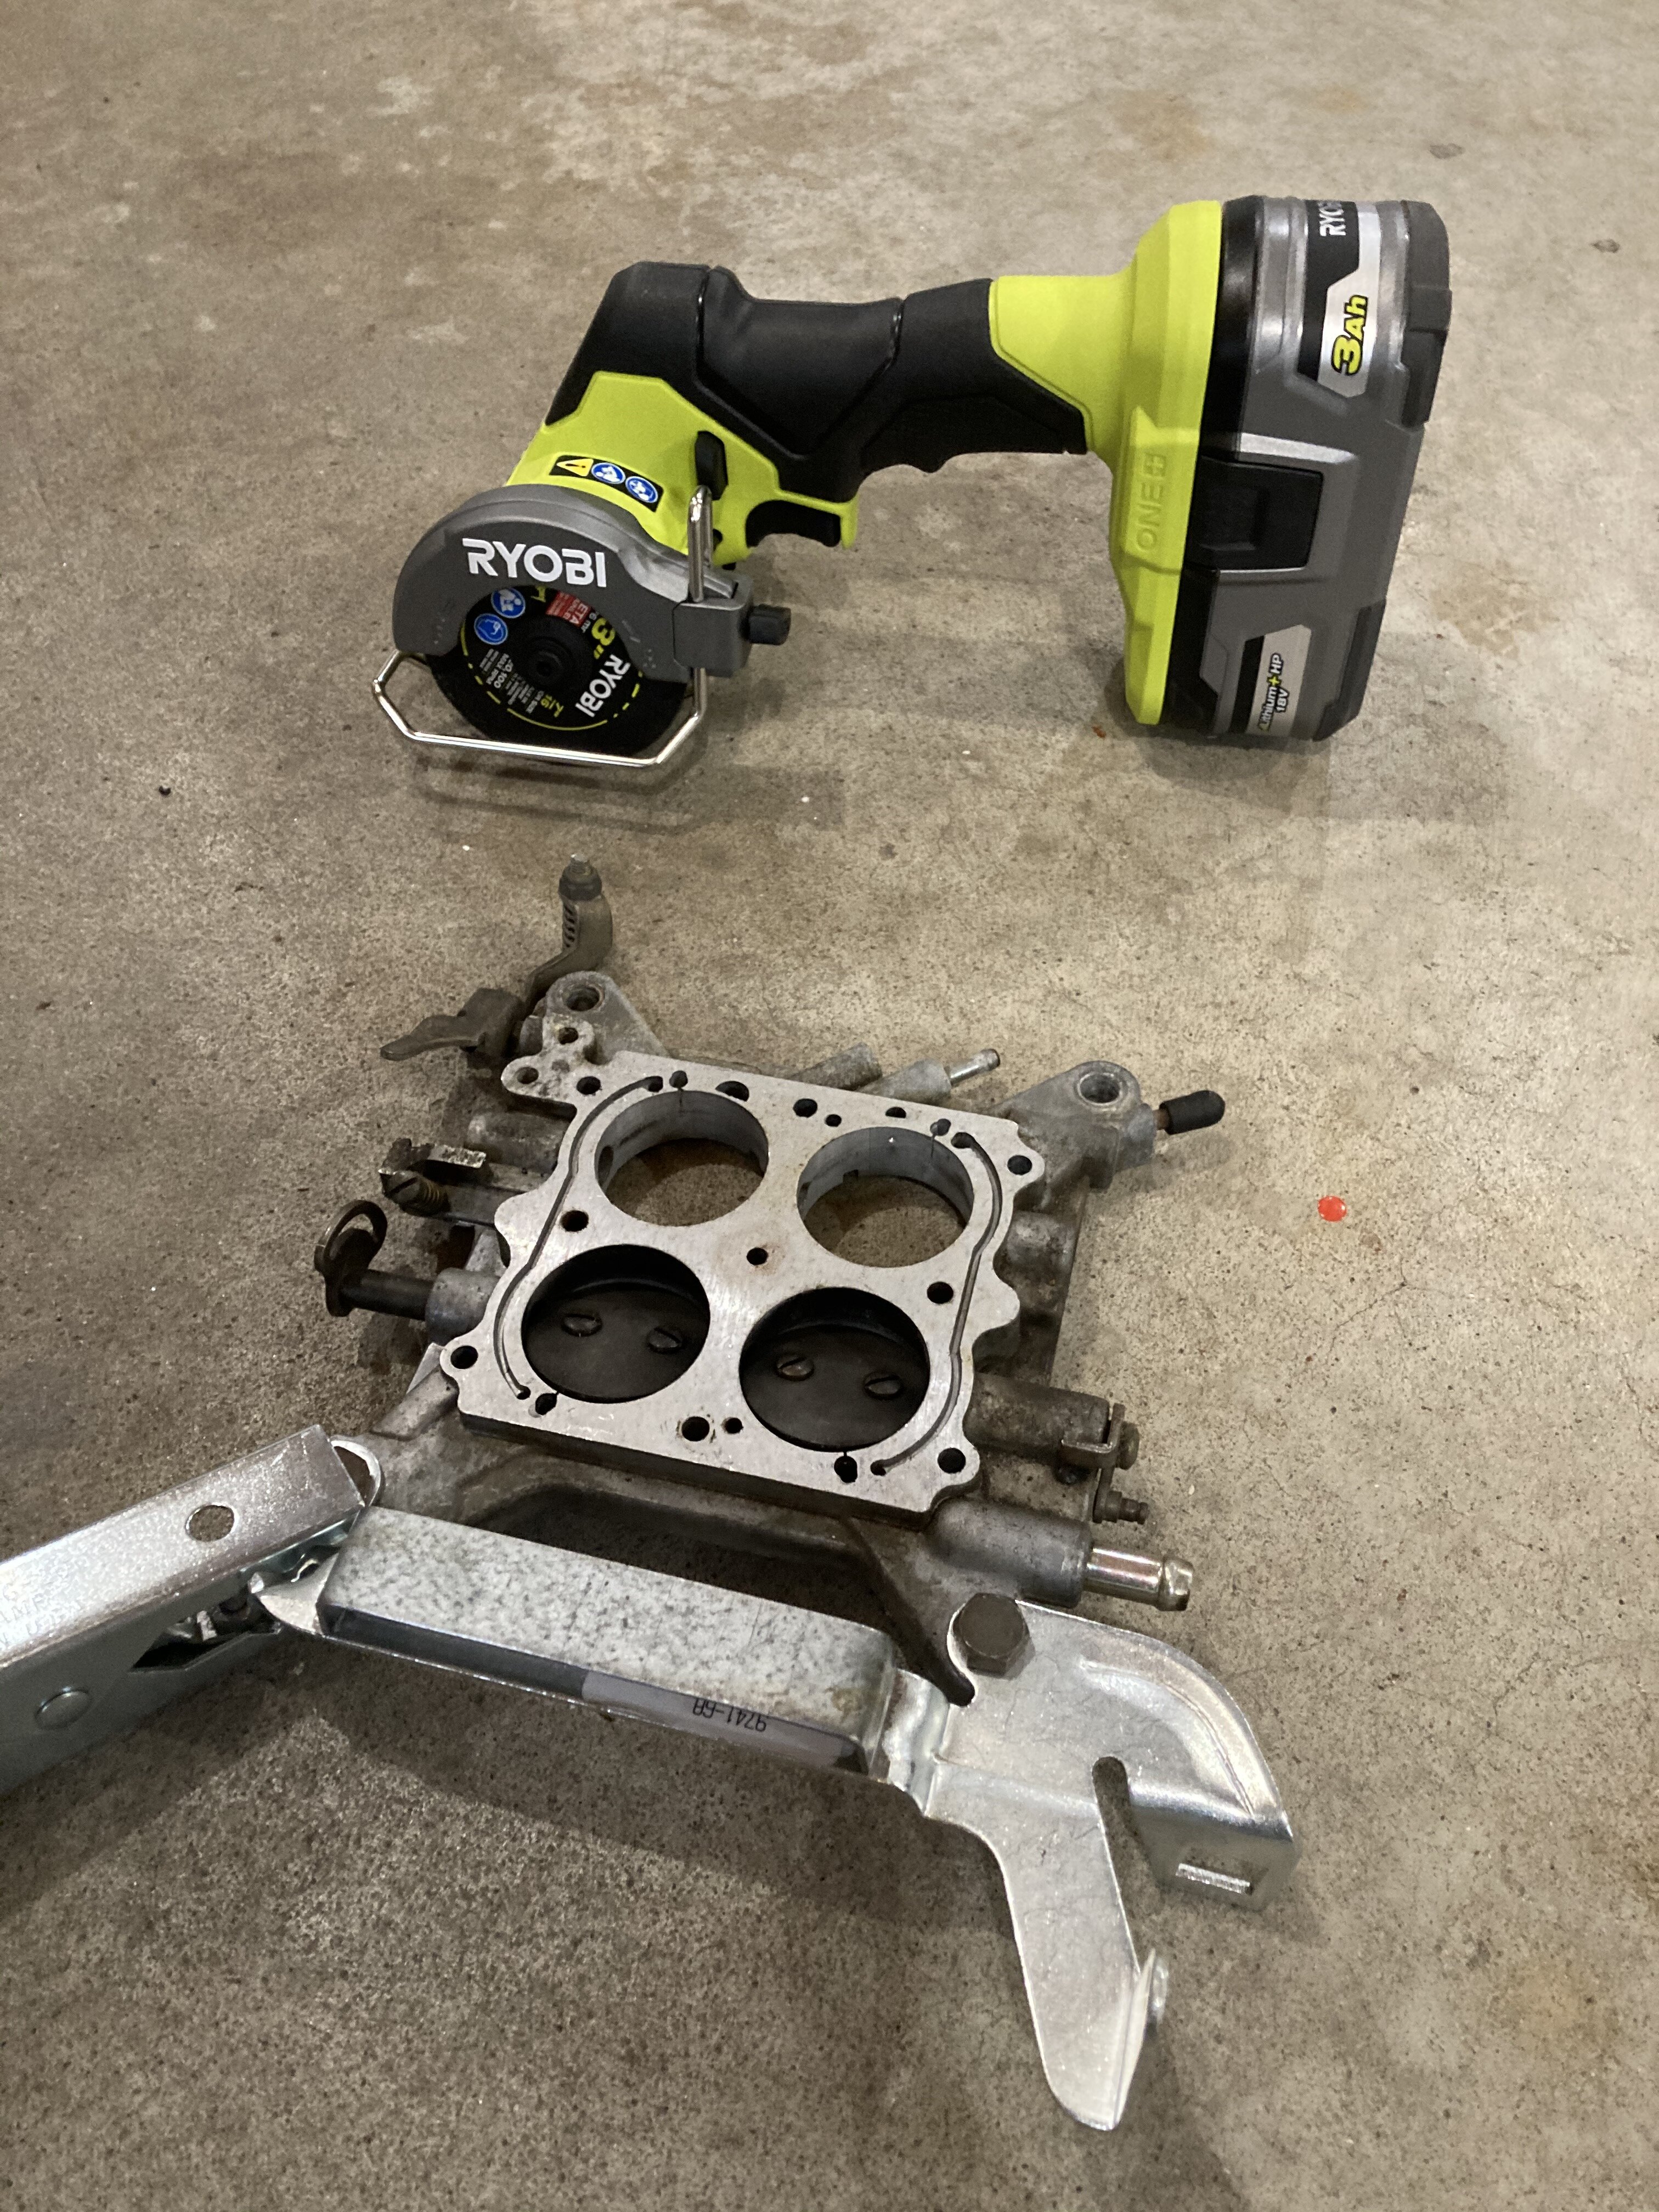
I cut a 0.83" wide strip of steel out of a RACO 2-Gang Electrical Switch Cover using a 6" Drill Master Cut-Off Saw I bought from Harbor Freight. Had to put the back stop at the further back position and remove the clamp assembly as the cover was maybe an 1/8" too wide and just held it down by hand. Had to flip over to finish the cut, as it only went about 80-90% thru. A larger abrasive chop saw would be able to do in one cut or could also use a band saw.
I used an old Holley carb base I had in my carb parts box as a "weld fixture", used a Ryobi 18V 3" cut-Off Saw to cut away the center section after welding the outside welds, then welded the inners after the piece was removed. A little grinding to clean up my welds then removed from fixture.
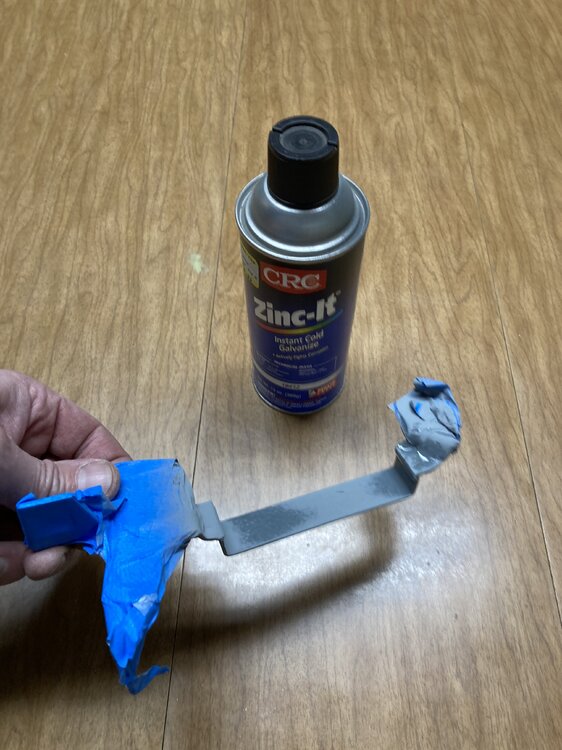
Cleaned it up with Lacquer Thinner then Wax & Grease Remover and then masked off the ends and painted the center section with cold galvanize paint.
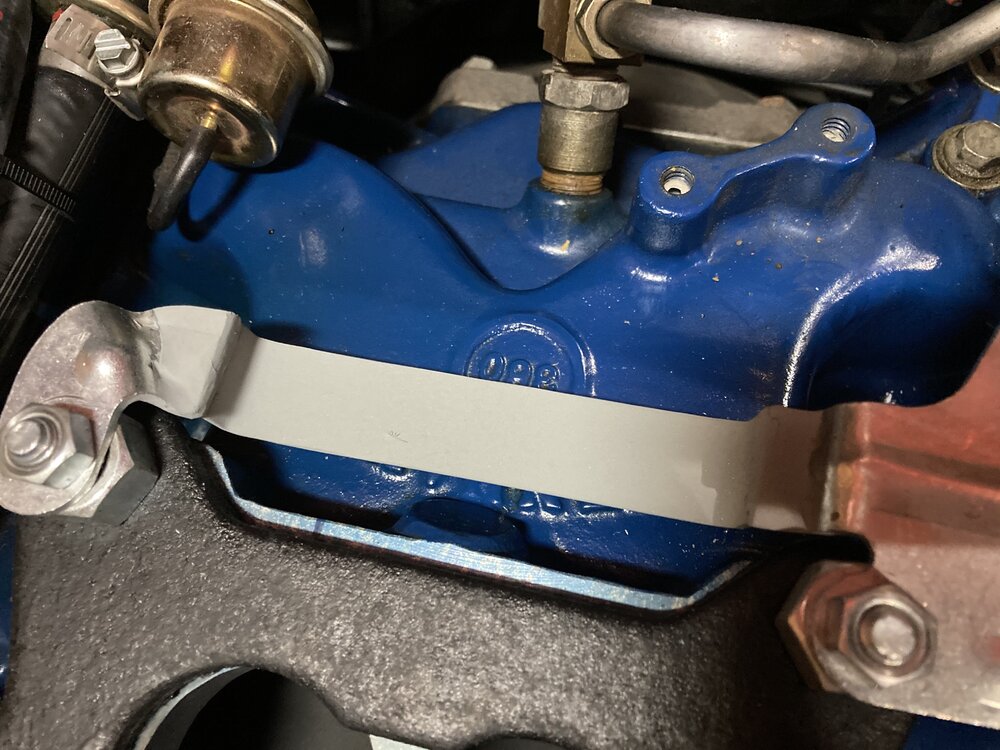
Mod is pretty much unseen as mounted in the last pic.
I'll post other steps for this carb installation as new posts.
Doug


-
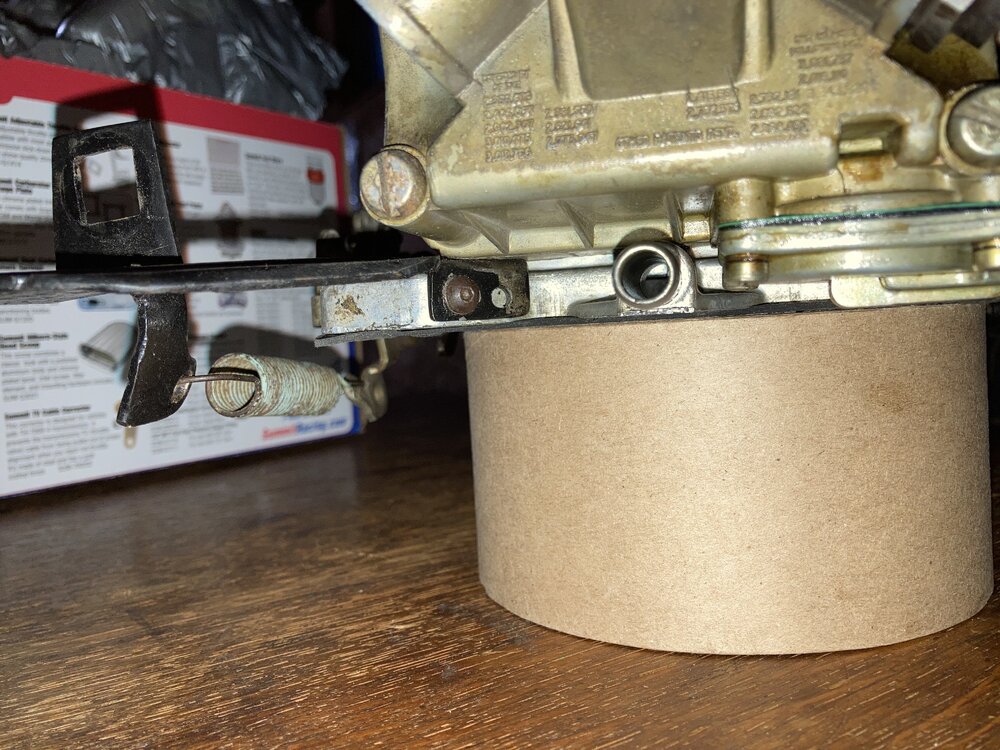
In the 1st pic, the area between the two black marks is where there is interference.
As you can see in the 2nd pic, the B302 bracket drop is only 1/4" and about 11/16" of drop is needed to clear the bottom of the Summit carb.
The drop section of the bracket is 0.83" wide and made out of 0.10" thick steel. I found an old galvanized switch plate that is 0.068" thick and will add about 1/2" of drop ... also verified that this added drop will not hit the intake, lots of room there.
I'll cut a 0.83" wide section out of this switch plate and weld to the bottom of the B302 bracket using an old carb base as a fixture. After welding, I'll cut the center section out of the B302 bracket and add more weld to the top / cut ends. Then touch up the bare steel edges of the drop extension & welds with cold galvanize paint. As this is under the back of the carb, the mod will be out of view and it will still look like a stock / un-modded Ford bracket when installed.
Doug

 Mach1 Driver reacted to this
 -
10 hours ago, jmlay said:May wish to look into this bracket: https://www.npdlink.com/product/bracket-throttle-cable/210693/203258?year=1969
I saw that one, but it is for aftermarket dual accelerator cables so it does not have the square cut-out for a stock cable.
Maybe the round hole could be opened up to a square hole, but is the cable mount even in the right spot in relationship to the carb studs for a stock cable ??
Doug
-
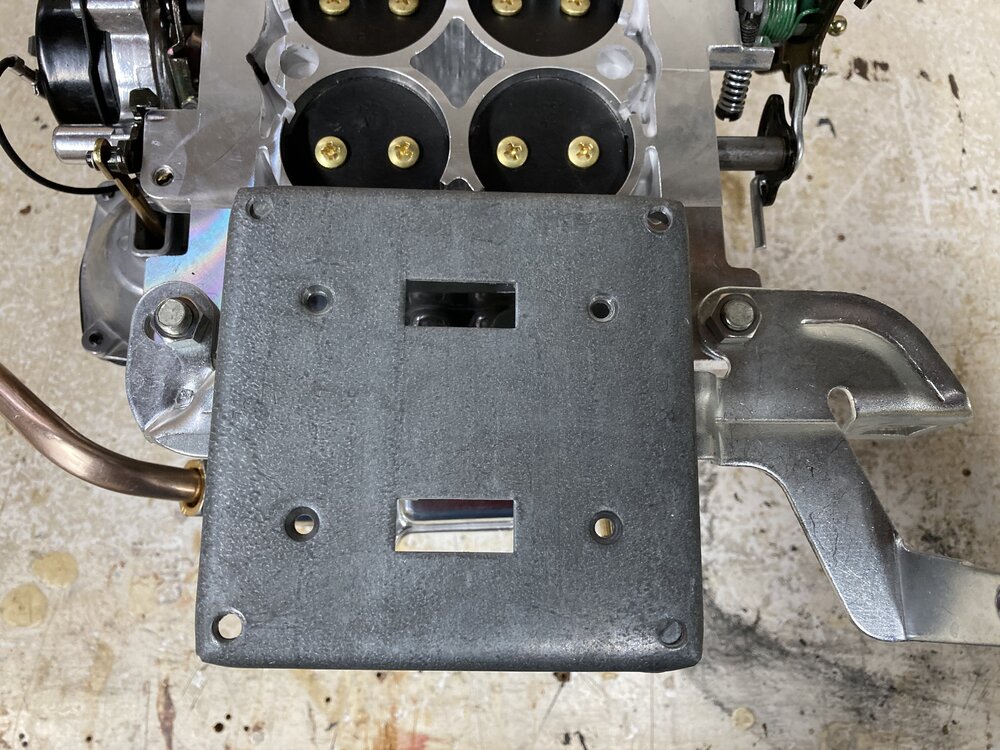
Got the B302 bracket yesterday from NPD ... the center drop is only 1/4" down from the top of the carb feet.
The feet on this Summit Carb are 0.475" thick and being a 1 pc. carb body (rather than a separate base like a Holley) the bracket needs to drop down this full amount.
Then as the guy in the other thread stated, there is a power valve cover that drops another 3/16" below the carb base. I removed this cover to see if it was truly unnecessary and there are two press fit plugs in two horizontal holes, but there is a vertical hole that is not plugged ... no idea where this holes goes or if it is a dead end. Could easily make a flat cover out of a piece of 1/8x1-5/8" sq. steel and it would be be flush with the bottom, but if I have to modify the accelerator bracket may as well leave the carb alone and make the bracket drop down to clear this cover.
I'll post some pics later.
Doug
-
Welcome to the forum.
Wow, that is coming along real nice ... love the Grabber Green.
Doug
-
And to think I bought my Tach Dash at the 1987 IOLA Swap Meet in very nice original shape WITH a good and complete dash harness for $85.00.
Went back and bought a second one from the same vendor for my brother a year or two later ... don't remember what I paid for that one but doubt it was a whole lot more than paid for the 1st one !!
Sometimes makes me wonder if my car is worth more in parts or whole.
Doug
-
Here is the one with the dip in it to clear the PCV hose ... NPD states it is for 1969 mustang & Cougar 390 & 1970 Torino 429 ... $93.33, more than double the other two.
-
As far as the bracket working with the Summit carb I found this in a thread on VMF:
"I had to remove the power valve cover on the secondary side because it interfered with the throttle bracket (I'm not sure why there's a power valve cover because the 600 doesn't have a power valve on the secondary side). I also had to bend the throttle bracket a little."
Here is the thread:
(7) Summit 600 carb review | Vintage Mustang Forums (vintage-mustang.com)
There is a power valve cover on the secondary side, I'll have to pull it off to see if it is actually covering any holes up or just there for looks. Hopefully I'm correct in my thinking that the B302 bracket drops down further than the std 4BBL bracket, maybe I will not need to tweak it as this guy did.
So good news that it may only need minor tweaking.
Doug
-
Thanks for all the replies.
I ordered up the NPD 9741-6A (Boss 302 version) and I should have it tomorrow.
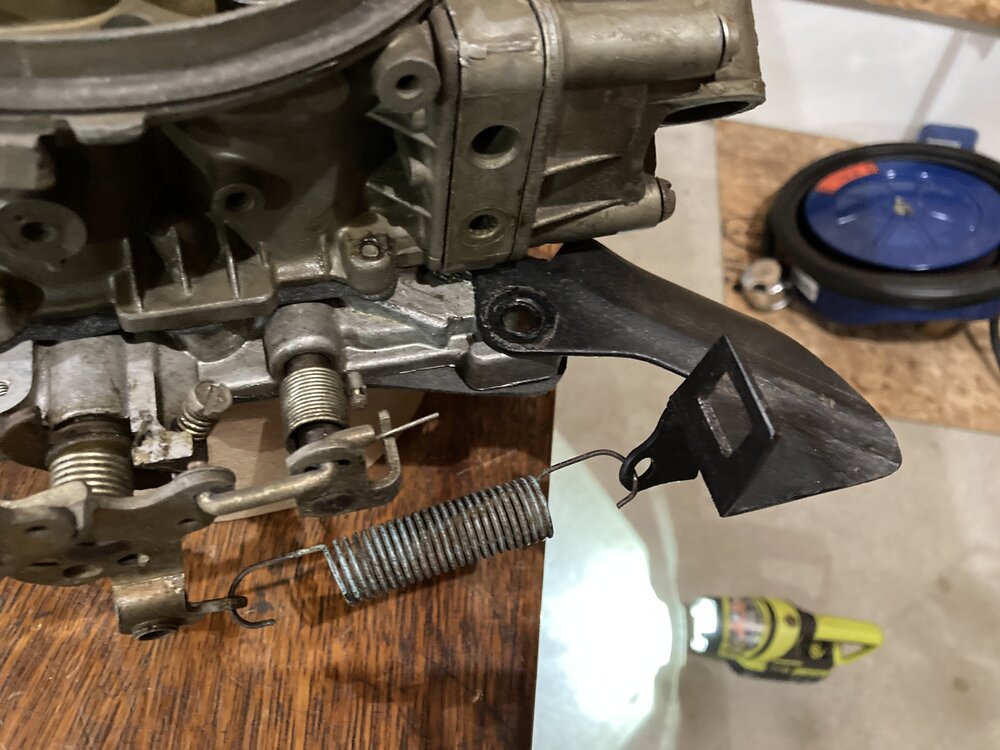
Here is my custom bracket I made for the Holley Double Pumper from a 2BBL bracket.
As you can see in the 2nd pic, I bent a tab and added a screw to hold it to the base.
Also from 2nd pic and the 3rd pic you can that the secondary accelerator pump & arm are in the way of using the factory 4 BBL bracket.
I'm also trying to duplicate my custom fuel line assembly I did on the Holley (pic 3) for the Summit carb as the chrome tube assy. supplied with the Summit carb is against the heater hose going to the top of the intake. First attempt is no where as clean looking as I did on the Holley, main issue is the Summit uses 3/8" tubing and the Holley used 5/16" which is much easier to work with.
Doug
-
There are two variations listed on NPD & CJPP
69-70 302,351 & 390 with 4BBL (NPD 9741-5A / CJPP TCB1)
and
69-70 Boss 302 (NPD 9741-6A / CJPP TCB2)
They sell for the same price and from the pics, they look almost identical or at least interchangeable.
Anyway, I just bought a new Summit M08600VS 600CFM with Vac Sec & Elec Choke to replace my Holley 600 CFM Double Pumper I've had on the car for over 30 years and it looks like one of the above brackets might work, or I could cut apart one and modify to make work.
I had a repo of the non-Boss 4BBL bracket years ago on the Autolite 4300, but this would not fit the Double Pumper so after the Holley swap it ended up on another car that I later sold.
For the Double Pumper I made a custom cable bracket using an OE 2BBL bracket as a starting point (would rather not modify that to fit this new carb).
Anyone know the difference between these 2 brackets ??
My guess is maybe the drop-down section goes lower on the B302 version to clear a bigger secondary fuel bowl but from the pics this looks pretty much the same.
Thanks,
Doug

-
I've been running DOT 5 Silicone in my '69 since the late 80's with no issues. Flushed it with new fluid in 2011.
Doug
-
I've been following this thread and just realized I never posted any comments.
Really turned out nice, glad you decided to restore it instead of parting it out.
Notice you put a 390 in it, was it a factory big block car too ?? If so, that would make that Grande' even rarer !!
Doug
-
Nice work and looks great, love the color.
The 17" Legendary GT9 wheels were an excellent choice and look great on it as well ... I've got the 15" versions on my '69 and absolutely love the look and quality of them as does everyone that sees them.
Comparing them to the stock 14" GT argent slotted wheels I had on the car for the past 30+ years many did a double take the 1st time they saw the car with them as it was a huge change to the o/a look !!
Doug
-
My 351W has a Wide Ratio Top Loader, 3:50 Gears, and 225/60-15 (25.63" Dia.) tires.
2840 RPM @ 60 MPH or 3551 RPM @ 75 MPH in 4th.
OK on 55 MPH back roads but screaming on the 70 MPH Interstate !!
Doug
-
I've recently been informed of a gas cap clocking issue with the '65-66 Scott Drake Zinc Plated neck. The issue being the gas cap will not turn far enough for the artwork to be level.
Interestingly, I was also informed that the Painted version of this neck (made by a different mfr.) available from various suppliers does not have this issue. I had originally bought 1 of these painted necks from Summit as it was a cheaper than the Zinc Plated one. Not liking the looks of the blistered paint around the stake marks (even after touching up), I felt the added cost of the Zinc Plated one was worth it so it was "1 & done" for the painted version.
After discovering the issue, I started stocking the painted version again and even found a supplier selling the Goodmark version for less than Summit. Well this vendor must have had them on "clearance", as they no longer list it.
Having 4 of the Scott Drake Zinc Plated ones in my inventory, I figured I needed to do something so I bought a Scott Drake 1965 Mustang gas cap to confirm that there was no clocking issue if the proper gas cap was used ... WRONG ... even the Scott Drake cap on the Scott Drake neck has the problem !!
So, I put a cut-off wheel on my Dremel and cut back the stops and eliminated the CLOCKING ISSUE. Took maybe 10 minutes.
All my '65-66 Scott Drake necks are now fixed and this mod will be done to all of them from here on out.
See attached pdf for instructions and pictures.
Doug
-
On 7/23/2020 at 5:54 PM, TexasEd said:I ordered an insert but have not installed it yet. Having too much fun driving to take it apart and work on it and my paint it already burned by the gas. I am working on getting it repainted and may just buy a new neck assembly to keep the new paint protected.
Since you have a '69, the Zinc Plated version is the way to go. I did buy one of the painted '69 necks from Goodmark to check it out, but there is barely any cost savings over the zinc plated one from CJPP, so once that painted one sold I never ordered another.
I've got 3 of the '69 Zinc Plated one currently in stock.
Doug
-
On 7/23/2020 at 12:05 AM, Mountaineerfan said:Hey, everyone!
I had my convertible top frame crunched in an accident. Insurance is covering all repairs, but we are having trouble tracking down a replacement top frame. The usual sources have 68s, but no 69s. Anyone have a source?
thanks!
I've got a complete convertible power top assy. from a '69 Cougar that has been in dry storage since the mid 80's. It is located in Skokie, Illinois however I have no interest in trying to ship it.
I looked at your profile and see you are in Georgia so mine is NO CLOSER to you than any of the others mentioned.
Doug
-
4 hours ago, RPM said:Doug, with your info I located a gas station that has pump handles that work. Thanks brother.
That is great news Bob ... really hoped that it was only the "older short nozzle" style an installation at the original dimensions would have issues with.
A sigh of relief really, as this further solidifies that the few '65-66 Scott Drake necks I did at the original dimensions (about 1" further down the neck than the others) are the only ones that will not work with most if not all Stage II Vapor Recovery nozzles.
Thanks again,
Doug
-
On 7/21/2020 at 10:42 PM, RPM said:Hey Doug @stangs-R-me, do you know if you have any California customers that have completed the mod? I finished mine today, (3 years from purchase?) and can't get the nozzle to either stay hooked in the tube, or keep from clicking off due to back splash. The insert is plug welded in the correct spot as per the instructions. I'm thinking the California nozzle with the retractable seal is keeping it from being inserted deep enough. My BMW has the stock door 1/2" closer to the cap.
Thoughts?
I had to CHANGE my dimensions a while back after finding out Cali (and a few other states) still uses Stage II emissions and the nozzles require the insert to be further up the neck. The only ones customers have had issues with though was the '65-66 Scott Drake Zinc Plated version that had the insert located the furthest down the neck.
Attached is the updated dimension sheet (back side of the tool list doc), where I've moved all inserts as far up as possible while still leaving room to add a VENT above the insert in the '69 GT500 vent recall location.
Doug


1969 Mustang Summit M2008 Series Carburetor Install ...
in 1969-70 Technical Forum
Posted · Report reply
Something I failed to detail was the PCV connection. This carb has a recommended 3/8" barb connection in the right front corner for PCV, however this is not an ideal spot for a typical Ford with a rear PCV connection. If you have a carb spacer with the PCV port in it (typical O.E.M.), you are all set. If you need to tap into the carb like I did, there is a rear port option.
The supplied brass hose barb can be seen installed in the last two pictures in the first post.
Doug