

LoneWolf2U
-
Content Count
1,612 -
Joined
-
Last visited
-
Days Won
20
Everything posted by LoneWolf2U
-
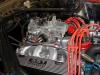
Shaker Emblem/ 351 0r cobrajet emblem
LoneWolf2U replied to h20front's topic in 1969-70 Technical Forum
Now to pull off the oil pan and see if that D2 block is 2 or 4 bolt main caps.:biggrin: Someone was smart enough to pull out the 351Wimpy and drop in a real engine. :shifty: -
Battery side of sol, if you put it on the starter side it will only get power while your cranking the engine over.
-
more possible that it has been changed for some reason in the past 40+ years. It could have been a 4 wheel drum brake and someone put on a 70 disc brake system.
-
Shaker Emblem/ 351 0r cobrajet emblem
LoneWolf2U replied to h20front's topic in 1969-70 Technical Forum
Those plates are just stick ons, not from factory. C engines have the upper rad hose coming from eng block front. W engines have upper rad hose coming from intake. Simplest way to tell. -
Nice looking but a little high in price. Lose the bling rims and I might talk to him more. :whistling: Just my 2cts
-
Yes and you can get someting simular to them at your local Lowes store from the hardware bins. at a fraction of the cost of a mustang supplier if your not going Concourse correct.
-
Seat Belt warning light stays on
LoneWolf2U replied to foothilltom's topic in 1969-70 Technical Forum
IIRC, the relay you are looking for is located behind the driverside kick panel area above the parking brake. -
3rd time putting on new intake gasket!
LoneWolf2U replied to StephenC's topic in 1969-70 Technical Forum
Valley gaskets are weak spots for internal pressures from crankshaft windage and ring blowby. Make sure that your pvc system is working and the opposite valve cover has a vented cap or breather. I use the Indianhead gasket sealer and the dowel rods for installations, with an old school prep for intakes. Using some 100 grit wet/dry paper and a wooden block sand the ends of the block and intake lightly to remove the smooth finish and clean with brake cleaner and air dry. Wipe the ends with sealer and allow it to tack dry, place the gaskets on and drop the intake down over the locator rods. replace rods with bolts and tork to spec's using a 4 stepping tork increase (hand snug, +10, +5, +5 ) across the bolt pattern. -
If you don't wish to use the alt wiring method, a simple key on spot to hook your choke wire to is the neutral/backup 4 wire plug near the firewall harness. It has power only when the key is in the on position.
-
1st pic is 70 model dist block. 2nd is 69 block. the nine line is for 69's And yes it could have a 70 block on a 69 vec, depends on manufature date and what was available on the line at time of build.
-
Glad to have helped out, now on to your next question. keep up the progress.
-
Glad to have helped out, now on to your next question. keep up the progress.
-
Lube the contact ring for the horn under the steering wheel hub. Your next complaint will be flickering lights when making a turn. Use a light coating of white grease on the copper ring.
-
Lube the contact ring for the horn under the steering wheel hub. Your next complaint will be flickering lights when making a turn. Use a light coating of white grease on the copper ring.
-
The post on VMF got deleted very fast. guess they did not like the comp. Most of all the old posters have drifted over there including me. I have moved from stangnet to VMF and now to Stangfix. While I still post occasionly at them it is mostly just reading.
-
The post on VMF got deleted very fast. guess they did not like the comp. Most of all the old posters have drifted over there including me. I have moved from stangnet to VMF and now to Stangfix. While I still post occasionly at them it is mostly just reading.
-
Brake stop light switch need a plan
LoneWolf2U replied to Print Dad's topic in 1969-70 Technical Forum
Sorry, replace petal shaft for pin in my discription. Assemble the unit with the spacer,bushing with master rod onto the petal shaft but have the shaft protuding out only to the edge of the petal arm. Slide the brake light switch in from the top, this will allow you to lower the U shaped opening over the petal shaft then push the shaft thru the opening of the switch install the nylon washer and hairpin. connect the wires. -
Brake stop light switch need a plan
LoneWolf2U replied to Print Dad's topic in 1969-70 Technical Forum
Does your swithc have the U shape on one side? Slide the pin in with spacer shim in place till the end is even with the outter side (pass side) of the petal arm. push the switch on the petal arm above the pin and slide it down onto the pin. push pin to stop and install retainer clip and wire connector. True space is limited. but 4 nuts will remove the seat making it much easier to do, than removing the dash cluster. -
c4 wireing for back up switch?
LoneWolf2U replied to 408-stroker-stang's topic in 1969-70 Technical Forum
IIRC the black with the red stripe is the backup wires. With the trans in park the pair of wires that have continuity is for the start side. -
c4 wireing for back up switch?
LoneWolf2U replied to 408-stroker-stang's topic in 1969-70 Technical Forum
IIRC the black with the red stripe is the backup wires. With the trans in park the pair of wires that have continuity is for the start side. -
c4 wireing for back up switch?
LoneWolf2U replied to 408-stroker-stang's topic in 1969-70 Technical Forum
Your trans switch with 4 wires is for start and backup lts. 2 wires control the starter and has contacts in P & N gear selector settings. 2 Wires have contact when selector is in rev. allowing backup lights to lite up. Not sure what the single wire does. -
Loss of power under load, First place I would look is the dist for it not advancing the most common trouble spot. next would be ported vac, is it plugged?