

LoneWolf2U
-
Content Count
1,612 -
Joined
-
Last visited
-
Days Won
20
Everything posted by LoneWolf2U
-
Having scraped a few driveways. With added thanks to the idiot that was talking on her cell while driving the minivan, I have a 1 inch crack in the pass corner from dodging her and clipping a curb. I think my replacement will be plastic.
-
Converting a Holley is simple, Ed's not sure. I run a Holley with electric choke, Once set it has worked perfectly.
-
Thrush was just an oversized tin tube. Real Ticket makers. I ran a pair of 30" glasspacks with 22 degree bends cut on a slant just in front of the rear tires. Simi quiet when just motoring around the block driving,(but not next to a wall) And a Howler when you put your foot in it!
-
Welcome.. as for parts in your neck of the woods cannot say for sure. By the engine should swap over without too much trouble as they are both small blocks. The problems may come when you start bolting on the front assessorys, Ie ps pump alt ect. the brackets are differant. plus the location of the water inlets to the pump and rad may need to be checked.
-
LoL... no conflict here but, I stopped using the wet method long ago. The wet settings were causing a flooding problem after engine runs and get upward in heat. The fuel started to perk in the carb even with the spacer in place and untill I started doing a dry float set it was a constant problem.
-
You don't have to remove anything from the engine to check for chain wear. With a helper to watch the rotor for movement, Rock the crank from below the car using a socket with a short extention and bar. You will not have to rotate the crank that much to see the slack in the chain. If the crank/dampner moves more than 1- 1 1/2 inch the chain/gears are worn.
-
-
Well with this info, timing maybe off due to chain/gear wear. This too will leads your complaint for poor performance. Simple check for chain/gear wear. Remove dist cap, Using long breakerbar with socket on front crank bolt rock the crank back and forth while watching the rotor in the dist. The amount of movement will show the slackness in the chain as the cam turns the dist, and the chain makes the cam move.
-
Max Clutch size for 164-tooth flywheel ?
LoneWolf2U replied to Burn's topic in 1969-70 Technical Forum
Mustangs unlimited, B7AT3263 01 pressure plate bolt kit 12ps 5/16x1 with lock washers. Using stock bell does not require offsetting dowels to be used. To check, with clutch tool in place mount bell and check that tool is centered in trans opening. -
Wet float adjustment, The 7/8 inch is the level of fuel in the bowl to make the float rise enough to push needle on to seat to stop fuel from coming in. (miss reading the info from the manual) As for the timing, Remove the bolt and hold down clamp from the dist. Raise dist enough to move the rotor 2 teeth clockwise and reinstall clamp and bolt. (you may need to tap the starter to get the oil pump shaft seated back in the dist base) This will allow you to move the dist while timing without hitting the rad hose. Reset your base timing at about 6-8* and test drive for responce and pinging.
-
Does that exhaust system end use the donut gasket at the manifold? Because stock systems did, and it would make your seal better.
-
Taking Apart front end this weekend.
LoneWolf2U replied to Daves69Coupe's topic in 1969-70 Technical Forum
Enough to get it back in......... LoL About 60 percent of the spring lenght. -
If your asking about removing the spindle from the rotor as in your pic, Remove the bearing dust cap and then the cottor pin and nut,washer and outer bearing. the spindle will drop out of the brake rotor. Make sure the new rotors have the inner bearing races installed before reassembly.
-
not the best pic installed
-
Max Clutch size for 164-tooth flywheel ?
LoneWolf2U replied to Burn's topic in 1969-70 Technical Forum
I am running an 11 inch on my 164 flywheel. -
Mysterious wire in engine compartment
LoneWolf2U replied to StephenC's topic in 1969-70 Technical Forum
Poss under hood light? If its green it would have gone to the Ac compressor for clutch. -
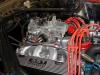
Here is mine in mock up stage for new ac pump and belt alignment before it went into my Mach.
-
Looks like they are for the E brake cables for attaching to the backing plate.
-
Taking Apart front end this weekend.
LoneWolf2U replied to Daves69Coupe's topic in 1969-70 Technical Forum
Use care removing/installing springs. Before removing lower control arm bolts mark the adjusting washers location. Note any shims and locations in the upper a frame bolts. Only remove the outer nut on the strut arms. this will make it drivable to get adjusted later. Hint if your not going concourse correct, Place a ballpeen hammer on the shock tower area where the upper a arm zerk fitting is and dimple it. This will make getting the grease gun tip on and off when servicing much easier. -
Remove the 2 - 9/16 headed frame bolts holding the pivot ball on the drivers side framerail. They are located to the rear of the Z bar on topside of the framerail. Done best by feel from underneath of the car. This will allow you to remove the Z bar after the linkage is disconnected.
-
Ok from your pic's it has been run before, So you NEED to get new lifters because they have to go back in the same hole location on the cams lobes. Roller lifters can be swapped out to any location because of cam grind. A flat tappet cam is not ground at a 90* angle. The lobes have a slight cut to them, This is what makes the lifter rotate in the bore while it rides the cam. Each lifter needs to be broke in the hole where it will reside for life. Swapping flat tappet lifters between bores is just a problem coming soon. When you install the new lifters, 1st soak them in oil overnite. 2nd put a THIN film of assy lube on the BOTTOM ONLY! Do not cover the sides in assy lube, straight oil only. Assy lubing the sides cause the lifters not to turn during break in period. Break in the new lifters by starting eng and run it up over 1800 - 2200 and vering rpms for 30 mins. I do cam/lifter break in using 10 min runs and check over engine and connections inbetween shutdowns.
-
Hurst rev light wired to stock firewall plug with off/on switch hooked into starter side of 4 prong plug for theft control.
-
The Motor Saga Continues. Need Recommendations.
LoneWolf2U replied to Big Secz's topic in 1969-70 Technical Forum
The wet comp test shows sticky rings, prob some carbon build up in the landings and the wd loosened it some. I watched your vid's and it sounds like a rocker for my guess. Your going to have to remove the valve covers and reinspect the rockers for wear on the ball and socket areas. And stud shafts for nicks. It sounds like you have a rocker hitting the stud. This Will be messy unless you have oil deflectors or open topped valve covers. So be ready to clean up afterwards. But with the covers off you can see the stud moving when the engine is running. Clean way takes a close eye to see it. Pull all the plugs and spin the engine with the starter while looking, But usually doing a visual inspection while its running sound and sight find the problem easier. Once you have the noise cured, you can deal with the running rich carb problem. -
And Welcome to the Forums....