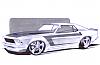
dchandler60 10 Report post Posted March 17, 2008 Here is a problem I am having that I hope with all the creative minds out there we can solve. I am uploading a image of the rear tailight " cutout " of my 69 FB, I am going with flush fitting Taillights and have already molded the plastic to fit flush against this opening. The problem is of course you do not want plastic against metal. If you can see the image, our 69 opening " folds in " and I am trying to find a solution to pad and seal these 3 openings against my plastic lense. I have tried like a small piece of 1/16" heat shrink tubing and slit it to slip on and outline the opening but that is not the right material for it. I hope you can find a idea that I can try. I am thinking of like some very small round rubber with a slit in it, that is flexible enough to run around the edges. Hope this make sense any questions just ask. Thanks alot for your help. David Quote Share this post Link to post Share on other sites
Mace 10 Report post Posted March 17, 2008 Can you show us a picture of your lenses? Quote Share this post Link to post Share on other sites
Pakrat 1,043 Report post Posted March 17, 2008 I think I have a good grasp of what you want to do but I'm not sure why you want to do it. What is the issue with plastic touching metal? If the new custom tailight was to fit flush how can there be any room for anything between the edge and the lens? I think something along the lines of the below would be your best bet. Slitting a tube down the middle is not easy to do straight for a long piece and even with the below you will always have a seam somewhere going around in a circle. I think no matter what you come up with though that it is not going to look very pretty. http://www.jcwhitney.com/autoparts/Product/Pr-p_Product.CATENTRY_ID:2012236/c-10101/Nty-1/p-2012236/Ntx-mode+matchallpartial/N-10101/tf-Browse/s-10101/Ntk-AllTextSearchGroup?Ntt=chrome+edge http://www.jcwhitney.com/autoparts/Product/Pr-p_Product.CATENTRY_ID:2008663/c-10101/Nty-1/p-2008663/Ntx-mode+matchallpartial/N-10101/tf-Browse/s-10101/Ntk-AllTextSearchGroup?Ntt=edge+trim The only other thing I can think of is rubber paint, like the stuff they use to apply a rubber handle to say a pair of pliers or a screwdriver. You could mask all around and paint it on so there would be no seam and you could make it as thick as you want with more coats. I just don't know if it peels off easy or not in this type of application: http://www.plasti-coat.com/dipcoat.htm This is just one of many brands found at any hardware store, i think I used Plasti-dip for alot of my tools and they hold up very well to use. Quote Share this post Link to post Share on other sites
Pakrat 1,043 Report post Posted March 17, 2008 One other thought, is your new lens one piece like the original? If so why can't you apply a regular foam weatherstrip to the flat surface of the lens instead of the edge of the panel and have it seal that way? It would help more to see the lens also or at leats a concept sketch of how the two come together. Quote Share this post Link to post Share on other sites
dchandler60 10 Report post Posted March 17, 2008 Should have done this in the first place, this is just stuck up to the opening and not mounted yet, see if no "gasket" then would rub with vibrations #2 I need for a seal to keep water out. When it is mounted there really is no gap like you see in photo. Hope this explains better. Pak that first image you sent might work if I can get it small enough. Quote Share this post Link to post Share on other sites
SELLERSRODSHOP 13 Report post Posted March 18, 2008 as far as sealing up against water, you need some of the old style windshield butyl "rope". it comes in three diameters, 1/4", 5/16" & 3/8". you can put pieces around the holes on the inside lip of the tailight panel, then when the lenses are tightened, it will seal up. Quote Share this post Link to post Share on other sites
d.reese 13 Report post Posted March 18, 2008 Is this going to be for the street? Where or what are you planning to use for DOT reflector? I do like it, think its cool, retro-mod type look and it would sell with a little work! Quote Share this post Link to post Share on other sites
dchandler60 10 Report post Posted March 18, 2008 Yes for the street, The original lense is cut and this this red, then clear diamond (this gives a true brake light effect) is fused to original and then mounted just like original. Sellers do you think the 1/4" will "tighten" down and not be seen? Thanks for the help Quote Share this post Link to post Share on other sites
MAD IN NC 21 Report post Posted March 18, 2008 Looks great - me like! For the sealant go spend a couple of hours in the weatherstripping section at Home Depot or Lowes... Hundred of options to choose and the options increase the further North you live some are as small as 1/4 x 1/4 inch blk foam which would compress. White is also available Quote Share this post Link to post Share on other sites
dchandler60 10 Report post Posted March 18, 2008 Yea, I have looked both places along with a couple hardware stores, just nothing small enough. This has to look show quality. Thanks Quote Share this post Link to post Share on other sites
bnickel 10,004 Report post Posted March 18, 2008 might try some small vacuum line and just glue it to the backside, don't cut it just leave it round, this will also help it seal against the taillight panel as well. Quote Share this post Link to post Share on other sites
Mace 10 Report post Posted March 18, 2008 If you're going the small tube route, small airline tubing for aquariums may work. It's soft, pliable and clear. Quote Share this post Link to post Share on other sites
Pakrat 1,043 Report post Posted March 18, 2008 I still think you are going about this the wrong way. Even if you find the perfect item to make a gasket it will have to have a seam somewhere in order to run it around the perimeter of the egde, that won't look show quality and it won't be 100% water tight. I think your best bet is to get a roll of firm regular foam rubber weatherstrip, say something that is 1/2-5/8" wide and about 1/4-3/8" thick and run it all around the back side of the tail panel like this, stop tightening and compressing it when the lens is within 1/16" of touching the edges. This is how they would have done it at the factory except it would have been a molded part. I actually fooled around with a simillar look to this a few years ago but I took a trashed and melted lens, cut of the three tips that use to stick through the holes real close to the base (about the same as the thickness of the tail panel edge) and then made new faces out of a drop ceiling light panel that I sprayed with tail lens red. This way the lens was flush with the outside of the tail panel instead of the inside and it mounted with all the same factory gaskets. Come to think of it, I bet you could even use the factory gasket as well and just shave it down to the right thickness. Actually now that I think about it further, what type of gasket does a 67/68 lens use? Don't they have a simillar finished look? Quote Share this post Link to post Share on other sites
captmike 10 Report post Posted March 18, 2008 Here's what I would consider: Use some of the spray can expanding foam that they sell at hardware and home centers. You would have to get a little creative with masking the area off to keep the stuff under control a little when you spray it on. Spray it on the backside of the panel to fill the area and let it set up. It can be pretty messy at this point ... it doesn't matter, just get enough on the back of the panel to fill the area around the raised metal edge. After it sets up, you can use a razor blade or corse body file to rough shape it down to just higher than the lip. Use sandpaper to finish it down smooth and flush with the backside of the lip. At this point you can paint it black or the same color as the car, or just leave it as is if you want. It doesn't matter as it won't be visible when finished. Now get a sheet of rubber gasket material and hold it up to the backside of the opening. You can use your tail light lens or about anything that will support it flat against the backside so you can trace the the openings onto it from the outside. All that would remain would be to carefully cut out your gasket and use it to mount your new lens. Mike. Quote Share this post Link to post Share on other sites
coz 108 Report post Posted March 18, 2008 Expanding foam is effected by heat and sunlight and will not hold up. Great for filling a gap in a joist but spray some out in the open where sunlight and water will get to it and it will not hold up. I used some to fill in some mortar holes in brick. Lasted 1 year in the rain and sun. My suggestion is a rubber gasket. Buy some thin rubber sheeting that will hold up to the weather and cleaning products and trace out the openings. Lay it in place and tack it with a touch of rubber glue or other non-destructive adhesive, place your lens in and tighten. Quote Share this post Link to post Share on other sites
bnickel 10,004 Report post Posted March 19, 2008 i would make a roughed in mold of the part you want then get some mold making RTV that can be dyed different colors to make a gasket similar to the original one that will work and cover the areas you want to cover. check this place out for the stuff you need to make it http://smooth-on.com/ edit: you could start with a block of florist foam that you can get any hobby store to make the initial mold, then just pour the RTV, let it set up and you'll have a gasket for whatever you want. IMO, this would be the best route to go, though also probably one of the most labor intensive ways to get there, but still not too bad labor wise. Quote Share this post Link to post Share on other sites