

prayers1
-
Content Count
2,112 -
Joined
-
Last visited
-
Days Won
8
Everything posted by prayers1
-
Why does my clutch pedal stick to the floor?
prayers1 replied to prayers1's topic in 1969-70 Technical Forum
OK. I have no experinece in this situation, but I'll take your word on it. I was puzzled why it didn't happen when I first took the car out. The only other thing I can think of, is that when I just replaced the rear, I took the rear brake line off the proportional valve to blow it out, I took the clutch pedal rod off the Z-bar and the Fork adjuster rod fell off. I had to unscrew the adjustment rod from it's already set position to get it back on the clutch fork and then readjust again. Maybe this time my clutch setting has caused something to allow the clutch pedal to stick. Just a thought, I really don't know. I thought that this thread might lead to an easy fix. Thanks to all for your input! -
I already know that I'll need to replace the Brake/Clutch pedal support and will do so with a roller bearing after the car comes back from the bodyshop sometime next year. I have a 4 spd Toploader, all new 11" clutch set up as well as all new Z-Bar linkage. On the 1st run, the only problem with the clutch pedal was that it sprung up too fast (the assist spring caused that). Yesterday, I took the car out for it's 2nd run and drove for about a 1/2 hour. Everything ran well except the clutch pedal started to stick to the floor. At times I had to put my toe behind it to pull it up. If it matters, the clutch starts to engauge about 3-4" from the floor. Is that OK or should the grab be a little closer to the floor? As I'm getting use to this clutch set up, I find myself putting the pedal down to the floor on each shift. I have learned now to feel when the clutch engauges instead of pushing it all the way to the floor. However, especially coming at a full stop or on a hill I still find that I push it all the way to the floor. What might be causing the pedal to stick?
-
Here's one for sale on eBay #120827683171
-
Those are twin tube. I'll try to shot for mono tube something like the Edelbrock IAS. Yes, I will wait for other opinions. ????????????
-
What do you think about these selling on eBay (4) $82.46, 120653716545
-
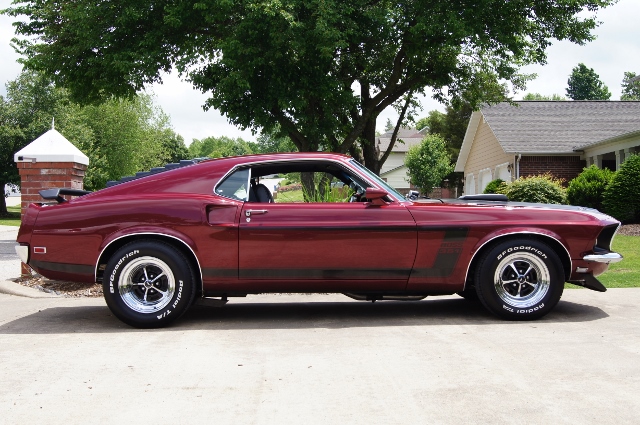
FYI- 69 Fastback, 289, 4 speed, stock suspension. Looking for a nice smooth ride from shocks, something that won't cost an arm and a leg. I know bushings have a lot to play on suspension, so now I'm just thinking shocks. NO Air Shocks!
-
Mike65- I agree, the down pipes are installed not as permanet, but to make it a little more quieter and moveability until the body work is complete. Since I have to replace 1 frame rail and a 1/4, the rear will be coming back out. So, no sense for full exhaust until later. I use to live I Central NJ and frequent Seaside Heights years ago. How's the Garden State doing?
-
Rear Drum Brake Spring troubles-Help!
prayers1 replied to prayers1's topic in 1969-70 Technical Forum
Nice project! CJ5 or 7? The tub looks to be in good shape. I use to have a 87 & 91 Wrangler. I like them with a little lift and 33" tires. -
That's what everyones telling me. That'll be done after the bodywork. Well, I cut the tab off with a sawzall. That was a good ideal of cutting the corners and bending. Hope someone else can use this usefull information.
-
Rear Drum Brake Spring troubles-Help!
prayers1 replied to prayers1's topic in 1969-70 Technical Forum
Where you've been, glad to see you on line! Yes, I agree. I'd hate to take the backing plates off now since the rear is all bolted in and brake lines hooked up. Saftey comes 1st over Horsepower in my book and I just want to make sure I can use this set up w/o the Guide Plates. So, I will use this set up w/o Guide Plates..... Thanks to all for chimming in! -
Rear Drum Brake Spring troubles-Help!
prayers1 replied to prayers1's topic in 1969-70 Technical Forum
Yes, I already know that. If you look at my pictures. The 8 inch Anchor pin has a shoulder on it to accept the guide plate, which keeps the brake drums from walking off. On the 9 inch there is NO shoulder for the guide plate. On the Anchor Pin there is only enough room for the 2 springs & cable/hook. There must be members out here that have this same set up. -
Rear Drum Brake Spring troubles-Help!
prayers1 replied to prayers1's topic in 1969-70 Technical Forum
Thank You PowerShift! The diagram doesn't address 8 or 9 inch. I have been looking on the web for an actual photo, but no luck -
Rear Drum Brake Spring troubles-Help!
prayers1 replied to prayers1's topic in 1969-70 Technical Forum
Someone suggested that the 9" didn't use guide plates. Is that true? I would think no guide plates on either 8 or 9" would cause the brake shoe to fall off. -
Rear Drum Brake Spring troubles-Help!
prayers1 replied to prayers1's topic in 1969-70 Technical Forum
Anyone!!!!! -
I'm replacing a 8" Rear with a 9", both are 28 spline small bearing axles that are interchangeable at the brake shoes, hardware and drums. I'm not really technical on the names of brake parts, so I'm using a Ford Shop Manual as reference to describe the specfic parts I'm referring to. The Anchor Pin is at 12 o'clock on the backing plate. First you have to place the Shoe Guide (anchor pin) Plate over the Anchor Pin, before putting the right and left spring on the Anchor Pin. In my case, the 9" Anchor Pin does not have the sleeve for the Shoe Guide Plate. So, if I put the shoe guide on, it's hole is bigger than the anchor pin and I could only put one spring on instead of two. If I take the Shoe Guide Plate off, I then can put both springs on the Anchor Pin. As with the 8", The Shoe Guide goes on the Anchor Pin Sleeve, then the 2 springs fit on the Anchor Pin. Do I need a different Anchor Pin Plate to fit over the larger hole for the brake shoes????? The pictures below are: 1, 8" showing the sleev over the anchor pin 2, 9" showing no sleeve 3, Anchor pin Plate.
-
Are you going to apply a sound deadener material to the inner fender wells and doors?
-
Boogerschnot-Thanks for reconfirming my thoughts. After the bodywork, I will sound proof the interior. By the way, I envy you. I'm sitting here with a flannel shirt and wool cap while I look up and see that your in Hawaii. I wish I was there!!!!!!! Take care, John
-
I have the Woodgrain Clock delete panel, I'm looking for the frame that holds the delete panel or open face clock panel. If you have one with broken clips or just broken, drop me a line.
-
Need torque spec on Axle/Shock mount.
prayers1 replied to prayers1's topic in 1969-70 Technical Forum
I have a few FORD shop manuals, everything else is mentioned, but couldn't located the U bolts. Thank You BuckeyeDemon for letting me know!! -
In the past, I had a habit of breaking larger bolts w/o a torque wrench. Being older and somewhat smarter I now use the Torque Wrench for just about everything. I just installed the rear, now I need to know the torque specs on the U-Bolts holding the Axle/Shock mount to the leafspring. Thank You!
-
1969 Mach 1, told me about the Weiand Street Warrior. With todays technology, Weiand did all kinds of test and comparisons, theres no way your gonna beat that! There's a lot of die hards out there that stick with the Shelby stuff, but Shelby didn't have this type of technology way back then. That coupled with the 570 Avenger is hard to beat. Plus, with the 570, Holley gives you a couple of springs to make adjustments. I didn't have to, I just used it out of the box. I also bought my stuff on StreetsideAuto, they beat everyones price, plus no shipping cost and they give you a coupon for 10% of your purchase, So one day you can order the Carb then you can apply the 10% credit to the Intake. The credit comes in an email 2-3 days after your purchase. I hope this helps!
-
Danno- Can you PM me on the cost to convert my radio. Thanks, John
-
I just put a Holley 570 CFM Avenger Carb and a Weiand Street Warrior Manifold on a 289, bored .60, 54cc heads, 194/160 valves, Comp Cam 512 lift and long tube headers and it screams. I never thought a smaller CFM would work, but after giving my specs to the guys at Holley thats what they recommended. I originally had a Holley 600 DP and a Edelbrock F4B Manifold. The new system blows the old away.
-
Kiwi John- Nice example. I just cut the protruding ends off today and covered the bare metal with some paint. Is your car painted Coral Blue? I really like how it looks!!!
-
I understand. I just wanted to put it all together, making sure I had everything right before I did it. Thanks to all for your input!