


1969Fstback
-
Content Count
559 -
Joined
-
Last visited
-
Days Won
4
Posts posted by 1969Fstback
-
-
I don't think removing the fuse box is necessary. If you back the nut off enough I am pretty sure the carriage bolt head will slide into the grove. Slide it all the way in then tighten the nut up to hold the bolt. I made one before I knew midlife sold them and that's how I did mine.
-
I don't know about you guys, but when barnett expounds on a subject I take note. It's great to have resident experts!! There are always "gems" in there to be mined.
I've learned a ton of passive information from his posts. I read his posts on topics that have nothing to do with my car build now and probably never.
-
oops sorry I totally looked at your question all wrong.
-
First and foremost, thank you for answering the original question asked!!
I have purchased this car and this is the car that I am going to build. I understand that life happens but I am planning on keeping this car for the rest of my life.
So as of right now it doesn't run, I am a student and have finals in a week. But I am trying to get a good plan on how to start.
The car is kinda rusty on the bottom, In places. I know that I need to patch one piece of the frame in the back. Other than that, i'm really not sure what is acceptable or not. I know to take all of the rust off, but how do I know what to replace and what can be taken down to bare metal and expxy coated? This is kinda the reason that I was thinking on having the car sand-blasted on the bottom.
Its good to know that this is all possible. I have lots of experience welding and metal work, this is just a different kind and I don't want to mess anything up. I am already planning on replacing both quarters, new fenders and hood and assuming that I will at least replace the skin on the drivers door. I don't understand the no sand-blasting thought? How do you know when to replace and when it is just good enough? I don't want to just throw parts at it, but I also don't want to do this again in 10 years.
Thank you both
I could see enough holes and bondo in the sheet metal to know I was replacing the panels. For me the door skins were rough enough that skinning them then was better then patch them. My qtrs had lower patch panels and the wheel lip was shot so those were a no brainer. The tail light panel was rough and lots of curves. Patching that would have been more time consuming then replacing. I took a wire wheel in some places to inspect. However, if you are gonna gut the entire car then yeah probably money ahead to blast it. My project ran and drove so I had no want of gutting it. Of course this is how I went about mine. I would pick certain things to do over the winter then drive in during the summer.

-
I was in you shoes 3 years ago. I bought mine knowing little to nothing about body work. I did what Bob said to do. I inspected everything. I foumd the rockers, frames and torque boxes and all but the battery apron where good. I was going down the road of blasting then after I inspected all the rust in the sheet metal I realized blasting it was a waste of time. I knew i need to replace the door skins, qtrs, floor, tail lights panel, tail light panel fillers. The roof was solid but has a sun roof so I knew I was going to do the roof skin. So after I determined I had to replace 70% of the sheet metal and the front fenders and hood bolt on I saw no reason to pay to blast panels I was going to replace. Mine ran and drove and stopped. I upgraded the brakes and upgraded the ignition then started on the floors where my learning curve would be hid by carpet. Ive replaced everything on my list all thats left is to patch the fenders. Got them back yesterday, blasted and primed. I made a list of items in least to most difficult. Hoping my skill would match the difficulty by the time I reached the next part. So far I have been happy with how it turned out. For me the money invested is of little consequence. I am restomodding mine and have no plans of selling. And the journey working on it is probably more important to me then the finished product.
Mach1 Driver reacted to this -
Got it screwed in and used a thread sealer as you suggested. Turned out good.
-
Thanks for the advice. I was leary of it very. I went back out and put a ratchet on the end and so I could put more pressure on it and got it started in. I stopped thing thread sealant or something may not be a bad idea before I screw it on in.
-
The shop vac idea crossed my mind, but the grease idea is excellent.
-
I bought the Scott drake oil tub and I am having problems getting it to start threading in. The threads on the block look pretty good, but not great. What's the best way to fix the threds? I can run a tap in obviously. I was,thinking run it in a little and back it out to clean the shavings off. How much concern do I have with the shavings?
-
The other one you have looks like the top plate should slide between coils under the shock tower. Based on the notch and the curved indentations.
How does the new one work? does it have to bolt to the saddle and the saddle needs to be unbolted?
I have the double curved hook type. Removed one side and it worked flawlessly.
-
Yeah got template to do the drop and all new control arms, springs, spring seat, new sway bar end links and all. Well I guess twice is better than 3 times.
Spindle last?
-
What's the best order to assemble the control arms, sway bar, spring and so on? Seems fairly straight forward, but time is a high commodity and I don't want to redo anything.
Thanks
reginaqu16 reacted to this -
I will add, I have my fenders off to remove the battery apron and fix some other rust. So I assume that makes it significantly easier.
-
I recently removed all the suspension from passenger side. I had never used a spring compressor. I bought an internal compressor. I had to do like everyone else and put a 5 inch bushing due to the bolt being too long. I used some tips from this site such as taping the arms to the spring it only took me 2 mins to compress and remove the spring. My control arms were completely shot.
-
Thanks gentlemen for the advice.
-
Leave them open, or put some bolts in them, it don't really matter.
How wet ya think it gets under the hood when you drive in a rain storm? 4 bolt holes wont amount to 1/100th of the water that you get under there from the rain LOL.
you could always pop some little metal finish caps in the holes if you were that worried about them
Yeah, that crossed my mind too. Kinda thought I was over thinking it.
-
Yeah, I was more concerned with water and such flying off the tire into the engine compartment.
-
I've acquired a Shelby drop template and make that mod before reassembling. What do you guys normally do with the old holes to plug them?
-
Purchased,
Thanks 3pedal
-
I have one $25 shipped...pay pal is fine via family and friends to save the fee....njjoeh@optonline.net
pm sent
-
I am in need of a Shelby Drop Template. I have found a few websites that sell those for around $32 which includes the template, 17/32 bit and shipping.
The 32 bucks isn't a huge expense, but figured if a forum member has one laying around they no longer need and could get something out of it and I could save a few bucks it would be a win win.
I will probably order one online in a few days if no one has one.
Thanks
-
The rear has 2 inch lowering blocks. The front I have apart to put new control arms and to lower it. I have 1" Eibach lowering springs which I know I need to cut. They werw not installed, I removed what was probably original springs. Do I install the spring as is for a baseline or go ahead and cut half a coil off or do something else? If I install as is and I am 1 inch or 2 inches higher than rear how much should I cut off,to start with. I am guessing even though they are 1 inch lowering that I will still be more than a inch higher than rear based on originals being fatigued.
I want to be level or slight rake, I am fine with either.
-
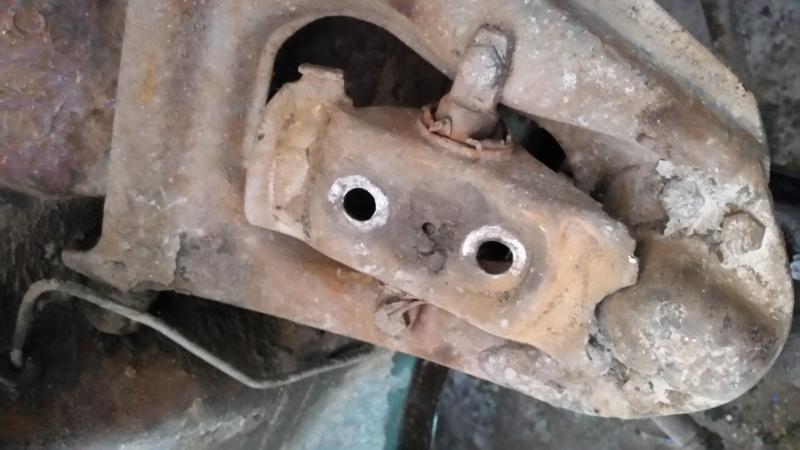
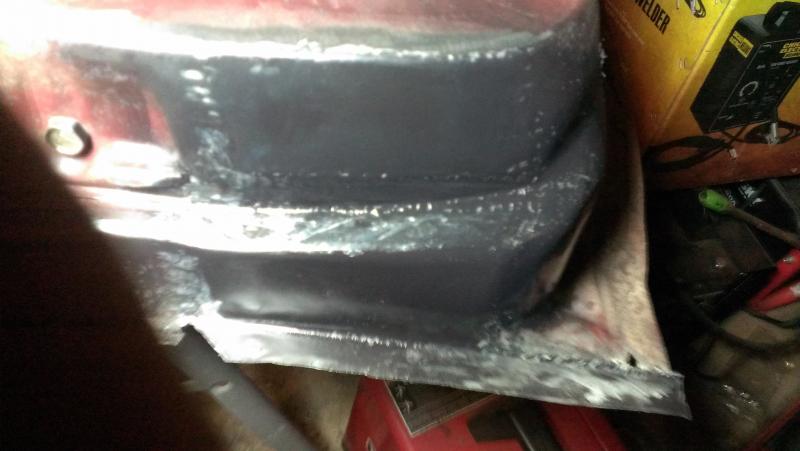
Mine before and after. Wasn't too bad. The after pic wasnt the final product but close. Of course yours is a good bit worse.

-
Yeah similar to that but looks like it the parts were sourced from home depot. It moved pretty freely. I need to go look at it better. I stared iy checked the unit seen the oil coming from the block. Got,annoyed shut it off and started lowering it and figured I'd come back to it in the spring. By then I may not be annoyed any longer.

Accessory Post on Fuse Box, Fused or Not?
in 1969-70 Technical Forum
Posted · Report reply