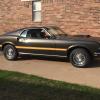
Caseyrhe 650 Report post Posted April 24, 2017 Here it is, my brothers Mach. He is the second owner, bought it in 78, drove for a 8 or 9 years, and then it was parked. He was going to have it totally restored, but when the shop started installing bolts and nuts from the hardware store, he said," stop, make it a roller, and I'll come pick it up." It has sat untouched in his garage and now his shop for about a total 6 years. Knowing he doesn't really know how or have the drive to put back together, I am stepping up and going to start. Car was totally rust free and has all its original sheet metal. Unfortunately the knuckleheads that disassembled the car, threw ALL the clips, screws, nuts, and bolts in a 5 gallon bucket, fun right! Good thing I tagged and bagged the parts car I bought. Gold, black int, 390 GT, 4 speed, fold down seat, tilt man steering, fact tach, no ac Quote Share this post Link to post Share on other sites
Caseyrhe 650 Report post Posted April 24, 2017 Cleaned up, repainted, and polished up the chrome parts on his lower dash this past week. Quote Share this post Link to post Share on other sites
Raven R code 281 Report post Posted April 24, 2017 Holy cow Casey! I would have taken a break.... a long break after you finished your car. It looks like you have a gem there though. Quote Share this post Link to post Share on other sites
Caseyrhe 650 Report post Posted April 24, 2017 I always have to be working on something! I refurbished the heater box today, new foam kit and heater core. He has most of what's needed to put it back together, seals, felt, insulation, pads, ....... but most needs to be cleaned up and repainted. So bring the stuff home and refurbish/paint then take it back to his shop, bring more home....will start installing soon. I bought a 51 Chevy truck in Dec, so that's waiting in the wings too. Quote Share this post Link to post Share on other sites
MAC390 327 Report post Posted April 24, 2017 Nice car there, kinda partial to s codes . Looking forward to the progress of the build. Quote Share this post Link to post Share on other sites
Grenadier116 24 Report post Posted April 24, 2017 Looks like a great project. It will be a beautiful Mach 1 when finished. I'm sure your brother will really appreciate your efforts when he finally gets to enjoy the car. Quote Share this post Link to post Share on other sites
69Mustang16 92 Report post Posted April 24, 2017 That is awesome to step in and help.. I'll be following this one! Quote Share this post Link to post Share on other sites
stangnet33 88 Report post Posted April 24, 2017 What paint/color did you end up using for the dash ? That's great that you stepped up for your brother, look forward to the updates. Quote Share this post Link to post Share on other sites
RPM 1,190 Report post Posted April 25, 2017 11 hours ago, 69Mustang16 said: That is awesome to step in and help.. I'll be following this one! Ditto! Quote Share this post Link to post Share on other sites
Caseyrhe 650 Report post Posted April 25, 2017 He had the paint, 2 rattle cans, never seen it for sale before, Sherwin Williams, "black metallic", surprised it still was any good seeing he said it was about 10 years old. Quote Share this post Link to post Share on other sites
Caseyrhe 650 Report post Posted April 27, 2017 Firewall insulation, Foot vents, emerg brake, pedals/bracket, gas pedal, and heater box all installed this evening 2 Thin Lizzy and 69Mustang16 reacted to this Quote Share this post Link to post Share on other sites
Thin Lizzy 37 Report post Posted April 27, 2017 Great job. Looking forward to seeing the progress. Quote Share this post Link to post Share on other sites
Machspeed 219 Report post Posted April 29, 2017 That is incredibly thoughtful of you to do that for your brother. Looking forward to watching it all come together in a week....lol! Quote Share this post Link to post Share on other sites
connery 4 Report post Posted April 29, 2017 Great project and congratulations to you for being so kind to your bro. That paint job looks absolutely beautiful! Keep on keeping on, as they say :D! Cheers, and hopefully you'll keep us posted! Quote Share this post Link to post Share on other sites
Caseyrhe 650 Report post Posted May 1, 2017 Spent the afternoon going thru boxes trying to sort the parts into some form of organization. Can't find the headliner tack strips, but know there somewhere in his shop and gave that task along with calling the guy to get the headliner installed. I brought these dusty things home with me and plan to refurbish these in the interim. Quote Share this post Link to post Share on other sites
1969Fstback 58 Report post Posted May 1, 2017 I think we are long lost brothers. I'll from mine off next week. Quote Share this post Link to post Share on other sites
Caseyrhe 650 Report post Posted May 1, 2017 42 minutes ago, 1969Fstback said: I think we are long lost brothers. I'll from mine off next week. Ha ha 1 69Mustang16 reacted to this Quote Share this post Link to post Share on other sites
Caseyrhe 650 Report post Posted May 5, 2017 Well, I found the freaking tack strips after 2 hours of looking through more boxes he brought from home, got them installed along with 4 coat hooks, chest belt bolts, and screws for headliner strip, which I painted also. Sun visors restored with new hardware ready. Just need the headliner to be installed, guess I may need to schedule that for him too, lol. I have disassembled the dash panels, repainted the bezels, got the clock working, so now I'm waiting for the new lenses and circuit panel to arrive that's on backorder through CJ's to reassemble. Hope to have some pics of progress Sunday evening. Quote Share this post Link to post Share on other sites
Caseyrhe 650 Report post Posted May 7, 2017 Lower dash and steering column in, wires all connected except heater blower motor. Need help finding where they plug into. Could it be the 2 light green wire with female ends? Have a 3rd light green wire, female end that's down by light blue console/ cig and ash tray light. Quote Share this post Link to post Share on other sites
Midlife 814 Report post Posted May 8, 2017 Heater blower motor should have a three-pin "triangular" plug with red, blue, and black/yellow wires. The two green wires with black covers over the spade leads are for AC. This plug is usually found near the RH door jamb connector area, but sometimes it comes off of the harness as it goes to the firewall in a flat three-pin plug, which needs an extension and coversion from flat three-pin plug to "triangular" 3 pin plug. Quote Share this post Link to post Share on other sites
RPM 1,190 Report post Posted May 8, 2017 This is what my plug looks like. It has a red, light blue and black w/yellow stripe wires. The orange or 48 year faded red wire from the blower motor in the engine bay goes to the single terminal below the multi wire plug. Quote Share this post Link to post Share on other sites
Caseyrhe 650 Report post Posted May 8, 2017 Thank you Quote Share this post Link to post Share on other sites
Caseyrhe 650 Report post Posted May 10, 2017 Working on the tail lights, that way my son has something to install while I'm installing something else. Popped off the SS trim pieces, that need buffing out, and decided I needed to get the rest of the trim to polish that at the same time. While there, also picked up all the fingerglass panels to get those painted up as well. Any ideal where I might be able to pick up the other half of cable retainer, pictured? While there, took a few pics of his parts, some were mine I gave him years ago.....maybe he will give them back??? Yes 428 SCJ ex manifolds, SCJ heads, 2 Nodular housings, ..... Quote Share this post Link to post Share on other sites
MAC390 327 Report post Posted May 10, 2017 Wow there's some nice gear on those shelves. Quote Share this post Link to post Share on other sites
Caseyrhe 650 Report post Posted May 11, 2017 Clock panel completed, polishing stainless waiting on parts for gauge cluster panel. Polished on the left, unpolished to the right. Quote Share this post Link to post Share on other sites