RPM 1,190 Report post Posted June 22, 2017 Your dad sounds like someone I could hang out with. Quote Share this post Link to post Share on other sites
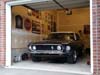
MN69Grande 203 Report post Posted June 23, 2017 On 6/22/2017 at 4:38 PM, RPM said: Your dad sounds like someone I could hang out with. Yeah Grandpa was a pretty cool guy. He's been gone a long time though. Here he is from between when the last photo was taken and maybe 5-6 years prior. Again not sure of what year. Early 80s maybe end of the 70s. Pretty nice T-bird no? Looks the same today in my Uncles Garage. Quote Share this post Link to post Share on other sites
Mike65 475 Report post Posted June 23, 2017 Nice T-Bird, cool pic. Thanks for sharing. Quote Share this post Link to post Share on other sites
MN69Grande 203 Report post Posted July 4, 2017 Tuning tuning tuning. Car was running pretty good but had a small stumble on take off, a rich idle, and a couple places in the throttle where things would lean out a little on the AFR (15-15.5). Finally figured it out. Needed to change from a 6.5 to a 5.5 power valve and reset the idle mixture. Once I did the difference was huge. I left the 6.5 in after using a vacuum gauge and getting 13-14 lbs at idle in drive. But I didn't drive around and average the reading. What I found is when I get on the throttle the vacuum would drop a lot then get stronger once the RPMs climbed again. I believe the PV was opening and dumping gas when the engine didn't need it. I'm pretty sure I had the idle circuit lean and when the PV closed as the RPMs climbed I would get lean right before the secondaries opened. It also had a weird lean spot at 1/4 throttle before for some reason. So new PV, up one step on the front jets, reset the idle circuit. Still idles a little rich and when I take my foot off the gas while driving. But I stay in a nice 12.5 - 14.5 on the AFR through the entire acceleration curve now. The stumble is gone, now the I just have a 1/2 second hesitation on initial take off. But I'm pretty sure that is because I changed the accelerator pump cam to a less aggressive one. So I'll swap that back and see what happens. I guess the moral of the story - use a Vacuum gauge, drive around, and get an average vacuum reading to set your PV. Reading plugs and an AFR won't do everything for you. Quote Share this post Link to post Share on other sites
MN69Grande 203 Report post Posted November 14, 2017 Ahh.... As they say WINTER IS COMING... in fact we've had four snow falls already this year already. So right now my transmission is out and getting rebuilt with some stronger components and my car is not in the garage to play with. But I'm trying to plan out my winter projects. I've skipped working on the car all summer because it was working well enough to drive it (until the tranny went out on the last drive of the season). I've already got most the parts. Focus is front end. Rollerize/adjusterize everything and put in a steering rack. Also replace the master cylinder and double check the MC push rod clearance (the brakes don't engage until I press the pedal 1/2 or more of the way down). Anyway just for fun I put down my hopeful to do list. We'll see how far I can get before April. Project Estimated Time Plus 50% Rework, causing other issues, and Problem Solving Parts Ordered Parts Received Comments Drivers door wiring harness 3-4 hours 6 hours Yes Yes New Brake Master Cylinder 5 Hours 7.5 hours Yes Yes Need to adjust the push rod, purge the fluid, and bleed Roller Spring Perches 2 Hours 3 hours Yes Yes Roller LCA 2 Hours 3 hours Yes Yes Adjustable Strut Rods 3-4 hours 6 hours Yes Yes Repair/replace horn steering wheel/column contacts 3-4 hours 6 hours No No Need to inspect parts once steering wheel is off Paint Steering Column 2 hours 3 hours Yes Yes Unisteer Power Rack and Pinion 10 hours 15 hours Yes Yes Repair Thermostat Leak 30 min 1 hour Yes Yes Del-A-Lum Rear spring bushings 2-3 hours 4.5 hours No No Detail "Mustang" and "Grande' " Emblems 1 hour 1.5 hours No No Had a black Paint Marker can't find it now Front shoulder Upper seat belt Cover 30 min 1 hour Yes Yes Miss placed, step 1 find the part Front shoulder Lower seat belt install 1.5 hours 2.5 hour No No Trouble shoot Cigarette lighter 1-100 hours 150 hour No No Hoping this is somehow related to isse with door wiring and will go away once that harness is replaced. Paint Grill 4 hours 6 hours Yes Yes Quote Share this post Link to post Share on other sites
MN69Grande 203 Report post Posted December 18, 2017 So on the last drive of the year my tranny blew apart. The clutches were burnt out and the governor was clogged. Looks like the addition torque was too much for that build. Oh well got the rebuilt transmission in. A bit pricey but it included a new Torque Converter and fair amount of performance internals. It's got a grand total of 10 miles on it and I guess I have to baby it to break it in for 300 miles. Completed one job and it led to adding 3 others to the list. Replaced the drivers door wiring harness. Found one of the door light feed was broken so maybe my door and dome lights will start working again. However in the process I found that the power windows were pulling so hard on the window regulator along with a bunch of other strangeness in the install, the regulator is bent in several places and was pulling on the steel of the door. So now I have to pull the glass out and take the whole window mechanism apart. Also since I had to pull the dash to get the to the ground for the harness I'm going to swap out the Gauge Circuit board where the left indicator is shorting out. The indicator lens (the green plastic square) also came out so I'm hoping that is still in the gauge cluster and I can get it back in. Then I'm going to hook the clock back up. Bummer because I was hoping to get the Master Cylinder swapped out next to see if that helps with my squishy brakes. Oh well maybe in January. Quote Share this post Link to post Share on other sites
RPM 1,190 Report post Posted December 18, 2017 Dang, for a minute I was thinking it was your new tranny that broke. One repair always turns into at least three total repairs. Quote Share this post Link to post Share on other sites
Vicfreg 771 Report post Posted December 20, 2017 MNGrande.... wow, what a great list of things to do. I will comment on the leaf spring bushings, that might be a little more work than anticipated. You might want to check into Poly bushings. The Del-A-Lum bushing housings need to be pressed into the frame. My experience is that the leaf spring front bushing area is one of my least favorite places to work on my car. Usually on my back, in the dark, and cursing....... I decided to use new rear springs from Detroit Spring (Eaton) as they have the original blueprints and use the same materials as the original springs. Then, I had to press out the rubber bushings front and rear (or you can burn them out). I used Prothane bushings. Nice hardware, 2 piece design, and pretty easy install with everything out of the car. Good luck, great winter work list. Quote Share this post Link to post Share on other sites
MN69Grande 203 Report post Posted December 20, 2017 13 hours ago, Vicfreg said: MNGrande.... wow, what a great list of things to do. I will comment on the leaf spring bushings, that might be a little more work than anticipated. You might want to check into Poly bushings. The Del-A-Lum bushing housings need to be pressed into the frame. My experience is that the leaf spring front bushing area is one of my least favorite places to work on my car. Usually on my back, in the dark, and cursing....... I decided to use new rear springs from Detroit Spring (Eaton) as they have the original blueprints and use the same materials as the original springs. Then, I had to press out the rubber bushings front and rear (or you can burn them out). I used Prothane bushings. Nice hardware, 2 piece design, and pretty easy install with everything out of the car. Good luck, great winter work list. Hi Vicfreg - I replaced the Leafs a couple years ago with the heavy duty springs so the bushings and bolts shouldn't be hard to get out. I want to use the Del-A-Lum to cut down on the body roll a bit. From what Opentracker told me the Del-A-Lum keep the springs from binding and allow better movement, which somehow keeps the rear end in place better. I had been debating a pan hard bar or watts link. But they said to try this first. I agree that wheel well isn't the funnest place to work in so hopefully it goes smoothly. To be honest with so much on the list I'll be amazed if I get that far. The front end will be the priority. I'm already itching for April to be back on the road. Quote Share this post Link to post Share on other sites
MN69Grande 203 Report post Posted January 1, 2018 I have two work efforts going on First some small cleanup items completed: Replaced the rubber cover on the shoulder belt. The one that hangs over the door. Replaced the Valve Cover Gaskets due to a small leak Fixed the Kick Down return by installing a return spring and carefully bending the Bar Pulled the thermostat and Housing to fix a leaky gasket Pulled the grill to clean and paint it. (Will also change out the emblem should clean the front end up a ton) The second effort that I thought would be a small fix was I pulled the door panel to replace the door wiring harness. Ended up needing to pull the dash to get at the harness' ground - fun. So I fixed a short in the gauge cluster, replaced the little bit of green plastic that fell out of a turn signal, replaced the little blue bulb lens, and the bezel lens that were scratched. Now the part that sucks. The shop that put in my power windows completely screwed up. They didn't update the glass to bolt in style like I asked, put the lower stop in, it also looks like they couldn't get the window adjusted so they used a nut and hose clamp to stop the window in back at a lower level, and finally the front glass run wasn't bolted in at the top. The result is the power window regulator mounting plate and door skin got torqued when the window went to the top or the bottom and both are now bent up now. I've got the door all apart. I can pound the door pretty easily. I've used Vice grips to some what straighten the regulator bracket, but I'm not happy with it. I called electric life but they don't do replacement parts, also they won't sell just one door. So if I can't get the bracket to fit again it will be full price to fix one door. So that's fun. At least I'm getting some decent garage time. Quote Share this post Link to post Share on other sites
RPM 1,190 Report post Posted January 1, 2018 That pretty much sucks. What's that old saying, of you want something done right... Quote Share this post Link to post Share on other sites
MN69Grande 203 Report post Posted January 1, 2018 26 minutes ago, RPM said: That pretty much sucks. What's they old saying, of you want something done right... In my case it's been more like - if you want something done right, pay someone else to screw it up, then spend twice the effort fixing it yourself. Though now that I have a decent garage with a heater I'm doing most things myself. Quote Share this post Link to post Share on other sites
JET 445 43 Report post Posted January 2, 2018 That is extremely poor service from Electric Life, I would be looking for an alternative... Quote Share this post Link to post Share on other sites
Vicfreg 771 Report post Posted January 2, 2018 Crap, looks like it somehow crushed your motor housing as well... Quote Share this post Link to post Share on other sites
MN69Grande 203 Report post Posted January 3, 2018 2 hours ago, Vicfreg said: Crap, looks like it somehow crushed your motor housing as well... Nah. Lucky for me that is just a pad to keep it from excessively rubbing against the door. Just the bent plate. I'm going to attempt to get it in shape and re-installed this week. Just need a few bolts and washers to put in the 70 bolt in style glass. Quote Share this post Link to post Share on other sites
MN69Grande 203 Report post Posted January 7, 2018 Well added a transmission cooler today. Took a couple tries to make a bracket that worked well. Attached it to core support upright if that is a thing. Need to run the hoses but I'm really happy with how it came out. Also got my freshly painted grill re-installed. Quote Share this post Link to post Share on other sites
Vicfreg 771 Report post Posted January 7, 2018 Nice work..! Quote Share this post Link to post Share on other sites
MN69Grande 203 Report post Posted April 15, 2018 Boy so I had huge plans this winter that didn't happen. Work has been crazy so of course no Garage time. Un-fortunatly work will probably be this way through mid-June maybe July 4th or so. But today I did get some time in. The drivers window is acceptable now. Goes up and 95% down (Getting caught on the electric motor) so I put the door back together, got the gauge cluster back in, and pulled the master cylinder. Just as I thought he brake pushrod was WAY out of adjustment. 3/16". So bench bled a new MC adjusted the push rod and put it all back together. Hopefully tomorrow I can bleed the brakes. Now I have to decide if I take the front end a part in 2 weeks when I have another chance or drive it for the summer and put the steering rack, adjustable strut rod, roller lower control arm, and roller spring perch project on hold. Quote Share this post Link to post Share on other sites
MN69Grande 203 Report post Posted May 5, 2018 Finally got a little time in on the car the last few weekends. Installed new roller spring perches. Which I think are going to make a huge difference. I also got the adjustable strut rod and roller lower control arm in on the passenger side. Can't wait to get this car on the road and see how well she does. Quote Share this post Link to post Share on other sites
Vicfreg 771 Report post Posted May 12, 2018 I did the adjustable strut rods on mine also. How did you set the Caster? Just rough measurements? Quote Share this post Link to post Share on other sites
MN69Grande 203 Report post Posted May 12, 2018 18 hours ago, Vicfreg said: I did the adjustable strut rods on mine also. How did you set the Caster? Just rough measurements? I will need to get it to an alignment shop. The tires are old so I'm not too worries about wear. So my theory was to measure from the bracket that anchors the Strut rod to the first bolt that holds it in place. So when I put the new ones in I adjusted them to the same location. On the lower control arm I used a wax pencil to mark 4 locations of where the ellipse was positioned. When I put the new one in I made them all line up again. I think this will be close. Then I'll drive 30 mph or less to the shop to get a real alignment. Quote Share this post Link to post Share on other sites
MN69Grande 203 Report post Posted May 12, 2018 Today I got the strut rod and lower control arm replaced on the drivers side. Tomorrow bleed the brake, change the oil, change the thermostat housing gasket, and maybe start her up. May have this thing back on the road sooner than later.... can hope. Funny though. Pretty sure the strut rod needed replaced. Look how bent out of shape that guy is. Quote Share this post Link to post Share on other sites
Vicfreg 771 Report post Posted May 15, 2018 Yeah...those front strut rods can tell a story.... on one of my other cars I restored, it led me to realize the car had been wrecked in the front, and put on a frame machine to be "straightened out" Quote Share this post Link to post Share on other sites
MN69Grande 203 Report post Posted June 4, 2018 Got started on putting in the Unisteer R&P. Pump is in. Old parts are out. Found the engine mounts looked bad so we swapped those out. Going to have to put a new drain plug in the Oil pan, enlarge the holes for the Camber Adjustment, and grind some metal to get the bracket in. The biggest pain is they sent hoses for a Chevy II and left 2 key parts out of the kit. So tomorrow I get to call them up and see what can be done. Moral of the story. Check the parts when they come in not 9 months later. Quote Share this post Link to post Share on other sites
RPM 1,190 Report post Posted June 4, 2018 "Moral of the story. Check the parts when they come in not 9 months later." Ain't that the damn truth. Quote Share this post Link to post Share on other sites