MN69Grande 203 Report post Posted June 28, 2013 @Pakrat - Yes and kinda yes. The white vinyl top is for sure. The black looks ok but I think the white will really stand out and you don't see it that often. The interior was originally Dark Ivy and I always liked it. But I did call TMI and they said it would be easy enough to do Dark Ivy seats with white inserts. I saw it done with black and grey once and it was cool. So it is a bit of a risk but in my mind it looks great. I just hope it's not a waste of 400 bucks. Quote Share this post Link to post Share on other sites
Pakrat 1,043 Report post Posted June 28, 2013 Sound slike a good plan, if you can find a nice interior shot of a dark ivy car I can always phtochop the inserts for ya. Quote Share this post Link to post Share on other sites
Pakrat 1,043 Report post Posted June 28, 2013 Sound slike a good plan, if you can find a nice interior shot of a dark ivy car I can always phtochop the inserts for ya. Quote Share this post Link to post Share on other sites
rwcstang 201 Report post Posted June 28, 2013 what rear shocks are those MN? Quote Share this post Link to post Share on other sites
rwcstang 201 Report post Posted June 28, 2013 what rear shocks are those MN? Quote Share this post Link to post Share on other sites
MN69Grande 203 Report post Posted July 1, 2013 @rwcstang - They are Gabriel. I'm trying to dig up the part number. They were the suggestion of a the guy I have working on the car. I won't know if we are keeping them until we try driving it. But he swears they'll work great. I'll let you know in a couple months. Have to get the motor in next week first. Plus the guy doing the Vinyl top is way behind so who knows when he'll show up. Quote Share this post Link to post Share on other sites
MN69Grande 203 Report post Posted July 7, 2013 Hoping to fire the motor up this next week. It's been a LONNNG time since I've run it. And since then I've changed the cam to to a roller kit and roller rockers. Plus shorty headers and duel exhaust. So I'm beside myself to hear the new sound. Anyway a few shots from my old cell. Sorry the lighting and quality is quite that great. Quote Share this post Link to post Share on other sites
70mstang 11 Report post Posted July 9, 2013 Looking good! Get a vid for us :) Quote Share this post Link to post Share on other sites
rd49221 14 Report post Posted July 10, 2013 looks good! Yes, video please! Quote Share this post Link to post Share on other sites
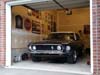
MN69Grande 203 Report post Posted August 25, 2013 Well things are going slower than anticipated. But today we had a guy out to put the Vinyl top on. Picks of that Monday I think. Here are a couple older shots of the fresh paint. The ones on Monday will be a more final result with cutting and buffing done and a few more panels hanging where they belong. Also painted a new Dash and Some door panels so they are ready to go. It was easier than I thought. I was worried about dying the interior using a spray can. I've read a ton of horror stories out there about it. But I think mine turned out. Still don't have it running. Mostly due to waiting for some parts. Also the front end is way up in the air but we put in 2 inch lowering springs... So not sure what to make of that. Granted the springs have been in over a year and the engine only briefly, but still.... Quote Share this post Link to post Share on other sites
rwcstang 201 Report post Posted August 25, 2013 looking good so far! Quote Share this post Link to post Share on other sites
prayers1 153 Report post Posted August 25, 2013 Looks Fantastic and GREAT progress!! The Dash pad came out real nice as well. I'm glad the spray can method worked for you, because I'm just around the corner of spraying the interior fiberglass panels and door panels. What did you do to clean it and prep for paint? Quote Share this post Link to post Share on other sites
MN69Grande 203 Report post Posted August 25, 2013 @prayers1 - I got the cleaner and dye from Mustangsunlimited.com along with the dash and door panels. Anyway it's not too hard. 1.) I cleaned the item and let it dry (not to hard since they were new, mostly just used a damp cloth to remove some particulate) 2.)Use the bonding agent. It is a concentrate you mix with water. Don't bother buying more than a bottle. I bought 2 and only used 1/4 of one bottle to do a dashpad and both door panels. You just use a sponge to wipe it on and cover everything. Then let it dry. Oh and wear gloves for this part the vinyl prep irritates the skin. 3.)I used a barely damp rag and wiped excess bonding material away, not sure if this is a good thing to do but there was a heavy residue in a couple places that made me worry. 4.)Lightly sprayed the item, let it dry completely and sprayed it again. 4 coats seemed to do the trick nicely HINT 1: The spray cans need to be continuously shaken and the nozzles need cleaned a couple times. At least after every 90 seconds shake, if not sooner. Also it is recommended you shake for 3 full minutes or more before starting initially. I took this very seriously. HINT 2: Sometimes the spray would come out splotchy(the big complaint about the process) so I always started spraying away from the item just in case. 4-5 inches away seemed a good distance and try to hold the can as vertical as possible. HINT 3: I used 3.5 cans of paint to cover a dash pad and both door panels. So just over 1 can per item. Hope this helps you estimate what you need to buy. Quote Share this post Link to post Share on other sites
Mike65 475 Report post Posted August 25, 2013 MN69Grande, I just looked through the pages of your build, good job. The body on your Coupe was much better then mine, I had to replace outer wheel houses & both quarter skins on mine. Keep up the good work. Mike. Quote Share this post Link to post Share on other sites
MN69Grande 203 Report post Posted August 26, 2013 @Mike65 - Thanks! You're project looks like it is coming along well too. I've been watching it (lurking) for quite sometime. My car was pretty much straight and ready to go, it's been in the family a long time at this point. Just three 1/2 inch or so sized hole patches in the truck and floor. Anyway the top is on and I love the combo. I know they didn't offer it in general but I like it. Also: -The car has had it's final shine buffed in -The seat covers are being made and hopefully we will see those in a couple weeks -The lower dash assembly is in -The H-pipe is modified to mount up to the Headman shorties -The doors are in the middle of assembly Next up will be: -The rest of the dash -The rest of the exhaust -Putting in all the accessories and mounts Probably will start looking much more like a finished product in 2 weeks fingers crossed. Though I should have ordered the headliner sooner, that is going to take a week to get, so the glass will stay out a while yet. Quote Share this post Link to post Share on other sites
Pakrat 1,043 Report post Posted August 27, 2013 Looks great! So how come you had to dye the dash? Were you going to go white at first and then decided on black or is that actually not regular black? 2 winifredng69 and WilliamFug reacted to this Quote Share this post Link to post Share on other sites
MN69Grande 203 Report post Posted August 28, 2013 @Pakrat - Actually it's dyed Dark Ivy Gold, which is pretty dark. I don't know if you can get them pre-dyed, I only found Black, White, or Tan. Black was the cheapest so that's what I bought and painted/dyed it. But going with the two-tone interior I did order a white headliner. Which I'm hoping will make it feel less like a cave inside. That's two weeks out though, I'm hoping the seats come in at the same time. Quote Share this post Link to post Share on other sites
Chelby-Ann 47 Report post Posted August 28, 2013 @Mike65 - Thanks! You're project looks like it is coming along well too. I've been watching it (lurking) for quite sometime. My car was pretty much straight and ready to go, it's been in the family a long time at this point. Just three 1/2 inch or so sized hole patches in the truck and floor. Anyway the top is on and I love the combo. I know they didn't offer it in general but I like it. Also: -The car has had it's final shine buffed in -The seat covers are being made and hopefully we will see those in a couple weeks -The lower dash assembly is in -The H-pipe is modified to mount up to the Headman shorties -The doors are in the middle of assembly Next up will be: -The rest of the dash -The rest of the exhaust -Putting in all the accessories and mounts Probably will start looking much more like a finished product in 2 weeks fingers crossed. Though I should have ordered the headliner sooner, that is going to take a week to get, so the glass will stay out a while yet. Fantastic looking Coupe. Your doing a real nice job. Quote Share this post Link to post Share on other sites
stangme428 33 Report post Posted August 29, 2013 looks nice... i like the color combo... something you never see... Quote Share this post Link to post Share on other sites
MN69Grande 203 Report post Posted September 11, 2013 Well not much to report. This is dragging on way to slow for my tastes. Mostly due to vendors sending wrong, broken, or just incorrect parts. Everything takes 3 weeks to get or more. Anyway -Installed the Export Brace -Installed the Front Shocks (looks like the stance is coming down so it doesn't sit like a 4x4 any more I guess leaving the engine out for a year makes the coil springs a bit tall) -Replaced the battery tray (the old one was rusted out) -Mechanics and Glass for all for windows are back in -Door Handles and Latches in Not a big list but a whole lot of parts showed up. Now we have the new headliner and a full seal kit to work with so we can get a little further. Also should have the distributor back so maybe(8 weeks later) we can fire the engine soon. Hopefully the interior guy can get in gear and get the seats done they are a month over due. Quote Share this post Link to post Share on other sites
zudman 11 Report post Posted September 11, 2013 Looks really good MN...Good choice with the white top....T.Z Quote Share this post Link to post Share on other sites
82firebird 11 Report post Posted September 19, 2013 Love the black/white combo. Crisp as a tuxedo! Quote Share this post Link to post Share on other sites
MN69Grande 203 Report post Posted September 20, 2013 Love the black/white combo. Crisp as a tuxedo! @82firebird. Thanks for the note. Actually the color is Black Jade. But it is so dark that unless it is in direct sunlight it's impossible to capture with a camera so far. I am very happy though with the contrast between the white top and dark color. And the guy that did the paint did a great job with the stripes. Quote Share this post Link to post Share on other sites
MN69Grande 203 Report post Posted September 27, 2013 Well this is starting to feel like a long long slog. Seems every time I order something or hire someone to do something for this car it's a 3 week wait min. Then 1/2 the time it's wrong. Any a tiny bit of progress. Dyno Mat/heat shield is in, Dash is in, Headliner is in. Today the glass should be going in. Got some carpet that will work even though it is way lighter than what was original. So there we go. MAYBE next week we'll try turning it over. MAYBE. I said that 2 months ago though. Question, anyone change the color from dark green, blue, red, or some rich color to white? With the white headliner in there my green visors look funny... SO... Is it worth painting them white or should I not cheap out and buy new ones for $50? Quote Share this post Link to post Share on other sites
MN69Grande 203 Report post Posted October 9, 2013 (edited) Got some pics of the new seat covers. Lookin pretty good. Trying to keep the deluxe look but adding padding and support. Edited October 9, 2013 by MN69Grande Quote Share this post Link to post Share on other sites