TheMenace 10 Report post Posted February 21, 2013 been following along and like everyone said before. its a shame what happened but its great to see you are pulling through and doing a great job at it too. keep up the good work and progress pics Quote Share this post Link to post Share on other sites
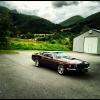
fredfordguy 16 Report post Posted February 21, 2013 fredfordguy - wow, those are big words. Thank you. Actually, I use this forum thread as a motivational tool to keep the project going. I'm very happy with the progress so far, but I really haven't gotten to the time consuming part of a project yet. When I get the car back, I'll have it up on a rotserie, and do the underside of the car. Then the inside, and then the body, before paint.... Anyway, posting utdates here is a good way to keep things going. (It's the going thing :rolleyes:) I hope you get your car back soon. 2 years is a long time to wait. The guy is giving me a super price so I can't make much noise about the timeframe, but I DO NOT wanna go 3 summers without our V8. There's only so much fun with a 6 banger. Here's a shot of it a few years ago. Quote Share this post Link to post Share on other sites
fvike 173 Report post Posted February 21, 2013 That's a great looking Grabber! Looks very straight. TheMenace: Thanks! Quote Share this post Link to post Share on other sites
fredfordguy 16 Report post Posted February 22, 2013 That's a great looking Grabber! Looks very straight. TheMenace: Thanks! It's my wife's first car, she bought it in 1977 for 1800.00, a Colorado car so it's never seen salt. Quote Share this post Link to post Share on other sites
sixt9stang 36 Report post Posted February 23, 2013 Nice progress. What are you running for the front suspension? Quote Share this post Link to post Share on other sites
fvike 173 Report post Posted February 23, 2013 It's the Total Control Products' front coilovers and rack & pinion. 1 69FB reacted to this Quote Share this post Link to post Share on other sites
fvike 173 Report post Posted March 5, 2013 Today the body shop started work on the Mustang. It's up on the jig, and the suspension has been removed. A little work has been done up on the cowl. I'm excited to get to this point. Quote Share this post Link to post Share on other sites
fvike 173 Report post Posted March 6, 2013 Pass side of engine bay is gone. Cowl has been straigthened. Pass side torque box. Not much rust, just surface. Pass side cowl. Pass side cowl. Driver side cowl. Driver side torque box. Again looking good. Cutoffs. Quote Share this post Link to post Share on other sites
Ash 145 Report post Posted March 6, 2013 Wow, I bet a lot of people here, me included, wished their insides looked that good. I bet that was a big relief! Quote Share this post Link to post Share on other sites
fvike 173 Report post Posted March 6, 2013 Well, in hindsight it is, but I wasn't expecting anything else, given the condition of the rest of the car. But it's nice to know that it is solid thru and thru. Quote Share this post Link to post Share on other sites
fvike 173 Report post Posted March 7, 2013 Today the other side is gone as well. The car is super solid! Frank at the bodyshop (whom I've known for many years) is doing a great job. I also supplied the fenders for fitment soon. Gonna go over there later today to deliver the hood and hinges. Quote Share this post Link to post Share on other sites
fvike 173 Report post Posted March 7, 2013 I cleaned the front suspension yesterday. Gotta give 'em some love too! I think I'll paint or powdercoat them black or like the current TCP arms. I also took some new pictures with my Samsung camera, way better than the iPhone. Quote Share this post Link to post Share on other sites
Grabber70Mach 107 Report post Posted March 9, 2013 Nice great progress so far. Quote Share this post Link to post Share on other sites
fvike 173 Report post Posted March 9, 2013 Thanks Grabber70Mach. Test fitting. Nothing welded yet. Dynacorn parts are good. Only issiue is that the bolt holes nearest the cowl doesn't line up to the fender bolt holes on both sides. Not a big deal. Quote Share this post Link to post Share on other sites
Mike65 475 Report post Posted March 9, 2013 Looks great with all new sheet metal. Quote Share this post Link to post Share on other sites
jnet4jt 10 Report post Posted March 9, 2013 Looks like your shop did a whole lot better on your car than the shop I took mine to. Looks real good. Quote Share this post Link to post Share on other sites
fvike 173 Report post Posted March 13, 2013 Today was test fitting with the hood. Everything lined up perfect and welding begun. Gaps was real good, didn't see it myself but one of the guys at the shop took this picture for me. My hood had some shipping dents in it, but nothing that can't be fixed. Welds. Quote Share this post Link to post Share on other sites
jnet4jt 10 Report post Posted March 13, 2013 Looks good. Quote Share this post Link to post Share on other sites
prayers1 153 Report post Posted March 14, 2013 Looking good and coming along fast. Any problems with bulging in the center of the hood along both outter edges. I just installed mine and have the center bulge, I now see that it's a commom problem with the repro hoods. Quote Share this post Link to post Share on other sites
BigDuke6 17 Report post Posted March 14, 2013 Frode: Let me give you the benefit of my experience. Get a global west monte-carlo/export brace and mount it on the firewall and then to the shock towers BEFORE the shop welds everything in place. It is a perfect template for making sure that everything is correctly lined up. Quote Share this post Link to post Share on other sites
fvike 173 Report post Posted March 14, 2013 Frode: Let me give you the benefit of my experience. Get a global west monte-carlo/export brace and mount it on the firewall and then to the shock towers BEFORE the shop welds everything in place. It is a perfect template for making sure that everything is correctly lined up. Jerry, that's a great tip. Actually, the guy doing the work on my car, Frank, already requested the Monte Carlo bar from me 2 days ago, so he is ahead of the curve. This guy really knows his stuff. I don't have a GW Monte Carlo bar, but I got him my standard one. I've gotten him the measurements pr the 1969 Body/Chassis manual. Quote Share this post Link to post Share on other sites
BigDuke6 17 Report post Posted March 14, 2013 I was thinking more about the export brace than anything else. When my bodyshop guy put the new dynacorn doors on after welding the new torque boxes in, they didn't fit by a lot. He had to disassemble them and reskin the doors. later, when I went to but the GW export brace in, one side was short by over an inch and there was no way the front end was ever going to flex enough to accomodate it. I had to cut the export brace to fit. If we had the export brace from the beginning, the body guy would have had the front end on perfectly because the GW tubular steel export braces are welded in a jig so that their measurements are spot on. Quote Share this post Link to post Share on other sites
fvike 173 Report post Posted March 14, 2013 Ok. Well, the doors, fenders and hood was spot on at the test fitting, so hope it's ok then. I had so much to do at work today that I didn't have the chance to go to the shop. It's most likely welded up now. But I got a lot of confidence in the work that's being done. I'm also going to use the TCP brace, and that is adjustable. I think it's gonna work. If not, then I'll be like :pinch: EDIT: I'm mixing up the export brace and Monte Carlo bar. Frank requested the export brace (firewall/shock tower mount) and got it. The Monte Carlo bar was not used. Quote Share this post Link to post Share on other sites
fvike 173 Report post Posted March 15, 2013 Everything was welded up today. Looks good, everything is straight and per measurements. Next up is replacing driver's footwell and the taillight panel. Quote Share this post Link to post Share on other sites
fvike 173 Report post Posted April 3, 2013 Driver's footwell was cut out before easter, and the new panel was welded in yesterday. A picture looking inside the framerail. New panel in place. Next up! The taillight panel has been changed once before, most likly without any rust protection between panels, so Frank found some rust there. Good thing it's getting swapped out. Quote Share this post Link to post Share on other sites