fvike 173 Report post Posted January 31, 2017 No, I asked my paint shop about that, and they said to wait with that until the car was done. Reason being that during the build it's easy to get scratches in it anyway, so why not wait so that you only need to do it once. 2 Kiarastaize and yapedVem reacted to this Quote Share this post Link to post Share on other sites
Grabber70Mach 107 Report post Posted February 2, 2017 Your car is looking great. Quote Share this post Link to post Share on other sites
fvike 173 Report post Posted February 19, 2017 Now that the new paint has rested enough that I'm comfortable to work around the car. First thing we did was to put some rust primer on the welds in the raised trans tunnel and then a new layer of U-Pol Raptor bedliner. After a week, I wanted to start bolting stuff on. Started with the fuel lines. The front one went on ok, but the one going back to the tank did not fit due to the larger wheelhouses. So we tried to bend them, but did a wrong bed, tried to correct it, but the line was basically screwed. This was stainless pre bent lines from Classic Tube. So, after that failure I opened up the Classic Tube brakelines. These were rusted. Bummer, I thought I had gotten stainless lines, but apparently I hadn't. They've been stored in my barn for 5 years, probably to moist there for them. So need to get new brakelines too. The whole day was a 2 steps forward - 1 step back kinda deal. So, I started to install some Dynamat. Not much, because it was getting late, but I wanted to have more than the front fuel line installed in a days work. Not a productive day, but that's how it goes sometimes. However, did get some sunrays on the paint a few days before: I'm calling a Win on that. 2 SWPruett and jipsaZ reacted to this Quote Share this post Link to post Share on other sites
RPM 1,190 Report post Posted February 19, 2017 As they say, any progress is good progress. Installing the dynamat like easy in pics, but it was work for me using that roller all day. Thanks for the update, I enjoy checking up on your car. Quote Share this post Link to post Share on other sites
fvike 173 Report post Posted February 24, 2017 Today I finished restoring the heater box and the wiper motor. A friend of mine overhauled both motors, and went over their internals. Quote Share this post Link to post Share on other sites
fvike 173 Report post Posted April 3, 2017 The rear bumper is starting to get where it needs to be. Two bumpers has been joined to form one. There's still some work left, but the overall shape is there. 1 1 jipsaZ and 69Mustang16 reacted to this Quote Share this post Link to post Share on other sites
stick 10 Report post Posted April 4, 2017 That's a lot of hard work you guys have done, it looks awesome. Quote Share this post Link to post Share on other sites
69Mustang16 92 Report post Posted April 6, 2017 Really nice work! 1 Mavavto reacted to this Quote Share this post Link to post Share on other sites
fvike 173 Report post Posted April 13, 2017 Thanks. I started dynamating some more. Tip to everyone: Buy the pre-cut kit. Saves you a lot of work. Also I've sent out a lot of bare aluminum parts to be coated gray to match the color on the hood hinges and cluch resorvair. Quote Share this post Link to post Share on other sites
MAC390 327 Report post Posted April 13, 2017 Putting that insulation in is a real pain in the butt, your car is looking so nice. 2 fvike and RPM reacted to this Quote Share this post Link to post Share on other sites
fvike 173 Report post Posted April 16, 2017 Starting to get the hang of it now.. 1 Grabber70Mach reacted to this Quote Share this post Link to post Share on other sites
SWPruett 83 Report post Posted April 17, 2017 Your car is really looking great Frode! Won't be long now! 1 jipsaZ reacted to this Quote Share this post Link to post Share on other sites
connery 4 Report post Posted April 29, 2017 Nice car you got there, mate! I'm actually wondering, if it's not a secret, of course, how much did it cost you up until this point, and how much do you think is everything gonna cost? I mean, from now on. Thanks for the updates and hopefully we'll see more from you! Congratulations, my friend! 1 Mavavto reacted to this Quote Share this post Link to post Share on other sites
fvike 173 Report post Posted May 7, 2017 In short; I have no idea. I have a ballpark number, but It's really of no relevance. Labor cost is much higher here than in the States. USD/NOK exhange rate is currently 8.65ish, 25% VAT on everything, overseas shipping on everything, it adds up. When it's all said and done, I might as well have bought 2 Mach 1s for the same money. 1 Mavavto reacted to this Quote Share this post Link to post Share on other sites
fvike 173 Report post Posted May 28, 2017 I've put my lower dash and the dash small parts in a acid bath. It cleans off easily after a day and a pressure wash afterwards. Not done yet, because the bath is a little to small for the entire dash, so I have to flip it after a while. This process saves the structure in the dash very well. Also, I suspected the acid would either dissolve the clutch pedal rod bushings to install roller bearings instead. I read that they were a PITA to remove, but here they fell out after two days. 2 sixt9stang and Grabber70Mach reacted to this Quote Share this post Link to post Share on other sites
fvike 173 Report post Posted June 11, 2017 I got a lot of parts back from powdercoating last week. It's a very thin coating, very nice. Almost all of the shiny parts around the car was coated grey to match the Ringbrothers hood hinges and clutch reservoir. I installed the DSE battery mount and the II Much diff vent. I'm gonna Dynamat the trunk too, but I ran out of mats. There will be a AN -6 line running from the axle housing to the vent. I'm not sure if I'll just run it over the frame rail, or thru it back at the rear spring shackle hole. After test fitting the battery, I decide to turn the mount around, so that the terminals is out of sight, for a cleaner look. Most of the stuff in the engine bay will be this gray color. Only the Hydraboost backing plate that I didn't have a tool to remove, and the MC and clutch pump that I didn't dare to sandblast will still be unpainted. 1 Grabber70Mach reacted to this Quote Share this post Link to post Share on other sites
RPM 1,190 Report post Posted June 11, 2017 Looks great, love the contrast in colors. Quote Share this post Link to post Share on other sites
fvike 173 Report post Posted July 2, 2017 Got the rear brake line in, and tried to install the transmission. Could NOT get the transmission to mate with the bellhousing, missing the last 3/8"s. Took the engine out of the car and tried it on the floor. Same result. Found out that the clutch was not centered, and after a litlle bit of googling, I ordered a steel alignment tool instead of the plastic that was supplied. Not centered. Input shaft would only enter halfway. 1 1 Mavavto and Grabber70Mach reacted to this Quote Share this post Link to post Share on other sites
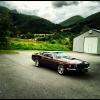
fvike 173 Report post Posted July 2, 2017 Did get a win on Saturday when I had the opportunity to take the Mustang out in the sun for the first time. Color looked awesome. 2 Grabber70Mach and SWPruett reacted to this Quote Share this post Link to post Share on other sites
MAC390 327 Report post Posted July 4, 2017 That car is real nice, love the colour. 1 jipsaZ reacted to this Quote Share this post Link to post Share on other sites
fvike 173 Report post Posted July 14, 2017 Engine and transmission finally in. Once the clutch was centered properly, it all slid in place. Headers and lamda sensors also installed. The TCP bracing kit has been powdercoated gray to match other parts in the engine bay (to be installed later). It's nice to have a manual shifter in the car. A friend of mine, who's an aspirering photographer, thought the shifter was so cool that he took this picture of it. 2 SWPruett and Grabber70Mach reacted to this Quote Share this post Link to post Share on other sites
Ash 145 Report post Posted July 14, 2017 That is a very nice photo, your friend has done well. As have you with the build. The underneath is looking great! 1 RPM reacted to this Quote Share this post Link to post Share on other sites
fvike 173 Report post Posted July 18, 2017 Did some blackout work today. First the area behind the went. Then a section under the backlite And at last a little touchup on the blackout behind the windshield, just covered the inside of the A-pillar. 1 Grabber70Mach reacted to this Quote Share this post Link to post Share on other sites
Grabber70Mach 107 Report post Posted July 21, 2017 It's coming right along, it looks great. Quote Share this post Link to post Share on other sites
fvike 173 Report post Posted September 9, 2017 I've gotten the lower dash, steering column and fold down seat parts painted. After 2 weeks of paint curing, I started to assemble the dash. 2 sixt9stang and SWPruett reacted to this Quote Share this post Link to post Share on other sites