Footcutter11 23 Report post Posted October 2, 2015 High speed shit. Really high quality work! I hope someday I can get even close to that good... 1 RPM reacted to this Quote Share this post Link to post Share on other sites
RPM 1,190 Report post Posted October 2, 2015 I agree 100% Footcutter! It"ll be a shame to cover up all that smooth metal. Quote Share this post Link to post Share on other sites
fvike 173 Report post Posted October 13, 2015 Body man says he's got about 10 hours of work left before we get primer! Ca 70 hours has been put into the car repairing metal that normaly would have been bondo'd. My stance is; I'd rather pay for an hour of metal work, than an hour of bondo work. A straight car also cuts down on the sanding hours. Looks straight. Gap is consistent. Scoop is flushed, but it was a in bit rougher condition than the passenger side scoop. Inner wheelhouse reworked. Here you can really see the width of the wheelhouse. Still some welding left. Inside the wheelhouse. The dented quarter panel bottom corner is now smooth. Same with the passenger wheelhouse lip. Quote Share this post Link to post Share on other sites
RPM 1,190 Report post Posted October 14, 2015 Metal working p0rn at its best! I wish my body guy knew what metal working was. So what was done to the side scoops or inner bracket to get them flush? Were the scoop edges just trimmed? I haven't handled my scoops in forever to remember the design. Quote Share this post Link to post Share on other sites
fvike 173 Report post Posted October 15, 2015 Metal working p0rn at its best! I wish my body guy knew what metal working was. So what was done to the side scoops or inner bracket to get them flush? Were the scoop edges just trimmed? I haven't handled my scoops in forever to remember the design. Yeah, basicly just trimming the edges. I haven't had them off the car after, so I can't say for certain right now. And yeah, the dude workin' on the car is seriously skilled. Not in a million years could I've gotten the result he gets myself. It's fun when you can get a true professional to work on your car. Worth every dime. 1 RPM reacted to this Quote Share this post Link to post Share on other sites
fvike 173 Report post Posted November 17, 2015 The car is now 99,9% finished with the metalwork. All in all, ca 130 hrs har been put into the car to get it as straight and dent free as possible. Just very minor stuff left before primer. I decided also to put on the U-Pol Raptor bedliner under the car at this time. Some pictures: Some welding was required in this area because of rust holes. When inspecting it further, there was still rust under there, so all 4 body part plates had to be opened up and fixed. A quick weld job turned into a 4 hour plate job. Drivers door opening starting to look ok. I think I'll stick to the original gaps, but some work was needed here. Some small holes to be welded, and the bottom rear corner of the door has warped a bit after the repair done there. Needs to be massaged back. Same area. Welding on the door to improve the gap. Notice how huge this gap is on the pictures above. Passenger side gap. Before and after shot of the decklid. The missing trunk weatherstrip should have the decklid line up with the quarter end panels. Quote Share this post Link to post Share on other sites
fvike 173 Report post Posted November 18, 2015 The hood is finally back on the car to see that it fits. It's a Dynacorn hood, so it isn't perfect, but the main problem is with the sectioned right fender. The '69 lighthouse bucket is welded on the '70 fender at an slight angle, not visible until you try to match a hood. A little more welding to fix the gap. A bit rough still in the picture. Quote Share this post Link to post Share on other sites
SM69Mach 68 Report post Posted November 18, 2015 Looking good man. Making good progress. Quote Share this post Link to post Share on other sites
fvike 173 Report post Posted November 25, 2015 Thanks SM69Mach. The guys at the shop is putting the finishing touches on the car, and test fitting everything. The Dynacorn hood is lining up nicely, the hood was moved verticaly a bit to the right after this picture. Swingin' the hammer: It's a joy to watch these guys work. It's finesse work, true craftmanship. This is the area he was workin on. He was hitting on the bottom body line on the door. Also, not very much bondo on the car! It says a lot about the job that has been done, because the doors was pretty dented. Not much bondo here either. I'm seriously starting to think about not using the rear wing. Gap welding done. Glory shot: Straight as an arrow. There just isn't anything in the world as beautiful as a '69 Mustang Fastback body. 1 69FB reacted to this Quote Share this post Link to post Share on other sites
Footcutter11 23 Report post Posted November 25, 2015 Thanks SM69Mach. The guys at the shop is putting the finishing touches on the car, and test fitting everything. The Dynacorn hood is lining up nicely, the hood was moved verticaly a bit to the right after this picture. Swingin' the hammer: It's a joy to watch these guys work. It's finesse work, true craftmanship. This is the area he was workin on. He was hitting on the bottom body line on the door. Also, not very much bondo on the car! It says a lot about the job that has been done, because the doors was pretty dented. Not much bondo here either. I'm seriously starting to think about not using the rear wing. Gap welding done. Glory shot: Straight as an arrow. There just isn't anything in the world as beautiful as a '69 Mustang Fastback body. Totally agree!! Quote Share this post Link to post Share on other sites
fvike 173 Report post Posted November 30, 2015 Ok. All body work is done. Time for some bondo/filler. Doors, roof-to-pillars seam, and passenger rear quarter get some, but not much. This post is just to document where the bondo is on the car. This side's also arrow straight. Some welding on the top of ther doore here also for gap opening. The headlight bucket was drilled out at the top and moved a little bit. This area is where it's heaviest use of bondo or filler. 1 SWPruett reacted to this Quote Share this post Link to post Share on other sites
RPM 1,190 Report post Posted December 1, 2015 For a 46 year old car, that's like no filler. Quote Share this post Link to post Share on other sites
Alan_Mac 48 Report post Posted December 1, 2015 Can't wait to see the paint on. What color and paint type will it be? Quote Share this post Link to post Share on other sites
fvike 173 Report post Posted December 3, 2015 Same color as it was. Ford Chastnut Pearl. The paint shop uses Dupont/Cromax Quote Share this post Link to post Share on other sites
fvike 173 Report post Posted December 7, 2015 Sanding has begun. Upper left quarter... and roof pillar. The backside of the drivers side vent was bad, so a new piece was patched in. Rear valence is done, and test fitted. Nice gaps. Other side. My car has always had the '67-'68 back up lenses. I wonder if it is because it's an early car? Build date Dec 26, 1968. Does anybody else have these? Quote Share this post Link to post Share on other sites
RogerC 136 Report post Posted December 8, 2015 Mine had those also, Dec 9, 1968 car Nice work! 1 fvike reacted to this Quote Share this post Link to post Share on other sites
Alan_Mac 48 Report post Posted December 8, 2015 Isn't Ford Chestnut Pearl a 90's paint color? Quote Share this post Link to post Share on other sites
fvike 173 Report post Posted December 8, 2015 Isn't Ford Chestnut Pearl a 90's paint color? Don't know, I think it came up as a Ford Truck color when I had it scanned. I know the car was Candy Apple red until it got repainted Chestnut Pearl sometime between 1995 and 1998. Quote Share this post Link to post Share on other sites
fvike 173 Report post Posted December 11, 2015 Finally some paintbooth action! Acid primer is being put on the small parts. Odd Magnar, the painter is prepping the trunk lid. The car was also being preped, but the picture I took of it was blurry. I'm just real happy that the paint shop has my car up high on the priority list. The goal is to have primer before Christmas. Quote Share this post Link to post Share on other sites
SM69Mach 68 Report post Posted December 11, 2015 Looking good. Lets see some color on this bad boy. Quote Share this post Link to post Share on other sites
fvike 173 Report post Posted December 12, 2015 Mine had those also, Dec 9, 1968 car Nice work! Mine is an San Jose car, is yours? Quote Share this post Link to post Share on other sites
fvike 173 Report post Posted December 16, 2015 WE GOT PRIMER! Started off with acid primer. Under the car and in the engine bay. The engine bay was painted, Opel Rallye flat black. I think it looks to shiny, but I it might be the paintbooth lights and freshness of the paint that makes it look that way. We'll see. Quote Share this post Link to post Share on other sites
fvike 173 Report post Posted December 16, 2015 Also today, the U-Pol Raptor bedline was sprayed. After seam sealer, a lot of masking had to be done. This is Matheus, the painter, he also laid the Raptor. Looks like a good product. It lays on pretty thin, but great coverage. I'm excited to see tomorrow how it looks when it's dried. Quote Share this post Link to post Share on other sites
RogerC 136 Report post Posted December 16, 2015 Mine is an San Jose car, is yours? Dearborn I might have accidentally hit the report button, I clicked to stop the page from auto scrolling on me and might have timed it perfectly while the page was moving. Sorry Quote Share this post Link to post Share on other sites
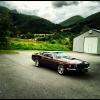
fvike 173 Report post Posted December 19, 2015 After unmasking, this was the result: Then it was time to leave the paintshop for now. Back alongside my brother's 'cuda. 2 SWPruett and shaun071 reacted to this Quote Share this post Link to post Share on other sites