fvike 173 Report post Posted November 13, 2012 Some more progress today, got the windshield out! Also got the main electrical harness out. This was all the rust there was on the pillars. The cowl is also rust free :) Not much left now. Need to replace driver side floor, but I was aware of that. I've had the replacement panel lying around a couple of years already. Quote Share this post Link to post Share on other sites
70Nightmare 20 Report post Posted November 13, 2012 Keep up the good work. Got a question for u how hard is it to take out front and rear windshield i have never done that. I know i need that special tool to get the clips out from underneath the weatherstrip any other tips or trick. Quote Share this post Link to post Share on other sites
fvike 173 Report post Posted November 13, 2012 The rear windshield is the easiest one. Remove the trim (may require a special tool, but I did it without) and use a knife to cut the gasket in half. Basicly you're cutting the top of the gasket, so that the glass is free. Then simply pop it out from the inside, pushing steadily at the corners of the glass. The front windshield is glued in, so it requires a special knife (its L shaped)to cut around the glass after the trim is removed. I got a skilled professional to help me. But same thing, cut and push, but it's a bit harder since it's glue and not a gasket. The rear windshield can rest in the gasket while it's pushed out, while the front windshield cannot. It will glue it self down if it touches the glue again. Quote Share this post Link to post Share on other sites
69droptopgt 10 Report post Posted November 13, 2012 Looking like your getting things done. How long do you think the resto going to take? Hopefully insurance gave you enough money to cover expenses. Quote Share this post Link to post Share on other sites
fvike 173 Report post Posted November 14, 2012 I'm hoping it will take a year, but I think it will take two. Insurance only covered the damage, not a full resto, so I gotta spend some money out of my pocket too. But that's fair. Quote Share this post Link to post Share on other sites
RPM 1,190 Report post Posted November 14, 2012 Good luck on the rebuild. Sorry about the crash, there are idiots everywhere. To get a more accurate repair time quote, I always have to multiply my guess times pi. Bob Quote Share this post Link to post Share on other sites
fvike 173 Report post Posted November 18, 2012 Good luck on the rebuild. Sorry about the crash, there are idiots everywhere. To get a more accurate repair time quote, I always have to multiply my guess times pi. Bob Hope you're wrong, or else I'm looking at 3-6 years on the project!:sweatdrop: Anyway, removed the heater box, no surprises there either. I like how solid this car is. Besides the driver foot well and passenger door, there is virtually no rust on the car. Next up: remove the steering and brake components from the engine bay. Quote Share this post Link to post Share on other sites
fvike 173 Report post Posted November 18, 2012 Good luck on the rebuild. Sorry about the crash, there are idiots everywhere. To get a more accurate repair time quote, I always have to multiply my guess times pi. Bob Hope you're wrong, or else I'm looking at 3-6 years on the project!:sweatdrop: Anyway, removed the heater box, no surprises there either. I like how solid this car is. Besides the driver foot well and passenger door, there is virtually no rust on the car. Next up: remove the steering and brake components from the engine bay. Quote Share this post Link to post Share on other sites
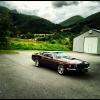
fvike 173 Report post Posted November 20, 2012 2" drop spindles from Stubtech in Australia. They look real good. They cost me 910 AUS + shipping, but I need them to fit a wheel wider than 8". My twin brother Joakim got a set of new front tires for his '70 Plymouth Barracuda the other day. 275s up front, the same as I want to run. This is an 18" tire. So natrually, I had to borrow it to do a mockup of my target stance. Planning on 315s or 335 18" in the back. Leaning towards 315 because of my fold down rear seat. Gotta nail the stance on this build. Quote Share this post Link to post Share on other sites
Monzy 10 Report post Posted November 25, 2012 (edited) Well thats what my car would look like smashed up :( They're almost identical. I have to comment on your blackout panel as I've been toying with the idea of blacking mine out. I think the tail lights get lost in the panel with the black being blended into the quarter caps. Would look better on just the tail light panel, I think.... Good luck on the rebuild, got a nice car to work on. Edited November 25, 2012 by Monzy Quote Share this post Link to post Share on other sites
fvike 173 Report post Posted November 25, 2012 Well thats what my car would look like smashed up :( They're almost identical. I have to comment on your blackout panel as I've been toying with the idea of blacking mine out. I think the tail lights get lost in the panel with the black being blended into the quarter caps. Would look better on just the tail light panel, I think.... Good luck on the rebuild, got a nice car to work on. That's funny, because I discussed it with my brother and a friend of ours when we did the blackout, and we all thought the tail lights stood out more, and that the quarter cap blackout did help that. They were painted that way originally on the Boss 302. Individual tastes I guess. Quote Share this post Link to post Share on other sites
UK Mach1 dude 13 Report post Posted November 26, 2012 Sorry to see your crash, such a beautiful looking car too. Your rebiuld is coming along nicely though, all the best with it. I used to worry about this sort of thing happening when I used to do trackdays, especially as my insurance diid not cover me and I never used to take out trackday insurance. As it turned out I ended up crashing my car on a normal road a few years ago due too slippy autumn roads and lack of concerntration. All fixed up now though. Thread on it here;- http://www.mocgb.net/forums/showthread.php?24421-Mach1-project Quote Share this post Link to post Share on other sites
fvike 173 Report post Posted November 27, 2012 Stuff happens fast. That looks like a hard lick! I'm glad you got it fixed. It's a nice car btw, not many white '69-70 Mustangs to see. Quote Share this post Link to post Share on other sites
UK Mach1 dude 13 Report post Posted November 27, 2012 You're so right, stuff does happen fast. Still not sure what happened that day other than the rear end slid out on a bend, then it snapped the other way and spun once or twice then went backwards into a tree, along the way it put a massive dent into the top of the passenger wing and tore off the door mirror and dented drivers side rear wheel arch. I was not sure of the white colour when I brought it ten years ago and always thought I do a colour change one day, however the white really grew on me and now I would not want it any other colour. Quote Share this post Link to post Share on other sites
Mike65 475 Report post Posted November 27, 2012 You have to be careful with these cars in the rain or when there are wet leaves on the ground since the back end is so lite. I learned the hard way when I first started driving back in the mid 70's & had a 1970 Mustang Coupe as my first car. Was exciting to drive in the snow.:scared: Quote Share this post Link to post Share on other sites
69droptopgt 10 Report post Posted November 27, 2012 Wow that white car does look nice! Never thought I would like mustangs white but that proved me wrong. This is a nice thread to follow. Quote Share this post Link to post Share on other sites
Monzy 10 Report post Posted November 28, 2012 That's funny, because I discussed it with my brother and a friend of ours when we did the blackout, and we all thought the tail lights stood out more, and that the quarter cap blackout did help that. They were painted that way originally on the Boss 302.Individual tastes I guess. I didn't comment back right away but I went out to the garage and had a good look at mine which is the same body colour red as yours and had a hard time visualizing the blackout on just the tail light panel. I think your picture was just on the wrong angle. I'm sure I'll see other pics of your build to compliment the blackout through the quarter caps. Quote Share this post Link to post Share on other sites
fvike 173 Report post Posted December 1, 2012 Monzy said: I didn't comment back right away but I went out to the garage and had a good look at mine which is the same body colour red as yours and had a hard time visualizing the blackout on just the tail light panel. I think your picture was just on the wrong angle. I'm sure I'll see other pics of your build to compliment the blackout through the quarter caps. Cool! I'd like to see pictures of your car too! Anyway, got some things done this week too. First, the gas tank was removed. Got some surface rust to deal with. Then we had it up on the lift, and dropped the FMX, the battery cable, the Accusump line and exhaust in front of the mufflers. My FMX. Fantastic transmission. Smooth shifts, never missed a beat. But it did have 2 oil coolers (Radiator and one extra /w fan). The bottom looks good too, but gotta clean it up. Finally removed the headliner. The padding looks new. Is this original? - My brother keeps popping up in these pictures. Quote Share this post Link to post Share on other sites
Ash 145 Report post Posted December 1, 2012 Looks like you guys have got all kinds of coolness going on in this shed. Is it a workplace or just a sweet home set-up you guys have got going? Quote Share this post Link to post Share on other sites
fvike 173 Report post Posted December 1, 2012 It's a old shop that we (10-12 people) used to rent for winter storage. When the owner went out of business, 8 of us who used to rent there bought it together. So now we have a great place to work on our cars. And we're renting out to a few guys. Just got the lift installed this winter, and we got a huge air compressor and the building is heated, so we got it pretty good. Next up is to paint the floors light gray to get it a bit cleaner and spreading the light better. But that's for this summer. The 2 open garage doors + the red curtained window is our part of the building. The other part is a masoner business. Quote Share this post Link to post Share on other sites
69droptopgt 10 Report post Posted December 1, 2012 Looking good fvike. Now I cannot wait to get back from mexico so I can start working on my car restoration lol. Nice idea on buying that place. Quote Share this post Link to post Share on other sites
Ash 145 Report post Posted December 1, 2012 That's a great idea with the group of you buying the workshop. Awesome set-up! Quote Share this post Link to post Share on other sites
RPM 1,190 Report post Posted December 2, 2012 Ditto on the great idea, photos look like Chebbys are outlawed. Quote Share this post Link to post Share on other sites
fvike 173 Report post Posted December 2, 2012 Ditto on the great idea, photos look like Chebbys are outlawed. Pretty much:single fuck: This is a Ford and Mopar town. But there is a Verdoro green '68 Firebird HO in the right corner of the indoor picture. And it is pretty bad. It's got a Chevy 355 race engine in it, it's an old school build with all the "go fast tricks" applied. The owner has told me what it does on the 1/4 mile, but I can't remember (My brother think it was 11.80). I've seen it break out on the 1/8 mile. It's probably the car that runs best in this town. Edit: And the white car at the right gate is a GMC Typhoon. Quote Share this post Link to post Share on other sites
miketyler 15 Report post Posted December 2, 2012 Fvike - I couldnt help but browse thru your photo album. Are you fitting 275's up front? Awesome. I test fit my 275's from the front of my Cuda on my 70 when I was placing order for wheels and although they fit they were very close for lock to lock clearance. I may get adventurous at some point and pursue that once I get the car running. For now, am running 315/35-17 on the rear and 245/40-17 up front. Did you post up details on your rear setup somewhere? Quote Share this post Link to post Share on other sites