70mstang 11 Report post Posted October 18, 2012 Looking good :thumbup1: Quote Share this post Link to post Share on other sites
Mike65 475 Report post Posted October 19, 2012 Looks good. It is starting to look like a car again. :thumbup1: Quote Share this post Link to post Share on other sites
70-DropTop 12 Report post Posted October 20, 2012 (edited) Little more progress since earlier this week...and yes, it is starting to look like a car again! Passenger rear quarter needs patched, along with the trunk floor drop off and wheel housing. The engine bay still needs finished. They're moving along and I'm pretty happy. Trunk floor repairs More trunk floor repairs New quarter panel put on and repaired door is hung Tail panel is installed A very happy guy on the side looking at his car coming together :) Oh, and that's the wheel housing for the other side laying on the floor Edited October 20, 2012 by 70-DropTop Quote Share this post Link to post Share on other sites
stangme428 33 Report post Posted October 20, 2012 wow ... looking good! great progress!! keep it up!! Quote Share this post Link to post Share on other sites
70-DropTop 12 Report post Posted October 26, 2012 The passenger side front and rear inner fender aprons have now been tacked in place. I'll have to get some more pics and post them. It's moving. :thumbup1: Quote Share this post Link to post Share on other sites
70-DropTop 12 Report post Posted December 1, 2012 (edited) Well, it's been a little bit and I wanted to post an update. The hang up lately has been the decision on whether to replace the fenders and hood or repair them. After grinding down the paint on these parts, the top hood skin is fine, but the underside has a fair amount of rust, including up into the structure. Similar story with the fenders...found previous repair work at the bottom and rust underside in the structure. Plus, the passenger fender was crumpled at one point and filled in. So, the cost to fix it and get it right was going to be more than new metal...dynacorn to the rescue! Pieces should arrive this week. The major sheetmetal repairs are pretty much done, back half of the car is mostly in primer, and they've started working the body. Here's all the pieces repaired or replaced: Driver quarter panel Passenger quarter panel Taillight panel Driver trunk floor and drop off Passenger trunk drop off Driver door patched Passenger door patched Passenger front inner fender apron Passenger rear inner fender apron Driver fender (on order) Passenger fender (on order) Hood (on order) Rear valence (want the dual exhaust cutout) (on order) Rear deck lid***new addition*** (on order) Side sport mirrors***new addition*** (on order) Wow...not sure what to think after I made that list. Damn was my first thought. No more rust was the next :). Car should be pretty good after all this. Edited December 7, 2012 by 70-DropTop Quote Share this post Link to post Share on other sites
70-DropTop 12 Report post Posted December 5, 2012 Here are photos from the past weekend. Quote Share this post Link to post Share on other sites
Mike65 475 Report post Posted December 5, 2012 Looks good. :thumbup1: Quote Share this post Link to post Share on other sites
70-DropTop 12 Report post Posted March 23, 2013 (edited) Progress is being made again! The new front suspension, steering, and subframe connectors are in! This includes adjustable coilovers, tubular control arms, rack and pinion with bump-steer kit, and brake calipers. The subframe connectors were run through the floor pan a little to not lose ground clearance. In all, it looks good! I'll post some pics later this weekend...and provide some details, like my 18x9.5" wheels fit up front, wrapped with 275x35R18 rubber. Here's a preview: Edited March 23, 2013 by 70-DropTop Quote Share this post Link to post Share on other sites
70-DropTop 12 Report post Posted April 24, 2013 Suspension and brake pics from last month: Quote Share this post Link to post Share on other sites
70-DropTop 12 Report post Posted April 24, 2013 Steering pics from last month: Quote Share this post Link to post Share on other sites
70-DropTop 12 Report post Posted April 24, 2013 Subframe connectors pics from last month. The rear frame rails were boxed in, and then a square tub was run through the floor board and tied into the seat pan floor reinforcement. Quote Share this post Link to post Share on other sites
70-DropTop 12 Report post Posted May 26, 2013 The engine bay has been chopped: And then ground down and cleaned up: And finally sprayed with a base coat/primer (its a little dusty): Quote Share this post Link to post Share on other sites
70-DropTop 12 Report post Posted May 26, 2013 Here it is mid-sanding and panel fitment: Quote Share this post Link to post Share on other sites
70-DropTop 12 Report post Posted May 26, 2013 Final sanding. Something is missing...where did those doors go? Here they are!! COLOR BABY!! Quote Share this post Link to post Share on other sites
70-DropTop 12 Report post Posted May 26, 2013 The color is Performance Red from the 1999 - 2001 Mustangs. It was called Vibrant Red in the early '90s. It is very bright, and sometimes looks like it has a little orange in it, depending on lighting. I really liked this color on my old ride, and went with it again. Quote Share this post Link to post Share on other sites
Mike65 475 Report post Posted May 26, 2013 Looks great, nice color. Quote Share this post Link to post Share on other sites
stangme428 33 Report post Posted May 27, 2013 looks good..! Quote Share this post Link to post Share on other sites
70-DropTop 12 Report post Posted May 30, 2013 I can tell I'm getting really excited to being near the completion of paint and body. The doors have been cut and buffed, the fenders were just painted, and the hood is being prepped. In general, I think the painter is doing a nice job. I'm just not happy he painted the door latches and striker plates...something to remove and clean off :( Quote Share this post Link to post Share on other sites
RPM 1,190 Report post Posted May 30, 2013 This is the first time I've seen your thread, glad I saw and read it. Very nice work so far. I've liked the strut front suspension since I first saw it a few years ago, but wasn't comfortable doing it myself. Those front tires sure fit nice in there. What do you guys with r&p steering use for headers? Nice red for the color, but I'm partial. Good luck and keep up the good work. Bob Quote Share this post Link to post Share on other sites
70-DropTop 12 Report post Posted May 30, 2013 This is the first time I've seen your thread, glad I saw and read it. Very nice work so far. I've liked the strut front suspension since I first saw it a few years ago, but wasn't comfortable doing it myself. Those front tires sure fit nice in there. What do you guys with r&p steering use for headers? Nice red for the color, but I'm partial. Good luck and keep up the good work. Bob Thanks. The shop I got my R&P setup from recommends mid-length headers. If I can do long tube, I'll go that way. I have a couple months or so before I get to the exhaust system. I'm collecting drivetrain parts now. Need to order my intake, heads, carb and the last few needed pieces for the T5 conversion. Quote Share this post Link to post Share on other sites
70-DropTop 12 Report post Posted June 1, 2013 The body shell has been painted and the rear deck lid. Just a few small pieces remain: Quote Share this post Link to post Share on other sites
Mike65 475 Report post Posted June 1, 2013 The color looks great. :thumbup1: Quote Share this post Link to post Share on other sites
70-DropTop 12 Report post Posted June 9, 2013 The color looks great. :thumbup1: Thanks...and it is a good thing that I agree with you! Quote Share this post Link to post Share on other sites
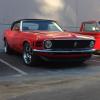
70-DropTop 12 Report post Posted June 9, 2013 I went over to the shop to give it look and come up with a final to-do list and here's what I saw. In general, everything looks pretty freaking awesome. The color is super bright and these pics don't do it justice. I'll have to take over my camera vs. phone to take pics. Front lower valence: A few bolts are missing, so panels aren't quite on right...gaps need a little adjusting: That looks pretty awesome: Another view: Quote Share this post Link to post Share on other sites