Mike65 475 Report post Posted March 31, 2014 JT, Just looking at some of your pics, nice work. I have replaced 1 door skin on my Coupe, both outer wheel houses, 1 trunk drop off, 1 trunk floor, 1 door shell, tail light panel, rear gas tank support panel, 1 trunk floor l/s, both front inner fender panels, patch the rot holes (4) where the inner fender panels overlap the top of the shock tower flange, & both quarter skins. I am now working on replacing both torque boxes. Looks like you are or did pretty much the same metal work as me. Mike. Quote Share this post Link to post Share on other sites
JTG 10 Report post Posted April 1, 2014 Yes it does sound familiar. It sure does look great without all the rusty metal on it, right? Quote Share this post Link to post Share on other sites
Mike65 475 Report post Posted April 1, 2014 Yes it does sound familiar. It sure does look great without all the rusty metal on it, right? Right, is sure does look good with new metal. :thumbup1: Quote Share this post Link to post Share on other sites
RPM 1,190 Report post Posted April 1, 2014 A two year old build thread, and I just see it tonight? Wth? Very cool story, especially the wife and her wanting you to keep it. Does she have a twin sister??? What is it with body shop guys and boats? I know 4 body shop owners who have boats. Crazy. Enjoyed reading your build, keep up the good work. Bob Quote Share this post Link to post Share on other sites
JTG 10 Report post Posted April 1, 2014 Body shop guys and boats. Well I think to own a boat you need to either be rich or know how to fix stuff. And since most body shop guys know how to fix stuff. Or maybe it's because they are tired of working on cars all the time so working on a boat isn't so bad. Quote Share this post Link to post Share on other sites
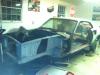
JTG 10 Report post Posted August 4, 2014 It's been a while since my last update. I got the passenger side door skin on without issue. The most recent panel to replace was the driver's side shock tower. This was a big one for me because it caused me some problem a long time ago. I bought the car in '88 when I was 18 and back then NJ had a full inspection every one. To test the brakes they would drive the car about 50' and slam on the brakes. Yeah, my shock tower cracked during the test. I left and the car was pulling hard. I was 18 so I didn't have the time, money or desire to do a full replacement so I found a guy to patch it up. Last week I cut it out, that's a job with a 3" wheel. Here it is all removed. Found some rust on the top of the framerail. And the patch. And here it is all welded in. It was nice have the bolt holes to line everything up. You don't have that with many panel replacements. I posted this in another thread but to keep everything together I'll add this here. I noticed the new part did not have a couple of holes used for a bracket on the old part. Below is a picture of a bracket for the power steering lines. I didn't drill the new holes yet, waiting until I get closer to make sure I go stock with it or not. Quote Share this post Link to post Share on other sites
JTG 10 Report post Posted August 4, 2014 With the shock tower in that completed the repairs for the driver's side of the car. Now I need to move over to the passenger side. I already did the torque box as one of my first replacements and the door also. I need to turn the car around to do the quarter area (quarter skin, outer wheelhouse and trunk dropoff. I also have the battery apron, shock tower and frame patch at the front. As you can see from my earlier pics the car is on jackstands. Fortunately I was able to get a dolly from a guy who just finished using it for a vette. Here's a pic of the base. And here's the car on the dolly. The guy with the vette was an electrician hence the parts used but it really is a great way to design a dolly. It's very easy to adjust. I used the front leafspring mounts for the rear mounts. The fronts were a little tricky because I couldn't use the bumper mounts because I still had to replace the passenger side. I put the rail under the car with a threaded rod going up through a hole in the frame. This hole lines up with the drainage hole in the floor pan. The car is easy to move around the garage. Now I just need to figure out the best way to keep it steady when I'm working on it, the wheels do not have locks. Quote Share this post Link to post Share on other sites
Mike65 475 Report post Posted August 5, 2014 JT, nice work on the shock tower. Looking good. Quote Share this post Link to post Share on other sites
JTG 10 Report post Posted August 5, 2014 Thanks. Cutting the shock tower out was no fun but putting the new one in went much better than I thought it would. I would recommend it for anyone on the fence about replacing these. I was unsure about doing the passenger side but looking at the old vs new I'm putting a new one in that side too. Quote Share this post Link to post Share on other sites
stangnet33 88 Report post Posted August 5, 2014 Good work so far ! Feels good when you jump a big hurdle. As for the car dolly, I don't think I ever considered using that kind of tubing. Looks like it will work Ok and if you mount the car right you can even use it for a datum reference. Here are a couple cheap idea's to hold it in place vs buying and having to mount new caster wheel's with locks. The first one is only a couple of bucks but the second one would probably work better and have to buy fewer. Just a thought :001_cool: Good luck with the other side. Quote Share this post Link to post Share on other sites
JTG 10 Report post Posted December 1, 2014 I kept the dolly locking simple and just wrapped an old t-shirt around a couple of the wheels. I replaced the passenger side quarter, trunk dropdown and outer wheelhouse using the same method as the driver's side. Here it is all cut out. There were a couple of small patches needed on this side. I still need to take the finished product pic for the quarter but it's all done. Quote Share this post Link to post Share on other sites
JTG 10 Report post Posted December 1, 2014 OK. I was going to post some more updates but realized I need more pictures online. I'll take some and continue my updating. More to come. Quote Share this post Link to post Share on other sites
Mike65 475 Report post Posted December 3, 2014 Looking good. Keep up the good work. Quote Share this post Link to post Share on other sites
JTG 10 Report post Posted December 11, 2014 Here's a pic of the passenger side quarter welded in. Here's a shot of the battery tray before http://i328.photobucket.com/albums/l352/jtg463/Mustang/Battery%20tray%20repair/IMG_0206.jpg And after Quote Share this post Link to post Share on other sites
JTG 10 Report post Posted December 11, 2014 After the batter tray it was the front frame rail and shock tower. I got the frame rail piece from Mike65 and it worked perfectly. Before And after, sorry the bracket for the rotisserie was already installed. With the battery tray in place I was able to cut out the shock tower and bolt in the new one while it was being welded. The existing shock tower wasn't that bad, no cracks or anything but the frame was bad around it and I replaced the driver's side so I figured I should do this one also. Here it is all cut out. Here's some of the rust. And of course the usual rust where the apron and tower overlap First the frame patches. And then the new tower welded in. Quote Share this post Link to post Share on other sites
JTG 10 Report post Posted December 11, 2014 Now the only welding I know I have left on the body is a few small patches and subframe connectors. So I started building a rotisserie. I grabbed every engine stand that I could over the last couple of years and ended up with four. One is currently holding up the 351W so I used the other three to build the rotisserie. I used the idea I saw online of using 2" square tubing for the vertical and put a 2.5" piece around it a a slider. All three of the stands had rectangular tubing for the verticals and 2" square for the base. I cut up all three verticals to use for the 6 gussets. I cut up one of the bases to use the square tubing. I built a hitch tray years ago and since I don't really use that anymore I took the 2" and 2.5" from that. For the brackets I used the leftover unistrut I used for the dolly. It worked out pretty good. In the front I used the bumper bolts. It flexed a bit so I also bolted it to the upper radiator support. I the back bolted it using the bumper bolt holes. Here's the front stand. Don't worry I drilled out the holes to lock the slider in place. Here's a closeup of the front slider with the circular tubing from the stand welded to it. Since I used rectangular tubing and bolted it to the radiator support I was able to make it adjustable. Another picture of the front. Here's a picture of the rear slider. I put a set screw (bolt) in the rear to allow us to hold up the slider while we were lifting the car. The clamp is a backup. Once we got the car to the right height and drilled a hole all the way through and put a bolt. And here's the car on its side. Now it's time to scrape and clean! Quote Share this post Link to post Share on other sites
Ridge Runner 1,112 Report post Posted December 12, 2014 Just one small suggestion ,Widen the back bar to at least 4 feet wide .If you happen to get it off balance it could tip over .A friend brought me a 67 Shelby to do some work on ,he wanted to try his new rotisserie .I told him i thought the lower rear cross bar was to short and if the wheels turned the wrong way it could tip .No !he had to use the new rotisserie .Got it mounted and as he tried to turn it over it started to lift the wheels off the ground .If i had not caught it it would have flipped the whole thing .we wound up clamping another longer tube to the lower bar to keep it from lifting and flipping ..Yeah he still wanted to use the new rotisserie . Quote Share this post Link to post Share on other sites
RPM 1,190 Report post Posted December 12, 2014 Just one small suggestion ,Widen the back bar to at least 4 feet wide .If you happen to get it off balance it could tip over .A friend brought me a 67 Shelby to do some work on ,he wanted to try his new rotisserie .I told him i thought the lower rear cross bar was to short and if the wheels turned the wrong way it could tip .No !he had to use the new rotisserie .Got it mounted and as he tried to turn it over it started to lift the wheels off the ground .If i had not caught it it would have flipped the whole thing .we wound up clamping another longer tube to the lower bar to keep it from lifting and flipping ..Yeah he still wanted to use the new rotisserie . Excellent advice. I widened mine which were probably ok to start with. Bob Quote Share this post Link to post Share on other sites
JTG 10 Report post Posted December 12, 2014 Yeah he still wanted to use the new rotisserie . That was us too. We had it all together and looked at the base and said, it would be nice if it was wider. Quote Share this post Link to post Share on other sites
Ridge Runner 1,112 Report post Posted December 12, 2014 I build my own rotisseries ,They are hitch and receiver tubing so they slide together .When not in use they fold up into a 4' x 2' x 4 foot high unit i can roll out of the way .I went double side bars so i can load it on a car trailer if i need to .It is adjustable every where so i can mount any thing on it and balance it.This one never got painted ,i had a car waiting the moment it was finished and as soon as car comes off there is another one waiting .I have two of my own and i really need a third ,i have made several for friends . Quote Share this post Link to post Share on other sites
JTG 10 Report post Posted December 15, 2014 I like how you used the hitch receiver for the left/right slider, good idea. Quote Share this post Link to post Share on other sites
JTG 10 Report post Posted December 15, 2014 I like how you used the hitch receiver for the left/right slider, good idea. Quote Share this post Link to post Share on other sites
Ridge Runner 1,112 Report post Posted December 15, 2014 I have it set up for 65 -70 mustangs now ,all i have to do is drill some new pinning holes to mount something else ,At the most make just the mounting ends .I would like to motorize one with a reduction motor for when i sand blast ,although i would have to cover the motor to keep the sand out . Quote Share this post Link to post Share on other sites
Ridge Runner 1,112 Report post Posted December 15, 2014 I have it set up for 65 -70 mustangs now ,all i have to do is drill some new pinning holes to mount something else ,At the most make just the mounting ends .I would like to motorize one with a reduction motor for when i sand blast ,although i would have to cover the motor to keep the sand out . Quote Share this post Link to post Share on other sites