JTG 10 Report post Posted May 31, 2012 A little bit of history first. I bought my first mustang when I was 15, a '67 coupe, inline 6 three speed manual. I worked on it until I got my license and drove it for about a year before I had some engine trouble and decided I wanted a mustang with a bit more power. While swapping out the inline 6 with another from a 68 I found the Mach I, a 351W auto, red with white interior. Here are a few pictures from back in the day. Here's one of all 3 cars. Another of just the Mach I I drove the '69 for the last year of high school and started to strip the paint with plans to re-paint it. I patched the typical rust spots with new metal, front & rear lower quarters, corners of the doors, etc. Well once I was in college I didn't have much time to work on the car so it remained unpainted. I met my wife and after graduation we were married. With a baby on the way I parked the mustang in the garage and opted for safer more reliable transportation. While the kids were younger I really didn't do much to the car and when we moved to a new house the car was moved to an outside self storage place. It stayed there for a few years before I was tired of paying that bill and decided to put it into one side of the 2 car garage. It stayed there for a year or two and I decided to sell it. I got it running and put a For Sale sign on the windshield during a garage sale. Nothing came of that and my wife talked me out of selling it and suggested I start working on it again. I knew the floors needed some work and maybe a few other spots. I decided if I'm going to do it I'm going to do it right, fully disassembling the car. I put some attic stairs in so I could get access to the attic over the garage and started putting all of the parts up there. This was a good decision. There were more spots to repair and a few surprises. The battery tray area was shot, both front frame rails had rust behind the bumper brackets and the gas tank was shot. I also discovered that the side cowl on the drivers side was crushed. I guess that's why it had a replacement fender. I got about this far before stopping again. With 3 kids growing up life was busy and I bought a boat so a lot of the time and money went into that. One of the good things to come out of the boat purchase was that I met a great couple at the marina, Jay & Daniele. Jay is into cars and works in a body shop. With his prodding I started working on the car again last year. I finished pulling it apart. The engine, trans, all suspension, everything. The only thing left to pull out is the windshield and back glass. I began working on the driver's side torque box a few weeks ago. The toe board, floor pan and upper torque box have been removed. I've put POR15 on the lower torque box and frame rail. Here it is with the rust removed. Here it is now with the POR15. Once Jay drops off his welder I'll start putting in the new metal. Here are a few other pictures of the work ahead. Battery tray. Passenger side torque box. Upper fender apron holes. I think I'm going to put replacement quarter skins on the car. My 20 yr old repairs look good from a few feet away but they were overlaps, not butt welds and this is a good time to do it. I'm also planning to switch the car over to a manual transmission. I think it will be a lot more enjoyable driving a stick in the mustang. I am also seriously considering going with a MII front suspension. I need to replace all of the suspension, steering and upgrade to disc brakes so why not go with a complete package. I know there are views on both sides about this and I'm not at the point now to make a final decision. I have tossed around the idea of going with a mod motor but I kinda like the old school sound of a carb motor. In this area I'm leaning towards a stroked 351. As you can see I'm not too concerned with staying 100% original. My car is your basic Mach I, not an R code, has 150k miles so I don't think I'll hurt its value too much. Not that I think I would sell it once it's finished. I just finished cleaning up and clearing out the garage. As you can see in one of the pictures it was unpainted sheetrock that was dark and lots of kids stuff and lawn stuff around. I pulled down the sheetrock on 3 walls because they were not insulated. The garage is now insulated painted and organized. All that's left is to put in a heater so I can work in there during the winter. Hopefully I can keep going on it this time. I've been reading this site for a while and have made some posts but now that I'm putting up a build thread it kinda makes the project "official". I'll post up some more pictures. Quote Share this post Link to post Share on other sites
JTG 10 Report post Posted May 31, 2012 Here's a weird "option" that came with the car when I bought it. A switch and dial mounted to the side of the driver's seat. It took me a while to figure out what it did. When the switch is on and you turn the dial it will adjust the gas guage from the true reading down to empty. There are 2 red wires going from the switch & dial to the gas guage. I don't know why you would want to do this unless you're trying to create a "reserve". Here's the tail panel of the car from 25yrs ago. The black paint and sticker where there when I got it. I liked the sticker although it's not really a "cobra". I also like the black tail panel on a red Mach I. I don't think I'll do it going forward but it's a good look. Didn't the Boss mustangs do this along with the inside of the headlight buckets? One more 25yr old shot. Notice the front bumper. I needed to replace the motor and towed it using a tow strap wrapped around the bumper. Not smart I know. By the time the 10 mile trip was over the bumper was pulled out about 3 feet. Hey, I was 18, I thought it would work. Thanks for reading and I'll get up some more pics as soon as I have some more progress. JT Quote Share this post Link to post Share on other sites
six_sigma 12 Report post Posted May 31, 2012 It's amazing that you've been able to hang onto it for that long! You've got to finish it and make your dream car now. Looking forward to seeing the build as it progresses. Quote Share this post Link to post Share on other sites
Flanders 46 Report post Posted May 31, 2012 wow, can't believe you've had it for so long. That's great! Here's hoping you can finish 'er off finally :D Quote Share this post Link to post Share on other sites
69SlowResto 19 Report post Posted May 31, 2012 Great story....looking forward to reading and seeing the build progress. Quote Share this post Link to post Share on other sites
jerr_man 11 Report post Posted June 1, 2012 I like the 69 split bumper look...lol Quote Share this post Link to post Share on other sites
Mach427 10 Report post Posted June 1, 2012 Wow! Looks like our Mach 1's share the same DNA, I also have a red with white interior, 351W AT with 4 barrel. Had mine since '90. Looks like we'll be covering much of the same ground here. I put a 5 speed in mine the year after I got it... you won't regret it! I'll be keeping an eye on this one, good luck with your project. Quote Share this post Link to post Share on other sites
JTG 10 Report post Posted September 17, 2012 Well, it took a while for me to get the welder set up and going but the torque box and toe board are in on the driver's side. I still need to clean up the welds on the underside but I'm going to do that once it's on the rotisserie. Quote Share this post Link to post Share on other sites
JTG 10 Report post Posted September 17, 2012 Now on to the passenger side. Quote Share this post Link to post Share on other sites
Mike65 475 Report post Posted September 17, 2012 JT, I have to do the l/s toe board, l/s floor pan, l/s seat riser, & l/s torque box on my 69 Coupe. Quote Share this post Link to post Share on other sites
Pakrat 1,043 Report post Posted September 17, 2012 I guess I missed this thread originally but I'm gald you have been able to hold on to it all this time also. I'm just a couple years younger than you but I wanted a '69 Mustang ever since I was 16 and unfortunately it took me another 16 years to finally get one. Too bad since they were pretty dirt cheap in the mid 80's but my Dad was particlaur about my getting a more practical car if I had to go on to his insurance. Quote Share this post Link to post Share on other sites
JTG 10 Report post Posted September 18, 2012 Have fun Mike. If you need a hand or anything just pm me. Yeah Pak, I bought my car in '88 for 2k complete and running strong. It would be 5 times that now. Quote Share this post Link to post Share on other sites
Mike65 475 Report post Posted September 18, 2012 Have fun Mike. If you need a hand or anything just pm me. Yeah Pak, I bought my car in '88 for 2k complete and running strong. It would be 5 times that now. Thanks, I might just take you up on your offer as I will be doing it on the ground. Mike. Quote Share this post Link to post Share on other sites
Pakrat 1,043 Report post Posted September 18, 2012 BTW I think I came to a revelation on my drive home last night about your weird switch and dial mounted to the side of the driver's seat. Could it have been used for the old first date "oops we ran out of gas" ploy? Does it look homemade or like some type of JC Whitney crazy thing? Quote Share this post Link to post Share on other sites
JTG 10 Report post Posted September 18, 2012 I thought of that too. It's either that or someone trying to create a built in reserve by lowering the gauge manually. It looks fairly well made. I would say JC Whitney before home made. It definitely took me a long time to figure out what it did. Quote Share this post Link to post Share on other sites
JTG 10 Report post Posted January 1, 2013 It's been a while since I posted an updated. I removed the rusty passenger side torque box, toe board and partial floor pan and replaced them with new metal. It sure is nice not having a big rusty hole in your floor. Here's what it looked like before I started. Toeboard cut out All bad metal cut out Here's a close up of the inner rocker cut out and POR15 applied. I didn't expect this repair when I started. New torque box welded in. You can see the patch I needed to do on the frame rail. That was tricky welding in there but it turned out well. This kind of bugged me. When I did the drivers side I only needed to replace a small portion of the floor pan. For this side I need to go back to just under the seat riser. I bought a long pan to cut down. I needed to flip the side flange, that was annoying. Then I noticed the new pan had an oval drain hole but the original floor does not. If I had replaced both sides I would have left it but I couldn't have an oval drain on one side and round on the other. I know no one will see it unless their under the car looking for it but I would know it was there. Here's a picture of the drivers side pan. And the passengers side before I started working on it. And here it is installed with the oval replaced from ribbed pieces from the remaining drivers side floor pan. I still need to cut the round hole but that can be done any time. And here's a picture of the floor pan and toe board installed. I tried to keep as much original metal as I could but this pic shows something I didn't notice until I was nearly finished. The ribs on the toe board are different than the original. Again it's not something anyone will see and I'm not going to do anything about it but it did annoy me that they don't match. Next up is the quarters and outer wheelhouses. Nearly 25 years ago when I first owned the car I put patches is the lower front of the quarters,lower rear of the quarters and the center arches. The patches were good for a couple of 18 year olds installing them but I'm going to replace the quarters with skins now. Quote Share this post Link to post Share on other sites
Mike65 475 Report post Posted January 1, 2013 Looking good, keep up the good work. Mike. Quote Share this post Link to post Share on other sites
Machspeed 219 Report post Posted January 2, 2013 JT, great story....I love reading things like this. I think it's pretty cool too that your wife was in on keeping the car and even encouraging you to fix it up. I have much the same story, as I bought my 69 Mach 1 back in 76. It was my first car and I still own it today. It has been in storage since the mid-eighties and sits there still today. This Summer, I will be bringing her home to begin a full rotisserie type restoration. I will be posting the start of it here then. Keep us posted on your continuing progress. In the meantime, here it is in storage. The Meadowlark Yellow car was a 428 CJ Mach 1 that I bought for $500 back around 84. I began work on it and then sold it back in 86 to purchase an 86 Ford F-150 4x4. I still have that truck, but really wished I had the CJ Mach….ohhhhh well. John Quote Share this post Link to post Share on other sites
JTG 10 Report post Posted January 2, 2013 Thanks Mach. It feels good to finally make real progress on the car. Quote Share this post Link to post Share on other sites
JTG 10 Report post Posted March 31, 2014 Wow, I can't believe it's been over a year since I put a post in the build thread. Life gets busy. Work has progressed on the car. Of course not as fast as I would like but time and budget are both tight. In the fall I replaced the DS quarter, outer wheel well housing and trunk dropdown. That was an interesting project. I was replacing it due to rust and poor repairs I did 25 years ago. There were separate patches on the lower front, lower rear and wheel arch as well as the trunk dropdown. My buddy and I were 18 at the time and while they looked good and made it 25 years I wasn't going to move forward with them. Here's some pics of what I did recently. Cut out around the scoop since that area was fine. Fitting the outer wheel housing and the trunk drop down. We lined up the quarter panel with the other two pieces and adjusted all the clamps before welding anything. See the holes above the top of the cut line. These are where we screwed the new quarter to the old one. This pic shows we welded up the holes on the trunk drop down, then welded that piece in and then started doing the wheel well. After the wheel housing was welded in we screwed the quarter back on and cut both panels at the same time with at 3" wheel and used butt clamps to hold it in. This pic is blurry but this is the start of the long, slow process of spot welding the quarter. Here's the final picture of it welded in. It still needs to be ground down and we need to trim the bottom of the trunk dropdown. Quote Share this post Link to post Share on other sites
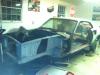
JTG 10 Report post Posted March 31, 2014 (edited) Next was to work on the front driver's side of the car. The car's only accident that I could see was a hit to the fender area. When I bought the car the fender was red but did not match the car. When I pulled it apart the outer cowl was dented in. This was an easy cut out and replace since there was no rust and it was easy to get to. Edited March 31, 2014 by JTG Quote Share this post Link to post Share on other sites
JTG 10 Report post Posted March 31, 2014 Earlier this month we repaired some spots further up on the car. There was rust on the frame where the bumper bracket mounted, the front of the fender apron and the usual spots where the aprons meet the shock tower. As you can see, just one number left visible from the VIN. Here the patches are welded in a ground down, still a little touchup to do. I trimmed back the shock tower because that will be replaced as well, it crack and was welded enough to be serviceable but it's ugly. And here's the new outer framerail welded in. Quote Share this post Link to post Share on other sites
JTG 10 Report post Posted March 31, 2014 (edited) Keeping with the theme of trying to finish the metal on one side of the car the DS door was next. Again an old repair combined with rust required a new skin. This project wasn't too bad. Of course it does help when your friend has done body work for 20+ years. I don't have any before pictures of the door. It didn't really look too bad but needed enough work that putting a skin on was the best way to go. We ground the edge of the door to separate the skin on 3 sides. All that was left to do was drill out one spot weld at the top. The edge weld on the other end of the top was so small it practically popped off. We then prefit the skin first to make sure there were no issue, the bottom of the door was out a bit and needed to be pushed in a bit. Here's the remaining shell with a coat of POR15. We used some nasty smelling body glue where the new skin met the old shell. Putting a layer of glue on both pieces before putting them together. Prefitting helped here because that glue is messy and it went right on. No action shots but the edge was hammered and dollied around the three sides. Then we used a door skin tool to press the edge down tight. This caused a bit of an issue at the bottom of the door because the tool was hitting the bottom of the shell and causing unwanted twisting. Once we realized this we put the tool away and finished it by hand. Here's the other side of the shell cleaned up and ready for primer. During this process we found one lower corner of the door was tin foil thin. There's a panel on the inside of the door at this spot so it could not be seen from that side. It took a bit of time to get that welded up and ground down again. That was probably the hardest part of this job. Edited March 31, 2014 by JTG Quote Share this post Link to post Share on other sites
JTG 10 Report post Posted March 31, 2014 Since the saw horse was out and we were fresh off the driver's side door I figured we work on the passenger's. I was planning to just do a small repair and clean up on this door but after we looked at it closer we decided it needed a skin too. Since that wasn't in the plan the part was not in the garage. So I pulled off the old skin using the same process as the driver's side and prepped the shell. I have some time before the skin arrives so I can work on restoring the guts of the door. Don't mind the rust on the edge, it will all be ground down. I wanted to get the POR15 on before I called it a day. I did keep the POR away from the mounting plates though. I was afraid it would glue them in place. Quote Share this post Link to post Share on other sites
JTG 10 Report post Posted March 31, 2014 (edited) So that's where I am as of last night. A lot of work was done this month. It feels good to have new metal on the car. Once the shock tower is done the driver's side should be done, from a metal perspective. I have also restored the guts of the driver's side door, gotta love that blast cabinet. Cleaning up all of the small parts and putting on a coat of paint to keep it from getting rusty/corroded again. I'm working on the passenger side components now while I wait for the skin. Then we'll put the car on a dolly, spin it around and start working on the passenger side. I already did the torque box, toe board and floor on that side. In a box is a new quarter skin, outer wheel house and trunk dropdown so that will be the first thing worked on. Then it's the framerail and upper fender apron repairs. This shock tower wasn't cracked so I'll look it over to make sure, maybe put on the reinforcement kits. The battery apron needs to be replaced too. Edited March 31, 2014 by JTG Quote Share this post Link to post Share on other sites