Silver_69_Coupe 31 Report post Posted October 26, 2011 I just ran across a source for O-Ring adapters instead of the Fuel Pump repair lines if anyone is looking for them. http://www.discounthydraulichose.com/product_p/41157.htm Quote Share this post Link to post Share on other sites
Grabber70Mach 107 Report post Posted October 26, 2011 What did you have to do to get the Hydro-boost to mount up to the firewall? To the brake pedal? Does the pedal have the correct geometry for the booster? How do you figure that out. Thanks Quote Share this post Link to post Share on other sites
Silver_69_Coupe 31 Report post Posted October 26, 2011 What did you have to do to get the Hydro-boost to mount up to the firewall? To the brake pedal? Does the pedal have the correct geometry for the booster? How do you figure that out. Thanks I replaced the metal and drilled the new hole down about 3/4" to get it to line up in the center of the pin on the lever. And drop the mater down from the hood a little. The geometry is good but since I am using a manual pedal I have an issue with pedal travel. The brakes work but I really need to use a power pedal to gain about 1/2" of travel. I also had to modify the pedal assembly a little to create clearance to get the nuts on the bolts I installed it with. The attached pics kinda show the mods. I will get some better pics and post them shortly. Quote Share this post Link to post Share on other sites
Silver_69_Coupe 31 Report post Posted October 26, 2011 Here are the pictures. Hard to show it with everything bolted together Quote Share this post Link to post Share on other sites
Grabber70Mach 107 Report post Posted October 27, 2011 Thanks for taking the pictures and time. I want to do the Hydro-boost conversion to mine. Quote Share this post Link to post Share on other sites
Silver_69_Coupe 31 Report post Posted October 27, 2011 When you get the donor parts make sure you get the hoses. That way you can use them as reference for you fitting sizes. You can do the firewall without replacing the metal. When I fist did it I just opened the hole up. But I did not like the way it looked. Quote Share this post Link to post Share on other sites
Silver_69_Coupe 31 Report post Posted November 14, 2011 Busy Couple weeks. I finally found a donor roof. And Replaced it. Still in progress. but here is where it is now. Need opinion on filling the roof to quarter seam. Can I get away with duraglass or should I invest in the setup to solder it. Quote Share this post Link to post Share on other sites
DRASTiK 22 Report post Posted November 14, 2011 I used duraglass on mine. That's some strong stuff. Quote Share this post Link to post Share on other sites
Silver_69_Coupe 31 Report post Posted December 9, 2011 I replaced the B Pillar and attempted to repair the quarter panel. No go on the quarter panel repair. It is getting a new one. Duraglass and drip rail shaving is done on one side. The drip rail is welded up on the other and ready to be sanded down and glassed. Quote Share this post Link to post Share on other sites
Silver_69_Coupe 31 Report post Posted December 21, 2011 Got the quarters and they are not even close to perfect. Most of these pictures are the passengers side quarter. Passengers side: The quarter is caved in by the top edge of the wheel well. The flange is bent and there is a dent where the front upper body line ends. Drivers Side: Mostly good. There is a dent where the front upper body line ends and it ends too soon. Quote Share this post Link to post Share on other sites
Silver_69_Coupe 31 Report post Posted December 25, 2011 Merry Christmas All. Just a quick update here. Got a couple of ripples on my upper seam but nothing too bad. They will fix when I duraglass the seam. Quote Share this post Link to post Share on other sites
Mike65 475 Report post Posted December 26, 2011 Looking good. Keep the pics comming, it keeps me inspired to keep plugging away at mine. Quote Share this post Link to post Share on other sites
Fordrevhead 29 Report post Posted December 26, 2011 With a friends help you can work a lot of those wrinkles out with a hammer and dolly, more than likley a shrinking hammer as they're probably caused from excess heat and metal stretch. Also look into a Metal 2 Metal aluminum filler product as well. This will need to be ground not sanded but makes a crazy strong first rough pass. I have seen panels rust away and this stuff is still there. Feels good though huh?:thumbup1: Quote Share this post Link to post Share on other sites
Silver_69_Coupe 31 Report post Posted July 14, 2012 Some updates. Sorry it has been awhile I have been plugging away at it and dealing with some setbacks also. Power windows are done Power door kickers are done. Cluster is installed and working. Tail Lights are mostly done. Headliner installed Windshield installed All Glass installed. Power Drivers seat working LED Tail Lights Built and working as designed. I have it far enough to drive it now. But need to register and insure. I am leaving the paint for last. Quote Share this post Link to post Share on other sites
Silver_69_Coupe 31 Report post Posted July 14, 2012 (edited) Sorry I don't have some better pics right now. My Camera took a dive into the river last week and it is not working so well right now. I am surprised that it works at all but it is mostly functional but today the pics are turning out really grainy. So I grabbed some that I had taken since my last post. I wasn't sure about the rear window but it grew on me really fast. It turned out good. There is still a lot of small detail bodywork but it is getting really close. The Electrical is 99% Done. I Need to do the instrument cluster lighting. Marker Lights and Wipers. Edited July 14, 2012 by Silver_69_Coupe Quote Share this post Link to post Share on other sites
stangme428 33 Report post Posted July 14, 2012 Looking great!:thumbup1: Quote Share this post Link to post Share on other sites
Silver_69_Coupe 31 Report post Posted July 12, 2015 I Decided I Hate body work!!! I like the finished product but wet sanding really takes forever. We bought a new house and moved so the Stang has been on the back burner for a while. I have driven it several times and am very happy with the results. The Hydroboost and Cobra barkes are a whole different experience. I had to add shims to the upper control arm to get the alignment correct. I though I was going to have issues with pedal travel on the brakes and clutch but they work great. And the 5.0 5 Speed is soooooooo much fun to drive. Currently getting it ready for paint and it is really coming along. The picture with the windows up is with most of the body work done prior to the first guide coat. The picture with it red is guide coat. It all is gets sanded off. Warning!!! Do not use red as a guide coat it is really messy. The picture with it all masked off is after red guide coat sanding. Then two coats of high build 2K Primer, and Black Guide Coat. This is the final stage prior to wet sanding. I started with the hood, roof and passengers side. And the last group of pictures is after wet sanding about half of the car. This part took about 14 Hours.I have not completed the lower rockers or drivers side yet. They will hopefully get done next week some time. Sorry for the poor quality of the pictures. My phone camera is not the greatest. Quote Share this post Link to post Share on other sites
Silver_69_Coupe 31 Report post Posted July 25, 2015 Progress!!! Quote Share this post Link to post Share on other sites
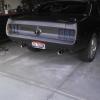
Silver_69_Coupe 31 Report post Posted July 25, 2015 Tucked rear bumper. Some minor fixes but getting close. Quote Share this post Link to post Share on other sites
Footcutter11 23 Report post Posted July 25, 2015 Nice ass!...on the car I mean... :) Quote Share this post Link to post Share on other sites
Silver_69_Coupe 31 Report post Posted July 25, 2015 Thanks. My wife says that too... She does not know cars but she is starting to notice all of the subtle changes that I have made to the car. She loves the tucked bumper. And shaved drip rails. Quote Share this post Link to post Share on other sites
SWPruett 83 Report post Posted July 25, 2015 Rear bumper looks great! Is that a hand fab piece or is that a glass aftermarket? Would love more detail on the fit-up process. Excellent! Quote Share this post Link to post Share on other sites
Silver_69_Coupe 31 Report post Posted July 26, 2015 It is the original bumper. Step By Step!!! All welds should be done using a stitch or tack weld not a continuous weld. Strip the chrome off. Cut the bumper in half across the license plate hole Cut it in half at about 1/4 inch below the outer most curve of the bumper. Cut the rear quarter ends off at about 1/2" into the quarter. Make brackets, Bolt Brackets into place Get the upper 2 Pieces where you want them and weld them to the brackets. Add about 2" of 16 Gauge sheetmetal to the inside bottom of the upper portions Weld on the inside of the upper sections. Set the bottom sections where you want them and weld them in place. (The gap between the bottom and top will be about 3/4") Cut sheetmetal or use 1/8" round rod to fill in the gap between the upper and lower pieces. Fill in the bolt holes. Make the quarter panel ends out of 16 Gauge sheetmetal and install them Use 1/8" round rod to get the edges close to where you want them. Tack at several locations. Weld up the round rod. Use a die grinder to set the gap where you want it. (The round rod should be very close to where you want the line to be) I started with 36 grit roll locks and worked down to 120 Grit. Clean up all your welds. Rough the bumper up with 36 or 40 grit sand paper, A D.A. sander works good for this. Float the bumper with short strand glass body filler (AKA Duraglass) or all metal filler. Block it out Prime it. Quote Share this post Link to post Share on other sites
Silver_69_Coupe 31 Report post Posted July 26, 2015 Here are pictures of it before smoothing. Quote Share this post Link to post Share on other sites
Footcutter11 23 Report post Posted July 26, 2015 Really nice job! Quote Share this post Link to post Share on other sites