SWPruett 83 Report post Posted July 26, 2015 Bravo! Very nice job and a complex piece of business that turned out awesome! Thanks for sharing the background! Quote Share this post Link to post Share on other sites
RPM 1,190 Report post Posted July 27, 2015 Nice, thanks for the how to. Since you live next door in Idaho, what say you drop by and help me with mine. The second one is always easier, right? :) Quote Share this post Link to post Share on other sites
Ridge Runner 1,112 Report post Posted July 27, 2015 The chrome shop we have in Visalia will strip chrome for us .It leaves the metal scratch free . very nice job Quote Share this post Link to post Share on other sites
Fantastic 57 Report post Posted August 24, 2015 that rear bumper deserves an article all on it's own. I remember when magazines actually had useful articles on stuff like that. Now the mags are just repetitive advertising. Love the bumper and everything you are doing. Quote Share this post Link to post Share on other sites
Rcodenewf 44 Report post Posted August 25, 2015 Looking good . I really like that bumper detail as well and thanks for posting the step by step process. Great work....John Quote Share this post Link to post Share on other sites
Silver_69_Coupe 31 Report post Posted September 7, 2015 Latest update... Body work is about 80% done. Pulling hood doors and deck lid to paint the jams. I painted the underside of the deck lid today. Quote Share this post Link to post Share on other sites
Silver_69_Coupe 31 Report post Posted September 7, 2015 Backside of hood. For some reason my camera makes it look a lot lighter shade than it is. Quote Share this post Link to post Share on other sites
DRASTiK 22 Report post Posted September 8, 2015 Looking good! What's the color? It seems somewhat similar to the color I have planned, but you mentioned that the camera changes it somewhat. I'm planning on a dark grey graphite metallic (chrysler color). Quote Share this post Link to post Share on other sites
Silver_69_Coupe 31 Report post Posted September 8, 2015 Gunmetal Gray. or close to it. I bought several mis-mixed dark gray colors of R-M Diamont grays and mixed them together. Comparing it to the Diamont color chart the closest match is Gunmetal Gray. The paint cost me $45.00. ( for 4.5 Gallons of Paint.) and I have 2 Gallons spray-able. On this chart mine is closer to Pebble or Iron. Of course it depends on the lighting also. Plus I painted this truck with it before mixing it all together. Too bad I had to sell the truck. That was when gas was approaching 5.00 a gallon and it got about 10 miles per gallon with a 40 mile per day commute. Quote Share this post Link to post Share on other sites
Silver_69_Coupe 31 Report post Posted September 24, 2015 Still plugging away at it. Always just one more thing to fix... The issue. When I rolled the fend lip I damaged the outside edge so it was very wavy and I was having issues getting the duraglass to fill in so I could clean it up. The solution. A 1" wide piece of thin plastic clamped to the lower edges. Pictures are not the best but they show the process.The plastic is taped so the filler will not stick to it. After the plastic is removed. After the first blocking. Now I have a way to smooth it all out. And the curve of the fender is correct. Quote Share this post Link to post Share on other sites
Silver_69_Coupe 31 Report post Posted June 24, 2016 Finally got some color on her... Still working on wet sand, 2 more coats of clear then cut and buff. Hoping to be done by fourth of July weekend. 1 Ridge Runner reacted to this Quote Share this post Link to post Share on other sites
Silver_69_Coupe 31 Report post Posted June 24, 2016 Still trying to figure out why some of the pictures are upside down. Very annoying. Quote Share this post Link to post Share on other sites
Silver_69_Coupe 31 Report post Posted June 24, 2016 Still trying to figure out why some of the pictures are upside down. Very annoying. Fixed it... Quote Share this post Link to post Share on other sites
Silver_69_Coupe 31 Report post Posted June 24, 2016 Here are some pictures of it outside. Keep in mind I started color sanding so there is some dirty spots. I had some problems with urethane wave that I am correcting. Quote Share this post Link to post Share on other sites
Silver_69_Coupe 31 Report post Posted November 21, 2016 Quick update. I hve been busy with everything but the stang the last few months. Here are some pics from the car show back in August. I have been trying to figure out exactly what I want to do with the interior. Mainly the center console, door panels, and back seat. I put together a few different designs and still have not come up with anything I am happy with. Please post up some custom interiors if you have them. Maybe I can get some different ideas. Quote Share this post Link to post Share on other sites
Silver_69_Coupe 31 Report post Posted January 6, 2019 I have to let her go. She is listed on eBay if anyone is interested. 1 fvike reacted to this Quote Share this post Link to post Share on other sites
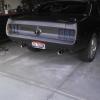
mustangstofear 608 Report post Posted January 7, 2019 The car really turned out nice. Is that a Steel rear bumper ? The fit looks to good to be stock. Quote Share this post Link to post Share on other sites
Silver_69_Coupe 31 Report post Posted January 7, 2019 Yes it is steel. It is the original, cut and tucked. it was not an easy one either. It took forever to get it to look and fit right. Quote Share this post Link to post Share on other sites