69R-CODE 25 Report post Posted December 4, 2009 (edited) Gentlemen, I have decided to finally start my first restoration project. I have posted on here before. Since then, I have been checking out this forum for the past three months and have got the fever! Attached are some more pics of the car. Here is my plan: 69 Mach 1 R-Code Fastback. Going with the original 428CJ in it. Painting the car Gulfstream Aqua (original color) I would like some starting tips, pointers, do's and dont's. What do I need to do first? What tools should I get? What order does the car need to be fixed? What things would you farm out? What things would you do yourself? Could you all point me in the right direction? PLEASE HELP!!!!!!!:helpsmilie: Edited December 22, 2010 by 69R-CODE 7 SweellTrex, quoriSer, AMBISBUTS and 4 others reacted to this Quote Share this post Link to post Share on other sites
S code 69 13 Report post Posted December 4, 2009 I'm nearing the end of my 69 gulfstrem aqua Mach 1 project, I'd do a post here myself but my car skills are better than my computer skills I can never get a picture on a web site. I'm not saying it's right but this is what I do. the first thing is the rolling shell, strip it to bare metal, fix what needs fixed, replace what can't, do as much body work as I feel I'm up to, then send it off for final body work and paint. the shops I use give me a MUCH better deal if I let them have the car for a year or so to use as a fill in project when things are slow. Once that's out of my hair I rebuild the engine, transmission, seats, small parts, ect and that keeps me busy and broke while the body is out of my shop. when I get the car back it's just a matter of putting it all together. If you're going to put a top lader in it be ready to open your wallet, that stuff is spendy. this car is the first auto I've ever owned and I was going to toss the C6 until I priced it all out. you could do a 5 speed for less probably but that's too non original for me. Quote Share this post Link to post Share on other sites
jnet4jt 10 Report post Posted December 5, 2009 (edited) I agree with S code 69. Strip it down and see what you're really starting off with. Then primer seal it, this will keep anything from corroding any worse than it already is. I did this and found out I had way way way more work than origonally planned. In my defense the car was a gift from the wife while I was deployed (awsome gift even if I did pay for it). After you've got a good idea of what you've got, post lots of pics of what you find wrong. The guys here are a lot of help. Oh and take a lot of pics before during and after. I like looking at other people's cars, It's where I get some of my motivation. As far as tools go, Patience Motivation A good air compressor Maybe a welder Money Patience Edited December 6, 2009 by jnet4jt Quote Share this post Link to post Share on other sites
69R-CODE 25 Report post Posted December 5, 2009 Thanks, I am getting a good air compressor for christmas and lots of tools. I will keep posting pics and let you guys walk me through this thing. Quote Share this post Link to post Share on other sites
69RavenConv 286 Report post Posted December 5, 2009 Like the other guys said, the first step is gutting the car; pull the engine, tranny, seats, carpet, etc, etc., then assess what you've got. You'll find alot of stuff is bad you didn't expect :surrender: The thing I highly recommend is take good pictures BEFORE you disassemble anything and put all small parts and hardware in baggies and label them with a sharpie. Quote Share this post Link to post Share on other sites
69R-CODE 25 Report post Posted December 7, 2009 What rust inhibitor or primer should I use? Quote Share this post Link to post Share on other sites
flight96 14 Report post Posted December 7, 2009 What rust inhibitor or primer should I use? If your going down to bare metal be sure to use an etch primer first. Then a good 2 part on top of that. Dupont has a really good etch primer...I can't remember the product code right now. As for rust inhibitors, there are lots out there. Some like POR15, I used Rust Mort. I also used Duponts Rust Not on all the frame. Good Luck !! Quote Share this post Link to post Share on other sites
69R-CODE 25 Report post Posted December 22, 2010 It's been a while but I am back! I ended up taking the car to a restoration shop and doing the car RIGHT! To Date, I/They have replaced: 1. Both Front Frame Rails and Frame Extensions 2. Both Shock Towers and aprons 3. Radiator Support 4. Both Torque Boxes 5. Both Inner and Outer Wheel Wells 6. Both Full Quarters 7. Staggered Shock mounting plate 8. Both Door Skins 9. Both Strut Braces The car just got undercoated and is in prep to get Epoxy (DP90). Then new coil springs (big block) and new leaf springs. Had the spindles and disc brakes re-worked and painted. Rear end cleaned and painted. Phase I will be complete and car will be coming home to let my wallet rest and time to re-build my 428CJ. Here are some pics to catch you all up! Enjoy. Quote Share this post Link to post Share on other sites
69R-CODE 25 Report post Posted December 22, 2010 more pics Quote Share this post Link to post Share on other sites
69R-CODE 25 Report post Posted December 22, 2010 More... Quote Share this post Link to post Share on other sites
468stang 11 Report post Posted December 22, 2010 Looking good. Quote Share this post Link to post Share on other sites
Rudolph Schenker 14 Report post Posted December 22, 2010 Great progress! :thumbup1: Quote Share this post Link to post Share on other sites
69R-CODE 25 Report post Posted December 22, 2010 Thanks! Quote Share this post Link to post Share on other sites
BuckeyeDemon 211 Report post Posted December 23, 2010 why the decision to undercoat the entire undercarriage? is your plan for a daily driven R-code? Quote Share this post Link to post Share on other sites
69R-CODE 25 Report post Posted December 23, 2010 yes demon, I plan on driving my car as much as possible. I know that is not original but I don't plan on selling this car (my fathers car). I don't see what extra protection will hurt? Quote Share this post Link to post Share on other sites
Angel 24 Report post Posted December 23, 2010 What did you use for undercoating? I plan to undercoat the entire under carriage as well since its my daily driver. Quote Share this post Link to post Share on other sites
69R-CODE 25 Report post Posted December 23, 2010 It has PPG DP90 epoxy primer/ then they used bedliner for the undercoating. I will check and see what the bedliner brand is. Quote Share this post Link to post Share on other sites
rangerdoc 22 Report post Posted December 23, 2010 http://www.secondskinaudio.com/sound-deadener/spectrum.php I just used this stuff on my interior but they also recommend it as an undercoating to help with sound. Quote Share this post Link to post Share on other sites
69R-CODE 25 Report post Posted January 7, 2011 FYI: I WENT TO SEE THE CAR YESTERDAY AND FOUND OUT THAT THE BEDLINER THE RESTORATION SHOP USED WAS U-POL RAPTOR BEDLINER. HERE IS A DESCRIPRTION I PULLED OFF THE WEB. Bed liner kit is a 2-component urethane system designed for applying directly to your truck bed, inner fenders, under body, and chassis. Dries rapidly and protects against rust, corrosion, UV damage, and extreme temperatures while resisting stains and abrasion. Waterproof material stays flexible and helps to reduce road noise and vibration. To match your vehicle's color, purchase Tintable. http://www.u-pol.com/documents/datasheets/tds/RLB-TDS-US.pdf Quote Share this post Link to post Share on other sites
69R-CODE 25 Report post Posted May 6, 2011 She is back Home!!! All metal work and suspension is complete. It is in Epoxy Primer and the engine compartment is finished out. Now to start putting my 428CJ back together!!! This may not look like much...but lots of $$$$ have been put into this car. Here are some pics when it came home a few weeks ago. Quote Share this post Link to post Share on other sites
TexasEd 188 Report post Posted June 8, 2011 Looks great! In one of your posts a picture shows the rear quarter panels removed. Did they prime & Seal behind the quarter panels too? 5 quoriSer, unlinihada, SextKecy and 2 others reacted to this Quote Share this post Link to post Share on other sites
TexasEd 188 Report post Posted June 8, 2011 Looks great! In one of your posts a picture shows the rear quarter panels removed. Did they prime & Seal behind the quarter panels too? Quote Share this post Link to post Share on other sites
69R-CODE 25 Report post Posted September 3, 2011 The CJ came home from the machine shop this week. I had the heads redone, crank polished, block hot tanked, new cam bearings, ect. Now starts the re-build! I am looking for a re-ring kit for my stock pistons. Does anyone know what type, and sizes I should get? When I go to Summit Racing or Jegs, they ask for all these different sizes and types. I plan on placing a big order this weekend. PLEASE HELP! Quote Share this post Link to post Share on other sites
BuckeyeDemon 211 Report post Posted September 3, 2011 consider getting the block and head shot blasted next time after the hot tank. it makes it look like fresh iron. did it not get a clean up bore? just a hone? Quote Share this post Link to post Share on other sites
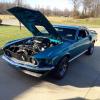
69R-CODE 25 Report post Posted December 21, 2011 Since my last post...The wife and I have had our first child (a boy) and work on the car has grinded to a halt. However, I have been trying to work on the CJ about one day a week. This is an update on work completed on the motor thus far: New cam bearings New main bearing New rod bearings New piston rings New Cam New Timing Chain New Lifters New Felpro gasket set New ARP bolt kit New fuel pump New Oil pump New Oil pickup tube The Heads have been completey gone through with new valve seals and springs I went with Dupli-color (1621) Old Ford Blue. I am not real big fan of the dark corporate blue. I know it is not factory correct, but I like it. Getting ready to put intake on and hopefully put pushrods and rocker arms on. The goal is to have the motor ready by end of Feb. and take the car back to the restoration shop sometime in April. Attached is a picture I took just after the heads were put on. Quote Share this post Link to post Share on other sites