stangme428 33 Report post Posted December 31, 2009 yep i think i have one with my kit...slides on first then the TOB. hey stangme one other thing we found which may or may not help on the md kit, we could not get the clutch to engage but just a hair, so long story short, the shaft that the hyd throw out bearing is on was longer on some of the tko 600 (dont ask why) so we called md and he said sometimes the need a spacer that slides over the shaft then the t.o bearing goes on after which gets it closer to the clutch, which they were out of stock so we cut our own from some pipe and it works great, so if you hit that prob. you know how to fix it.. and post some pics how is the motor coming, back in the car yet ,, maybe by spring or summer we can be driving!!! Quote Share this post Link to post Share on other sites
buening 63 Report post Posted January 1, 2010 Good info. I'll install drop motor mounts before I cut the trans tunnel. What is your angle difference between the trans output and the axle pinion as you have it now? Nice to find out you two are the guinea pigs on the MD hydro clutch setup :huh: Maybe I should wait to buy until you guys get all the bugs worked out :tongue_smilie: I found the few threads on Stangnet about the clutch stop. I think the main thing to check is the max travel limits of the throwout bearing to what is actually occurring. They are mainly using the McLeod throwout, but am not sure what brand you are running. http://www.stangnet.com/mustang-forums/721606-hydraulic-clutch-conversion.html http://www.stangnet.com/mustang-forums/779634-should-i-remove-my-clutch-pedal-spring.html http://www.stangnet.com/mustang-forums/714636-300zx-hydraulic-clutch.html Quote Share this post Link to post Share on other sites
Jayru 17 Report post Posted January 13, 2010 Hey Stangme, don't know if you saw this, but Muscle Car replaced a roof skin on a 68 mustang last week. They made it look easy. Thought you might need the motivation ;) http://www.powerblocktv.com/site3/index.php/watch-full-episodes/ep?ep_num=MC2010-01&ep_show=MC Quote Share this post Link to post Share on other sites
stangme428 33 Report post Posted January 13, 2010 cool.... i needed it ... thanks jayru -- just ordered head and intake gaskets to pull the heads and seal the water passage plugs. getting ready to measure 1 million times and cut the trans tunnel a bit and place the angle finder to align things hopefully one final time... im ready to order a yoke and drive shaft and get it moving under its own power.... i did speak with Modern Driveline and i DO need to send my clutch master cylinder back and exchange for the larger bore unit... summit order head gaskets - FPP1013 intake gaskets - 7265 Hey Stangme, don't know if you saw this, but Muscle Car replaced a roof skin on a 68 mustang last week. They made it look easy. Thought you might need the motivation ;) http://www.powerblocktv.com/site3/index.php/watch-full-episodes/ep?ep_num=MC2010-01&ep_show=MC Quote Share this post Link to post Share on other sites
buening 63 Report post Posted January 13, 2010 Let us know what angles you get for the trans and pinion. Quote Share this post Link to post Share on other sites
flight96 14 Report post Posted January 13, 2010 Hey Stangme, don't know if you saw this, but Muscle Car replaced a roof skin on a 68 mustang last week. They made it look easy. Thought you might need the motivation ;) http://www.powerblocktv.com/site3/index.php/watch-full-episodes/ep?ep_num=MC2010-01&ep_show=MC Hey I watched that as well. It was pretty good. I got a kick out of them trying to line up the front fenders and hood. I would have liked to see the out takes from that. Knowing what I went throught !! There was a LOT of swearing going on in my shop that day !!! Quote Share this post Link to post Share on other sites
buening 63 Report post Posted January 25, 2010 Any updates? How was the install with the motor and trans together? With the longer T56, I bet it was a little challenging trying to clear the radiator support and stay clear of the firewall at the same time. My motor is already in the car and I installed the T56 from below. I installed the bell to the block first, then raised the trans and mated to the bell. It went smooth except I cannot reach the top passenger bolt :( Also, where are you measuring the angles for your driveline angle? I have my trans supported by a jack and need to measure the angles. Quote Share this post Link to post Share on other sites
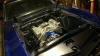
stangme428 33 Report post Posted January 26, 2010 (edited) ah well a slight setback .... Andy and Ryan pulled the intake and heads off the motor the other day ... the inserts are definitely not sealed, so hopefully thats where the water was leaking from.. should be .. we cant find any other signs of water. odd part is that the plug/insert is half way off the block once the heads are mounted. (the pic is while it was being removed - not inserted) only other possibility i can think of for water seepage is maybe around the ARP studs - i have read where some place sealant around the studs due to entering the water passages... these studs have no sealant on them at all. now the problem is trying to get the insert sealed in... we put RTV sealant around one and hand tightened it and then started to tighten with a wrench and .... um.. its damn snug and wont seat flush or back out now... and its not cross threaded... lol... gotta pickup a 14mm allen wrench tomorrow to hopefully get it back out or tighten until its seated flush. once we get passed the heads and the engine compartment painted... eastwood chassis satin black is on its way ... we should be able to mate the motor and trans back together and mount it... ill have some angles to post then... sorry for the delay folks.. also pulled the clutch master cylinder to send back to modern driveling for a replacement. :punk: Edited January 26, 2010 by stangme428 Quote Share this post Link to post Share on other sites
stangme428 33 Report post Posted January 29, 2010 ah ... always something it seems... two inserts will not go back in.... nor will the other two back out all the way. not enough grip for a allen to hold on to to screw them out or in.. taking the heads to a guy that works with metals every day so he can remove them.... then insert new plugs, seal them and have them machined down. hopefully this is the source of the problem.... Quote Share this post Link to post Share on other sites
flight96 14 Report post Posted January 29, 2010 I feel for ya man. For a while during my build it seemed that no matter what I did I kept running into one issue after another. The good news is, all of a sudden it will all come together. Just imagine the feeling af driving that damn thing for the first time !!! That's what kept me going. Until then, be prepared to swear a lot !! Quote Share this post Link to post Share on other sites
stangme428 33 Report post Posted February 1, 2010 thanks flight96 - yeah one day she will be on the road... some days it feels like it will be soon... and some not so much..lol :tongue_smilie: Quote Share this post Link to post Share on other sites
buening 63 Report post Posted February 1, 2010 Are you using the stock brake booster along with the clutch master cylinder? If so, do you have pics? I'm curious how the clearances are between the two. Quote Share this post Link to post Share on other sites
buening 63 Report post Posted February 1, 2010 Are you using the stock brake booster along with the clutch master cylinder? If so, do you have pics? I'm curious how the clearances are between the two. Quote Share this post Link to post Share on other sites
stangme428 33 Report post Posted February 2, 2010 Are you using the stock brake booster along with the clutch master cylinder? If so, do you have pics? I'm curious how the clearances are between the two. yes i am using the stock booster... its close.. ill dig up some pics..:biggrin: Quote Share this post Link to post Share on other sites
stangme428 33 Report post Posted February 2, 2010 Are you using the stock brake booster along with the clutch master cylinder? If so, do you have pics? I'm curious how the clearances are between the two. yes i am using the stock booster... its close.. ill dig up some pics..:biggrin: Quote Share this post Link to post Share on other sites
Jayru 17 Report post Posted February 11, 2010 You've been seriously slacking with updates! What's going on with the ride? Quote Share this post Link to post Share on other sites
stangme428 33 Report post Posted February 12, 2010 screeeeeching halt at the moment.... been very busy with work and so have my buds... the heads are waiting to go to the machine shop... we had been able to remove two of the inserts from one head and that's about it. I'm still trying to work out the logistics of getting a complete roof from NC down south.... ill have to call .. hopefully he still has the roof.. work work... glad to be employed ... that's for sure..:tongue_smilie: also have to recover all my project info, receipt scans and photos from a external drive that died... sucks when the IT guys hard drive crashes... lol Quote Share this post Link to post Share on other sites
stangme428 33 Report post Posted February 12, 2010 (edited) Are you using the stock brake booster along with the clutch master cylinder? If so, do you have pics? I'm curious how the clearances are between the two. yes... stock until i can afford a hydraboost setup.. here are a few pics of the setup. you will think that the unit is not going to fit... but it fits fine!! my replacement clutch master cylinder from MD should arrive today..:biggrin: update: woo hoo it arrived... now to get to jax this week and work on her.... Edited February 12, 2010 by stangme428 Quote Share this post Link to post Share on other sites
stangme428 33 Report post Posted February 20, 2010 ah -- dropped the heads off at the machine shop Wednesday 2.17.10 ... to replace the inserts and seal them, weld them.. something.... machinist broke his foot ... so waiting on him to get back in the groove...:tongue_smilie: paint arrived from eastwood company for the engine compartment... hopefully we get to apply it sometime...lol Quote Share this post Link to post Share on other sites
buening 63 Report post Posted February 26, 2010 Hey what size MC did ModernDriveline end up sending as the correct one? They don't really state on their website what size they are using. Quote Share this post Link to post Share on other sites
stangme428 33 Report post Posted February 27, 2010 Hey what size MC did ModernDriveline end up sending as the correct one? They don't really state on their website what size they are using. MD-900-6088 Master Cylinder .700" bore x 1.4" stroke replaced a .625" .....:biggrin: Quote Share this post Link to post Share on other sites
stangme428 33 Report post Posted March 3, 2010 woo hoo - machine shop called authorized the following: weld water passages pressure test resurface heads standard cleaning after machining etc. more $$$ :001_huh: but what the heck.. don't have to worry about leaks from that area anymore... still trying to find a cost effective way to get the top to south ga or a body shop to repair ... with metal.. the roof.. :biggrin: Quote Share this post Link to post Share on other sites
buening 63 Report post Posted March 4, 2010 resurface heads?? Man that sucks. I would have sent those heads back and let AFD figure it out. Quote Share this post Link to post Share on other sites
stangme428 33 Report post Posted March 4, 2010 ah not worth it to send em' back to AUS .... for what that would cost.. the heads will be done... im ready to get the motor back together and get it rolling under its own power... taking way to long to even get close to finishing this build...:tongue_smilie::biggrin: resurface heads?? Man that sucks. I would have sent those heads back and let AFD figure it out. Quote Share this post Link to post Share on other sites
flight96 14 Report post Posted March 4, 2010 Oh man I feel your pain !! 2 steps forward 3 steps back.... But it will all be worth it once your driving the beast !! Are they shaving the heads at all ? Not too sure what deck height your block is but with mine shaving the heads was not an option. Quote Share this post Link to post Share on other sites