stangme428 33 Report post Posted October 7, 2009 (edited) anyone with photochop skills... i am thinking of midnight blue or vista blue with satin black hood, roof to follow the vinyl top line, trunk lid, tail light panel and head light buckets.... and maybe boss 302 reflective stripes with the 302 replaced with 408 ... and 16x8 mini lite replicas... anybody willing to do a rendering i can take to the paint guy... pm me and let me know the cost.. Edited October 7, 2009 by stangme428 Quote Share this post Link to post Share on other sites
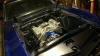
stangme428 33 Report post Posted October 8, 2009 teaser photo of the mighty demon 750 annular carb on top.... cant wait to get this bad boy on the road... taking longer than expected but..... better do it right than fast and redo it later....:biggrin: still NO luck on a engine dyno -- only found one in a 2 hour area and was advised not to use it by various engine builders and hot rod guys.... with Daytona not so far away i guess ill check back in that area... new manual power disc brake pedal arrived today 10.7.09 ... purchased from mustangs plus via ebay and drop shipped from SSBC ... talk about packed for shipping.. wow... SSBC could have shipped it via UPS to BFE and it would have survived.... very nice quality pedal also with bushing kit... Quote Share this post Link to post Share on other sites
stangme428 33 Report post Posted October 9, 2009 (edited) wow.. so much in one day!!... my buddy andy found a engine dyno in Jacksonville FL after talking with Stage 6 motorsports - Horsepower by Hedrick - need to call and see what's included for 650 per day dyno sessions. also going to call HP performance to see if Tony can tune the carb setup or just what is possible between the two companies... and what i can afford..lol edit:10.10.09 - spoke with Hedrick - cost includes breaking in the motor and tuning. I'll have to take my headers by to make sure they can fit the superflow dyno. I'll try to schedule soon!! the full blockoff plate for the qucktime bellhousing came in, to replace my original partial lower block off plate, and the pilot bushing also arrived. so, maybe now we have all the T56 related parts... still awaiting the ron morris adjustable motor mounts, they should arrive tomorrow 10.9.09 from mustangdepot.com on the motor mounts, i wanted them mainly for the strong frame mount and the front to rear placement of the engine. if i can slide the motor back and get a better front/rear weight ratio then great. but not sure how much the gain in weight transfer i will get with moving the motor back 1" or so. if thats possible with my T56 shifter location. we shall see, never a dull moment.:tongue_smilie: Edited October 12, 2009 by stangme428 Quote Share this post Link to post Share on other sites
stangme428 33 Report post Posted October 12, 2009 (edited) progress!!:tongue_smilie: Joe, Andy and I finally had enough parts and schedules aligned to work on the 69 today... with Joe and Andy doing all the work!! once again its great to have gear heads as friends!! installed Modern Driveline cantilever - heimjoint mounted willwood master cylinder test bled system installed new brake pedal test fit Viper T56 hydraulic throwout bearing, collar, spacer in a nutshell-:punk: The Modern Driveline cantilever-heimjoint setup seems to work great, Joe did a great job finding the correct place for the setup. we found the dimple on the outer firewall for the factory clutch cable hole, drilled it out with a hole saw, test fit the willwood unit with and without the power disc brake booster. scribed the bolt holes needed for the bracket and drilled them out. mounted the willwood unit and attached to the clutch pedal and pumped it until all air was out to test. The brake pedal from SSBC came with a new bushing and washer kit, after a few tries Andy finally was able to install the washers between the new bushing and mount. still awaiting the Ron Morris motor mounts, delayed delivery due to weather according to UPS, should arrive monday 10.12.09. I'll edit and upload a few pics as soon as i reduce them. lots of progress!!! Edited October 12, 2009 by stangme428 Quote Share this post Link to post Share on other sites
rusty428cj 14 Report post Posted October 12, 2009 You are building a very nice Coupe. We restored a 1970 for a customer a couple of years ago. It had a lot of rust repair. Installed Rod & Custom front suspension and 4 wheel disc brakes. We are in the Tampa bay area if you are still looking for someone to paint it. 1 Desertdave reacted to this Quote Share this post Link to post Share on other sites
stangme428 33 Report post Posted October 12, 2009 nice paint, looks good! I have found a shop in Jacksonville FL, but its nice to know i have options if it doesn't work out. thanks for the info. Quote Share this post Link to post Share on other sites
stangme428 33 Report post Posted October 12, 2009 here ya go! a quick un-edited MOV of the ModernDriveline cantilever-heimjoint with scott drake roller bearing clutch kit. its 7.5mb of un-edited video with shop fan audio!! http://www.crabbnet.com/69build/cantilever_roller.MOV You may notice that the fuse block is out in the video. this is a test of the linkage to check for binding and bleeding and throw. later we moved the bolt that connects the heimjoint to the cantilever so the head was on the fuse block side, otherwise the bolt/nut would hit the fuse block. more adjustments to follow when the T56 is installed. when you receive your parts and you look at the small space you have to work with, your first thought may be... its not going to work... but it will fit!! Quote Share this post Link to post Share on other sites
stangme428 33 Report post Posted October 21, 2009 (edited) OK - a few photos of the Moderdriveline hydraulic clutch install- Thanks! to Andy and Joe for all the hard work! photo of the dimple to drill pilot hole found on automatic trans cars photo of bracket mounting near fuse block photo of wilwood master cylinder near power disc brake booster photo of MD heim joint with bolt head facing fuse block - must do or bolt nut will interfere with fuse block photo of new SSBC brake pedal and clutch pedal parts received this week: scat pro seats - summit kit with 67-70 mounting kit Hooker 351C 2V competition headers ron morris adjustable motor mounts - slide that motor back! flow-kooler water pump Mallory Max-Fire distributor Edited October 21, 2009 by stangme428 Quote Share this post Link to post Share on other sites
Jayru 17 Report post Posted October 21, 2009 Hey stangme428, I've been thinking about those Ron Morris mounts. I think my subframe is tweaked just a hair and it's very hard to get the DS motor mount to line up (took me 2 hrs and a ratcheting tie strap last time). An added benefit would be to slide the motor back for better weight dist. right? Can i literally just slide it back as much as the mount allows (after loosening the trans mount) with no ill effects to anything else? Would an inch make a big difference? Also, How long did it take to get them after you ordered'em? Love your project! Jay Quote Share this post Link to post Share on other sites
stangme428 33 Report post Posted October 22, 2009 Jayru - im not sure you can overcome the "tweaked" subframe with the RM motor mounts, you will still want to make sure everything is level after the fact. i plan on sliding my motor back as far as possible. i have a few books on chassis design and modification, but i don't have any scales to measure the effect of moving the motor back an inch to plug into the formulas. i'll keep looking for others that have done so for handling purposes and post what i find.:tongue_smilie: i ordered the RM-6110 motor mounts with stock and lower options from mustangdepot.com - lowest price i could find. order placed 10.6.09 shipped on 10.7.09 3Day select received on 10.14.09 due to bad weather according to UPS i would imagine that they would have arrived on time if not for weather delays in KY. This was my first order, i believe, from mustangdepot.com and communication was great. i had emailed after the delay and they sent me all the information to track the delay etc. thanks for the kind comments :biggrin: Hey stangme428, I've been thinking about those Ron Morris mounts. I think my subframe is tweaked just a hair and it's very hard to get the DS motor mount to line up (took me 2 hrs and a ratcheting tie strap last time). An added benefit would be to slide the motor back for better weight dist. right? Can i literally just slide it back as much as the mount allows (after loosening the trans mount) with no ill effects to anything else? Would an inch make a big difference? Also, How long did it take to get them after you ordered'em? Love your project! Jay Quote Share this post Link to post Share on other sites
stangme428 33 Report post Posted October 30, 2009 jayru, you do have a lot of adjustability to move the motor from side to side on a horizontal plane both at the motor mount location and at the frame mount location. ---------------------------------------------------------- Hey stangme428, I've been thinking about those Ron Morris mounts. I think my subframe is tweaked just a hair and it's very hard to get the DS motor mount to line up (took me 2 hrs and a ratcheting tie strap last time). An added benefit would be to slide the motor back for better weight dist. right? Can i literally just slide it back as much as the mount allows (after loosening the trans mount) with no ill effects to anything else? Would an inch make a big difference? Also, How long did it take to get them after you ordered'em? Love your project! Jay Quote Share this post Link to post Share on other sites
stangme428 33 Report post Posted October 30, 2009 (edited) progress!! we bolted the Viper T56 to a spare block we had to see how much modifications needed to be done if any to trans tunnel. its going to be interesting!!! at the moment the test block is sitting in the engine compartment with ron morris STOCK height motor mounts and a jack holding the tail of the T56. another interesting item.. the front of the car is sitting higher than normal, naked block with crank isn't loading the springs. the pinion angle is way off, but the top of the T56 is hitting the trans tunnel just before the shifter opening. after sliding the motor and trans forward a inch or so to get closer to the stock location of the motor the trans/pinion angle was much better, but we still need to modify the trans tunnel and sit the built motor with oil pan and heads etc in to make 100% sure of location. things to do: mod the trans tunnel (hammer first:tongue_smilie: then cut if needed) measure motor angle (stock 3 degree from what i read) mod emergency brake cable bracket location mod aftermarket sub frame connectors for installation of trans crossmember measure, measure, measure and measure again for pinion angle a few pics -- the shifter location is going to be perfect. the ModerDriveline Mcleod shifter and hurst handle feel great in relation to the stock steering wheel, seat, pedals etc. thanks to Joe, Andy and Ryan for the fun work!! last pic we needed to find a location to mount the reservoir for the clutch master cylinder.. so Joe made a bracket, painted it black and mounted it! Edited October 30, 2009 by stangme428 Quote Share this post Link to post Share on other sites
stangme428 33 Report post Posted November 5, 2009 (edited) the roof - the roof -- ok - i knew pulling off the top would be the worst part of the project.. even with installing a T56. Lots of glue? residue and rust chunks laying under the top. My buddy reminded me that the paint guy commented on how good his body man is. I hope so! I want to paint the car dark blue, with a flat black top similar to the GT2 project.... The main rust is just above the header not into the windshield. we also had to "clearance" the B&A intake at the front water jacket to allow the Mallory Max-Fire distributor to seat. Nothing a air grinder couldn't handle. found that some of my 12point stainless water pump bolts from my ARP bolt kit are not in the packaging. taken out at some time, who knows. on the search for matching water pump bolts online.... update: summit states that all of the bolts dont come with the ARP kit due to the various changes over the years to the 351W. gonna try and piece enough bolts that match together for the water pump. Edited November 5, 2009 by stangme428 Quote Share this post Link to post Share on other sites
JTG 10 Report post Posted November 5, 2009 That roof is scary!!! Are you planning to put a new skin on? Quote Share this post Link to post Share on other sites
stangme428 33 Report post Posted November 6, 2009 yup - looking for a roof skin now - if not .. we can piece weld replacement metal as needed.:whistling: That roof is scary!!! Are you planning to put a new skin on? Quote Share this post Link to post Share on other sites
ccobra70 10 Report post Posted November 6, 2009 I have seen body guys to wonders what I thought is a total loss, thats going to be a nice car when you get done, keep up the progress. Quote Share this post Link to post Share on other sites
stangme428 33 Report post Posted November 18, 2009 (edited) gauges - after researching on 69stang.com, knowing that i wanted new updated gauges, i ordered auto-meter pro-comp ultra-lite gauges from summit and a 69-70 bezel from yearone. speedo tach vaccume - to be installed in shelby style console oil water voltage fuel - to be ordered when i decide on a fuel sending setup. stock or aftermarket baffled tank AF ratio gauge to be installed in shelby console the gauges fit nicely within the yearone bezel, the mounting brackets that come with the gauges work perfectly. :tongue_smilie: still looking for a donor roof and researching POR-15 for the roof repair. ARP 12pt waterpump bolt kit for 302 arrived. schedule engine dyno Edited November 18, 2009 by stangme428 cant spel without coffee Quote Share this post Link to post Share on other sites
Jayru 17 Report post Posted November 18, 2009 So where does the turn signals and brights indicator go in that Year One bezel? Are they just eliminated? Nice looking setup none the less! Quote Share this post Link to post Share on other sites
stangme428 33 Report post Posted November 18, 2009 So where does the turn signals and brights indicator go in that Year One bezel? Are they just eliminated? Nice looking setup none the less! at this point yes no turn signal/headlight indicator - i think most are using a LED setup for indication. i will miss my running horse indicator on my old bezel. hopefully i can find some creative ideas on the net and try them out. ill post more pics when i come up with something.:shifty: Quote Share this post Link to post Share on other sites
m3rol 10 Report post Posted November 18, 2009 at this point yes no turn signal/headlight indicator - i think most are using a LED setup for indication. i will miss my running horse indicator on my old bezel. hopefully i can find some creative ideas on the net and try them out. ill post more pics when i come up with something.:shifty: Why dont you cut a hole with the mustang's horse shape and use it as the emergency lights indicator? and the same for the turn signals, just use triangle shapes instead of the horse. Quote Share this post Link to post Share on other sites
RogerC 136 Report post Posted November 18, 2009 I believe the horse bright indicator is removable from the original speedo. I plan to do this when I get to that point. Quote Share this post Link to post Share on other sites
stangme428 33 Report post Posted November 19, 2009 I believe the horse bright indicator is removable from the original speedo. I plan to do this when I get to that point. RacerX - cool... i have not taken my original bezel apart ... ill have to check that out. m3rol - neat idea but im looking for something a bit smaller like the original. thanks for the input - someone may run with it..:tongue_smilie: Quote Share this post Link to post Share on other sites
RogerC 136 Report post Posted November 19, 2009 (edited) I was looking at mine a while back and IIRC I think the lens is a small square about 5/16" or 3/8". You may have to disassemble the speedo to get it out. If not, it don't matter to me. I'll find a way to use it cause its one of those small details I've always liked about the car. Edited November 19, 2009 by RacerX Quote Share this post Link to post Share on other sites
ccobra70 10 Report post Posted November 23, 2009 stangme I was looking at the yearone site at that same bezel and it looks like in the picture there is a place in the middle cut out for turn indicators , just wonding cause i dont see it on your ?? Quote Share this post Link to post Share on other sites
stangme428 33 Report post Posted November 23, 2009 cobra70 - you are correct, from the photo on the site it looks like one, but mine does not have it. not sure if mine is a fluke... but i think i would rather have a few LED's. i have not seen another yearone bezel in person.. stangme I was looking at the yearone site at that same bezel and it looks like in the picture there is a place in the middle cut out for turn indicators , just wonding cause i dont see it on your ?? Quote Share this post Link to post Share on other sites