stangme428 33 Report post Posted February 14, 2011 jayru --- interesting, ill check it this week and report my findings. thanks for the info, in the data i have read i didnt see anything about under load changes, although i am aware of the load on the pinion while the leafs try to twist it up... i assumed that the u-joint handled the load/change in angle. im also wondering how the 4 1/2 reverse eye leaf setup will change the equation. Aren't you running leaf springs? If so... you should have the pinion at zero or even 1-2 degrees down. What you're describing makes it neutral at rest (5 down/five up), but you have to account for axle wrap up under load. The wheels are turning pushing the pumpkin/pinion up while driving. This will make your 5 up more like 8-10 up. I did a lot of pinion research when my rear got all whacked out after switching to Del a lums (and i had a driveline noise above 60mph). I had 3 down on the trans and 3 up on the pinion (which i thought was perfect but made a hell of a noise/vibration). After researching i shimmed it to -1 down on the pinion and the noise went away. It rises up to around the +3 under load now to make it neutral. Quote Share this post Link to post Share on other sites
Jayru 17 Report post Posted February 14, 2011 (edited) jayru --- interesting, ill check it this week and report my findings. thanks for the info, in the data i have read i didnt see anything about under load changes, although i am aware of the load on the pinion while the leafs try to twist it up... i assumed that the u-joint handled the load/change in angle. im also wondering how the 4 1/2 reverse eye leaf setup will change the equation. What you were looking at was the proper way to set up a modern car (4 link rear) most likely. Since they are held top and bottom and use coil springs there is no wrap up - therefore you can just set it to neutral and forget about it! They say the more power the motor has, the more the angle will change because of the force multiplication on the rear leafs. Some drag cars have the angle set at - 4 to 7 to make up for this! (although that's a strict 1/4 mile racer) You need to find the balance for part throttle cruising vs full throttle wrap up. -1 or -2 seem to work the best. The leafs could change the angle because your old springs may have lost arc which moves the pinion angle around. Definitely don't finalize anything until you have the correct/new springs in the car. Edited February 14, 2011 by Jayru Quote Share this post Link to post Share on other sites
buening 63 Report post Posted February 14, 2011 more items to work on.... negative wedge kit and front wheels are not playing nice with each other... rubbing the upper control arms and weight. 16x8 4.5" backspacing and 1 3/4" upper control arm drop. Wow, 4.5" backspacing and you are hitting the balljoint area? It almost looks like you have more than 4.5" backspacing. Guys running 17" and 18" rims with 4.75" backspacing don't have clearance issues since the wheel lip is away from the balljoint. I wouldn't think the negative wedge would cause this much change. Interesting! Quote Share this post Link to post Share on other sites
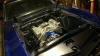
buening 63 Report post Posted February 14, 2011 Aren't you running leaf springs? If so... you should have the pinion at zero or even 1-2 degrees down. What you're describing makes it neutral at rest (5 down/five up), but you have to account for axle wrap up under load. The wheels are turning pushing the pumpkin/pinion up while driving. This will make your 5 up more like 8-10 up. I did a lot of pinion research when my rear got all whacked out after switching to Del a lums (and i had a driveline noise above 60mph). I had 3 down on the trans and 3 up on the pinion (which i thought was perfect but made a hell of a noise/vibration). After researching i shimmed it to -1 down on the pinion and the noise went away. It rises up to around the +3 under load now to make it neutral. Driveshaft angle then comes into play as well. Think jacked-up 4x4 trucks. You can have the driveline angle within 1-3° but will have a huge driveshaft angle, causing havoc on u-joints. I had my front frame on jack stands and the rear axle on stands, so the rear was loaded but wasn't exactly as it is when on the ground. The car sits too low for me to check, but I had about 2.5° trans pointing down and the pinion was at 0°. The nose of the car is a bit lower than the rear, so my pinion as it'd be with four wheels on the ground would be pointing down a degree or two and my trans would be closer to level. stangme, if the suspension was hanging like it is in the picture of your car on the lift, the pinion will be pointing up. The leaf springs are arched the most and the shackles are pulled forward, causing the axle to turn upwards. Get that rear axle supported to load the suspension and you'll get more normal numbers. My guess is you'll need to get a few more degrees less with your transmission, which was why I dropped my motor to avoid cutting the tunnel :yes: Quote Share this post Link to post Share on other sites
stangme428 33 Report post Posted February 15, 2011 cool... thanks guys.... trial and error... we will figure it out... -- to add to the formula i will be purchasing some CalTracs in a month or so, so that should add to the fun!!:punk: Quote Share this post Link to post Share on other sites
stangme428 33 Report post Posted February 15, 2011 Wow, 4.5" backspacing and you are hitting the balljoint area? It almost looks like you have more than 4.5" backspacing. Guys running 17" and 18" rims with 4.75" backspacing don't have clearance issues since the wheel lip is away from the balljoint. I wouldn't think the negative wedge would cause this much change. Interesting! yeah... i never measured the backspacing when i received these years ago... so maybe its time.. lol:ninja: Quote Share this post Link to post Share on other sites
stangme428 33 Report post Posted February 25, 2011 in training all week --- hope to get back on the car this sunday-- andy did quck check on the pinion angle, looks like its 4deg pos.. hope to have more info this weekend, get some bolts tightened up, some ports taped off and she heads back to mustang masters for paint.... Quote Share this post Link to post Share on other sites
stangme428 33 Report post Posted March 12, 2011 (edited) slacking on the updates..... busy times--- ok - so we measured for the drive shaft - 49 13/16 from the T56 to the u-joint cup - per the instructions from Modern Driveline. still have to measure which u-joint i have... cant believe i forgot.... edit--- dang it.. they are comps not super comps... oh well.. they are ceramic coated... ordered a set of hooker super comps ceramic on sale from CJ Pony Parts - EXHD54 $366.08 67-70 351C 2V HOOKER COMP LONG TUBE CERAMIC HEADERS 1-3/4 PRIMARIES 3" collector so once these are installed ill have a set of hooker comps for sale cheap.... only test fit once... ill post them in the parts section when I get to that point.... 69 is awaiting pickup to head back to mustang masters to work out imperfections and final paint... man I am dieing to hear her run.....!!!!! still a long way to go..... Edited August 20, 2013 by stangme428 wrong drive shaft length changed from 59 to 49 Quote Share this post Link to post Share on other sites
stangme428 33 Report post Posted March 12, 2011 (edited) slacking on the updates..... busy times--- ok - so we measured for the drive shaft - 49 13/16 from the T56 to the u-joint cup - per the instructions from Modern Driveline. still have to measure which u-joint i have... cant believe i forgot.... edit--- dang it.. they are comps not super comps... oh well.. they are ceramic coated... ordered a set of hooker super comps ceramic on sale from CJ Pony Parts - EXHD54 $366.08 67-70 351C 2V HOOKER COMP LONG TUBE CERAMIC HEADERS 1-3/4 PRIMARIES 3" collector so once these are installed ill have a set of hooker comps for sale cheap.... only test fit once... ill post them in the parts section when I get to that point.... 69 is awaiting pickup to head back to mustang masters to work out imperfections and final paint... man I am dieing to hear her run.....!!!!! still a long way to go..... Edited August 20, 2013 by stangme428 wrong drive shaft length changed from 59 to 49 Quote Share this post Link to post Share on other sites
buening 63 Report post Posted March 12, 2011 wow thats a steal on those super comps! good score. Quote Share this post Link to post Share on other sites
buening 63 Report post Posted March 12, 2011 wow thats a steal on those super comps! good score. Quote Share this post Link to post Share on other sites
stangme428 33 Report post Posted March 17, 2011 the ceramic hooker comp headers arrived today3.16.11 and are looking good!!! cant wait to get them installed and some exhaust flowing through them... mustang masters picked her up today, headed back for final body work and paint.... will go by and write up the next statement of work after paint... paint, headliner, installation of glass and re-installation of all items removed for paint etc was on the last statement. thinking of the following items - 70 glass setup depending on cost, currently i have original 69 AC glass - weather stripping - new door handles all really depends on cost, otherwise ill do those items myself.. :thumbup: Quote Share this post Link to post Share on other sites
stangme428 33 Report post Posted March 17, 2011 the ceramic hooker comp headers arrived today3.16.11 and are looking good!!! cant wait to get them installed and some exhaust flowing through them... mustang masters picked her up today, headed back for final body work and paint.... will go by and write up the next statement of work after paint... paint, headliner, installation of glass and re-installation of all items removed for paint etc was on the last statement. thinking of the following items - 70 glass setup depending on cost, currently i have original 69 AC glass - weather stripping - new door handles all really depends on cost, otherwise ill do those items myself.. :thumbup: Quote Share this post Link to post Share on other sites
stangme428 33 Report post Posted March 27, 2011 (edited) -- she is out in the sun getting block sanded .... :punk: Edited March 27, 2011 by stangme428 Quote Share this post Link to post Share on other sites
69shelbycoupe 11 Report post Posted March 27, 2011 You are just a bit ahead of me in body prep. Can't wait to see both our cars with paint. Quote Share this post Link to post Share on other sites
Fordrevhead 29 Report post Posted March 27, 2011 -- she is out in the sun getting block sanded .... :punk: Unfortunately that's the kind of party where none of your friends show up. Looking good though! Quote Share this post Link to post Share on other sites
Legion 10 Report post Posted March 27, 2011 ...I take it you're in the witness protection program:w00t: Quote Share this post Link to post Share on other sites
stangme428 33 Report post Posted March 27, 2011 (edited) ...I take it you're in the witness protection program:w00t: nah... that's the body guy.... didnt tell him i was gonna post his pic on the net .. so i gave him the Gaussian blur treatment ..lol.... im the goof ball in the engine bay on post 274 69shelbycoupe - yeah cant wait to see both of them.... the way this kona blue changes color i dunno what to expect in the end.. im gonna tell them to error on the deep blue side... depending on the light and the angle its every color from black to purple to deep blue... it looks nothing like a mistic paint but the color is still a bit different... cant wait to see the vista blue also!! Fordrevhead - if i announced beer and pizza that would change things... but... i don't think the body work would be so smooth...:tongue_smilie: Edited March 27, 2011 by stangme428 Quote Share this post Link to post Share on other sites
stangme428 33 Report post Posted March 30, 2011 (edited) ok -- time for the fun... spent a bit of time placing the Boss 429 scoop on the hood this afternoon. after some research it seems the original Boss 429's sit 6.5" from the end of the hood. while most want to slide it back ... i'm going with the original Boss 429 location just for fun. so pic number 1 is what i'm going with ... since i didn't measure while i was placing i got it close.. but yes it will be measured before holes are made... should be ready for paint by the end of the week.... Edited March 30, 2011 by stangme428 Quote Share this post Link to post Share on other sites
BuckeyeDemon 211 Report post Posted March 30, 2011 is that scoop dimensionally the same as a boss 429 scoop? it looks different, maybe just an optical illusion. Quote Share this post Link to post Share on other sites
stangme428 33 Report post Posted March 30, 2011 is that scoop dimensionally the same as a boss 429 scoop? it looks different, maybe just an optical illusion. its close but of course its a reproduction.... :thumbup1: Quote Share this post Link to post Share on other sites
Daves69Coupe 10 Report post Posted March 30, 2011 ok -- time for the fun... spent a bit of time placing the Boss 429 scoop on the hood this afternoon. after some research it seems the original Boss 429's sit 6.5" from the end of the hood. while most want to slide it back ... i'm going with the original Boss 429 location just for fun. so pic number 1 is what i'm going with ... since i didn't measure while i was placing i got it close.. but yes it will be measured before holes are made... should be ready for paint by the end of the week.... heres a couple pics from when I installed mine. Not sure how far mine is from the end of the hood tho Quote Share this post Link to post Share on other sites
stangme428 33 Report post Posted March 30, 2011 heres a couple pics from when I installed mine. Not sure how far mine is from the end of the hood tho dave.. that looks good!! thanks for the pics... how are you dealing with the hood cut out? does your air filter sit ok etc? just curious, i have not decided on a hole cut out yet.. thinking about cutting like yours and placing some mesh over the cut out and trying to come up with a air filter assembly to seat against the hood.. Quote Share this post Link to post Share on other sites
Jayru 17 Report post Posted March 30, 2011 My vote's to set it further back. It's your car, but it looks a little goofy to me sitting so far forward. Just my 2c Quote Share this post Link to post Share on other sites
Daves69Coupe 10 Report post Posted March 30, 2011 dave.. that looks good!! thanks for the pics... how are you dealing with the hood cut out? does your air filter sit ok etc? just curious, i have not decided on a hole cut out yet..thinking about cutting like yours and placing some mesh over the cut out and trying to come up with a air filter assembly to seat against the hood.. Hood closes over my filter fine Quote Share this post Link to post Share on other sites