Protowrxs 111 Report post Posted December 2, 2014 Just a quick little update. I know the oil drain plug picture seems useless but I screwed around with that on and off now for a month or more. The Cobra T Pan was stripped and had one of those quick fix drain plugs in it. I REALLY didn't like what it looked like and it hung way down past the bottom of the pan. After trying a couple different ways/sizes to drill / tap it I finally gave up and bought a big 3/4" replacement magnetic drain plug and a proper drill/tap and took care of it. Looks much better than it did and should seal up and maybe protect the engine a little even. Otherwise I have finalized the rear disc brake setup, have it all installed including the e-brake cables, pads, etc and will be ready to fill and test the brakes pretty soon. I can't believe how fast things get dirty in the garage though. The brake booster is finally painted and installed along with the line lock and proportioning valve. You can't see it there but I have a Summit vacuum reservoir mounted under the drivers side fender that the booster is fed off of. The Wilwood reservoir is for the hydraulic clutch master and seems to fit in there properly although a final test with the hood hinge and spring is needed. 1 Xde4hewkew reacted to this Quote Share this post Link to post Share on other sites
Protowrxs 111 Report post Posted December 28, 2014 Sorted out a couple more Things recently. Fuel pump mount and fittings and gauges primarily. Cut up some scrap to make a fuel pump mount after working out the fitting arrangements. Braided hose from then sender to the pump inlet, drives the regulator and then out to billet regulator and out to an AN to hard line adapter driving the new aluminum fuel line. Not that it's a big deal but the regulator in the back keeps low pressure from back to front but also makes pressure adjustment more of a hassle I guess. Since the battery is going back in the trunk like in the old days of the car, the pump relay and a pump safety impact shutoff from a Taurus is going to be mounted in the trunk. On the gauge side I make a couple U brackets to hold in the mechanical oil pressure and water temperature gauges in the stock locations and installed the with new gauge lenses (worth the money even though I had thought about using my old ones). I'm keeping the stock speedometer but mounting a simple Sun Pro tach in the secondary big gauge location. No way to afford a factory tach setup and this tach looks similar to the stock gauge feel. Quote Share this post Link to post Share on other sites
Protowrxs 111 Report post Posted January 13, 2015 Cluster Built, Rough Wiring Test, AC Compressor Bracket Couldn't get any of the image alignment buttons to work so they are all inline Cluster Finalized Progress has moved to the inside for a bit as I finally decided to lock in on a cluster and gauge solution. I really had planned on replacing the speedometer and going with after market in dash speedo and tach but the money just needs to go elsewhere. I picked up a couple of SunPro mechanical gauges for oil and temp as they are affordable and have a similar look as the factory 1969 speedometer and then bought a new, but cheaper, SunPro tach that had a more matching gauge face than the original old tach I had planned on using. After removing the bezels off the oil and water gauges they fit perfectly in the outer pods. I used some flat aluminum stock to hold the gauges in the pods. I then bit the bullet and drilled out the backing panel for the gauges to fit the new tach in the dash. I modified the existing column mount to hold the tach into the cluster and mate up into the main pod. Looks good enough for me, keeps the tach off the column gives me better gauges. Obviously I had to ditch the "printed circuit board" solution so I rewired the cluster for illumination, power, ground, turn signals, high beam, brake warning as well as a couple,other features. I used a single RGB LED in the top middle as a multi function warning light. Red indicates brake fluid is low, green is tied to a small switch I had used in the past for a notice when the vacuum secondaries open and Blue Lightsthe blue is used when the line lock is on. Easy enough and avoids multiple indicators. Since the turn signal indicators were gone from the outer pod gauges, I used a couple of RGB LEDs in the lower portion of the bezel to replace them. Originally I had some old red LEDs installed but they were way too old and weak. Since I already had some RGB LEDs from my robotics hobby, I used them here as well and along with an old multi position switch mounted down lowin the bezel I can change the turn signals from red, to blue to green just for fun. Since the fuel level gauge was gone from installing the tach, I used a three gauge pod mounted below the center dash like I used to have but have a vintage vacuum gauge, SunPro volt meter and an old vintage 72ohm LED fuel gauge. I know, a mix of weirdness but fun stuff for me and should be quite functional. I added another wire run and connector from the dash cluster long enough to reach down to the center gauge pod with a connector on the end. Makes it easy to install and access the lower gauges. A set of new plastics lenses rounded out the cluster along with some new square plugs to allow installation and removal. I had already painted the bezel black and am quite happy not having the chrome highlights around the pods myself. For now the illumination is blue LEDs as I liked the original blue hue from the plastic bulb covers. I did remove the plastic blue covers as the LEDs look great. I can always change the bulbs if I don't like the color. That should round out the cluster and gauges and although I've tested them on the bench I do need to hook up the connectors to the under dash gauge and bench test power and connections. Wiring Testing While working in wiring I did some power up testing on the under hood and dash harness hooked up on the front of the car and insured the high beam, low beam, and horn relays I installed worked as well as the solenoid and was happy when they all did. This proves I had the wiring right for those areas, next is to drive this from the inside switches once the inside wiring harness is installed and the firewall connector mated up. I actually was a bit aprehensive about this as I wired it up and documented it but had not actually tested anything. AC Bracket I also started working on an AC compressor setup solution. In itially I was thinking of using the old York type compressor as I have a couple of them and believe at least one is good but the more I read about them not liking R134a and how ugly they really are anyhow stuck up so high on the drivers side I changed my mind. However, I really hated the existing solutions of adapting the original York mount to put a Sanden type compressor on. This puts the compressor way up there in the same position or even higher up. Since I do not have and do not plan power steering with the manual rack installed, I could move things down lower to match stock alternator setup on the other side. After loads of measuring, finding specs for pulley locations and drawings of standard compressors online I mocked up a cardboard version to make sure it would work in the location. After satisfying myself that I could make it work I ordered a standard type compressor to mock up and finalize the mount. It works out pretty simple with the 1970 model Milodon water pump allowing a simple triangle bracket along with some backing spacers and it should work out. This puts the compressor a bit lower, or possibly even lower if I can get enough belt tension, and provides for a modern solution for the future AC unit. Next will be figuring out a set of double groove pulleys that I want along with the correct fore and aft spacing. http://www.protowrxs.com/Nolen/Stang/Rebuild/2015-01-11.asp Quote Share this post Link to post Share on other sites
RPM 1,190 Report post Posted January 22, 2015 Very nice work. I might need you to drop by to wire my car :) Quote Share this post Link to post Share on other sites
DarkBuddha 107 Report post Posted January 23, 2015 Excellent work, especially on the a/c compressor mount. I'm running one of the ugly high mounts for the Sanden in mine, but I'm also running ps, so I'm kinda stuck that way. And I'm totally empathetic with trying to figure out the right pulley setup. I think we probably had a dozen different pulley configurations before we finally settled on one, and then just recently I went and messed it all up again by going back to a 351w from the place-hold 302. I'm not looking forward to figuring it out again.Anyway, with a bit of luck, you'll be back on the road sooner than ever! Quote Share this post Link to post Share on other sites
Protowrxs 111 Report post Posted January 26, 2015 Ha, thanks RPM but you would be sorely disappointed. These cars are so simply wired but I still get lost over and over again. Budda yeah, without the PS it's much easier to make it work... unless one wants to spend $1500 for the beautiful serp setups. Out of my league though. That's a Wrap - Finalized Under Dash Harness - Testing in the car Finally finalized the under dash and under hood harness... I think. This involved wiring up the final requirements for the MSD +12v, +12 start and run for the fuel pump, A/C compressor wiring to run the fan when the compressor is on (required a diode to keep the fan controller from turning the A/C compressor on as well), feedback wiring for when the fan is on for a future LED indicator for the heck of it, and more. Since I wanted all of this to go through the normal firewall connector I had to put ends on both sides and run new wire. I also ran five extra wires through the connector for any future use. After that I installed the wiring loom and/or wrapped the harness with proper wiring wrap. I also had to run the wiring for the line lock and the feedback to the cluster for the RGB LED for it and tried to think of anything else while finalizing the wiring. I added a 12v fused circuit to add power ports over on the passenger side of the car either in the glove box of next to the lower center since the ash tray / cig lighter is replaced with gauges. I also had to add a relay to control the start circuit as I want to keep the starter from engaging unless the clutch is depressed. It's no super safe as you do not have to fully depress the clutch but better than nothing. The biggest progress was actually installing the harness on the lower dash, installing the cluster, and testing it all. The install went ok, the hardest part being getting the ignition switch lined up and tightened down. Once that was finally done it was a matter of plugging in connectors and securing the harness in different locations. I still have to mount the new fuse box to the floor but that shouldn't be too hard. I was able to test all the features once it was all plugged in and it was nice to see cluster illumination for the first time in decades. Also the RBG LEDs worked fine for the turn signals and I can switch them to red, blue or green. They are red in the picture here. The center warning LED works as well as it red because there is no fluid in the master cylinder and red means brake warning. It will light up blue when the line lock is on and green when the secondaries on the carb are open. I had to use the press to angle the center mounted gauge mount to get an angle that I could actually see the gauges but they look good to me. I will have to fill in the side areas to make things look better in the long run but after I made a secondary bracket to mount the main bracket I can now easily install and remove them as needed. I tested the horn and the relay kicks, the high and low beam relays work and the fan relay works so it looks like the wiring is good. Feels good to get to this point and it feels like the car is actually going back together. Quote Share this post Link to post Share on other sites
Protowrxs 111 Report post Posted February 23, 2015 Short Block Done - Clutch Work - Poly Bushings - Hiding Wiring Short Block Buttoned Up After what has seemed forever... ok, I guess it has been forever but anyhow the 347 shortblock is finally buttoned up. I had to get a different oil pickup, fix the oil pan drain plug and get the pump and pickup back on the motor before I could move forward but now that's done. I installed the oil pump and pickup, re-checked the clearance between the bottom of the pick up and the pan and sealed it up. There was a little drama after I had the oil pan gaskets all ready to install with sealer, dropped the oil pan on and realized the Mr. Gasket oil pan bolts I bought years ago were useless with the thick railed COBRA T pan. I quickly scrounged up enough 1/4" bolts and washer to make it work before the sealer setup. I also final checked the front cover, installed the front seal, and installed the front cover, the balancer and the timer pointer. I had already drilled the 1985 front cover I'm using for the front oil dip stick tube. I liked the 1985 cover as it doesn't have the mechanical fuel pump mount and I am not planning on running a mechanical pump anyhow. Just looks cleaner. That year was a standard rotation water pump which fits in with the standard setup I am using. After finally getting the oil pan on I could not actually install the lifters, dog bones and spider hold down without having oil running all over the place so the short block really is done at this point. I still have to install the one piece rear main seal but that can't happen until I get the engine off the engine stand for access. Clutch and Slave Mount I've been worried about making a clutch decision and how to mount the slave cylinder for years now. After finalizing getting the scatter shield on the trans I put it up on the bench to begin to try to figure out to mount the CNC slave to allow driving the clutch fork. After measuring things and working up a cardboard template I began my scavenging hunt for some metal to make it out of. Originally I thought I'd have to weld up some plate and make some bracing but hitting the junk pile netted an old riding mower rear tranny cover. Actually this is from the old "Go Mow" go kart project from years ago. NEVER throw anything away! :-) My cardboard template laid over this piece of still perfectly. Without a working band saw, I broke out the jig saw and began cutting out my marked up piece from the template. I cut it all out, lined up the mount holes, and as I was ready to mount it saw it wasn't lining up and thought I had flipped the template when I cut the metal. Rather disappointed I re-laid the template on the cutout piece and welded up some extra plate to make up for the "lost" area I thought I had messed up. Then when I tried to line the holes up on the trans and the scatter sheild to mount it all up found out the trans has twisted (I didn't have the other side bolts in yet as they are larger bolts and I have to drill out the trans ears still) and my original bracket was indeed perfect to begin with. Ugh! SO I broke out the jig saw again and cut off the newly welded extension and it all lined up properly. Stupid stuff. Granted it's not the prettiest slave mount bracket for for the price of a piece of scrap steel and some cutting (and re-cutting) time I think it will work great. I also picked up some misc springs from the local auto parts store and once I know the exact mounting I'll bend and cut if off to hold the fork to the slave. I also ran some brake line from the slave up around the trans to the top of the scatter shield where I will have some soft line from a Jeep connect to another hard line that goes from the master to the firewall area by the scatter shield. Should work out nicely I hope. As noted I have been looking at clutch options for quite some time. I had a Centerline and a Spec that came with the trans but I really didn't want to put a used clutch setup in the car as I do not plan on having to mess with the clutch again in my lifetime... seriously. But then again I didn't see where a $500 clutch was needed for what I'm doing but I didn't want a stock setup either with the 347 and a bigger tire on the car. This RAM 88794HDT kit seemed to fit the bill just fine and was in the middle price wise. I've run a RAM clutch in the TBird Turbocoupe and have been happy with it. It's rated to 450hp which on the high side of anything I'll be doing with this setup. It *IS* pink, or very close to it but it will be hidden away in the scatter shield anyhow. Poly Bushings Another thing on the to do list was installing the rear poly bushings on the DOZZ Boss 302 leaf springs. The bushings were the originals and were worn enough that the leafs could be moved left and right quite a bit when the rear end wasn't mounted in the car. I know I could have replaced the springs with new units but again the goal is to get the car back on the road and the bushing will help a lot while keeping the old Boss springs in use. I was a bit concerned about how to get the front bushing out as I knew it had the steel outer shell that had to be removed. I felt extremely lucky when I stuck the spring in the press and realized the press as exactly the right size to push out the shell but not seize up in the spring. After a few minutes of pressing the front bushings were out shell and all and ready for the new poly bushings. After installing the bushings in the leaf and getting things back into the car I was amazed at how solid the leafs feel in the car. Should make a big difference in how it rides and feels I would think. With the bushings done the rear end really should be ready to roll. I had to install the new longer wheel studs in the passenger side and re-install the leaf springs but it should be the last time to mess with this area. You may notice the old school slapper traction bars on the car. This is another area where I'd like to put some different bars on it but then again these were one of the first things I bought for the car after the headers back in the day so I kind of like running them. Hiding Wiring I also pretty much finished up the front end wiring having it all routed under the fender like before including the MSD wires, new wires for fan control, and the wiper fluid box. This keeps the drivers shock tower clean and I ran it like this "back in the day" and was quite happy with it. Quote Share this post Link to post Share on other sites
Protowrxs 111 Report post Posted March 2, 2015 Clutch and Console Clutch Final Work With the clutch in hand and the slave mount completed I reviewed how to handle connecting the trans clutch line to the master clutch line. I found a small 6" double female flex brake line used on Jeeps somewhere and decided it would work for a flex line between the trans and the chassis. The hard line was run up the trans and scatter shield and an extra exhaust hanger bracket was drilled out to mount the end of the soft line to the scatter shield. On the firewall side another bracket will be fitted to hold the other end of the soft line in place once I get the location dialed in. Should work and look reasonably good I hope. I also pulled the scatter shield off and drilled out the passenger side transmission ears to handle the larger bolts the scatter shield requires. Now I just need to pickup some grade 8 bolts for that side and it should be the final bolt up. I cleaned up the Ford clutch fork and made sure it was in good shape, installed the new throw out bearing on it, lubed everything up and hope this is the final install for it as well. I can't really finalize the slave mount holes until I get the flywheel on the motor, clutch mounted to it and the motor and trans together so it's left for now. The Console Find I always loved the 69/70 center factory consoles and really am not found of the aftermarket ones. I also really wanted a factory console with prices being way out of my range for even minimally good units I had long forgotten about making that happen. Like I had shown in previous posts, I was going to mount gauges where the non-console cars ash tray was as I never planned on finding an affordable console. However, checking in on the local Mustang forum recently I noticed an ad for a 69/70 console and gauge cluster linked out to a Craigslist ad. Intrigued I followed the link and saw this console listed for $150. It had both ash trays and the guy also had an extra top plate and a standard trans top insert available for another $50. The ad had actually been up a while so I wasn't sure if it was even still available. I made contact with him and it was available. He shot me a few more pics and the unit really looked in pretty good shape. Definitely good enough for my project. I ended up getting all the console parts for $175 which is cheap to me. It has a newer console cover and even the inside storage is in pretty good shape. While waiting to get a pickup date setup I went ahead and ordered the gauge pod replacement for the ash tray since I have to have a couple gauges there from replacing the gauges with aftermarket units in my cluster. The primed top plate is actually in better shape than the other that is missing a small corner BUT is loaded up with primer. The black area on the right side is where I started experimenting with sand blasting the primer off using low pressure. Looks like that will keep the texture unlike sanding off the primer would have. I've also ordered a wood grain insert to hide the extra holes on either of the top inserts and am thinking about modifying the cut up seat belt store to make a simplistic cup holder which would be very handy but still keep some normal look inside. Since my original center gauge solution had three gauges, "economy" using the vintage "econometer" gauge, voltage, and fuel level, I plan on keeping the "econometer" and the fuel gauge there and not using that voltage gauge. I've ordered a small digital volt gauge I'm going to stick somewhere that even has the ability to measure up to 100A of current with a shunt it has. It's a small 48mm x 22mm gauge so surely I can find somewhere unobtrusive to mount it. AND LIKE OTHERS I HAVE NO CLUE WHERE THIS ATTACHED THUMBNAIL IS COMING FROM NOT MY CAR - BUT I'LL TAKE IT.... Quote Share this post Link to post Share on other sites
RPM 1,190 Report post Posted March 2, 2015 Nice find on the console! Great price and no shipping. Quote Share this post Link to post Share on other sites
Protowrxs 111 Report post Posted March 16, 2015 Stainless Gas Tank, Radiator, Fans, and Wiring Picked up a Gas tank Was going to have to get a gas tank sooner or later anyhow and had been keeping my eye on this stainless version. Figured it would be best since the car isn't going to be driven daily, the stainless looks cool, plus I wouldn't have to paint it this way. The tank and sensor look great. I'm sure it's not the super top quality like the high dollar tanks are but should fit my needs quite nicely. It's dang shiny too. Thinking about leaving the trunk un-carpeted or at least cut out the top of the tank to see the shiny. Radiator and Fans I had also been waiting for a vendor to get the big block stamped aluminum radiator back in stock so I could get this area taken care of. I wanted this particular one as it has stamped top and bottom tanks like the factory so the proper big block upper and lower mounts should work. Just looks better to me as well. The fans are some swap meet specials that cost a total of $7.50 for BOTH of them I do have a 16 inch single that I was going to run but have some concerns about fan motor to water pump pulley clearance. By running the duals that shouldn't be a problem. Additionally I can stage the fans with two fan controllers if so desired. I did pull the fans completely apart, cleaned, tested, lubed and painted them so they do look better than when I picked them up. I have also thought about a shroud for them but I would need to bead roll any sheet aluminum and I don't have a bead roller... yet. Rear Wiring Harness I had been looking for my rear wiring harness for a while and finally remembered I actually wrote up an index for all the boxes in the attic by box number. Yep, read the list, find the "rear harness" information and it was where it was supposed to be. There was some work to do here for sure. The harness was dirty with missing cover wrap, wires that had been tapped into before I owned the car for trailer lights (yes, the car had a trailer hitch on it when I bought it), plus I need to add another wire for the electric fuel pump relay. I ended up adding a two prong connector at the front and ran two wires to the back, one for the fuel pump relay and the other for either a future audio amp or other need. Might as well add it while I was modifying the harness. The "after" harness looks better but I still need to pickup some more covering before the final run from the trunk to the front. I DID install the harness in the trunk (no pics) and connected ground, cleaned up the mounting and tested the side marker and tail/brake lights and all is well. Kind of cool like the car is slowly coming back to life. Quote Share this post Link to post Share on other sites
Protowrxs 111 Report post Posted April 2, 2015 Engine Wrapping up - Seat Options Engine Is Wrapping Up Progress does continue on the 347 despite the basic appearance. I was unhappy with the way the head studs worked on the short studs as the nuts were not fully thread engaged so I bought a set of ARP 12 point bolts to use instead. I finalized on a pair of Cobra covers I'm going to use out of the various options I've accumulated and cleaned them up and painted them like I wanted. Turned out pretty nice to me. This is how the engine used to look and I liked that look so here it is again. With the covers painted the 347 looks ready to rock, and not knock, and roll. All that is left is to re-run the lifters after swapping the head studs / bolts out and install the intake. Then it needs to come off the stand and have the rear main installed, flywheel and clutch installed and get married up to the McLeod scatter shield and 3550 trans. So ready for this to happen. :-) Seat Update I had debated about seats for some time and had bounced around the idea of having the 71-73 high back seats recovered, buying aftermarket versions, or finding something I could buy seat kits for and recover myself. I've always liked the seats in my 1985 Mustang SVO which is the same layout as the 1990-91 Foxbody Stang seats so I searched around a bit for some options. The downer with the 71-73 seats is adjustability... there isn't any. The seat folds forward for back seat access and moves forwards and backwards on rails and that's it. With my back bothering me in crappy seats I figured I better think about seats a bit more. I found a couple options online including a more expensive set with decent upholstery or a cheaper set in Shawnee that needed recovering. For the price the decent set just was not worth it and after finding cloth, vinyl, or leather options for recovering I picked up these worn but solid 91-92 Mustang GT seats in Shawnee. Saved a trip out of town and was what I was looking for. TMI makes upholstery kits for Fox cars and the 91-92 GT style matches the vertical pleats of the existing back seat that is in good enough shape. So I picked them up and, although they need recovered, they have power lumbar adjustments (really helps my back), manual bolster adjustments, adjustable under knee support, and recline and adjusting backs. In other words they are MUCH better seats than the olds ones PLUS they have the 68-69 look and feel to me that better matches this car. Just have to get the seat kit ordered now. This is an example of vinyl or leather, I think I'm going with cloth though. Quote Share this post Link to post Share on other sites
RPM 1,190 Report post Posted April 22, 2015 Coming along nicely. Did you do a side by side comparison on the head studs and bolts? I wonder if the studs were for the correct alum heads. Seats in our cars are always so much "fun" to get right. Quote Share this post Link to post Share on other sites
Protowrxs 111 Report post Posted May 14, 2015 Just teaser.. .need to complete a good update but... After about 19 years... Quote Share this post Link to post Share on other sites
Footcutter11 23 Report post Posted May 15, 2015 Oh, now that is pretty! Love the color! Quote Share this post Link to post Share on other sites
Protowrxs 111 Report post Posted May 17, 2015 Oh, now that is pretty! Love the color! Thanks! I almost went with black but I always liked the light Ford blue and that is what it looked like ages ago... Now to keep on keeping on. Quote Share this post Link to post Share on other sites
Protowrxs 111 Report post Posted May 27, 2015 Yes There is Progress! - Engine, Parts, Tires and More Engine Is In! So the more impressive progress is the final installation of the 347 and Tremec 3550... finally! Still load of work to do, things to hook up, things to test and so much more but just getting the engine/trans in the car is a BIG step for this forever project. Here are a few of the process pics to get to this point including mounting flywheel, clutch, bellhousing and tanny. The install was rather uneventful. The only real challenged was having to remove the steering link to the old Unisteer rack to get the trans down in the car cleanly. Seat Work After picking up the Fox Stang seats earlier, I went ahead and ordered some TMI covers for them. Initially I was really going to go with some vinyl or leather covers or have them recovered. However, after thinking about NOT having a car with leather of vinyl seats and remember why I went with cloth covers. The vertical design matches the existing rear seat BUT I purchased a full Fox body kit and will likely work with someone to use them on the 69 rear seat. The covers went very smoothly, much easier than I expected. I now know I can re-cover my 85 SVO Mustang seats as well so another project is on the list. I do now wish I could have afforded the extra money for replacing the seat foam but for the minimum seat time this car should see the old foam should suffix. Only issue is there is a bit of sag from not enough filling in some areas. And Parts! The last bit of news is the parts that arrived while working on installing the engine. Parts list included flowmasters, 2.5 exhaust, header collectors, battery and rear tires. Tires are another compromised area. I really wanted a fatter tire under the car but was limited with the 8.5" slot wheels which I wanted to keep. So I stuck with the 10" tire instead of the 12". I was afraid the 12 would have had too much bulge on 8.5 inch wheel. Quote Share this post Link to post Share on other sites
Protowrxs 111 Report post Posted May 27, 2015 Engine Work, Front Springs, and Engine Accessories Tire Fitment With the 10" Tire and the 8.5" wheel it fits about as expected. I'd still like it a bit lower but until the car is fully equipped with doors, sheetmetal, battery, and interior I'm not going to make any changes. Rear lowering is rather eashy in the back with some 1/2 or 1" blocks. Front will be more of a challenge if needed. Front Shot Front skinnies are the same tire, just for the 4.5" front rims. Obviouslly need to buy some lug nuts still but I like the overall tire look. Too High Just threw on a fender to see where it's at and it's too high for me BUT still needs all the front sheet metal, hood, doors, etc and some time to settle back in a bit. It sat lower before but that engine also had iron heads so not sure where it will naturally end up at. Hopefully I won't have to try to make adjustments but if I do I may just buy new lowering springs. Sitting Down This is sitting down a bit more with me on the front end and shows the front end assembled. The roller spring perches are going to be nice but with the larger pipe required for the bearings getting the nuts on the lower shock mount was a pain. Headers etc With the headers mounted and the collectors in I have some idea of whow the H Pipe and exhaust may work out. I am hoping there will be no or minimal bending required but we will see. Front Accessories Love the pulleys I picked up from a fellow Stanger in Norman. I wanted aluminum pulleys but really wasn't impressed with the ones out there in my price range. March brand was just way too expensive but the CVR and others just didn't look nice. Found these and I have no clue what they are but always loved this style. Quote Share this post Link to post Share on other sites
Protowrxs 111 Report post Posted June 24, 2015 Actually running... https://youtu.be/gSOBiisL1p8 Smell the fumes view... https://youtu.be/8rfhsSSpgaM So it's running, now to get it driving. Stephen Quote Share this post Link to post Share on other sites
Footcutter11 23 Report post Posted June 27, 2015 Love that feeling. Never get's old. Quote Share this post Link to post Share on other sites
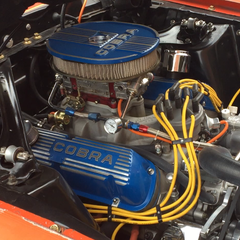
Protowrxs 111 Report post Posted January 3, 2016 Still working on this thing a little at a time. Car runs, drives, needs debugging but feels nice and strong. I needed to organize my plug wires and didn't like the simple small black separators so I tried something a little different. Did a simple 3D design and then printed them on my home built 3D printer out of PLA. They may or may not survive the under hood head, may have to move to ABS but should't melt away as melting point is around 300F. They may warp, time will tell. Works though for now. Model is here is anyone else wants to try: http://www.thingiverse.com/thing:1231498 Otherwise the car needs the interior finalized. Front Fox body seats are in. Needs dash back on, windows, door panels, rear quarters, speaker tray and rear seat and final mount the console. Also need to install the door and window seals to button up the inside. I think the turn signal cam is mangled as both front blinkers blink on either turn direction, going to replace that first and go from there. In the mean time our son wanted a project so yet another Ford is on the premise to be rescued. Picked up a 1966 Galaxie 500 Fastback with the plan to use all the EEC-IV EFI stuff that did not get used on this car along with either a C4 or an R470W OD with maybe a home brew controller using an Arduino. Time will tell but besides the hail damage the old car seems pretty solid. Son and his girlfriend next to it when we drug it home. Another big project for sure as it's nasty inside and out but overall solid body, trim all there, and besides the '65 grill and bad hood the rest seems intact. Stephen Quote Share this post Link to post Share on other sites