bnickel 10,004 Report post Posted December 6, 2011 what the hell happened? you were making such great progress then we started getting posts about your lawnmower go-kart, which was pretty damn cool BTW, but less and less on the stang. at this rate I'll have my 69 Cougar, which I've barely even touched in the 2.5 years I've owned it, done before you get the stang done.......:smartass::tt2::001_tongue::tt2::biggrin: Quote Share this post Link to post Share on other sites
Mike65 475 Report post Posted December 6, 2011 Stephen, I was looking over your web site about your Mustang & you stated you have had the car for 10 years, dont feel bad I have had mine for 10 years now & doesnt even run. I have parts scattered all over the garage & I am still working on the sheet metal repairs & feel like I have gotten more done in the last 1 1/2 years then in the previous 8 1/2 years due to 4 moves a failed business venture & being out of work far a bit. Sometimes life gets in the way of our plans. Just keep plugging away like me, a little here & there & one more thing is done. Mike. Quote Share this post Link to post Share on other sites
DRASTiK 22 Report post Posted December 9, 2011 Hey Proto, did you clearance the block for the 347, or did you have the machine shop do it? I'm currently saving for a stroker kit, but have the roller block in my shop collecting dust. If you did it, I was just curious how involved it was. My understanding is that it's just a small amount of material from the bottom of the cylinders, but I may be way off. Quote Share this post Link to post Share on other sites
Protowrxs 111 Report post Posted July 13, 2013 Just a little update on the non-progress but a little progress on the "forever project". After another dormant period and years of other projects like the 88 Turbocoupe, the SVO, the 89 Ranger 4x4, helping my son merge a couple 240sx cars into one, dealing with three collasped vertabrae in my back, bulding a remote control lawnmower and a few other projects I hope to get back on the 69. It had set without a rear housing in it for a long time as I waited to prep the narrow(er) housing and get it back in the car. It already had a 57 Ford housing in it but this one is a few inches narrower than that allowing a standard backspaced wheel to get more tire under the car. I had to clean some welds and weld on new spring perches and some strapping for the perches before it could be installed. The housing was pretty rough having been in a drag Nova and having had coil perches, linkages, etc welded to it. Instead of the normal gloss black, I used some bed line rattle can spray which I like, it's tougher than paint and it hides the rough hosing exterior more. Finally back on the ground my son and I rolled it out of the garage to clean things up on 100 degree day (thanks to the little AC unit in the garage it keeps it below 80 in there). Of course we live in Oklahoma so within an hour of rolling it out, with no chance of rain in the area, a storm brewed up with loads of rain and worse yet hail for an hour or so. Luckily no damage as it never got larger than nickel size but was scary for a while. No springs up front yet so she is dragging her nose. Here are a few pics of the lastest... Hoping once again to have more activity and updates... Stephen Nolen Quote Share this post Link to post Share on other sites
Pakrat 1,043 Report post Posted July 15, 2013 Hey that's great and all, welcome back, you've been missed, blah blah blah, now, uh, let's here some more about the remote controlled lawnmower!!!! :1eye: Quote Share this post Link to post Share on other sites
stangme428 33 Report post Posted July 15, 2013 welcome back!!! now thats funny... funny that i was wondering about the lawn mower also... ok so lots of drone RC parts out that could be adapted to a lawn mower... i just dont have a spare mower to work with.. lol Quote Share this post Link to post Share on other sites
Protowrxs 111 Report post Posted July 15, 2013 Ha, just a combo of a $50 power chair, old mower, RC radio, couple of servos and a welded up little frame to mow the small areas around the house. Here is a pic of the current one, I still need to finish the controls on the big zero turn to make things much easier. Lucked out on the chair as the issue was just a cut power wire. The rest was really pretty straight forward. This mower is an electric start so it is really easy to get it started and mowing. Needs some tweaking on the servo setup but works pretty good. Quote Share this post Link to post Share on other sites
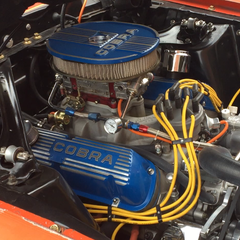
Protowrxs 111 Report post Posted March 19, 2014 Decisions decisions... :-( Although I really think the EFI tubular GT 40 setup would be really slick and I've worked that direction for a long time with wiring, computer, sensors, etc, the "old is cool" carb setup is tugging at my hot rod heart strings. The project is slimming down some to try to actually get it running so I'm falling back on my oldie US slots with some spinner centers instead of some 17 / 18 Cobra style wheels so I'm thinking go back like it was in its glory days when I was a teen. Damn that was a long time ago. Opinions? Ideas? Or whatever's? Quote Share this post Link to post Share on other sites
bnickel 10,004 Report post Posted March 19, 2014 well I'm collecting lot's of "Day Two" style parts for the 69 Cougar, including the Ford Muscle Parts intake and matching Ford numbered Holley carb, I'm adding some chrome "Power by Ford" stamped steel valve covers just like what you could get from Honest Charley's, Summit and Gratiot Auto supply back in the day and I've also got several different ignition options to choose from including an NOS Stinger ignition, an NOS Accel dual point, Super Coil and Ignition Amplifier setup and a Mallory Double Life dual point with Volt-Master Coil and Super CD ignition box. I've also got a vintage Hone-O-Drive overdrive an FIV Secura steering wheel and I'm currently looking for a cheap set of vintage American Racing 200S "Daisy" wheels. I'm thinking of doing a mild vintage street machine style paint job too, in Winter Blue with a Pearl white top and some kind of vintage style graphics on the sail panels like maybe some candy blue and heavy flake flames or something with an Eliminator style scoop and a hood tach. My vote is old school all the way!!!!!!!! I think you should do the headers with a flat white ceramic coating too to really pull off that old school vibe. :clap: Quote Share this post Link to post Share on other sites
DarkBuddha 107 Report post Posted March 19, 2014 I vote whatever gets it on the road quicker. You can always swap to whichever other one later if you really want. But you can't make up for the time lost not being able to enjoy it. Seriously, I know you know what I mean. Quote Share this post Link to post Share on other sites
Pakrat 1,043 Report post Posted March 19, 2014 (edited) I think you should do the headers with a flat white ceramic coating too to really pull off that old school vibe. :clap: You know that get's my vote!!!! BTW B, did you finally sell the GT? But you can't make up for the time lost not being able to enjoy it. All too true! I just modified my whole plan into two stages this week for short and long term. Short term is everything that gets me on the road again this summer like putting the 3spd back instead of hunting for a 5spd and maybe even leaving the old white top in place or not re-installing the frame at all for now as I don't plan on driving with it up anyway. Edited March 19, 2014 by Pakrat Quote Share this post Link to post Share on other sites
bnickel 10,004 Report post Posted March 20, 2014 You know that get's my vote!!!! BTW B, did you finally sell the GT? not yet, got a couple small rust holes that have come back, one in the door and at the joint of the rocker panel/quarter panel right behind the passenger door and the trans is still not shifting exactly right, delayed upshifts, so I have to get those issues fixed first. I also bought new chrome for the original quarter ornaments and I'm gonna put those back on instead the Shelby scoops, which were installed incorrectly at the body shop so now they're warped to hell because of it. I also got a killer deal from Discount tire on a new set of Cooper Cobra tires, size 215/70-14.....$215.00 for all 4, or $57.00 per tire plus tax, they are normally like $85 a tire or more even from Discount. I don't know if they were clearance-ing them out or what but it will be getting the original GT wheels put back on it too and the buyer will get a choice of the Edelbrock 454's or the GT's or both for extra money. Quote Share this post Link to post Share on other sites
Protowrxs 111 Report post Posted August 11, 2014 Back on the forever project... 347 Assemble started. I checked clearances and had the assembly balanced a couple years ago as well as the block clearanced for the 347 kit. Finally decided to get serious about putting things together before I lose all the parts. Already can't find the cam thrust / retainer so have ordered another. On a side note a couple of my OLD hot rod buddies and I have a running challenge to get our cars back on the road for the summer of 2015 and our local Knights Auto Club 30th annual show. We helped start the club back then but went our own ways years ago. Should be interesting. I think it will be on the road but not beautiful by any means. 347 Scat Crank... Home brew cam installer... Together at last.... Ready for a degree check... Protowrxs -Stephen Quote Share this post Link to post Share on other sites
Angel 24 Report post Posted August 15, 2014 Engine looks good! I can relate on the "forever project". Ive been saying Next summer for about 2-3 years now. Quote Share this post Link to post Share on other sites
RPM 1,190 Report post Posted August 15, 2014 (edited) Nice progress. Classic title The Forever Project! Wish I'd have thought of it. It certainly applies to me as well. Your cam installation tool looks like something I'd come up with and made me laugh. Good luck. Bob Edited August 19, 2014 by RPM Quote Share this post Link to post Share on other sites
Protowrxs 111 Report post Posted August 16, 2014 Thanks for the comments. Sad thing is I've had most of these parts for a very long time, just never finalized the block and a few other things and married them all together. Our poor son is 18 and just went off to college and has never seen the car running... that's how "Forever" it has been. :-( Running by Summer 2015 is the goal though... ugly or not, running and driving \o/... I hope... Stephen Quote Share this post Link to post Share on other sites
Protowrxs 111 Report post Posted August 19, 2014 Continued on the 347 assembly and have it just about done. Setting actual TDC for degree checking cam Checking the cam degrees against specs, all is well within 1-2 degree which is the best I can do with my tools and the lube that was still on the cam lobes. Checking the high volume oil pump and Milodon pickup for clearance and fit. Have some "real" bolts ordered (ARP) for the pump and pickup final mount. Re-chased all the external threads after painting things to make sure they are ready to roll. Went from THIS... To THIS on the car to get the old mocked up stuff out and start the final prep and paint for the underhood area. I need the Cobra T Pan as well to put on the 347 and I have checked and re-checked all the rack clearances, headers, have the 3550 all worked out, etc and should be good for final engine / trans install after underhood paint done. I have a full Trick Flow gasket set ordered with the O-Ring head gaskets on the way and a Milodon water pump to finish out the core of the engine area. Still have to figure out timing marker, finalize the alternator mount setup, drill out the 1985 front cover for a dip stick and fill the mid block dip stick hole up but overall the engine is just about done. Progress at least and parts in one place instead of 100 boxes \o/ Stephen Quote Share this post Link to post Share on other sites
stangnet33 88 Report post Posted August 20, 2014 Good progress ! Curious what balancer you are going with ? Quote Share this post Link to post Share on other sites
Protowrxs 111 Report post Posted August 20, 2014 Just a Summit brand SFI balancer. Overkill for what I'm doing I'm sure but it was "on sale" a couple years ago. Thanks for the comment, I really want to keep some momentum this time and get it moving on it's own. Stephen Quote Share this post Link to post Share on other sites
Protowrxs 111 Report post Posted October 29, 2014 Just a little progress... feels like a lot more though. Had a nice weekend so I rolled the car out, cleaned out the cobwebs (literally), dusted it off (literally) and pulled the old mocked up motor/trans out and laid down some color under the hood and under the car itself. Now I can actually start putting it back together for semi-good. I ended up rattle canning the under hood although I had wanted to spray it. Resource lacking and ability lacking ruled that out but it's good enough for me and I'm the only one that matters for now. :-) Just a roll out shot - funny seeing the black steelies way under the fenders with the narrower rear end. From This... To this... The UNDER... The OVER... Closer up of the clutch slave and proportioning valve... Quote Share this post Link to post Share on other sites
Protowrxs 111 Report post Posted October 29, 2014 Just a little progress... feels like a lot more though. Had a nice weekend so I rolled the car out, cleaned out the cobwebs (literally), dusted it off (literally) and pulled the old mocked up motor/trans out and laid down some color under the hood and under the car itself. Now I can actually start putting it back together for semi-good. I ended up rattle canning the under hood although I had wanted to spray it. Resource lacking and ability lacking ruled that out but it's good enough for me and I'm the only one that matters for now. :-) Just a roll out shot - funny seeing the black steelies way under the fenders with the narrower rear end. From This... To this... The UNDER... The OVER... Closer up of the clutch slave and proportioning valve... Quote Share this post Link to post Share on other sites
stangme428 33 Report post Posted October 29, 2014 great progress! looking good!:thumbup: Quote Share this post Link to post Share on other sites
stangme428 33 Report post Posted October 29, 2014 great progress! looking good!:thumbup: Quote Share this post Link to post Share on other sites
Protowrxs 111 Report post Posted November 24, 2014 A little bit of progress since the last post. Been working on brakes for the most part. Brake Update Continued work on the brakes. The front lines had already been routed and bent but had to be pulled back out to pain the under hood. I re installed them and re installed the line lock, proportioning valve. Also built the lines from the master cylinder to the line lock and proportioning valve. Brake Top View While working on the brakes I also ordered a Wilwood reservoir for the hydralic clutch setup. I looked at aluminim version, thought about using a Ford Ranger version but gave up and ordered this one that fits in the area quite well. Obviously I still have to pull the power brake booster and prep and paint it before adjusting the brake pushrod to the correct setting and final installation. On to the Rear Mouting the SN95 V6/Gt rear hoses had been on my list and I've seen others use an exhaust U clamp to make it happen so I used the same approach. I used a 3" U bolt but think I should have tried a bit smaller. I ended up welding a pair of washer on the bottom of the factor mount to make it right. I had a couple chrome acorn nuts so that is what I'll be using to finish it off. It's amazing how fast things get dirty under the car but it's never going to be show car. I also still have to paint the old slapper traction bar underneath there for final install and have painted the caliper see on the right. Emergency Brakes With the emergency brake cables still waiting in the parts box and the caliper brackets on the car solid I figured I would go ahead and workout the emergency brake cables. New cables would run about $50 or so but the existing cables are in good enough shape for my needs so they were reinstalled. Routing is a bit of a challenge with the slapper bars and the Global West tubular sub frame connectors but should work. Years ago I fabbed up these small 90 brackets that allow mounting the stock emergency brake cables to the SN95 caliper adapters. They simply move the cable end point to a position that should work with the existing SN95 emergency brake lever. Once the calipers are install and the cable properly routed we will find out if that actually works. :-) Rear Disc Setup The rear disc setup was finalling prepped and painting and is now ready for installation once the proper length wheels studs are sourced and installed. These are stock SN95 V6/GT (non Cobra) pieces so parts are available at the local auto store. With all the "Cobra" branding on this car I'm sure many wonder why I didn't go with the Cobra rears but it has worked out well since I'm going back to more how the car used to be looks wise. These rotors and calipers will work with the 15" slot mags that are going back on the car while the bigger Cobras would not. Additionally I kept the stock front discs so bigger rears would have been and over step in my opinion. Final Test Fit With the calipers finally painted I did a final test fit of the drivers side to make sure my brake lines, e-brake, etc are going to line up and fit ok. Obviously no brake pads installed (I have to find them in one of all the boxes of parts) but it should work well. I intentionally painted the calipers black keeping with the same color scheme on the front. Just didn't seem right to have bright red calipers on an old style car. Next up is getting correct length wheel studs, poly leaf bushing installs and some final tightening of brake lines. Quote Share this post Link to post Share on other sites
Protowrxs 111 Report post Posted November 24, 2014 A little bit of progress since the last post. Been working on brakes for the most part. Brake Update Continued work on the brakes. The front lines had already been routed and bent but had to be pulled back out to pain the under hood. I re installed them and re installed the line lock, proportioning valve. Also built the lines from the master cylinder to the line lock and proportioning valve. Brake Top View While working on the brakes I also ordered a Wilwood reservoir for the hydralic clutch setup. I looked at aluminim version, thought about using a Ford Ranger version but gave up and ordered this one that fits in the area quite well. Obviously I still have to pull the power brake booster and prep and paint it before adjusting the brake pushrod to the correct setting and final installation. On to the Rear Mouting the SN95 V6/Gt rear hoses had been on my list and I've seen others use an exhaust U clamp to make it happen so I used the same approach. I used a 3" U bolt but think I should have tried a bit smaller. I ended up welding a pair of washer on the bottom of the factor mount to make it right. I had a couple chrome acorn nuts so that is what I'll be using to finish it off. It's amazing how fast things get dirty under the car but it's never going to be show car. I also still have to paint the old slapper traction bar underneath there for final install and have painted the caliper see on the right. Emergency Brakes With the emergency brake cables still waiting in the parts box and the caliper brackets on the car solid I figured I would go ahead and workout the emergency brake cables. New cables would run about $50 or so but the existing cables are in good enough shape for my needs so they were reinstalled. Routing is a bit of a challenge with the slapper bars and the Global West tubular sub frame connectors but should work. Years ago I fabbed up these small 90 brackets that allow mounting the stock emergency brake cables to the SN95 caliper adapters. They simply move the cable end point to a position that should work with the existing SN95 emergency brake lever. Once the calipers are install and the cable properly routed we will find out if that actually works. :-) Rear Disc Setup The rear disc setup was finalling prepped and painting and is now ready for installation once the proper length wheels studs are sourced and installed. These are stock SN95 V6/GT (non Cobra) pieces so parts are available at the local auto store. With all the "Cobra" branding on this car I'm sure many wonder why I didn't go with the Cobra rears but it has worked out well since I'm going back to more how the car used to be looks wise. These rotors and calipers will work with the 15" slot mags that are going back on the car while the bigger Cobras would not. Additionally I kept the stock front discs so bigger rears would have been and over step in my opinion. Final Test Fit With the calipers finally painted I did a final test fit of the drivers side to make sure my brake lines, e-brake, etc are going to line up and fit ok. Obviously no brake pads installed (I have to find them in one of all the boxes of parts) but it should work well. I intentionally painted the calipers black keeping with the same color scheme on the front. Just didn't seem right to have bright red calipers on an old style car. Next up is getting correct length wheel studs, poly leaf bushing installs and some final tightening of brake lines. Quote Share this post Link to post Share on other sites