Rich Ackermann
-
Content Count
362 -
Joined
-
Last visited
-
Days Won
30
Reputation Activity
-

 Rich Ackermann got a reaction from RPM in My new 1970 M-Code Mach 1 Project
It's been awhile since i updated all on my project. I spent a lot time on the electrical, the stereo, and the rear fold down seat, and dash components recently. Also, was waiting on my engine builder to get the engine done.
Well the engine is back and I dropped it in. Was thinking I had an issue with the valve cover making contact with the brake booster and the Sanderson shorty headers hitting the CPP GM style steering box. Today I installed the tremec tko 600, billet steel fly wheel,, Quicktime bell housing,, Kevlar clutch with a hydraulic clutch that I bought from MDL. It went right in and all my clearance issues and concerns vanished now that the engine was level. What a relief!
Furthermore, I had installed an Edelbrock Air Gap intake, which everyone told would not work with a shaker because the intake is too high. So, I decided to use a 428 air cleaner base which along with 351W has a lower profile, but also has a different offset. Well I can happily say I don't have a height issue and I just clocked the 428 base to align the distributor concave area and re-drilled the holes in the top to straighten out the scoop. I have to fabricate a offset plate to properly seal the base to the top (plenum), since the plenum is shifted forward about an inch forward over the base. The offset plate is an easy thing to do
next up, wire up the Holley sniper and Hyperspark distributor and Ignition. Finish assembling the front end of the motor, and grill/bumper, exhaust, and interior. Finally the windshield and driveshaft. Then it should be road test ready.
The last pic shows a good shot up from underneath the driver's side header, where you can see the clearance with the steering in and further up daylight between the valve cover and the booster.
-
 Rich Ackermann got a reaction from SWPruett in My new 1970 M-Code Mach 1 Project
It's been awhile since i updated all on my project. I spent a lot time on the electrical, the stereo, and the rear fold down seat, and dash components recently. Also, was waiting on my engine builder to get the engine done.
Well the engine is back and I dropped it in. Was thinking I had an issue with the valve cover making contact with the brake booster and the Sanderson shorty headers hitting the CPP GM style steering box. Today I installed the tremec tko 600, billet steel fly wheel,, Quicktime bell housing,, Kevlar clutch with a hydraulic clutch that I bought from MDL. It went right in and all my clearance issues and concerns vanished now that the engine was level. What a relief!
Furthermore, I had installed an Edelbrock Air Gap intake, which everyone told would not work with a shaker because the intake is too high. So, I decided to use a 428 air cleaner base which along with 351W has a lower profile, but also has a different offset. Well I can happily say I don't have a height issue and I just clocked the 428 base to align the distributor concave area and re-drilled the holes in the top to straighten out the scoop. I have to fabricate a offset plate to properly seal the base to the top (plenum), since the plenum is shifted forward about an inch forward over the base. The offset plate is an easy thing to do
next up, wire up the Holley sniper and Hyperspark distributor and Ignition. Finish assembling the front end of the motor, and grill/bumper, exhaust, and interior. Finally the windshield and driveshaft. Then it should be road test ready.
The last pic shows a good shot up from underneath the driver's side header, where you can see the clearance with the steering in and further up daylight between the valve cover and the booster.
-
 Rich Ackermann got a reaction from Grabber70Mach in My new 1970 M-Code Mach 1 Project
Progress has been slow lately. But I have much of the electrical wiring done. I now have my exterior lighting mods installed and tested, including the led switchbacks in the front fender extensions and the sequential arrows in the power side view mirrors. I also used red led bulbs in the taillights. I used red instead of clear led bulbs to avoid the orange color effect in the lens, as a result of the brighter led bulbs. See the video link below.
https://1drv.ms/u/s!AuF11H1Kul6fwG98iUZuD52EK00T?e=X2qLZq
-
 Rich Ackermann got a reaction from toranav8ss in My new 1970 M-Code Mach 1 Project
More progress...spoiler, wheel lip and rocker moldings. Taillights and panel... I know some folks don't like how painted them.
-
Rich Ackermann got a reaction from toranav8ss in My new 1970 M-Code Mach 1 Project
Progress has been slow lately. But I have much of the electrical wiring done. I now have my exterior lighting mods installed and tested, including the led switchbacks in the front fender extensions and the sequential arrows in the power side view mirrors. I also used red led bulbs in the taillights. I used red instead of clear led bulbs to avoid the orange color effect in the lens, as a result of the brighter led bulbs. See the video link below.
https://1drv.ms/u/s!AuF11H1Kul6fwG98iUZuD52EK00T?e=X2qLZq
-
 Rich Ackermann got a reaction from RogerC in My new 1970 M-Code Mach 1 Project
Progress has been slow lately. But I have much of the electrical wiring done. I now have my exterior lighting mods installed and tested, including the led switchbacks in the front fender extensions and the sequential arrows in the power side view mirrors. I also used red led bulbs in the taillights. I used red instead of clear led bulbs to avoid the orange color effect in the lens, as a result of the brighter led bulbs. See the video link below.
https://1drv.ms/u/s!AuF11H1Kul6fwG98iUZuD52EK00T?e=X2qLZq
-
 Rich Ackermann got a reaction from mach1cj in My new 1970 M-Code Mach 1 Project
More progress...spoiler, wheel lip and rocker moldings. Taillights and panel... I know some folks don't like how painted them.
-
Rich Ackermann got a reaction from RogerC in My new 1970 M-Code Mach 1 Project
More progress...spoiler, wheel lip and rocker moldings. Taillights and panel... I know some folks don't like how painted them.
-
 Rich Ackermann got a reaction from jjstang in My new 1970 M-Code Mach 1 Project
Okay I am looking for honest feedback here.....
The chrome on my taillight bezels is cracked and pitted. Can't find nice originals for a decent price and repros are about $70 a piece, so I decided to do something with the crappy ones I have. Having them re-chromed is out, and chrome paint looks, well like paint and not chrome. I kind of like the Boss all black look, but I am not building a boss. Trying to stay close to a Mach I look with the wide rocker moldings and the black honey comb tail panel. So I decade to try painting them black (Boss like), but then bring in the body color to ascent the three light portals and break up the all black look. So here is the result...
You won't hurt my feelings if you don't like them or think they look cheap. Honest opinions are what I am after....
-
Rich Ackermann got a reaction from Grabber70Mach in 1970 convertible engine - concours style help
I think you made the right decision. Concourse trailered/street driven levels are over rated. Its just more trouble than its worth and you will not drive the car as much for fear of cleaning it endlessly or something doing damage to all your work. Restore just the things that you want to and you will enjoy your car more. Good Luck!
-
Rich Ackermann got a reaction from RPM in 1970 convertible engine - concours style help
I think you made the right decision. Concourse trailered/street driven levels are over rated. Its just more trouble than its worth and you will not drive the car as much for fear of cleaning it endlessly or something doing damage to all your work. Restore just the things that you want to and you will enjoy your car more. Good Luck!
-
 Rich Ackermann got a reaction from Crazyhorse in I Need To Vent
I am very sorry to hear this and feel your pain. It turns my stomach to think that this could happen. I also, can identify with your over 60 thoughts... well put. In my case i am 62 and dealing with a progressive medical issue and wonder every day if I will remain healthy enough over the next few years to finish my car and drive it.
It may be a little too late, but I strongly suggest...
You should check the storage facility and your local police and find out if there were any other reported thefts at that facility during that period. If not then, your unit was potentially targeted and not just picked at a random. That might help you narrow down who the perpetrator might be.
Keep an eye out locally on facebook for someone posting about the "new" TKO trans and suspension parts, or on craiglist for sale.
Call your insurance company and ask if your policy would cover your belongings if you stored them outside the home and inside a storage unit. Ask to be directed to that part of your policy and read it in detail. See if there are any items the current policy won’t cover. typically cash and jewelry are not covered by tenant insurance, for instance.
Find out if you need to take out a separate rider on your current policy and what that will cost you per month to cover your unit.
Finally, change units. The thief now knows where to find your stuff and add the rest of you valuable stuff to you homeowners or tenant insurance policy.
-
Rich Ackermann got a reaction from RogerC in My new 1970 M-Code Mach 1 Project
Had the rear glass and quarter windows tinted 30%. Had them done off the car. Held off on getting the door glass done until after I get the car thru DMV inspection to avoid failing. Installed my Nu Relic power window regulators and door glass. Also installed the tinted quarter glass, rear glass and my motorized side-view mirrors.
Also inserted my custom made set of Tri-Bar Pony center caps on my new US Mags Bandit wheels, they fit like they were made for them. Happy to get the manufacturers name off them.
Next up installing the Vintage Air air-box and work on the dash wiring.
-
Rich Ackermann got a reaction from SWPruett in My new 1970 M-Code Mach 1 Project
Had the rear glass and quarter windows tinted 30%. Had them done off the car. Held off on getting the door glass done until after I get the car thru DMV inspection to avoid failing. Installed my Nu Relic power window regulators and door glass. Also installed the tinted quarter glass, rear glass and my motorized side-view mirrors.
Also inserted my custom made set of Tri-Bar Pony center caps on my new US Mags Bandit wheels, they fit like they were made for them. Happy to get the manufacturers name off them.
Next up installing the Vintage Air air-box and work on the dash wiring.
-
 Rich Ackermann got a reaction from JamBaLam in I Need To Vent
I am very sorry to hear this and feel your pain. It turns my stomach to think that this could happen. I also, can identify with your over 60 thoughts... well put. In my case i am 62 and dealing with a progressive medical issue and wonder every day if I will remain healthy enough over the next few years to finish my car and drive it.
It may be a little too late, but I strongly suggest...
You should check the storage facility and your local police and find out if there were any other reported thefts at that facility during that period. If not then, your unit was potentially targeted and not just picked at a random. That might help you narrow down who the perpetrator might be.
Keep an eye out locally on facebook for someone posting about the "new" TKO trans and suspension parts, or on craiglist for sale.
Call your insurance company and ask if your policy would cover your belongings if you stored them outside the home and inside a storage unit. Ask to be directed to that part of your policy and read it in detail. See if there are any items the current policy won’t cover. typically cash and jewelry are not covered by tenant insurance, for instance.
Find out if you need to take out a separate rider on your current policy and what that will cost you per month to cover your unit.
Finally, change units. The thief now knows where to find your stuff and add the rest of you valuable stuff to you homeowners or tenant insurance policy.
-
 Rich Ackermann got a reaction from Machspeed in I Need To Vent
I am very sorry to hear this and feel your pain. It turns my stomach to think that this could happen. I also, can identify with your over 60 thoughts... well put. In my case i am 62 and dealing with a progressive medical issue and wonder every day if I will remain healthy enough over the next few years to finish my car and drive it.
It may be a little too late, but I strongly suggest...
You should check the storage facility and your local police and find out if there were any other reported thefts at that facility during that period. If not then, your unit was potentially targeted and not just picked at a random. That might help you narrow down who the perpetrator might be.
Keep an eye out locally on facebook for someone posting about the "new" TKO trans and suspension parts, or on craiglist for sale.
Call your insurance company and ask if your policy would cover your belongings if you stored them outside the home and inside a storage unit. Ask to be directed to that part of your policy and read it in detail. See if there are any items the current policy won’t cover. typically cash and jewelry are not covered by tenant insurance, for instance.
Find out if you need to take out a separate rider on your current policy and what that will cost you per month to cover your unit.
Finally, change units. The thief now knows where to find your stuff and add the rest of you valuable stuff to you homeowners or tenant insurance policy.
-
 Rich Ackermann got a reaction from MorganLeBlanc in My new 1970 M-Code Mach 1 Project
Thanks for your email and encouraging words. Next I be installing some electrical wiring to the roof and tail end, then the headliner and glass.
-
 Rich Ackermann got a reaction from mikee in My new 1970 M-Code Mach 1 Project
Morgan,
I bought the kits from CPP. The kit came with the calipers and brackets, and rotors (I upgraded to slotted), and flex hose with mounting brackets. It also comes with a generic e-brake cable kit, similar to a Lokar kit used by Wilwood. The e-brake kit was a straight forward install using the original front cable to pedal, tensioner location and hook, and rear mounting bracket locations. The stock cable connector is a bit short for the kit cable terminators but works. I may buy a stock cougar cable connector which is a few inches longer and will accommodate the terminators better. The kit comes with a nice cable conduit whihc you only need about two feet of it on the left and right for the rear section after to bracket to the calipers. I decide to put the rest to good use over the cable as it runs under the floor pan. See pic below....
Yes, out of the box the overhead console has two on/off map light buttons on it and is designed to only work with constant unswitched 12 volt power just like the hood and trunk lights (using the stock green / yellow line wire). I rewired the console to also work with the interior courtesy lights when using the door jamb and headlight switches, like the stock sail panel lights (uses the stock blue / black line wire). This required adding a couple of one-way diodes to prevent the constant unswitched circuit from back-feeding 12v to the interior switched light circuit. Now the lights work from the on/off buttons or when opening the door or turning the headlight switch.
After all that, I decide to go a step further and replace the brushed aluminum with wood grain to match the rest of the 70 deluxe interior wood grain AND then I added a red accent strip around it to match the vermilion headliner and interior color. The accent strip also illuminates red when the interior courtesy lights are on. I thought about making it light with the dash lights but that would require more wiring... maybe I do it not sure yet.
-
 Rich Ackermann got a reaction from Mike65 in Mike65's 69 Coupe build
Mike,
Been quietly following your build over the past year or so. Nice work! I always learn something new. I was born and raised in NJ, move out to DE in 2013. Big difference in cost. The high property taxes in NJ is like having a second mortgage. Good luck with your search and eventual move. I hope to get to see the stang, maybe at a south jersey car show before you leave the state.
-
Rich Ackermann got a reaction from RPM in Electrical Issue (PSA)
Glad to hear that there was no major damage and that you found the culprit. After hearing this, I am going to install a 175amp fuse on my battery.
-
Rich Ackermann got a reaction from MorganLeBlanc in My new 1970 M-Code Mach 1 Project
Getting ready to install the rear brakes and all the lines. In the meantime, I have always loved the look of the 67-68 overhead console. I looked at the dimensions of the console and how it mounts to the roof brackets. So i decided to buy one and give it a shot. It worked out. BTW: I plan on installing the stock type moonskin headliner, not one of those hard shell versions.
The rear bracket worked as is and is held solidly in place by 4 screws to the roof cross member. but I had to modify the front bracket. First I made an "L" bracket and body glued it to the roof. I reshaped the stock front bracket to attach to the "L" bracket and the windshield frame by 5 srews.The console held by 4 screws to these two brackets. There appears to be no clearance issues with the the headliner wire supports (whatever they are called).
The overhead console has two on/off buttons on it and is designed to only work with constant unswitched 12 volt power just like the hood and trunk lights (the stock green wire with the yellow line). I rewired the console to also work with the interior lights with the door jamb and headlight switches, like the stock sail panel lights (stock blue wire with a black line). This required adding a couple of one-way diodes to prevent the constant unswitched circuit from feeding 12v back to the interior switched light circuit. Now the lights work from the on/off buttons or when opening the door or turning the headlight switch.
-
Rich Ackermann got a reaction from MorganLeBlanc in My new 1970 M-Code Mach 1 Project
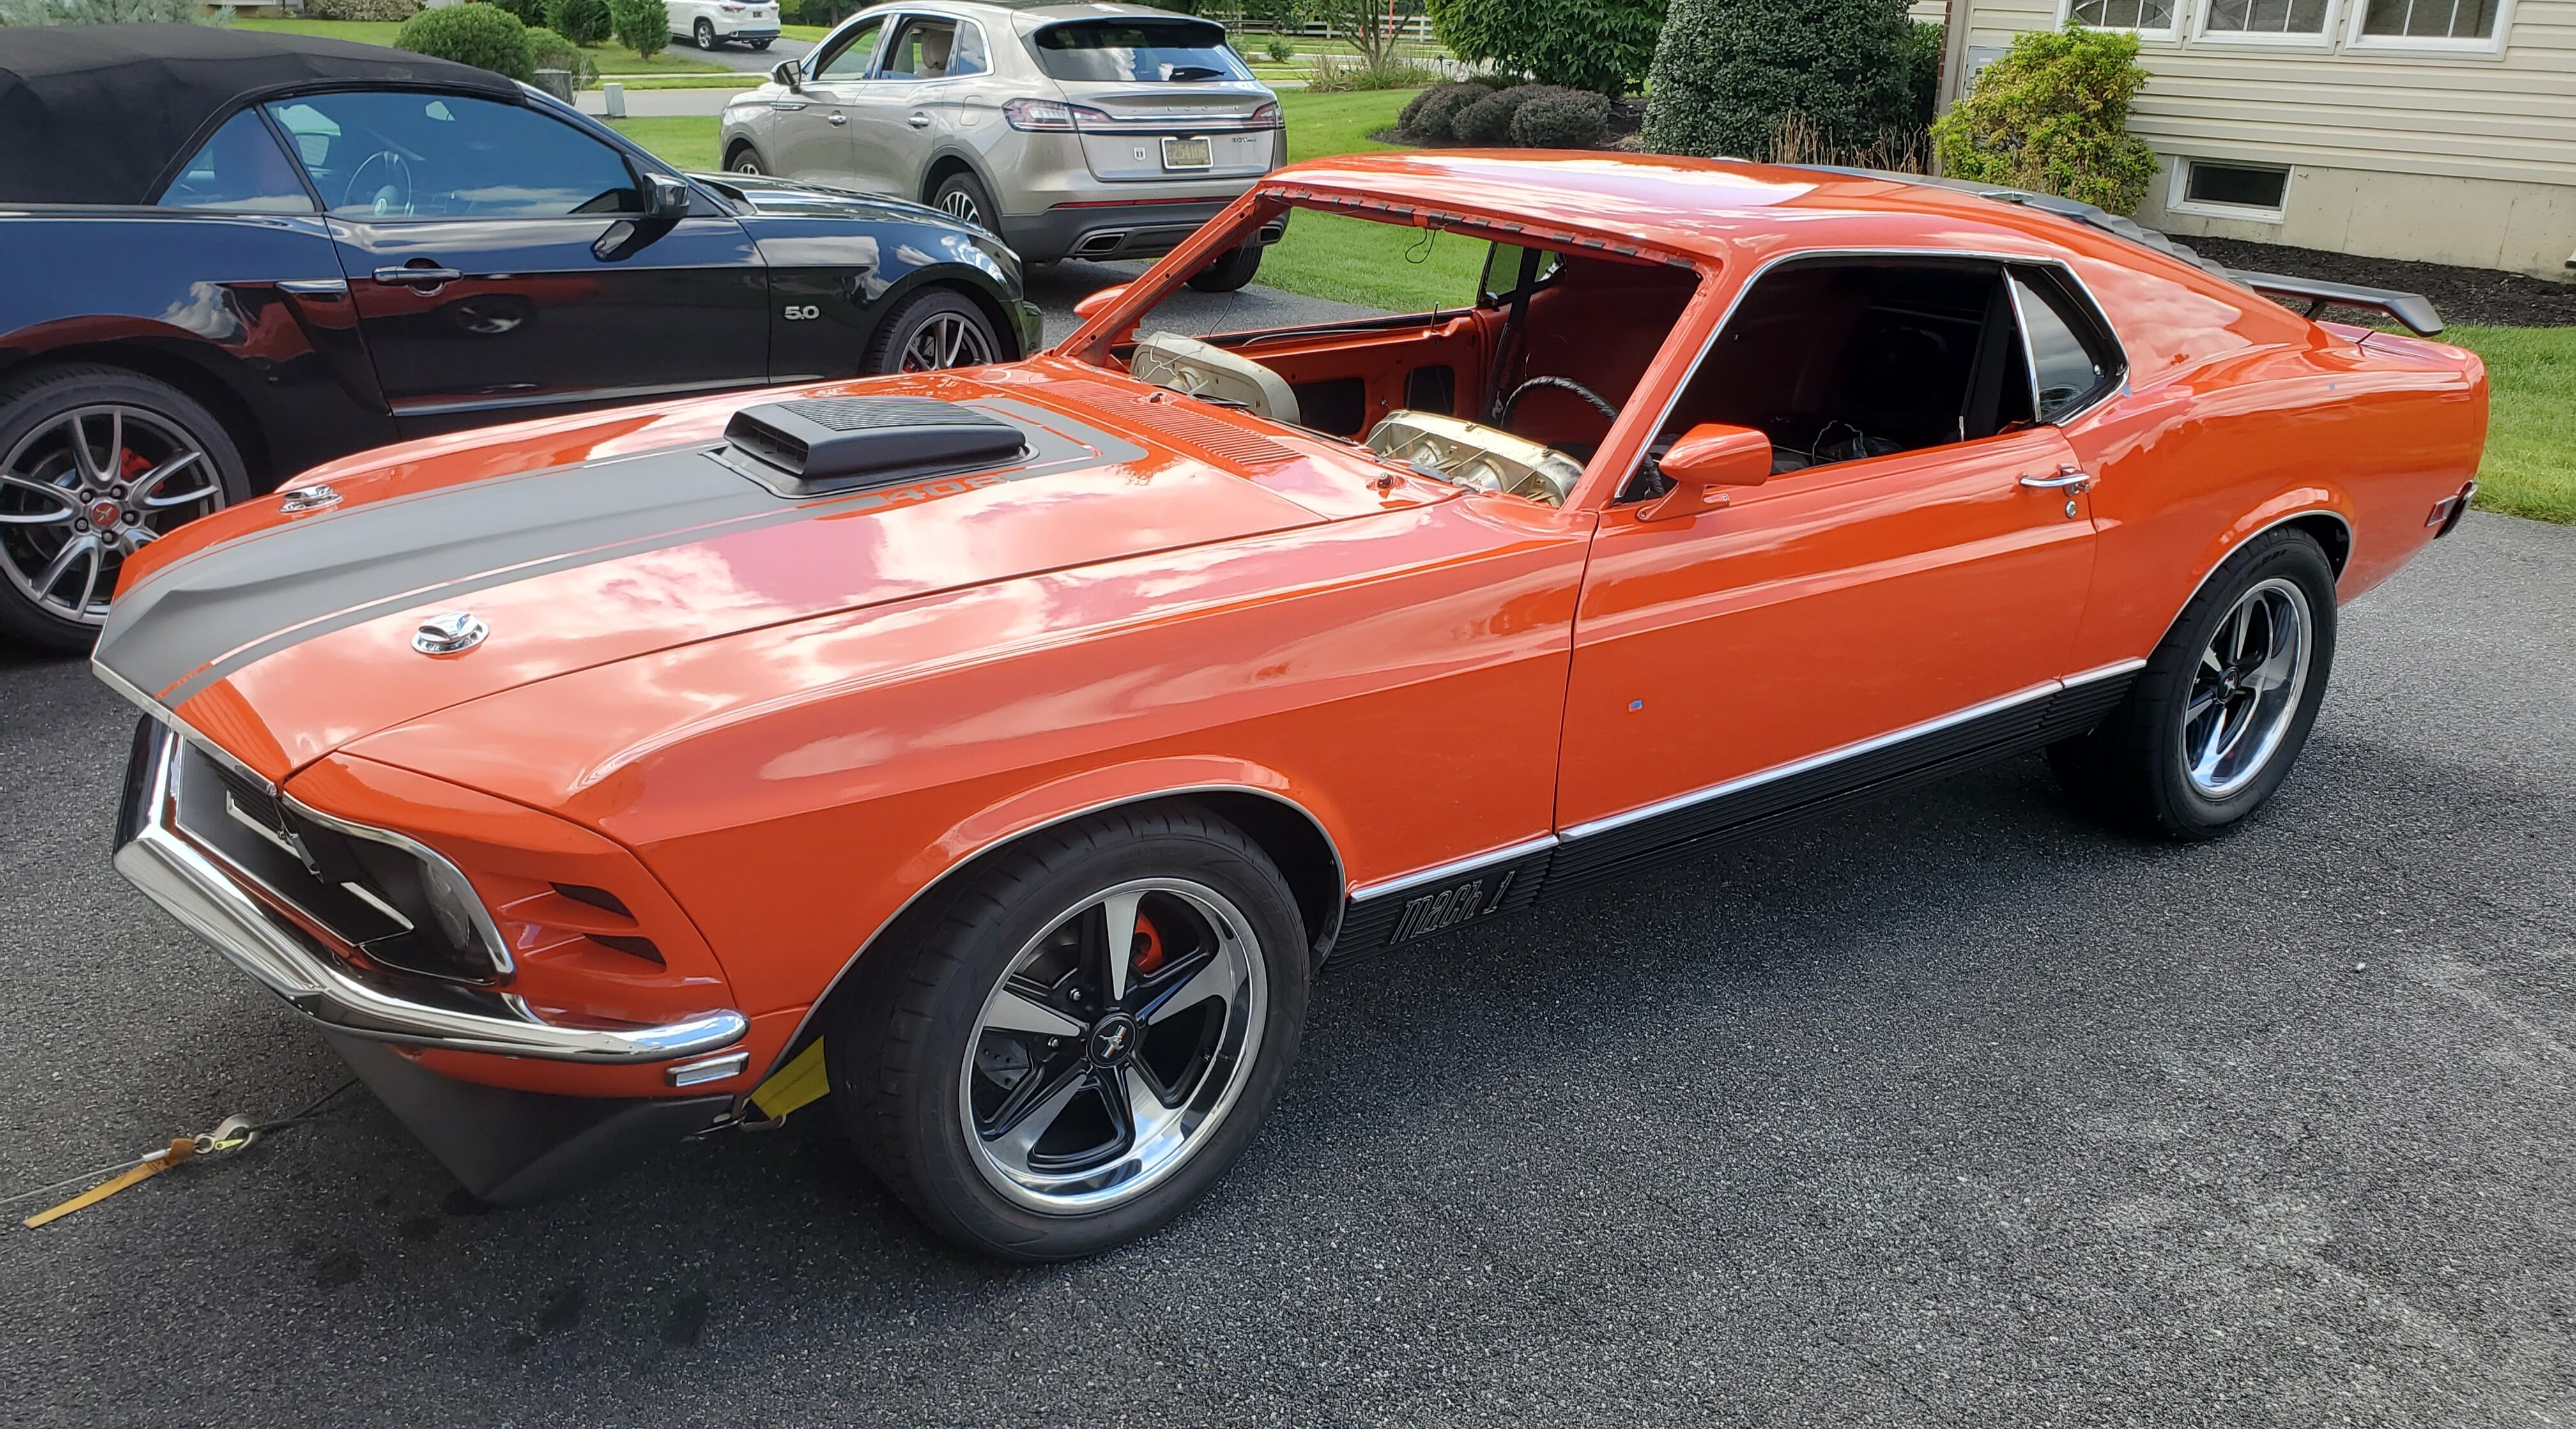
On another topic. I have installed my Global West front suspension, CPP Granada front spindles disc brakes, power steering box, and stock linkage with Granada outer tie-rod ends. Also the rear is in with a Yukon center case, and Eaton TrueTrac with 3.70 gears in the stock nine inch with stock 28 spline axles. Also partially installed the CPP rear disc brake conversion kit.
Borrowed a set of 18 inch US Mag wheels with tires from a friend to check clearances before I buy my wheel and tires. I think they look great on my car. I might just have to keep them...Lol!
-
Rich Ackermann got a reaction from MorganLeBlanc in My new 1970 M-Code Mach 1 Project
Going "mostly" original with the interior and exterior in appearance, .... The previous owner had butchered the rear inner quarter panels by cutting speaker holes, but that was about all that was wrong with them. So I decided to repair them instead of replacing with repro. Also finished up on the Mach 1 rocker moldings. They needed stud repair and bright-work dent repair. Painted them a dark charcoal gray rather than the stock dark argent. We will see if my stud repair method holds once I install them.
-
Rich Ackermann got a reaction from Machspeed in Four Wheel Disc Advice and Recommendations
Hi, I converted my 70 from all drum to all disc. Have not driven the car, so I can only speak to the conversion and installation.
I bought the whole thing from CPP and the brake lines from inline tube.. I used Granada front spindles/disc. The install was straight forward. The Granada flex lines required a adapter to connect to the stock hard line. The 69 disc/spindle not as strong as the stock 70-73 or the Granada units. Both will require changing the outer tierod ends and the Granada hub diameter is larger (70mm) and will not fit stock wheels. The 70-73 stock setup will connect to the hard lines without an adapter like the Granada brakes and works with 14" wheels. Converting the rear complicates things a little more. These kits commonly use a GM Eldorado rear brake caliper. It comes with brackets to adapt them to a Ford 8" or 9". Depending on rotor size they require a 15" or larger wheel. They typically require cutting the drum hard brake lines to connect to the flex lines in the kit. If you have stainless steel lines, you need hydraulic equipment to re-flare them after cutting. I chose not to use the flex lines and avoided needing to cut the lines and just had to bend them. The big challenge for me was what proportioning valve to used. If you stay with a disc/drum setup, a stock 70 valve and stock brake lines will work fine, but if going all disc a GM PV4 valve is needed. With this valve there will be master cylinder lines, brake line, brake light switch, and valve mounting modifications, as well as line adpters needed. Also, the parking brake cables will need to be modified or partially replaced with a Lokar type kit. So rear disc brakes are a nice upgrade but cost, and installation effort is greater than staying with a stock rear drum setup. The cheapest and easiest is disc/drum for all the reasons stated above.
One additional comment, you mentioned converting to a Tko or tremec 600, if you also convert to a hydraulic clutch, i believe a small (7"-8") brake booster is needed for clearance reasons.
-