
Rich Ackermann
-
Content Count
362 -
Joined
-
Last visited
-
Days Won
30
Everything posted by Rich Ackermann
-

My new 1970 M-Code Mach 1 Project
Rich Ackermann replied to Rich Ackermann's topic in Project Progress Forum
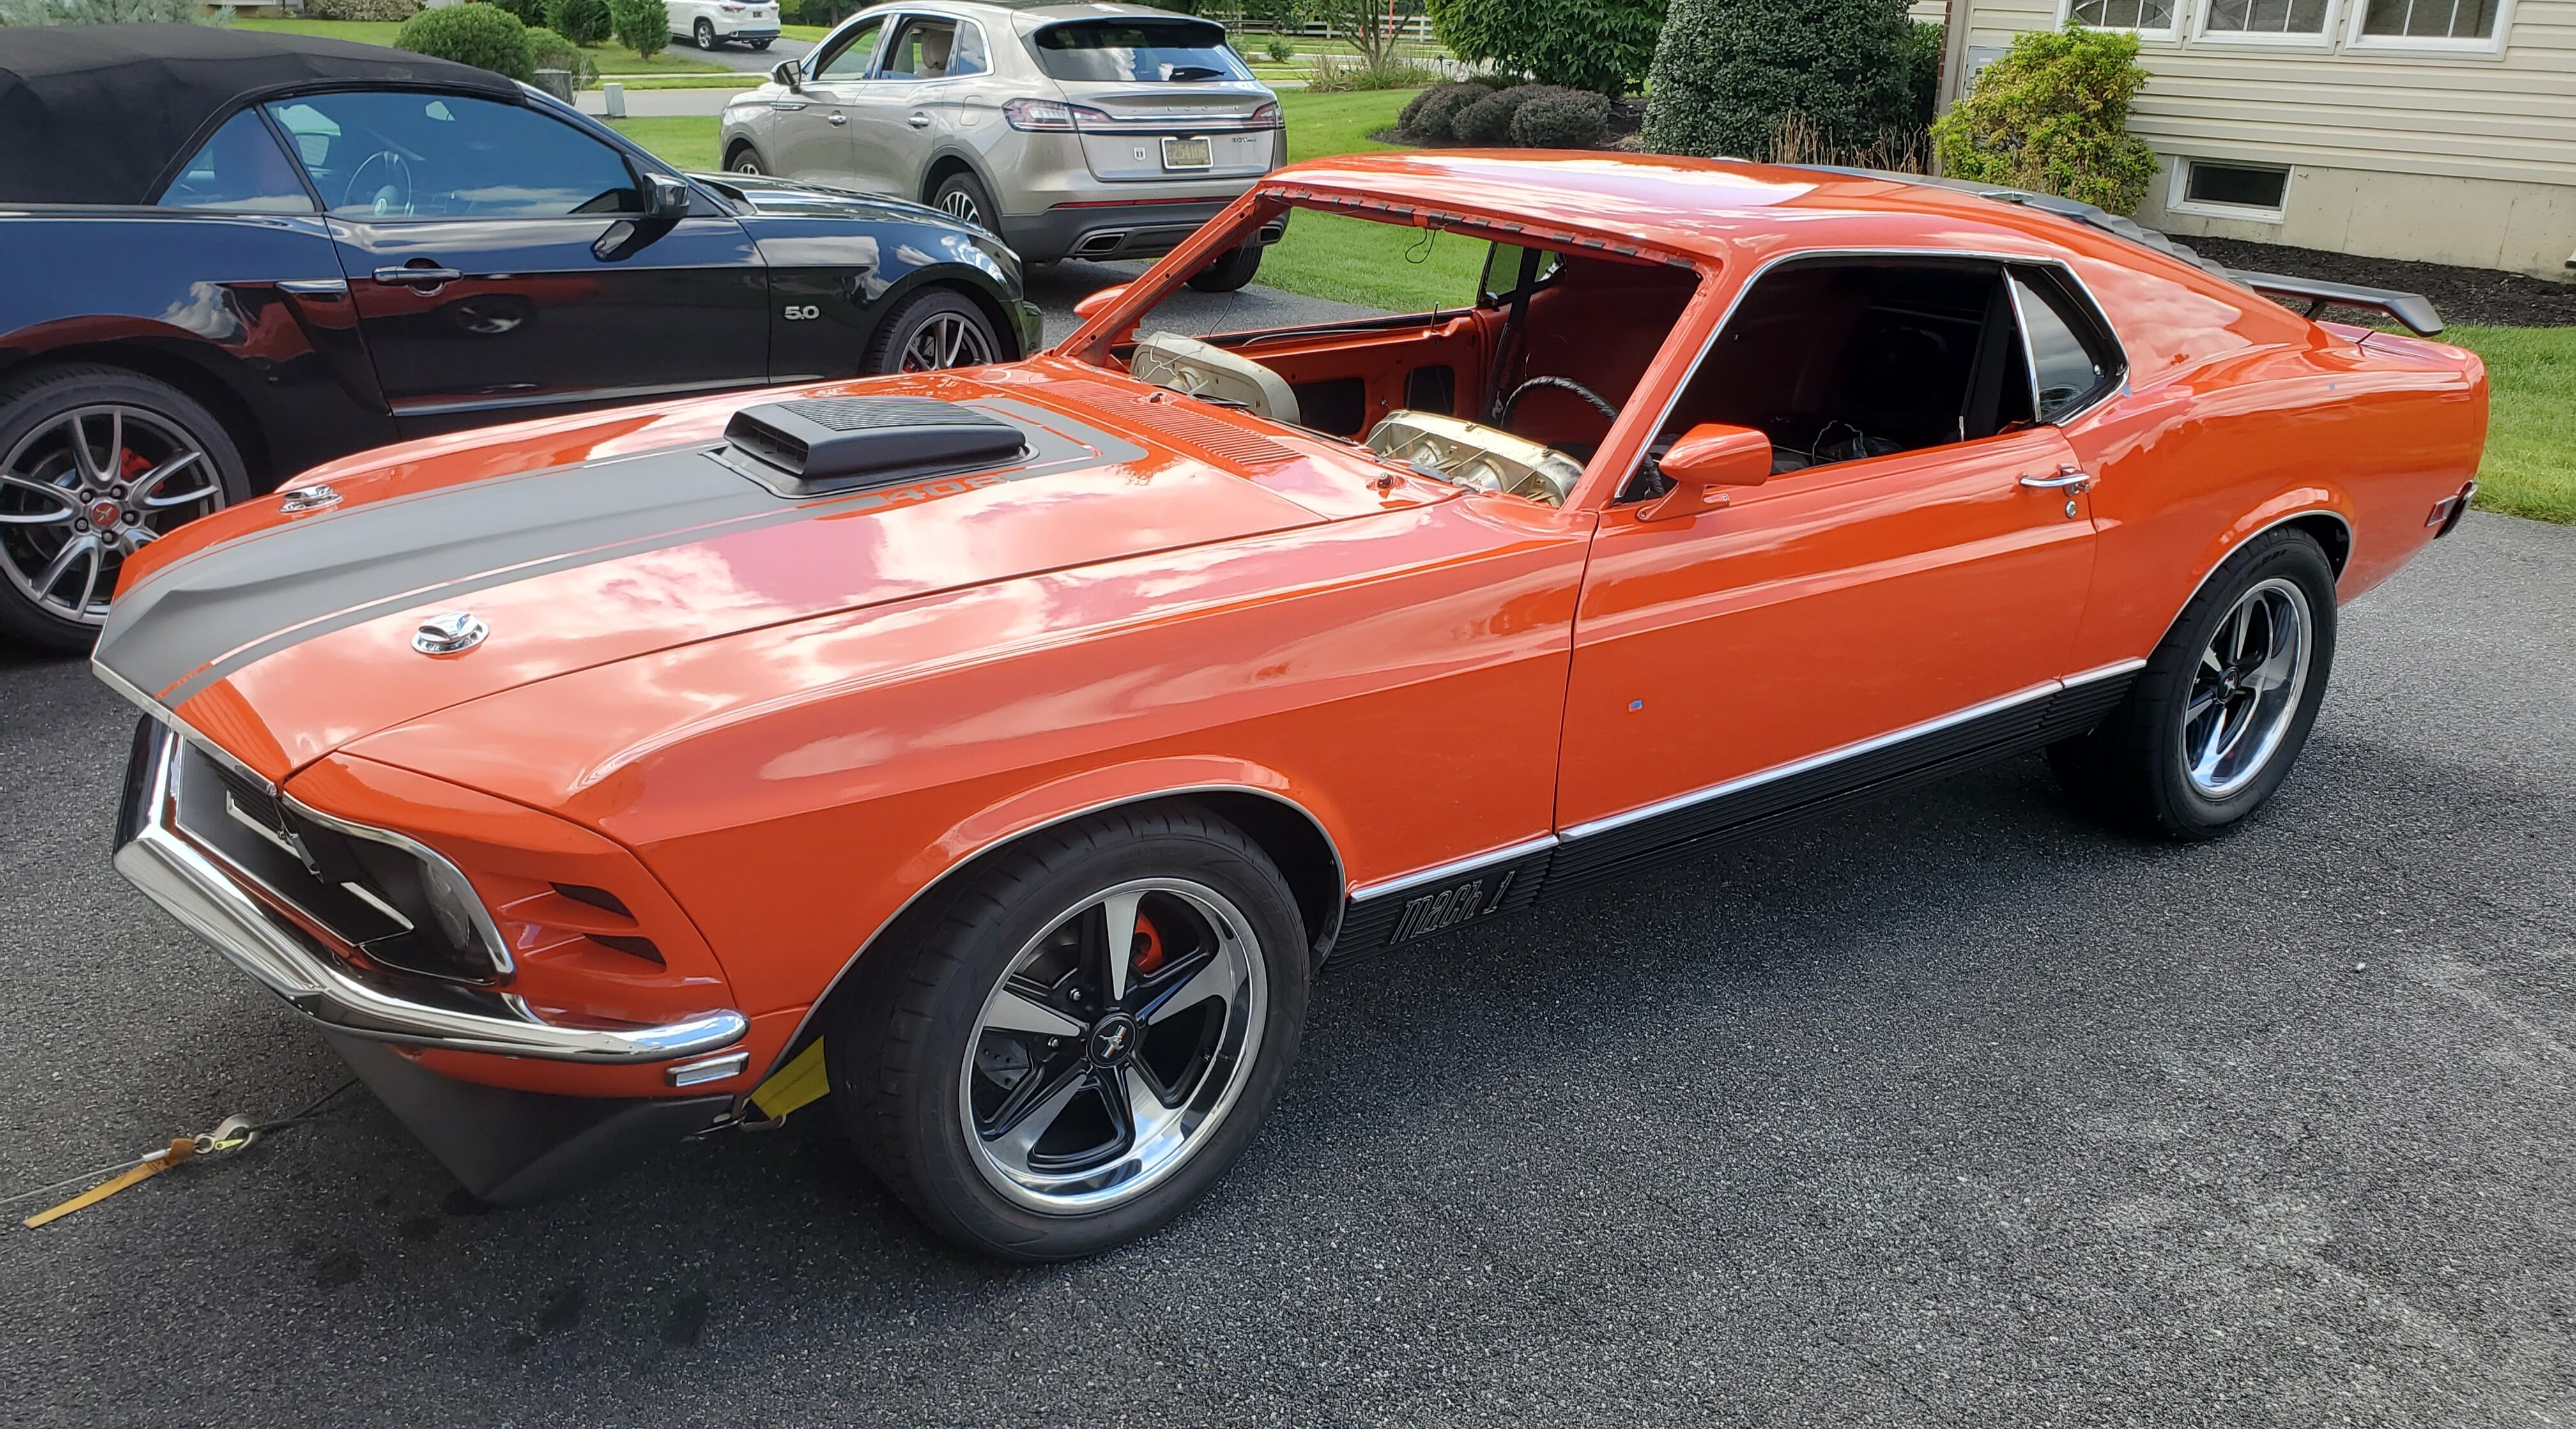
A Project progress update.... Well, it's been more than 3 years since I bought the 1970 Calypso Coral Mach 1 M code with Vermillion Red interior and it's almost done. The Cleveland was stroked to 408ci with a Tremec 5spd, Eaton TrueTrac with 3.70 gears. Four-wheel disc brakes with Global West Front Suspension. Holley Sniper EFI and Holley Hyperspark Ignition. Lots of other mods.. Still needs the interior door panels and windshield installed. I can't wait to drive it, but I still need to bleed the brakes again, Bleed the Hydraulic Clutch, take it in for a wheel alignment, and some exhaust pipe work. Then I can get it inspected and drive it. I'll post a walk-around video next.... hope you like it. Still needs door panels and windshield and molding... Here is the switch for the power windows and the toggle switch for the remote power side view mirrors. I mounted them in the center console where they are accessible to both the drive and passenger to avoid putting holes for them in the door panels. The fold down rear seat with a pair of Kicker 8" sub woofers mounted in the trap door panel. I was able to install a 17" x 9" rim with a Nitto 45 x 245 size tire in the trunk even with a fold down rear seat trap door panel. This spare wheel matches my front wheels and is a bit smaller than my rear wheels. I did it by relocating the hold down loop. First I sweeeezzzed the wheel in to the trunk where I wanted it, and then I placed the hold down bar thru the dust cap hole in the spare and marked where to weld the hold down loop to the trunk floor. The space is so tight, that I have to release the latch on the trap door when putting the wheel in, or taking it out, but once the wheel is completely in or out I can latch trap door again. Here is a pic of it.... Below is a walk-around video.... -
My new 1970 M-Code Mach 1 Project
Rich Ackermann replied to Rich Ackermann's topic in Project Progress Forum
These are the only pics I can find of the Hyperspark coil bracket I made to mount it to the Edelbrock Air Gap intake. Unfortunately I don't have any pic when I was making it or the dimensions. My goal was to keep the coil horizontal and below the air cleaner base. Looking the coil and bracket from the front of the engine between the distributor and the Sanden AC compressor. -
I installed MeterMatch week. After having installed a Holley in tank retro fuel pump with the integrated sender for a 70 Mustang with a 22 gallon tank and having difficulty matching the new sender up with stock Fuel gauge. With 6 gallons of gas in the tank the gauge remained on "E". I installed MeterMatch. I spliced it in to the yellow sender wire behind the dash cluster before the circuit board plug.Meter match requires 12v accessory, ground, and the sender wire in and out (spliced in before the dash cluster plug). There is an optional 12v on/off pulse for a high and low indicator (a bulb or chime for example). I used it with an LED bulb to set a low fuel flashing warning light. There are four Fuel level data points you can set on MeterMatch. I set them to have the needle point to a little below E= 2 gallons, 1/4=5.5 Gallons, 1/2= 11Galons, and a little above F= 22 Gallons. I inserted a wire probe on the yellow sender wire before MeterMatch to monitor and record the ohms the sender was sending to MeterMatch. It takes time to fill the tank to these precise amounts and let the gauge settle in, then adjust the Ohms MeterMatch is sending to the gauge up or down to get the needle to where you want it. I drained the tank in reverse to confirm the needle came down to the expected levels and filled it a second time fine tuning my original settings. I attached it under the dash next to the fuse box with adhesive velcro where I can pull it down and remove the cover to make future adjustments. Important if your sender is not just off but it is sending inconsistent or erratic ohm values, MeterMatch won't help you fix that.
-
Kris, sorry for the delay, I was away for the long weekend. I used a holley filter near the gas tank (see picture below). I think it came with some rubber hose and clamps which I used to connect the tank line to the filter and then to the two part stock 3/8" hard line, which I had replaced with new, then again maybe I bought the hose.. I also used the same fuel Injection rated rubber hose to connect the two parts of the stock hard line together just behind the drivers side torque box. I ran the hardline to a hole in the rear inner fender apron below the brake master cylinder and distribution block..from this point I ran 6AN PTFE E85 Braided Fuel Injection Nylon Stainless Steel hose with 6AN fittings of various types as needed to the Holley EFI supply port and I installed a plug in the return port. Below are the parts I bought, most which you can buy on Amazon. EFI return plug - AC PERFORMANCE Black Aluminum -6 AN Male Hex Head Socket ORB Port Plug With 6 AN AN6 O Ring Rubber Fuel Injection Fuel Hose 30R9 3/8" I.D. I used these to connect the rubber hose to another 6AN fitting, such the Aluminum 3/8" hardline connector below....EVIL ENERGY 6AN Straight Push Lock Hose End,-6 Female to 3/8 Push on Barb Fitting 3/8 Vapor Guard Hose Clamp Screw Type Various 6AN fittings as needed Aluminum Hard Line Tubing Fitting 3/8 Tube to 6AN Male Fare Fuel Hose. Used to connect the stock hard lines to braided hose line. 3/8 Fuel Line Tubing Mounting Clamps Stainless with Rubber Insulator EVIL ENERGY 6AN PTFE E85 Hose Braided Fuel Injection Line Fitting Nylon Stainless Steel Black (Hose ID: 0.315 inch) I also bought Quick Fuel Throttle Ball Assortment to connect the stock accelerator cable to the Holley EFI. Rubber hose connecting the two parts of the 3/8" factory hardline just behind the torque box. The Holley filter. I used the rubber hose and clamps here to make it easy the replace the filter as needed. I used a stock coil bracket to mount it. Cheaper than the fancy aluminum FI brackets sold for it. The 3/8" rubber hose fitting to 6AN hardline fitting. I would do this one below differently the next time. Next time I will bring the braided line out thru a grommet and the fender apron and connect it to the hardline in the fender well or just eliminate the second hardline and rubber hose connection entirely all the way back behind the torque box. This is the 3/8" hardline to 6AN fitting which passes thru the rear inner fender apron below the master cylinder.
-
I agree with smh00n comments particularly around the fuel sender and using the proper wire size, clean positive connection preferably directly from the battery and having good grounds. If may I would add that a common issue folks have that is overlooked is making sure there are absolutely no pinhole leaks in the exhaust pipe before the O2 sensor, around the O2 sensor Bunge clamp, or around the exhaust manifold collector/flange. Also any leaks a foot behind the O2 sensor. The slightest leak allows outside ambient air into the exhaust and wreaks havoc on the AFR values sent to the EFI. Especially at idle where outside air is most likely to be drawn in to the exhaust pipe thru the hole. Whereas when accelerating and at higher RPMs in general, exhaust is forced out those holes so the O2 sensor does not give a the EFI an inaccurate reading. I learned the hard way how a small pin hole leak in a critical spot in the pipe can screw up the works..
-
Best way to prep engine bay for paint
Rich Ackermann replied to lalojamesliz's topic in 1969-70 Technical Forum
Thanks MAch1 Driver, Restoring the driveshaft on my 73 vert was really fascinating ... Finding the soapstone mark (the loop) made by the guy balancing the driveshaft to mark the spot to attach the counter weight was really a surprise. I did my best to capture and recreate all the paint marks and inspection marks I could. The C6 Transmission was full of inspection markings. -
Best way to prep engine bay for paint
Rich Ackermann replied to lalojamesliz's topic in 1969-70 Technical Forum
Hi Bob, They make a Gel version of Evaporust. I have not used it much. In my experience Evaporust does not like to be exposed to air. Its looses its effectiveness faster when exposed to air. I would try brushing the Gel and cover the area with something like thing painters plastic or plastic wrap to keep the air away. Just allow the plastic to cover and stick to the Evaporust surface. -
Hi Bob, It looks like he was working on it in his garage and was leaning over thru the window to start it, or put in gear and off it went... With Ring and surveillance cameras so common now these kind of videos are plentiful on the net. Yes it was on TikTok. I did a video capture to save it off to my computer, but here is the link....https://vm.tiktok.com/ZMRkG1XLC/
-
Kris, The factory spec is 73 Ohms @ empty and 10 Ohms @ Full. The more gas in the tank the less resistance at the sender and your ohms will go down (the gauge needle will move towards full). The Holley Sender is advertised as being the same Ohm limits. I bench tested the Holley sender unit and can verify that the Ohms limits are very close to factory. When I installed it with the fuel pump into the tank and checked the Ohms at the dash cluster wire, it read 89 Ohms @ empty. I checked the Ohms again near the tank and the sender read 74.3 Ohms and 9.8 Ohms. I don't know why the difference when close to the sender or far away at the dash, but that its. If your gauge needle has always been reliable, then I would just bench test the Holley sender to confirm it is sending the correct Ohms when you move the float from E, to 1/2 and then Full. My car has not been running for 30+ years, so I did not have that luxury. I could not trust the gauge or the sender without verifying the Ohms sent and where at the gauge moves the needle to. All that said, my gauge was not at factory spec anymore, probably due to its age. Rather than replacing it or having it rebuilt, I bought a device called MeterMatch which you can program to to read the Ohms from the sender and send to the gauge something different to put the needle where you want it to be. For example.... Your tank is full, you can program MeterMatch to send 73 Ohms to the Gauge when it receives 89 Ohms from the sender. The tank is at 1/4 full and the sender sends 47 Ohms (roughly a 1/2 tank of gas) the Gauge reads a half tank when it should read 1/4 tank. You program MeterMatch to send the gauge 16 Ohms (1/4 tank) when it receives 47 Ohms. You can program 2 to 4 data points to control the needle and optionly a high and/or low alert value, and MeterMatch will send 12v on/off to whatever alarm you connect it to (a Bulb will flash or a chime will sound on/off for example). Sounds complicated, but its is easy to program. You just need to start with an empty tank and count the gallons as you fill it so you know where the gauge needle should be at the various points (E/ 1/4, 1/2 and F). MeterMatch will calculate the ohms in between the data points you programmed, so the needle will continually move evenly from F to E. Sorry, I got carried away with my answer and gave more than what you asked for....
-
Best way to prep engine bay for paint
Rich Ackermann replied to lalojamesliz's topic in 1969-70 Technical Forum
I thought I add my two cents to this thread... I use Evaporust on just about every rusty part I can. Even if I plan to media blast the part as it cuts down on the basting time. Evaporust is bio degradable and will not remove paint marks provided the paint is not over rust. My favorite examples are 1973 Mustang driveshaft where the paint marks were very visible after soaking in Evaporust for 4-5 days, the parking brake pedal and the clutch on my York A/C Compressor, which I wanted to retain a natural finish on it and could not use any gritty material to clean it.. Someone mentioned Dustless sand blasting. I had my 70 Mach 1 Dustless Blasted in my driveway by a service. First I'll say Dustless is misleading...No dust but very messy. Since they use a water solution of sand and a rust inhibitor, it prevents heating and warping of the metal and prevents flash rust for weeks provided the car is kept dry indoors. It's important to shake and blow out all the blasting material from every nook and cranny. I was removing the basting material from the rockers and rails for week afterwards. I wish I could have dipped the car in a big vat of Evaporust, but that much Evaporust would have been very expensive! Once the sheetmetal work was done, I sprayed the undercarriage, floors, engine bay, wheel wells, inside the doors, and trunk area with SPI Red Epoxy, which is designed to be applied over bare metal. They have gray and black if you don't like red. I then covered the floors, inside the doors, underside of roof, and wheel wells with Raptor bed-liner. Raptor provides very good rust protection for the floors and other hidden areas subject prone to rust. You can get Raptor in various colors or in a tintable version, if you want to use your body color. On the Undercarriage and the wheel wells again, I applied Lizard-Skin over the red Epoxy for sound deadening and to give it a textured "undercoating like" appearance. Lizard Skin is gray in color rather than black, which I was not happy about. Later I also applied 3M rubber undercoating to the wheel wells to give it a more stock like texture and appearance in black. Finally on the engine bay I sprayed Eastwood Chassis Black over the SPI Red Epoxy. EvapoRust at work... I used a 4" wide PVC tube, stuck the driveshaft it it, and capped the ends after filling it with the stuff. LEft it for a week or so... Submerged the parking brake assembly in Evaporust... Submerged the just the clutch face down in a pan of Evaporust... My 73 Convertible done with SPI Red Epoxy on the undercarriage. My 70 Mach 1 undercarriage with SPI Red Epoxy ... Gray colored Lizard-Skin over the SPI Red Epoxy. I did not like the gray color in the wheel wells, so the wheel wells were sprayed with the Red Epoxy, then the gray lizard-skin, and then black 3M Rubber undercoating. Hopefully good rust protection and some sound deadening. Engine bay with Eastwood Chasis Black over SPI Red Epoxy Raptor on the floors I used premixed Caution Orange instead of the tintable type. I thought it was close to the car's Calypso Coral body color. Kind of bright, but no one will see it once the interior is in...lol! Dustless Basting in my driveway... no dust, but a big cleanup job afterwards.... -
No. The fuel pump fits into the stock hole for the fuel sender. This retro pump unit also has the sender built into it. It is specifically designed for 64 - 70 mustang gas tanks. The pump comes with 3 different sender floats, depending on your tank. Mine is a 22 gallon take. This pump also has a hydro-mat on the fuel pickup to reduce the chance of drawing air in when the fuel level is low. Holley part # 12-305.
-
No further explanation needed. So you thought you had a bad day working on your Mustang.webm
-
An update on calibrating my fuel sender and factory fuel guage... I purchased a product called MeterMatch, which is designed to read the ohms from a sending unit (ex oil, temp, fuel) in my case the Holley fuel sender, and output the ohms you set to the gauge. So you can essentially take the ohms generated by the sending unit with the tank 1/2 full and make the gauge show 1/2 full by generating the ohms your gauge needs. (Ex. 20 ohms from sender can be converted to 10 ohms to the gauge to move the needle to E or visa versa.) It also hase the capability to turn on a low and a high warning light indicators at designated ohms you set. So far the device is working well.
-
I just installed the Holley Sniper EFI with the Holley Hyperspark Ignition box, distributor, and coil on my 1970 M-code Cleveland which is stroked to a 408ci. Also installed a Holley Retrofit return-less fuel pump for 1970 mustang 22 gallon tank. It can use your existing 3/8" fuel line. You will need to modify each end of the line to connect the EFI, filter, and pump, but its fairly straight forward. There is a significant amount of wiring and a few fuses and relays needed to bring it all together. When adding the EFI, ignition and fuel pump, make sure you have enough available voltage. I doubt a stock 50- 60 amp alternator and the 10 gauge supply wire in the stock ignition harness is enough to support it all, particularly if you have previously added other power hungry components (i.e. a modern stereo and amp). Correct wire size is important too. Holley is very clear about this in there installation manual. Make sure you have no exhaust leaks before the O2 sensor. Even a pinhole leak can draw in ambience outside air and cause an erroneous lean fuel condition and the Holley EFI ECU will be constantly adjusting the fuel mixture incorrectly. Ask me how I know! As far as I am concerned Holley has fantastic customer support. They have technicians available 7 days a week and until 10pm Eastern time. A few weeks after installing my Sniper, the ECU failed, Holley sent me a shipping label and 10 days after I sent it to them, I got it back. They had replaced the ECU and the handheld display completely free of charge. All that said, my setup is running well. Still making adjustments. I have no regrets picking the Holley Sniper and Hyperspark Ignition components. The Hyperspark ignition is designed specifically for the Sniper EFI so the integration details is already done for you. Ps. The intake manifold I have on my Cleveland is an Edelbrock Air Gap dual plane and has a cutout in the divider between the two planes, which I have read is important to have when using a dual plane intake mani with the Holley EFI. The Holley Sniper EFI on dual plane intake mani's without the cutout in the divider can cause inconsistent fuel mixture issues between the left and right sides. Single plane manifolds do not have or need a divider and therefore do not have this issue.
-
I ordered and just installed the MSD 8920 tach adapter as per the instruction connected the Holley Sniper brown aftermarket tach wire to the MSD 8920 wire for a current triggered tach, and early indication is it appears to be working beautifully. Thanks all.
-
aslanfe, You are correct. I have a 22 gallon tank and that is the float option I used. Danno, Thanks Its down to draining the tank and pulling the fuel pump/sender to make sure the float is working and then ohm test the ranges. I know the gauge will operate as it goes full when grounded, but it still make be off due to it's age. Thanks
-
Yes. That's the one. HLY-12-305 Fuel Pump, Electric In-Tank, OEM Style EFI, 67 gph/255 lph, 58 Max psi, Ford, Mercury, Kit (Mfr. #: 12-305)
-
Thanks Randy. I have also contacted Rocketman's to have my original converted to voltage sensing... www.RCCInnovations.com Randy, Another question... My fuel gauge is reading low with an aftermarket Holley EFI sender. Is there a way to adjust the CVR? I have a new aftermarket CVR, Does it have a some sort of adjustable potentiometer? I am only using it for the temp and fuel gauges. Thanks
-
I have run in to an issue with my Factory tach in my 70 Mustang. I have a 1970 Mustang Mach 1 with a Cleveland stroked to 408 with a factory tach. I have installed a Holley Sniper EFI with the Holley Hyperspark ignition system (Distributor, Coil and Ignition Box). Its running well. I am using the wire that Holley provides for to drive an aftermarket tachometer (Pin G Dark Brown wire is for aftermarket Tach Output). The Cleveland idles between 950 and 1000 RPMs according to the Sniper hand held monitor. When I look at the factory tach it reads a steady 5,000 rpms with engine hot. What’s really strange is when I increase engine rpms (give it gas) the RPMs on the Holley hand held increase accordingly while the RPMs drop on the factory tach. A couple of video links of this below. Has anyone heard of this before? Any thoughts on what might be wrong and can this be fixed? I am trying to get the Holley tech guys to explain this, but so far no luck. Thanks,
-
Your headers look very similar if not identical to these..
-
.
-
Best of luck with the move and the new place!
-
Sorry no spacer on mine. I might be able to fit a spacer up to a 1/2", but it would obviously raise the shaker a 1/2" higher than where mine is now...pic below.
-
My new 1970 M-Code Mach 1 Project
Rich Ackermann replied to Rich Ackermann's topic in Project Progress Forum
Good catch! If I recall, the water neck with the ports is from a 70s 351M or 400ci truck engine. They are getting hard to find. I watch for them on eBay and swap meets. I'll dig up some pics of the Hyperspark bracket. -
My new 1970 M-Code Mach 1 Project
Rich Ackermann replied to Rich Ackermann's topic in Project Progress Forum
RPM, I should have called Holley tech and questioned it before assuming it was wrong. It would have saved me a lot of time and hair. Hair at my age I can't afford to loose....lol! ...For future reference.....

