

stangme428
-
Content Count
1,881 -
Joined
-
Last visited
-
Days Won
5
Posts posted by stangme428
-
-
yep i freaked out when i looked at my front setup even when we installed the engine and trans... took a bit of rolling around and driving until it settled... thank goodness..
-
-
yup ... i like it! it has a lot of performance and technology available, and so much potential with modifications to the ecoboost and coyote... in person it has a presence like the early cars to me... but that's whats cool we all can have our own interpretation of it!! some will love it... some will hate it... but at the least we have a choice... pony car wars live on!!
-
Rip OZ !!... great community!
-
Looks pretty good ! Wish your family and dad the best.thanks stangnet33 and everyone for your positive thoughts and prayers!
-
cool ... coupe time!
-
prayers1 - sorry if i missed it.. but what headers do you have? also, what heads? i have aluminum Cleveland heads and sanderson shorty headers ceramic coated... just curious about how much heat you have.
-
I went with the AEM unit and had the exhaust shop weld in a bung for the o2 sensor when i had my exhaust installed..
-
I remember when looking to get a new cluster a couple years ago that if I bought each piece separately I came out at about the same price or more for the JME. Eventually went with the Year One pod and bought separate Auto Meter gauges. Didn't want to screw around with my speedometer being off because of my tires/transmission gear/ etc. so I bought the GPS unit. That was another $180 but it's accurate.i did the same, went with the year one gauge pod and auto meter gauges ... i ended up with about 700-800 in the gauges... i did not go with the GPS just yet... but i did purchase two extra gauges to mount elsewhere... vacuum and oil temperature gauge..
-
i have the a-pillar gauge pod... yes its not OEM quality ... but it was the only A-pillar pod i could find. i dont have it 100% installed, but i have mounted my vacuum and air fuel ratio gauges in it...
it does not have a hole to mount at the base of the windshield, i had planned on drilling my own once i have it positioned like i want it.
with the gauges installed in the pod some of the weakness of the plastic goes away and the overall pod is more ridged... but the finished texture, and overall quality can be improved!
not a lot to tell by the pics.. but all i have at the moment...
i also have the ashtray mounted shelby style pod with AC... the AC controls are hard to get at but it does work.... its not perfect... i dont have the console installed at the moment to take pics.
we dont have a lot of options it seems... but the a-pillar unit can be painted to make the texture and quality look better..which is what i plan on doing... and if you like you can stiffen up the unit with some DIY reinforcements....
-
okay -- so its never as easy as it seems..
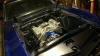
So i purchased a Champion radiator shroud to fit the Champion 3 row clamp in 24" radiator with dual 12" fans. i didn't mind paying a bit for a direct fit shroud.... but as it turns out... it was NOT a direct fit... no problem with the shroud... its the Champion radiator... seems Champion decided to use the same radiator mounting bracket on the drivers side as installed on the passengers side... except.. they installed the drivers side upside down which placed the wrong mounting holes for the shroud on the drivers side... the passenger side mounting holes lined up like a champ... but ... nothing a drill couldn't fix. if i had needed the bolt in style i would have noticed years ago.
so we had to spread out the shroud just a bit so we would have enough material to mount to at the lip on the radiator side. we drove all over town to find stainless bolts, washers, lock washers, and nuts.... tractor supply, advance auto, and finally home depot... nobody had everything we needed in stock... 1/4 stainless for mounting the fans and 5/16 for mounting the shroud.
the end result was a ton of air was now moving... you can tell when the thermostat opens up just by the air temperature change pulled via the fans... idle temps seem to be down by 10-15 degrees.. we will see how it goes when driving... trying to attend the Savannah mustang show this weekend!
one other thing.... after we marked the fan holes and drilled, we removed the protective coating, cleaned, and then sprayed the shroud with eastwood diamond clear satin ... and yes we have some touch up to do after having to modify the shroud lip.. :-)
*** update - dad is having a rough week with chemotherapy, so i will be traveling to spend the weekend with him instead of the savannah show***
-
looking good! great paint!
-
Started my build in boiling springs SC ... Lots of great places to ride in SC ... I miss the mountains and the winding drive to bat cave!
-
Cool what's the build plan...?
-
Awesome I'm sure you had a blast.... And a bachelor party is always a good time...
-
awesome.... a B9 build!!!
-
a critical component arrived this week! Cobra key fob! and i plan on experimenting with EPAS - electronic power assist steering - i ordered the "Bruno" control box mod as mentioned on VMF - so it will probably be a while... before experimentation begins ... you know how slow i can be :-)
-
received the 3 row Champion radiator shroud from ledfoot racing on 9/12/14 ... hope to get it installed this weekend 9/20/14.. time permitting.. hope to make the cooling a bit more efficient in the end and get the nylon zips out of the radiator...:thumbup:
-
nice.... looking good!
-
Sorry for the phone pic but only one I have right now.nice touch! i like it !:thumbup:
-
yep i agree..... the huge boss 429 scoop i had "chopped" the car up and made it "stubby" with the Shelby duck tail...i was ok with it ... but.. i think with a lower hood scoop and the chin spoiler... it makes the long hood line more sleek and gives a lower stance... the head on look with the chin spoiler... love it..:thumbup: anywho we are never done with these cars... :punk: well until we run out of money!! $$$:thumbup:
-
ok -- chin spoiler installed... pics are before we secured it with the small self taping screws... i like it!:punk:
also received a quote from Maier Racing on a fiberglass 69 hood with eliminator scoop... hope to order first week of October if all goes as planned!
Xde4hewkew and Ronaldbaf reacted to this -
wow... received the tommyzee subframe connectors today Wednesday 9/10/14... man these things are built like a tank!
also received the 69 front chin spoiler from CJ pony parts on Tuesday 9/9/14.
awaiting the arrival of the radiator shroud and should have some install fun soon..... hopefully!!:tongue_smilie::punk:
-
Finally ordered the fan shroud to fit the 2- 12" fans for my champion radiator from ledfoot racing . .. looks like the part number is 338FS for the CC338 -- feel better getting rid of the plastic zip pieces holding the fans in position. plus the shroud should help cool things a bit better..
update*** received the shroud on 9/12/14 -- looks good!
Champion All Aluminum Radiator
Champion Cooling All Aluminum Radiator
Plus Ledfoot Racing Shroud and 12" Fans
3-Row Core | Cools 700hp
Radiator Dimensions:
Total: 21" (22" with cap) x 25.75" wide (with brackets)
Core: 16.5" tall x 24.25" wide x 2" thick
Inlet: 1.5" passenger side
Outlet: 1.75" passenger side
Tanks: 2.5" thick
Tubes: 0.63" thick
Saddle or Bracket Mounted

too much negative camber
in 1969-70 Technical Forum
Posted · Report reply
yep i freaked out when i looked at my front setup even when we installed the engine and trans... took a bit of rolling around and driving until it settled... thank goodness..