smh00n
-
Content Count
318 -
Joined
-
Last visited
-
Days Won
11
Everything posted by smh00n
-
What did you do to/for your Mustang today?
smh00n replied to 69_Mustang's topic in 1969-70 Technical Forum
You have to watch the buffers. Most pros' put painters tape on the trim to stop it being hit. But nowdays the pads are soft foam so unless they are cutting enamel or acrylic back they shouldn't be using a harsh compound. Good luck with the channel, I subscribed. The comparison to the dull and shiny trim was a bit short so maybe hold it longer in view? I use a cheap video editing program to chop up my very basic videos so that's something you could look into? -
What did you do to/for your Mustang today?
smh00n replied to 69_Mustang's topic in 1969-70 Technical Forum
Love the Crocs. Real Aussie feel to it :) -
I've been told that gas shocks are good for high demand use - where the piston is moving rapidly as the suspension moves such as in motor racing. The gas does not heat as fast as oil does. But the benefit is not seen with road use as they are not worked that hard. Probably opinion #3,597 of a gazillion but. I put Koni adjustables on mine mid-last year. They were on sale and about 25% cheaper then Bilstein which is why I bought them. Can't compare the old ones, they were 2 dollar shop items, but I find the ride a bit hard on the road, and doesn't 'soak' up the bumps like a modern car, but does hit them. They have been set to roughly half way on the adjustment scale. I have not really changed the settings on the front, but did dial up the rear to stop axle tramp. When I get motorvation I'll change the settings but you have to pull them out to adjust them so the fronts are not enticing. Our roads down here are probably rougher than US roads, especially main roads, and the KYB adjustable are a no-no here, for what that's worth.
-
A '70 sportsroof Grabber pack gets some love in Australia
smh00n replied to smh00n's topic in Project Progress Forum
The man said 20% loss was typical so I’m guessing 420 at the crank. The cam is rated to 6,600 and it drops power at 6,000 so at least I have a reasonably low-stress engine. Never built a small block so I don’t know if this is ok, awesome or out of the ballpark for power. -
A '70 sportsroof Grabber pack gets some love in Australia
smh00n replied to smh00n's topic in Project Progress Forum
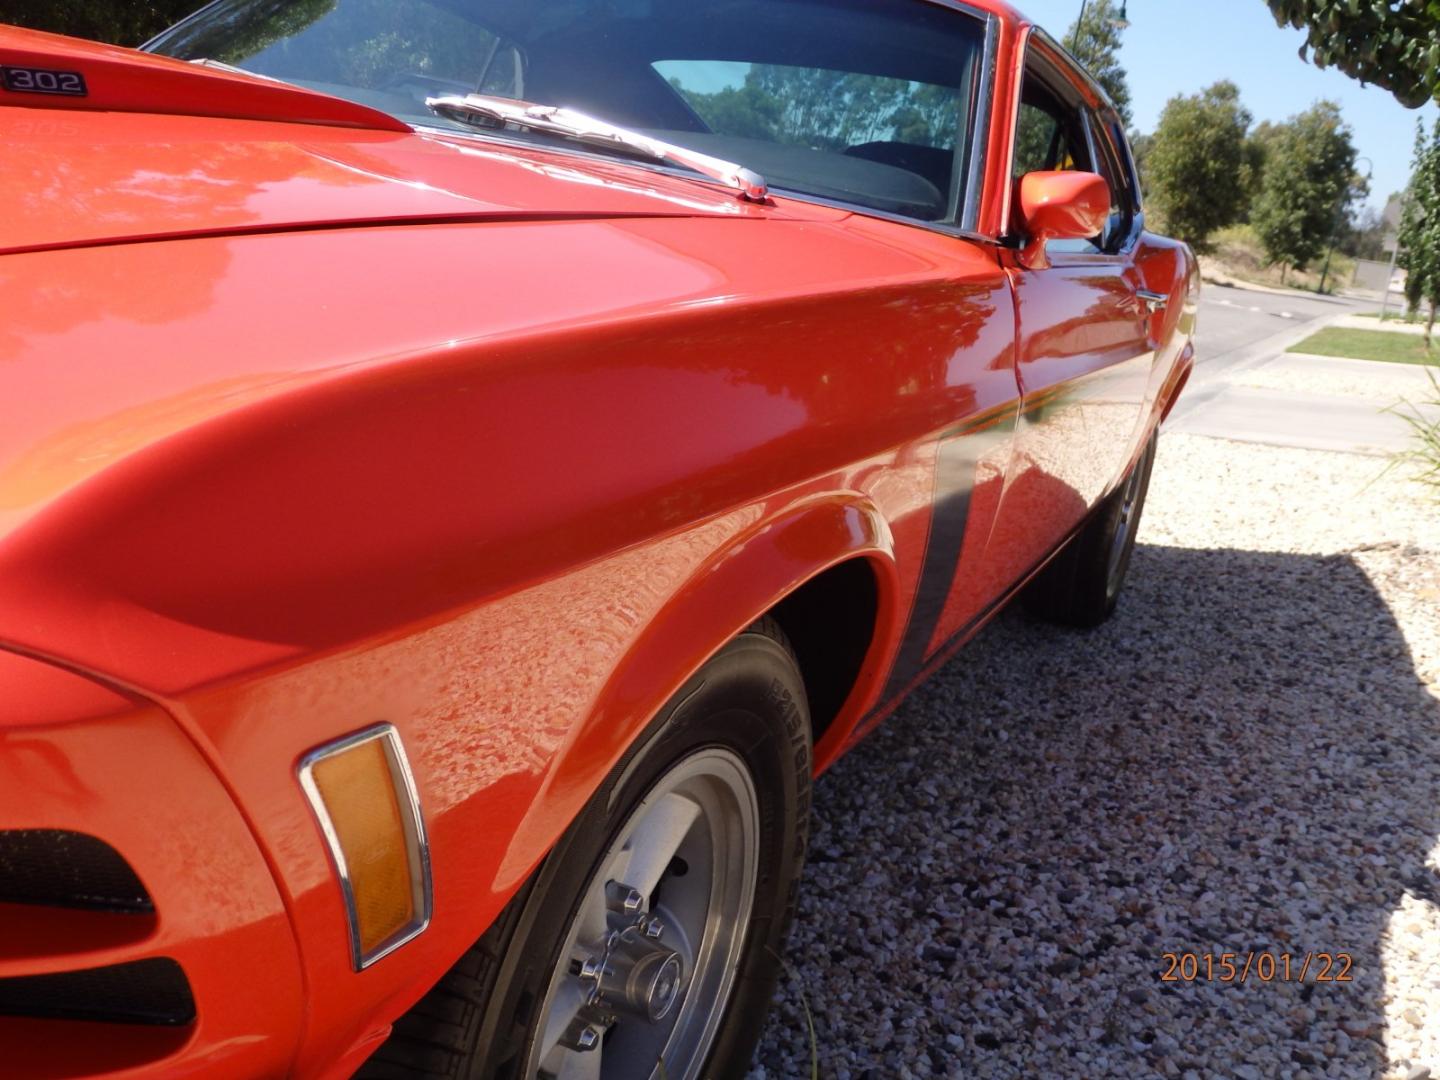
The engine is a late model 8.2" roller block, 347, Dart Pro 1 heads, scat rotating bits, 10.5:1 comp, Lunati 231/239 @0.50, RPM airgap, FPA 1 5/8" headers, all running on 98 octane gas (no corn fed stuff) with a TKO600. Sniper is the 600Hp 4 injector thing through a MSD 6AL box and billet distributor. -
A '70 sportsroof Grabber pack gets some love in Australia
smh00n replied to smh00n's topic in Project Progress Forum
It's Hammer dyno time! The story so far. Engine in, all systems go but still having issues with the tune. I tried a few changes, emailed back and forwards to my man in the US but I realised I was wasting my time. So I made a booking with a tuner that had previously tuned a carb'd car years ago and he got results. Not cheap but - $1,350 AUD which would be about $1,000 USD. First up he checked the settings, then spent about an hour running the engine and playing with the ignition and fuel maps. Really not much to see, just sitting on the dyno running at light loads. Finally, the time came to do power runs. I had decided to put a 6,500 rev limit on as I wasn't sure how much revs the standard roller block could take. I'd been told 6,500, 7,000 and 7,500 but none of them were going to pay for a blowed up motor, so 6,500 it was. Another factor was the cam was rated to 6,600 for power. First run: 325 hp at the treads. He made a total of 8 runs, with all but one increasing power as he tweaked tables and numbers. The final run gave up 355 hp and about 330 ft/lb at the wheels. But more importantly, it had a fat flat torque curve and the fuelling was much cleaner. Driving it revealed it was back to how it was without the timing and fuel management and basically drove like a modern car - no snatch out of third gear corners and 1,200 rpm, hauled the mail when it needed to. And the idle has come down about 100rpm and it is much cleaner. Hopefully now I just drive it and don't worry about it not starting, idling, or going. Yesterday was 37° C or about 98 F° and the engine temp stayed steady at 90-91°C (195) in traffic and came quickly back down to 84° C (184) whilst driving. Have to be happy about that. IMG_1910.MOV -
No, I just followed it as a spectator. Was a good week, the real big names/fast cars were missing but that meant a lot more focus on the 'real' street cars doing around 10 seconds. The 70 was pulling off 8.50-8.60 all week. I think it was a 427 Windsor on nitrous. I have lots of other videos I need to put up on You tube sometime IMG_1084.MOV IMG_1084.MOV IMG_1084.MOV
-
I pulled mine through and attached to the new sender. My new fuel tank was a Tanks Inc so the pump/sender unit was towards the rear of the tank.
-
A '70 sportsroof Grabber pack gets some love in Australia
smh00n replied to smh00n's topic in Project Progress Forum
Bad news and good news. Bad news? The clutch cable started to melt. I took it for about a 40 minute run, stopped at the shops and when I jumped back in the clutch was all sticky and shuddery. Thinking the worst I took it straight home. Next day, pulled the cable and yep, the wrap was burnt and the outer cable had started to melt. Dammit. Hard to see but the white discolouration is the area. As luck would have it I was recently in a parts shop up the road and they had silicone sleeving. Looked it up, rated to 250F so I went down and bought some 5/8" and 3/4" lengths. I put the 5/8" stuff on first (I had to split it and wrap it as it would not go over the end, then I put a length of the original silver stuff over it, then the larger silicone sleeve over that, and finally wrapped it with heat wrap. These are the 3 stages before wrap. If this thing melts again I am going to go nuts. When I put it back in, the cable still hit the headers, so employing my inner McGyver, I put a spring off the pan stud and tie-wired it to the cable to give it an air gap: The result? A tiny air gap but one that will not melt the cable. On the drive, I found the speedo wasn't working. So a quick check identifies that the clip on part to the speedo head is too long, the clip isn't engaging and the inner cable is not hooking in. So I had to trim back the steel part to get the clip to engage, the end result a working speedo but a heck of a noise from the cable as it is hitting something. Dammit again. I'll buy another one from MDL and pay the expense. Next, install a small throttle extension lever I had ordered and installed which lifted the cable and made the arc longer, but it gave a 50% improvement in throttle response - without it you could not give it a little gas when starting (this is a stick remember) and you either had 2,500 revs on or you smoked it out of there. Holley p/n 20-16 for reference. All good, but now the cable hit the air cleaner base. The expensive K&N 14" drop base air cleaner I bought especially to clear the hood when using an RPM airgap manifold. Another Dammit (I have plenty, I won't run out). So, off to the speed shop I go to buy a 1/4" air filter spacer. And then as the filter sits higher I need a new centre stud. Of course, you can't spend just 10 bucks at a speed shop so I walked out with a new rocker adjusting spanner and allen key, so I now look like one of them pro-fess-ional in-jun builders. Except no one see's me working on the car. I had preciously been emailing a bloke in the US about getting the Sniper working properly. When I changed to timing control it was all out so he was sending me updated GCF files (GCF is the data the Sniper uses to run and sets timing, fuel, and all sorts of other electrickery I don't get). Luck would have it, he was awake and reading emails, so therefore ensued about 20 emails going over the set up and tweaking it. The end result is the car starts and does not stall, does not have a massive air sucking issue at idle and doesn't stall as I drive to a stop. The tweaks were actually very simple, but having read and acted on internet 'experts' I had the settings all over the shop. To fix the idle air control (IAC) you have to increase the idle screw. But, because it has a TPS you turn the thing off before you move the idle screw and when you turn it back on again, the computer says, I'm at 0% throttle opening and therefore I will idle at my electronically set rpm. Kinda reverse to carbs which don't got no brains. Coupled with the lever and his tweaks, it is driving real nice again and is something I want to drive. And that was the good news. I still have to tweak the driver side exhaust pipe, as I put it too close to the rail. It's hard lying on your back by yourself trying to work out angles to cut pipes, the length to cut pipes and see clearances. It just needs a cut and a turn of about 1/16" but that will put the join angle out and I will need to trim and muck around. Or I just fill the gap with weld and not let anyone under there to look. -
A '70 sportsroof Grabber pack gets some love in Australia
smh00n replied to smh00n's topic in Project Progress Forum
Exhaust finished. Spent a day re welding the pipes into the existing system. As the FPA are long tube it was a matter of cutting off the down pipes, shortening the S bends and welding. I will be glad once I have a lift, crawling under cars trying to deduce angles to make cuts is hard. I also bought better lap clamps for the joins. If y'all are not using these already go and buy them now from Summit. 11 bucks each, so easy to use and clamps well. These cost at least 40 bucks each over here so we are getting ripped. Pretty happy with the result - the headers just come under the rails and sit nice and high. I went through and re-did the rear muffler mounts so they sit higher as well. The sound to me seems different inside (although, I also fitted sound mat under the rear seat to try to kill some drone). NO CHUFFING which makes the darn cost worth it. The only beef I have is the clutch cable is too close to one pipe. I had some left over header wrap so I wrapped both pipes all the way up to near the curve near the port, and also wrapped the clutch cable too. At $146US + shipping and taxes, no way I am melting that bad boy intentionally. The positive is they are further away from the speedo cable and rail. On the other side, the starter is touching the pipe so I may have to see if I can rotate it a bolt hole to clear The service FPA gave was outstanding. He was super helpful, did what he said and most of all the headers fit the heads and the car and I hope not to ever pull them off. Today Fedex delivered me a new speedo cable and axles seals from Rock Auto. It's sad when I can get all this stuff delivered to my door cheaper than I can buy one speedo cable here. The no-name cable came without the rubber grommet and o'rings, but for 11 bucks I ought to just shut up. EDIT; I will not be shut up. The end to the speedo head is a natch too long and it won't clip on. I should have bought the 17 dollar cable not the 11 dollar one. And I have a spare, as I bought two of them. -
TKO conversion - back up switch and neutral start hacks
smh00n replied to smh00n's topic in 1969-70 Technical Forum
Closing this one out, as a job done. Although, I do question the need for a relay as when I was proving the power wires, there was only 0.240 volts coming through when the ignition was on. I don't know if that beefs up when the starter is engaged or not. @Rich Ackermann the word description has you using 2 terminal 30. The picture is correct so the wiring sequence is 30 - power in from the OEM NSS wiring on the plug 86 - power in from the OEM NSS wiring on the plug - I jumped these at the #30 terminal with the piggy back wire 87 - power out through the relay back to the OEM NSS wiring on the plug 85 - ground from the NSS switch Basically all you are doing is grounding the relay with the NSS which allows power to flow through the relay and completes the circuit (Ignore the dodgy burnt wrap, I got too excited with a butane blowtorch) I cut the replacement 4 speed harness wires and soldered in two new wires. I should have kept the auto loom but the guy who box the gearbox wanted it so I chopped up a brand new repro. I got smart and put some red heatshrink on the power side, so I knew what way to wire the relay. For the life of me I could not find out what type of connector is used on the plug, so I replaced it with a Deutsch connector. First time I used one, I'm converted. Whilst they are easier to assemble than the Delphi Weatherpack, they are dearer and the correct tool is eye watering expensive. Once crimped, shrinked, tied and mounted (I hung the relay under the RH strut brace so it's somewhat hidden but easy to access), the proof was in the starting. It hasn't showed up real well but I started it in neutral and then shifted it into 1st. Cut out straight away. IMG_1468.MOV Tick that job off the list :) -
A '70 sportsroof Grabber pack gets some love in Australia
smh00n replied to smh00n's topic in Project Progress Forum
New parts fitted and new parts failed. After my trip to the US, I arrived home with a set of FPA headers. I have to thank Stan - he built these in about 8 weeks and shipped them to my motel 2 weeks before I got there. Before I fitted them I made up new, solid rear mounts for the mufflers. They are not pretty as I'd like so no shots, but they have 2 insulation rubbers each side and oth to the floor pan so I am hoping that issue is fixed. I elected to go with the dark gray ceramic coat and grabbed a spare set of exhaust gaskets. Total cost in local $$$ over $2,000. The quality is nice - neat welds, mandrel bent bends and thick flanges that have been dressed. Only question I have is why the join on the #1 pipe. The old set had been leaking on the #8 port on the drivers side. The RH bank never leaked at all so I'm stuffed why the LH one did. The design of the pipes is also much better for access; all of them go down where the Patriot set went across the top on the driver side. Resulting in having to bash a huge dent in the lower pipe to clear the Borgeson box. Fitting the new ones - super easy. Both had to come up from underneath but they fit in well. Cleared the Borgeson box no problems. But, I have concerns about the proximity to the clutch cable, steering idler and starter. The clutch cable is $146 from MDL so I will have to wrap it pretty well with decent wrap (my Chinese sourced stuff failed on the speedo cable and it has melted through). The idler is a roller bearing unit so all I can do is grease it regularly. The starter although it has wrap and is a small one (no way you'd get a standard one in there) will need to have the wires wrapped as well. As promised, the bottom of the headers are level with the frame rails, so scraping might be gone for the future. Next steps are to do the pipes from the headers to the X pipe. When I jacked it up, I noticed an oil stain under the LHR wheel. Having a good look, the axle seals are leaking and have spat oil all over the drums and inside of the wheel. Both are like that so I will need to pull the axles and check the seal, and probably replace the brake shoes. Dammit, you get stuff supplied that should be correct and it's not. Or, I fitted the seals wrong. Also when looking underneath I found the reason for the banging on the floor when giving it some gas. Initially I thought it was the exhaust as the previous owner made a hash of the mounts and one broke. But, the driveshaft has been hammering on the floor due to axle tramp. I need some advice here - I have adjustable Koni on it so will ramp them up harder to try to stop it. I have fitted 1350 uni joints and yokes to the 8" so I wonder if the 9" cars had a longer diff snubber rubber off the body. I can't see any marks on the rubber so it seems the diameter of the yoke is allowing it to hit the floor before the snubber is reached. Can anyone advise if the 9" car snubber rubbers are longer? Last, the old headers also were too close to the speedo cable and it has now melted and jammed. Only 26 bucks in US, $85 over here. I tried buying one in the US but no shop had them and I didn't go past a Summit or Jegs. -
They gotta pull a trailer to each track. Can’t do any outside help, only the driver and passenger can work on the car
-
Currently following Drag Week as a spectator. Bit of a disappointment as some of the well known guys and girls are not here, but lots of ‘regular’ quick street cars. 2 of ‘our’ Mustangs here; a white 70 sport roof rocking a 427 Windsor on nitrous in the 8.50 class, and getting close to the 8.50. The other is a 69 coupe that is a bit slower, about 13 or 14 I think (too many cars to try to remember). Also, in Rockingham was a driver quality 70 sports roof in Calypso Coral and black which might be a Mach 1 for sale. Now fitted with a 460. Pics attached if interested. IMG_0922.mov
-
Anyone going? I'm dragging my sorry a** on a 22 hour flight to follow the 5 days.
-
They bolt on fine, but the driver side leaks. I think the ports are too big for the headers, and its squeezing out the bottom of one pipe. I have tried *everything* to stop it. Funny, it only leaks on pone port on one side. The heads have been mildly ported so maybe the man got a bit keen on one port? Anyway, Stan has built and sent a new set for me. I pick them up September 14 when I go to Bristol for the NASCAR race. Cannot wait, even though they cost me $2,000 local currency.
-
I dropped the sump, added about a 1/3 tube of Dow Corning black silicone to each end. After about 50 miles, no leaks. Hoping it stays that way. Repop trash......
- 1 reply
-
- 1
-

-
Closing this one off. First, I had been supplied 69 inner tie rod ends, not 70. Didn't think to check them properly when I fitted it all up. Then the shop I had do the wheel alignment must have done a hack job, as the second shop that came recommended made it steer better. I would not say it is fully happy, but it is very much improved to what I had. At least now I can join the people saying that the Borgeson conversion is good.
- 22 replies
-
- 2
-

-
- head scratching
- pitman arm
- (and 1 more)
-
A '70 sportsroof Grabber pack gets some love in Australia
smh00n replied to smh00n's topic in Project Progress Forum
Update on this bump steer. Borgeson stated they had not found an issue in all their installs. They did suggest to pull the pitman arm and see if any paint was preventing it form sitting higher up on the sector shaft, which was going to be plan B. Whilst thinking about the steering I pulled the sump to fix the rear main seal leak. Half a tube (literally) of Dow Corning black silicone later it was back on. It don't leak so far, fingers crossed. Looked up and the p/s pump had a weep from the pressure hose. Reefed on that fitting to tighten it. Whilst under there I had a look at the tie rod ends. Found out that I had been supplied 1969 items, not 70 which may not have helped the steering issue. I replaced them with new 1970 ones. I thought I'd try another shop for a wheel alignment, so I went to one recommended by another Stang owner, which luckily was 20 minutes away. An hour later, the new shop had pretty much dialled out the problem. It's not *perfect* but it is much better than it was. I'm glad that is sorted. Last, found a helpful person on the Holley Sniper forum, who gave me some tips and provided a new configuration file. The PCV valve was the older flapper style so I spent 28 bucks on Amazon getting a fixed orifice one, and plumbed it into the front vacuum port of the Sniper. The oil breather cap was also puking oil out when I gave it a Big Rev, so I replaced it with a Cleveland (uurrgghh) style cap with the hose into the air cleaner. It still leaks, but only slightly. The new tune was pretty wild - lit up the rears in first and second on power, and rolling in second it would light them up at will. (I had some fun with a sports bike behind me, showing him the side stripe at will). Not really practicable but, so I pulled the timing back a bit which has toned it down. But I miss the sideways action so I might stick a couple of degree's more timing back in (insert evil emoji here). But it sounds alright I think. IMG_0523.MOV After all that, I finally washed it after 10 months of shop dust got to me, and hit with a random DA polisher and some Poor Boys EXP paint sealant. It's a good looking car from 10 feet but the paint is crud and I have managed to put all sorts of chips and marks in the paint. Lucky I prefer drivers not show queens. -
Well I got a reply back from Patriot who tell me these headers are not designed to fit Dart heads. Summit don't say they will or won't :( Anyway, Stan at FPA has really stepped up and is building me a set to pick up when I go to the Bristol NASCAR night race next month. It's only a $2,000 cost, what else would I do with the cash.
-
Scott Drake repro drag links for 1970 quality?
smh00n replied to smh00n's topic in 1969-70 Technical Forum
@RPM I am grabbing false hopes I realise. And I am letting the interwebs know it :( The steering tie rods are on a different angle to the lower control arms on both sides, and I suspect that's my issue. They are facing up from the inner joint and that's my problem. Here Down Under, our road authorities will not allow any changes to suspension or steering especially with welding, and rod ends are also out. Remember, these decision-makers know better than us and are only saving our sorry asses. Makes me feel better when I see that tax money go out each week. Not. But, I have other issues, being the repop drag link I bought has the taper too large to fit the tie rods into. They bottom out before they tighten, and I have had to put washers under the nuts to tighten them. So, the drag link need is more to fix that than the bump steer and appease my OCD. And since I had to pull it all to drop the sump to fix the leak (thanks Scott Drake) I thought I'd replace it. -
Scott Drake repro drag links for 1970 quality?
smh00n replied to smh00n's topic in 1969-70 Technical Forum
$400+ down here. Plus I have new roller idler and a pitman arm, so I don't really want to go back to that old stuff. -
Scott Drake repro drag links for 1970 quality?
smh00n replied to smh00n's topic in 1969-70 Technical Forum
Sorry, it's a manual steer one. I need it for a Borgeson conversion which is giving me static -
Scott Drake repro drag links for 1970 quality?
smh00n replied to smh00n's topic in 1969-70 Technical Forum
Yeah, I don't know why I am considering them. I have their repro B302 oil pan that leaks something fierce from the rear main. Doesn't even come close to the correct radius. Second Felpro one piece gasket just ordered and a gallon of RTV :( -
Folks Trying to figure out my bump steer issue I thought I would try a new drag link. The one I have needs washers behind the nut of the 2 inner tie rod ends to snug up the taper on the joint, so something isn't right. It was a repro which was NOS and in a bag with an orange and yellow logo, but I don't remember much more than that. I see Scott Drake now have repro's and whilst I'd prefer an OEM Ford one, these might be the answer. Has any one used one or know of the quality? For me, its a $400 cost to buy one so I need to know if they are decent as it's a lot of cash if they are the same as what I have. Part number is D0ZZ-3304-CI (suffix is A for OEM)