


Protowrxs
-
Content Count
1,173 -
Joined
-
Last visited
Everything posted by Protowrxs
-
plastic bushings for steering column mounts
Protowrxs replied to jusatad's topic in 1969-70 Technical Forum
Cool! I still haven’t tried pulling mine back apart. I can try to print some (PLA or maybe PETG) and send them your way if there is an STL file to use. -
What did you do to/for your Mustang today?
Protowrxs replied to 69_Mustang's topic in 1969-70 Technical Forum
Nice - I went ahead and ordered a replacement instead of checking / soldering up the old one. I may test the new one to be sure before I install though if I wasn't the exception. Thanks for the info! -
plastic bushings for steering column mounts
Protowrxs replied to jusatad's topic in 1969-70 Technical Forum
Yeah that would work... just don't want to pull my column back out to get those dimensions. :-( Anyone have a column mount out that would measure things? I may try to find a cheap extra to use to measure and test if not. -Stephen -
What did you do to/for your Mustang today?
Protowrxs replied to 69_Mustang's topic in 1969-70 Technical Forum
On the lift of a friend of mine. Figured out drive train vibration - crap driveshaft phasing - have to get another one properly shortened, fixed squeaking right rear - ebrake cable run for the rear discs was rubbing wheel, cut off the heim bolts on tie rod ends, figured out oil leak - thought pan, appears to be rear of valve covers and spacers, figured out why aftermarket fuel gauge isn't working - new sending float is sunk in the tank. Plus a few other things - good to wrap up a few things bugging me. -
plastic bushings for steering column mounts
Protowrxs replied to jusatad's topic in 1969-70 Technical Forum
Just have to say it's interesting that I haven't been here in a long time, this was just posted and popped up in the top search, and I"m looking for the same solution for missing plastic bushings. Anyhow, I have been living with a rattle column since my plastic bushings were junk period. Does anyone know of a source for new ones? If I can get dimensions I may try to 3D print some and see if they work. -Stephen -
Glad it's going back together as I've followed your thread a long time. All these crash and crunch threads makes me want to leave mine in the garage now that it's running and it's not nearly as nice as most here. Good deal it's getting done right though! Stephen
-
What did you do to/for your Mustang today?
Protowrxs replied to 69_Mustang's topic in 1969-70 Technical Forum
Finally re-installed the front sway bar... with an upside down bushing washer the first try ... which I didn't catch until I was done... oh well, another 10 minutes of whining and it was done right... -
Still working on this thing a little at a time. Car runs, drives, needs debugging but feels nice and strong. I needed to organize my plug wires and didn't like the simple small black separators so I tried something a little different. Did a simple 3D design and then printed them on my home built 3D printer out of PLA. They may or may not survive the under hood head, may have to move to ABS but should't melt away as melting point is around 300F. They may warp, time will tell. Works though for now. Model is here is anyone else wants to try: http://www.thingiverse.com/thing:1231498 Otherwise the car needs the interior finalized. Front Fox body seats are in. Needs dash back on, windows, door panels, rear quarters, speaker tray and rear seat and final mount the console. Also need to install the door and window seals to button up the inside. I think the turn signal cam is mangled as both front blinkers blink on either turn direction, going to replace that first and go from there. In the mean time our son wanted a project so yet another Ford is on the premise to be rescued. Picked up a 1966 Galaxie 500 Fastback with the plan to use all the EEC-IV EFI stuff that did not get used on this car along with either a C4 or an R470W OD with maybe a home brew controller using an Arduino. Time will tell but besides the hail damage the old car seems pretty solid. Son and his girlfriend next to it when we drug it home. Another big project for sure as it's nasty inside and out but overall solid body, trim all there, and besides the '65 grill and bad hood the rest seems intact. Stephen
-
Actually running... https://youtu.be/gSOBiisL1p8 Smell the fumes view... https://youtu.be/8rfhsSSpgaM So it's running, now to get it driving. Stephen
-
Interesting seeing the various IT people here, been my lively hood since the mid 80's myself. Doesn't seem like that long though. In any manner I have way too many hobbies which is why the Stang is still in the garage. Besides the side tracks with the 88 TurboCoupe, 85 SVO, and 89 4x4 Ranger I've been sidetrack by the following: 1) Stopmotion Brickfilms - http://Protowrxs.com/Stopmotion - Spent a few years in this world when our son was young and got lost in it 2) Home Automation - http://House.Protowrxs.com - our house has been online since 1999 and in various states of working and non working automation 3) Personal Robotics - http://letsmakerobots.com/user/18840/pages/robot - Loads for fun, and time, in this hobby for a while being creative 4) Chopper Bikes - http://protowrxs.com/bikes - Had fun hacking up bikes and falling off of them 5) MX Motorcycles - http://protowrxs.com/mx - Spent time off road when our boy was growing up And several other adventures in life such as building an Remote Control mower and go kart... which again is why the 69 Stang is not done :-( Stephen
-
Engine Work, Front Springs, and Engine Accessories Tire Fitment With the 10" Tire and the 8.5" wheel it fits about as expected. I'd still like it a bit lower but until the car is fully equipped with doors, sheetmetal, battery, and interior I'm not going to make any changes. Rear lowering is rather eashy in the back with some 1/2 or 1" blocks. Front will be more of a challenge if needed. Front Shot Front skinnies are the same tire, just for the 4.5" front rims. Obviouslly need to buy some lug nuts still but I like the overall tire look. Too High Just threw on a fender to see where it's at and it's too high for me BUT still needs all the front sheet metal, hood, doors, etc and some time to settle back in a bit. It sat lower before but that engine also had iron heads so not sure where it will naturally end up at. Hopefully I won't have to try to make adjustments but if I do I may just buy new lowering springs. Sitting Down This is sitting down a bit more with me on the front end and shows the front end assembled. The roller spring perches are going to be nice but with the larger pipe required for the bearings getting the nuts on the lower shock mount was a pain. Headers etc With the headers mounted and the collectors in I have some idea of whow the H Pipe and exhaust may work out. I am hoping there will be no or minimal bending required but we will see. Front Accessories Love the pulleys I picked up from a fellow Stanger in Norman. I wanted aluminum pulleys but really wasn't impressed with the ones out there in my price range. March brand was just way too expensive but the CVR and others just didn't look nice. Found these and I have no clue what they are but always loved this style.
-
Yes There is Progress! - Engine, Parts, Tires and More Engine Is In! So the more impressive progress is the final installation of the 347 and Tremec 3550... finally! Still load of work to do, things to hook up, things to test and so much more but just getting the engine/trans in the car is a BIG step for this forever project. Here are a few of the process pics to get to this point including mounting flywheel, clutch, bellhousing and tanny. The install was rather uneventful. The only real challenged was having to remove the steering link to the old Unisteer rack to get the trans down in the car cleanly. Seat Work After picking up the Fox Stang seats earlier, I went ahead and ordered some TMI covers for them. Initially I was really going to go with some vinyl or leather covers or have them recovered. However, after thinking about NOT having a car with leather of vinyl seats and remember why I went with cloth covers. The vertical design matches the existing rear seat BUT I purchased a full Fox body kit and will likely work with someone to use them on the 69 rear seat. The covers went very smoothly, much easier than I expected. I now know I can re-cover my 85 SVO Mustang seats as well so another project is on the list. I do now wish I could have afforded the extra money for replacing the seat foam but for the minimum seat time this car should see the old foam should suffix. Only issue is there is a bit of sag from not enough filling in some areas. And Parts! The last bit of news is the parts that arrived while working on installing the engine. Parts list included flowmasters, 2.5 exhaust, header collectors, battery and rear tires. Tires are another compromised area. I really wanted a fatter tire under the car but was limited with the 8.5" slot wheels which I wanted to keep. So I stuck with the 10" tire instead of the 12". I was afraid the 12 would have had too much bulge on 8.5 inch wheel.
-
Gotta hate Pitney BLOWS myself. Sorry if anyone here works there, I've just had negative experiences with their products, service and support for decades. Bummer though, I've gotten where I do not hardly buy anything off ebay test isn't free shipping myself. Stephen
-
Thanks! I almost went with black but I always liked the light Ford blue and that is what it looked like ages ago... Now to keep on keeping on.
-
Just teaser.. .need to complete a good update but... After about 19 years...
-
Interesting hearing about the IT pros here! I too have been in IT since the early 80's will likely continue until I hopefully retire out. Hobby wise I wander around various things over the years including; 1) Brickfilms - i.e. stopmotion Lego - http://www.Protowrxs.com/StopMotion 2) Hobby robotics - http://letsmakerobots.com/user/18840/pages/robot 3) Home Automation - i.e. Online House - http://House.Protowrxs.com .. and of course OTHER cars like my 88 TurboCoupe, 85 SVO Mustang and 89 4x4 Ranger. I also dabble playing guitar, built a go kart from an old riding lawn mower and build an RC Lawnmower (http://letsmakerobots.com/node/38188) No wonder my 69 Mustang is still in the garage unfinished... Stephen
-
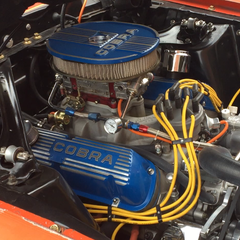
Engine Wrapping up - Seat Options Engine Is Wrapping Up Progress does continue on the 347 despite the basic appearance. I was unhappy with the way the head studs worked on the short studs as the nuts were not fully thread engaged so I bought a set of ARP 12 point bolts to use instead. I finalized on a pair of Cobra covers I'm going to use out of the various options I've accumulated and cleaned them up and painted them like I wanted. Turned out pretty nice to me. This is how the engine used to look and I liked that look so here it is again. With the covers painted the 347 looks ready to rock, and not knock, and roll. All that is left is to re-run the lifters after swapping the head studs / bolts out and install the intake. Then it needs to come off the stand and have the rear main installed, flywheel and clutch installed and get married up to the McLeod scatter shield and 3550 trans. So ready for this to happen. :-) Seat Update I had debated about seats for some time and had bounced around the idea of having the 71-73 high back seats recovered, buying aftermarket versions, or finding something I could buy seat kits for and recover myself. I've always liked the seats in my 1985 Mustang SVO which is the same layout as the 1990-91 Foxbody Stang seats so I searched around a bit for some options. The downer with the 71-73 seats is adjustability... there isn't any. The seat folds forward for back seat access and moves forwards and backwards on rails and that's it. With my back bothering me in crappy seats I figured I better think about seats a bit more. I found a couple options online including a more expensive set with decent upholstery or a cheaper set in Shawnee that needed recovering. For the price the decent set just was not worth it and after finding cloth, vinyl, or leather options for recovering I picked up these worn but solid 91-92 Mustang GT seats in Shawnee. Saved a trip out of town and was what I was looking for. TMI makes upholstery kits for Fox cars and the 91-92 GT style matches the vertical pleats of the existing back seat that is in good enough shape. So I picked them up and, although they need recovered, they have power lumbar adjustments (really helps my back), manual bolster adjustments, adjustable under knee support, and recline and adjusting backs. In other words they are MUCH better seats than the olds ones PLUS they have the 68-69 look and feel to me that better matches this car. Just have to get the seat kit ordered now. This is an example of vinyl or leather, I think I'm going with cloth though.
-
Build 5 speed conversion or buy kit
Protowrxs replied to rwcstang's topic in 1969-70 Technical Forum
I really can't say if buying or building is best as mine isn't on the road but it hasn't been bad building. I modified a trans mount, bought a master / slave kit, made my own slave mount, modified the clutch pedal, and am just about to drop the engine and trans in for final setup. I'm sure I saved some money but the main thing for me was the experience, and figuring it out. Also, when I started this it was quite a while ago and options where limited. The hardest part may well be finding a clutch pedal unless there are reproductions now. I had one from literally decades ago so didn't have that worry. Good luck, just my experience to date... Stephen -
Mine came from MustangsPlus and were good quality at least back then... been 10 years ago apparently though :-( Did passenger tower and battery tray - Pics here - http://www.protowrxs.com/Nolen/Stang/Rebuild/2006-07-24.asp
-
Hmm.. I have one on my 1985 SVO that sits under the car port and have never had any issues. Even a cheap battery that's been in it since 2010. I do try to fire it up every 2 to 3 weeks just for the car's sake but it's worked fine. It was killing the battery after 2-3 weeks otherwise which I have never tried to track down in any detail. Would be interesting on what others have experienced. Stephen
-
Cool. Very nice job! I really would like to convert to bolt in myself but just impossible to find affordable ones anymore. Going to bookmark this thread for sure. Protowrxs
-
Ha, welcome to the site TurboStangGT, yes this is the horror thread of the site. The reminder that there are very sad, evil, and dumb Stang owners out there. At least they aren't here. :-)
-
I'm interested as well in the wire location and grommet as my standard plain Jane coupe didn't have any wires either. Looks like the nicer cars has the wire just below the door switch and I do find a dimple there. Doing generic door locks only myself with an after market remote but would like the door Wiring geo wants to look nice. But we digress, drdorr question in this old thread is about the locks rods. I haven't installed any locks yet so I don't know what or how they will work.
-
Should go to the top connection of the blower motor speed control on the heater box. Just above the connector from the blower motor speed switch connection. Stephen Edit: added a quick pic
-
Those that you eliminated are for the egr and the canister purge stuff I think. (maybe?) If you want to make sure the ECU doesn't throw a check engine there is a way of putting a resistor value across the leads so the ECU thinks the sensor or control is still there. Sorry that is so vague, I found out how to do all that and bought a bypass resistor but can't remember the details. Good job so far, you're figuring it out qucikly Stephen Edit: Duh, those are labeled but what I said would likely still stand.