


JayEstes
-
Content Count
639 -
Joined
-
Last visited
-
Days Won
16
Posts posted by JayEstes
-
-
On 4/22/2021 at 1:32 PM, aslanefe said:I had installed small speakers inside the kick panel vents which still let me use the vents when needed. The small speakers did not sound decent so I decided to increase the speaker size while keeping them functional. So I modified the vents to mount pod I manufactured which holds 5.25" speakers. Now I have bigger speakers and vent is still functional (it does not open all the way, just about half way now).
<snip>
While I was covered in resin, I decided to make a pod that replaces the whole vent and let me mount up to 7" diameter speaker on my 1970 vert. You remove your vent, install this pod which acts like a cabin for your speaker). One for right side, one for left side (which are mirror images of each other).
<snip>
Then decided to see why the clock on the vert was not working; opened it up and found a gear had broken spindle. Does anybody have any old clock mechanism that I can use parts from, may someone who converted to quartz etc?
<snip>
While I was working on the vert, I decided to polish the windshield trim. the one on right is polished, the one on left not yet.
<snip>
As you all know one think leads to another, so while I was at it I decided to take the vert apart and restore it while changing the color back to it's original competition yellow. Looks like it is going to need some (maybe a lot more than some) rust repair/metal replacements. I will be changing it a little bit, will use modern cloth top with glass, will change the upholstery and door panel designs to vinyl/cloth and make them resemble 1980s Recaros.
This is a really interesting mod aslanefe - I have done a same idea- different concept. For mine, I left the vent body unmodified, but created a bracket that allowed a 5.25in speaker to be suspended in the center, over the open hole. I can use the vent also, but with reduced airflow.
I'd like to understand more about how this affected the vent opener. You say it can open but limited amount of opening, I'm trying to figure out how it is limited. Perhaps we could take it to it's own thread? Let me know if you're interested in discussing.
-
so we all discovered.... once again... that midlife is a genius. how many times do we have to repeat history?
He always has the best advice I ever got on the 1 subsystem of the car I don't trust and don't like...Jay
-
well I didn't see this this listed, so I'm going to throw it out there. I got rid of all rust, and primed and re-painted the spots. Then I cleaned everything well with lacquer thinner lightly - it removes oil and softens up the paint a little. then I used rattle can truckbed liner. The stuff I used left a very hard finish, and it seems tough as nails. It's been about 4-5 yrs now, and I'm very pleased with the results - it doesn't seem to hold dirt very much. It made a nice even coating underneath too that hides blemishes. I put sound deadening on the inside.
Anyway, I've ben really happy with the results, and would recommend it for a simpler durable solution.
-
19 hours ago, rwcstang said:Converted my headlights to LED, The lens housing are crystal clear (not bad looking) for a good price too. $199.00 best conversation imo, really bright at night!
if you want the OEM look I recommend buying these: https://www.octanelighting.com/5-3-4-stock-glass-metal-headlight-18-24w-6k-led-h4-lamp-light-bulb-headlamp-set.html
Looks great! harnesses hook to original? No mods anywhere to put them in?
-
This is an interesting topic. I'm curious what the reasons are for this? it obviously changes the inertia of the flywheel having 3/4 lb more weight on it near the extremities. But the weight is balanced, so it's not inducing side to side loads, jsut loads in the form or torque. But it's just an attachment plate between engine and trans, so those things should dominate the torque felt by the engine. What does this heavier flywheel do to the engine? Can anyone explain the issues it creates in more detail? Just curious. I'm not looking to run any experiments here.
-
When I did my rebuild, I pulled out all carpet, seats, belts - everything I could unbolt. After vacuuming and just cleaning it with usual stuff, I didn't have a lot of rust to deal with. But there was a lot of seam sealer (which is like a semi-hardened tar that has body paint on most of it) around. I didn't want to sand everything off and besides, a lot of the paint was in decent shape - why remove it?
So what I did was the following: I got a 1in putty knife, some really tough PVC gloves, some scotchbrite pads, and a 5 gallon bucket of "clean-up thinner" (Laquer Thinner) from a local paint supply store. After getting dirt off and isolating areas of rust, I used the putty knife to remove most of the seam sealer (60-70%% of which was either flaking off, or sticking to things it shouldn't be). Then, I used the scotchbrite dipped in a small bowl of thinner, to clean areas where the sealer had been removed and clean and rough up the painted areas. Laquer thinner will remove the paint if allowed to stay on there very long, so I used it lightly, and would clean the surface, and rough it up with the scotchbrite, and immediately wipe it off with a rag so it didn't wrinkle the remaining paint/primer. This left a really clean, primer ready surface. This worked great for getting the remaining seam sealer off, and it got the paint prepped to receive primer over the top, leaving the good original paint/primer in place. The use of a scotchbrite pad soaked in laquer thinner is the most effective cleaner I have ever seen, it cuts thru everything (oil/ grease, dirt grime, paint). It is pure hell on gloves and hands, so get a couple pair of gloves as even a pair of PVC gloves will harden after several sessions of use. Obvious caveats go with this process for respirators and fans. Laquer thinner is a strong chemical.
After that, I just resealed the seams with orderly beads of paintable silicon caulk, and then I used rattle can automotive primer over everything. Making damn sure not to paint over anything resembling rust or its semi-hidden effects. I always ground any of that down and put the primer on bare metal once rust was gone.
I put on at least 2 coats of primer everywhere, then put down dyna-mat for sound deadening everywhere. This was a fairly long process, but a lot better than trying to remove everything (remember, in my case most of the floor was in good shape). The floor looked great after this, and I think it was a nice medium restore option that left good parts of the car in place, but re-did everything else as best I could. Trying to remove everything with anything less than a full-body dip is a ton more work than it is worth.
Hope this addresses your question, and you find some of these tips helpful. It wasn't super fast, but I was really happy with the results, and I felt like the effort was focused where it was needed.
Mach1 Driver and lalojamesliz reacted to this -
okay one caution - maybe the other guys didn't have the problem I did, but I ground off the rivets (which are steel I believe) - no problem. then I cleaned and prepped everything and put in the velcro - no problem. However, the housings that the rivets were inserted into are pot metal (very soft) much softer than the steel rivets. So when I went to drill them out and tap for new screws, my drill slid off the center of the steel rivet and went down into the soft pot-metal. This caused them to be misaligned a little, and it was less than satisfying (thats what she said).
perhaps if I had drilled out the rivets all the way down instead of grinding initially, everything woulda been groovy. Anyway - don't just grind off the heads - drill out the steel rivets while you can - right up front of the activity.
-
Are there any rumors about a calendar for 21? I could use something that helps me look forward to next month a little....
-
On 11/3/2020 at 9:11 AM, 1969vert said:here is my vert..nothing on the side.. a little narrower and tighter than the 70.
I do think the scoop helps a lot.

That's a perfect stripe for the 69 right there. Very well done!! Best I've seen
-
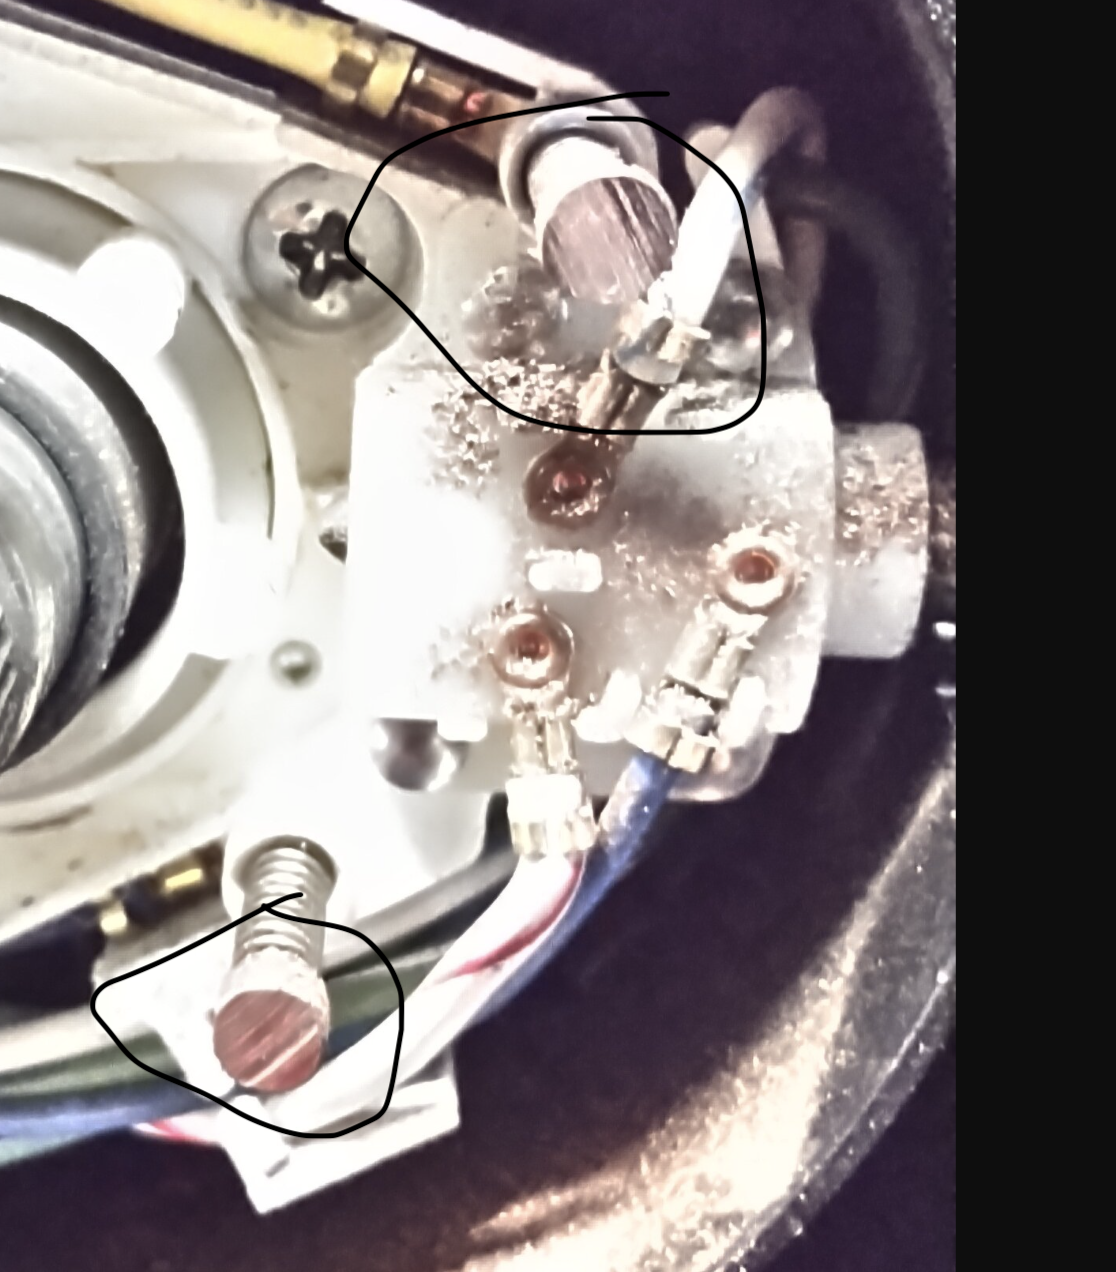
just in general, machines should not generate shavings - ever. You need to find out what is interfering and eliminate it - it could just be "tolerances" on your 3rd party wheel so it might not be a big deal, but you don't want those shavings around the steering wheel. They can get into other joints and cause some real wear problems.
The contacts circled are where the shavings are coming from - there should be rounded smoothed edges where these make contact. Looks like they are scraping a jagged edge somewhere on the wheel

-
On 10/15/2020 at 2:55 PM, newstang said:i have more if you need them
Ya know, that just makes all us original floor guys jealous... Could you try to be less obvious about how much better that is? Really, it's not making my life any better... ;-) I busted my ass to get my half-ass, sort of ok, patchy-weldy floor into the "acceptable" range.
stangs-R-me and bigmal reacted to this -
Yeah. I take the blame on this one. At the time- I honestly didn’t know any better, was not thinking it thru and didn’t think about it hard enough. Weird that it didn’t give a problem from the beginning and only became an issues after years working like that.
You know what they say- “life is tough- but it’s tougher if you’re stupid”
Jay
-
33 minutes ago, 1969_Mach1 said:Hope Midlife comes along with his explanation, because that makes no sense to me. Simply adding a tach wire to only the engine compartment harness? I've converted a non-tach harness for a factory tach and it involves reworking both the engine compartment and under dash harness, and much more than adding one wire.
There was more done to the harness to enable tach, it’s currently unused in the dash, but the only thing that came into the engine compartment was the red “pwr” wire. I had Randy rework ALL my harnesses, and please bear in mind I need to plead some ignorance here as I have the mods in, but have not implemented them...
-
OK, well a verdict is in, although, I am going to admit - as is usually the case between me and electricity - I found something that makes it work fine, but I'm not 100% sure why it did what it did.
So, I had my harnesses refurb by Midlife which I think is still one of the best decisions I made. When I had him do the engine harness, I had him add a line for the tach. Now I haven't had a tach put in since, and it is not wired to a tach. I understood this to be tach power, so I ran it to the positive terminal harness and hooked to 12V power there (this could have been a problem that I did that - I don't know how the tach is configured, but assumed this "tach power" red wire needed to go the +12V). So it was hooked up to the + terminal - it has been that way since I put it in, I've had essentially zero elec problems since I put the thing back together ~2016 or so. But I never had a tach....
I also suspected the NSS so I removed and cleaned it - I did find some heat damage from the new dual exhaust, but upon inspection, no shorts in that cable. I jumpered over the NSS switch just in case for the rest of the troubleshooting.
So what I found was really odd - stumbled onto it this way: I hooked up my battery charger, because I thought I could drive out the problem if I did - the car would generally start when jumped. Put the thing in 50A mode... It cycles on/off because the batt is saying full. I get the car cranking, and as I do- I crank, then stop, then crank, then stop. Did this about half a dozen times and I notice a spark at the base of the positive terminal right on the battery. Battery is bad I thought! How could a good battery spark at the +post! gotta be a bad battery. Swap the battery and it seemed to go away initially, however I cranked/stopped something like 10x and then I see the SAME spark at the +post of the battery. OKAY this is the car somehow - not a bad batt.
Removal inspection showed that little tach power wire was tied down right where the sparking was occurring. Now, I do not know what has happened, but initially I was like well, it must be shorted to ground somewhere in the car because if I remove it, everything is fine. Car runs/starts normally all other functions are restored.
In thinking about it since finding the problem - There is a very good chance I did something stupid by hooking up that wire, but that is definitely what I thought I needed to do at the time I put it in. Also, if that wire was occasionally short, WHY would the thing spark at the positive terminal post?? Shouldn't it spark at the location where it touches ground? Maybe not, because the tach end at the instrument cluster was left free. Taped-up, but free. Anyway, I now believe one of two things occurred:
- That wire is hooked up properly, but is hitting ground somewhere, and was draining my current to crank the starter, and run ACC circuit.
- I made a mistake hooking up the "tach power" line and should have left it unattached until a tach went in.
SO, in summary - it's running again, but the logic of how I got a spark at the battery post really baffles me. So me and mr electricity are back in our respective corners - catchng our breath for the next round....
How crazy is that?
-
9 hours ago, aslanefe said:How about running a wire from under S terminal to inside, and an other wire from battery + to inside. Connect a switch to the ends of the wires. Turn the key to start, if starter does not engage, do not let the key off but press the switch you just rigged up. If the engine turns over, the battery, starter and selonoid are fine.
Thanks. That's a good simple test I can try.
-
7 minutes ago, 1969_Mach1 said:You are certain the wires are connected to the ignition switch correctly?
Back to the jumper cables, since is works fine when they are connected, do you have another battery, maybe from another car to temporarily install and see if all your issues are resolved. You said your battery was tested at Auto Zone and was okay. But was it tested correctly? It might have a cell going bad.
thx yes. I'm doing that tomorrow. My charger still thinks it's fully charged, but maybe it's got a weird failure where it only reports full charge, but has no real charge when you need it. Tonight I did put the charger on 50A charge for a second and tried to crank - not a peep out of the solenoid. HOWEVER the NSS switch and cable were removed so I think that's not a good test. I am so fed up with this dang problem.
-
what kind of carb do you have? If you have an original, you could have an accel pump diaphragm failure which leaks fuel all over the intake. It would be obvious though if you look at carb - I had standing pools of fuel on the pockets on the top of the intake, and the smell was bad.
-
okay, well bend me over and "thank you sir may I have another!". NO JOY with new ignition switch. I still get some sort of relay click (or "pop") when I turn the key "sometimes".... but sometimes I don't. Sometimes its just silence.... Headlights now DO NOT work. They DID work before the swap and now don't. However, interior dome light works fine (while door open etc) but when I pull headlight switch - dome light goes off. I really don't know WTF is going on. Radio and fan are no go in any key postion.
I got under car and started looking at NSS, and found some heat damage on the jacketing from exhaust pipe. I pulled it, and wire jackets are melted some, but no sign of shorting anywhere. Is there a standard test I can run on the NSS? OHM it out or something? The interior collar rotates but is kind of gritty/grindy, and I wonder if it is still good...
I've lost the knack men. Someone save me - I can't find my ass with either hand in the garage now...
-
8 hours ago, aslanefe said:Hi Jay, how would 245/60/15 fit on front with your rim, do you have ample clearance with 235s?
It's hard to say. It's much closer to the same but still about 0.5in larger. Since I haven't had any tire rub issues (not once in 10K mi) I guess I have "ample" clearance - but that's pretty subjective. Couple of pics to try and quantify:

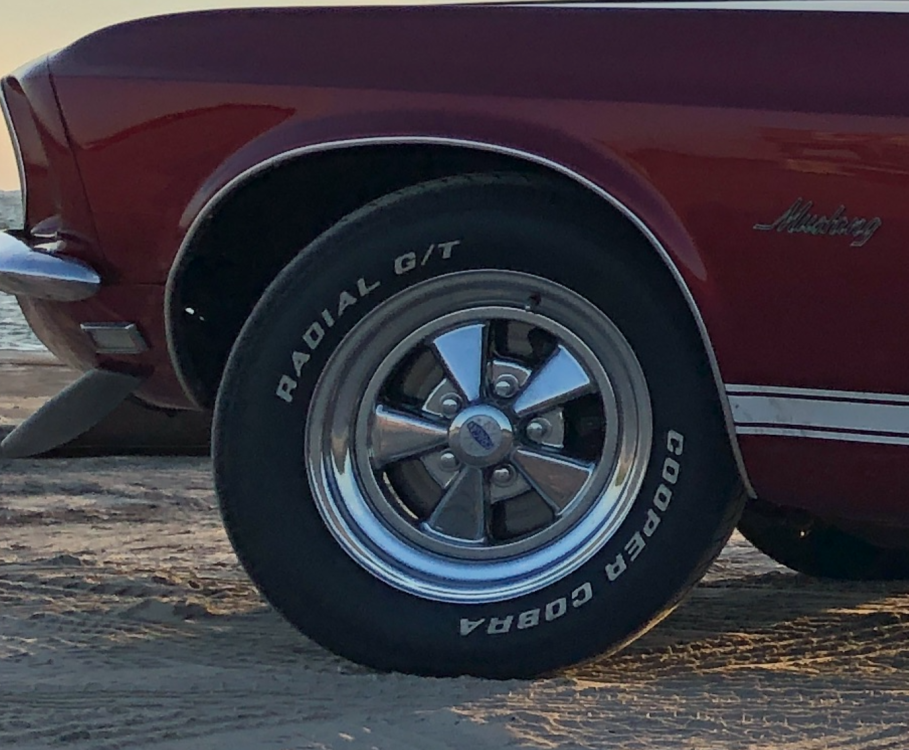
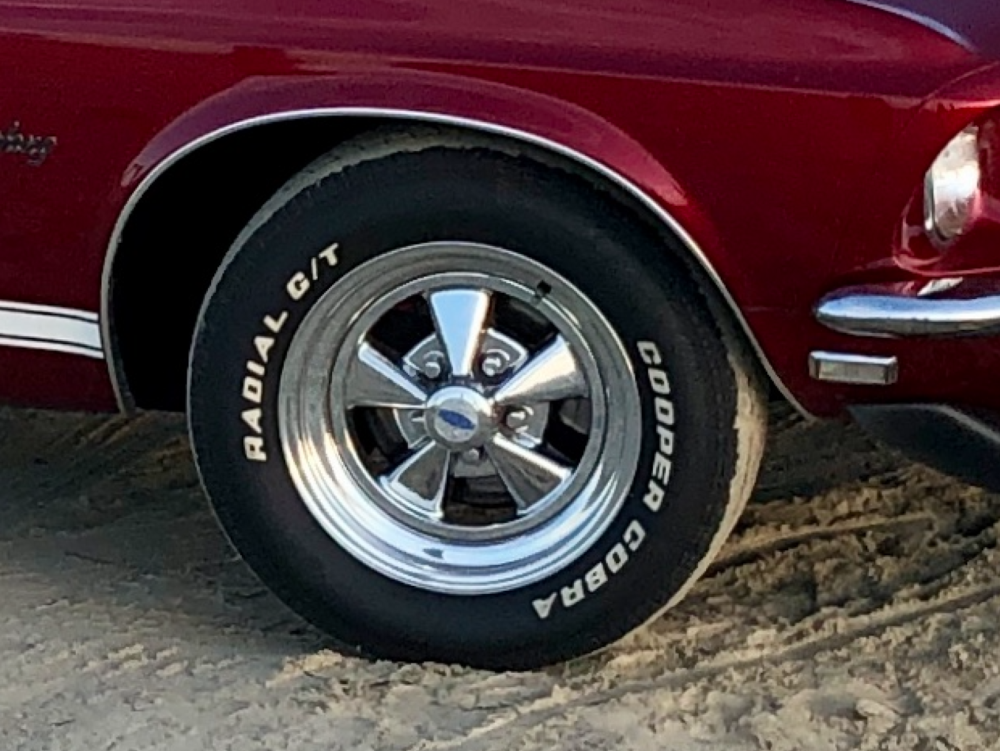
Bear in mind I have STOCK springs, and I put KYB gas-adjust shocks all around (which are fantastic BTW), arning drop with stock suspension arms/spindles. I figure another 0.25in larger on either side on that tire is probably not a problem, but I am not showing it at full wheel turns either. IDK - I like what I have and I wouldn't change a thing - it never ever gives me problems.
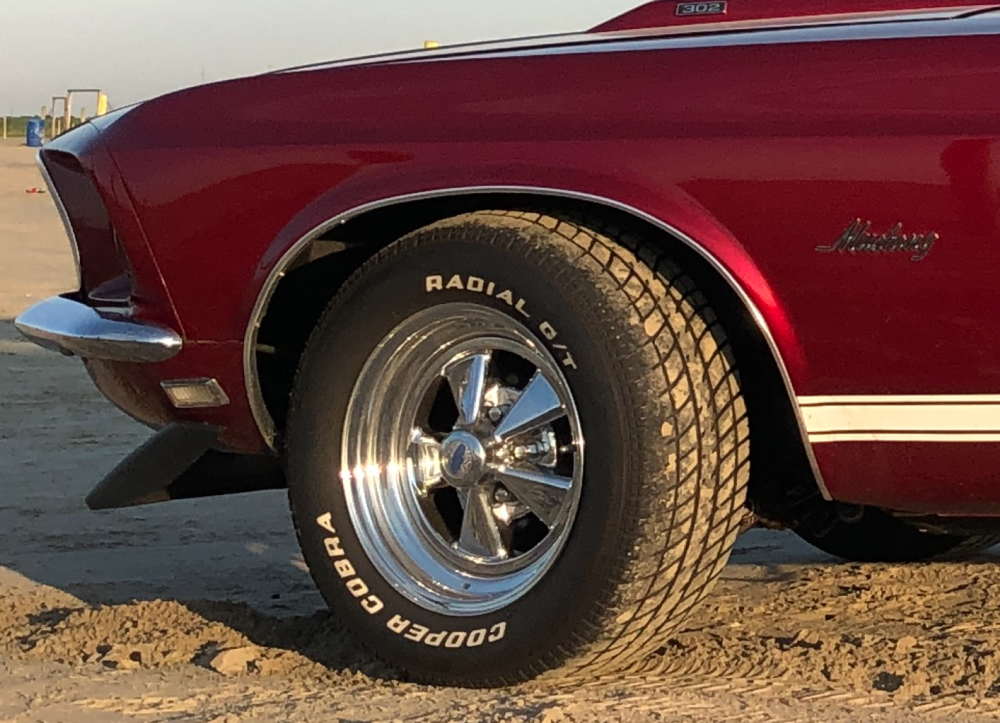
One more that might give you pause:
-
I used a template to move the holes for the Shelby/Arning drop. I put in all stock suspension after that. All the comments above are good on the spring compression. I did it, but it is a very dangerous spring. If you don't have that thing completely under your control it can really hurt you. I think internal spring compression is the only way to go - the external spring compressors have a way of being perfect when you put them on, but as the spring is compressed it changes shape, causing the grip to change - this can lead to an unexpected slip. I put on 15x8 wheels (4.25in backspace: https://www.summitracing.com/parts/crr-61815?seid=srese1&gclid=CL2x2NXE3cMCFYk2gQodPGsAOA) with 235/60 Cooper Cobra white letter tires. With those wheels tires, the stock suspension, the drop, the stock spring height, I have not had a single wheel rub. I'm very happy with the setup.
The 225/70 tires though are 1.3in larger diameter: https://www.tacomaworld.com/tirecalc?tires=235-60r15-225-70r15, so It is not clear that system won't have a tire-rub issue. You might be able to modify the backspace to make it okay - I'm not sure.
Hope you find this useful.
Jay
-
2 hours ago, Midlife said:If you don't have ACC in any key position, then definitely the ignition switch is bad, or...you also don't have BATT power!
ACC comes from the ignition switch.
New ignition switch should be here tomorrow, so I'll know then. I checked the harness connection, unplugged & replugged and still no joy - so it's not just a loose connection there or anything.
-
2 hours ago, 1969_Mach1 said:That's correct.
Did you say everything works fine when you attach jumper cables to your battery? Did you try simply jiggling the battery cables and battery cable connections? Could be coincidence I guess and still a bad ignition switch.
Yes. I had to remove the battery to rework the the non-stock ground I have installed in the chassis near the battery, so all of those connections were opened, checked, (already clean) and retightened. It was jumped both times with a portable battery system. Definitely not loose/dirty connections in the engine compartment - I've checked all of those.
-
Copy all, but I don't have radio or fan in ACC, RUN or CRANK. Those just don't work at all. Although, if I jump it, everything seems to work - which seems strange to me. I'm gonna see if I can check connections on the ignition switch I have and if it can't be made to work, I'll replace it. I just checked the video on west coast classic cougar site, and found out the switch is a separate electrical piece on the back of the key tumbler that can be bought separately.
Re: this comment:
30 minutes ago, Midlife said:The fact that you lose radio and other ACC accessories is expected, as power to that circuit is dropped when the key is in the CRANK position.
so, when key in CRANK, power to radio and other ACC will be dropped, BUT I should have a full 12V at S-terminal?
-
okay, thx for tip on S-terminal. I just checked that, and while holding the key in CRANK, the S-terminal is only reading 0.14V. SO I believe that means the problem is likely the ignition switch inside the car. I've no real idea how these fail, but I assume some corroded internal contacts or worn out contacts. This failure signature came about really abruptly, and so it's not like I was getting intermittent stuff - it just went out suddenly. Pretty surprising.
Anyone know if it can be disassembled and cleaned/repaired or is this is a "buy new one" situation? I'd prefer to keep the original and original keys etc.
Thanks for the help!
Jay


U joint cap clips, help needed
in 1969-70 Technical Forum
Posted · Report reply
you guys are geniuses. Good thread.