

427Stang
-
Content Count
42 -
Joined
-
Last visited
-
Days Won
1
Everything posted by 427Stang
-
For those with Convertibles and want 3" exhaust tubes
427Stang replied to Rich Ackermann's topic in 1969-70 Technical Forum
Thanks, the toughest part was fabricating the exhaust pod in the rear. the stock Shelby pod is a massive restriction to flow. -
For those with Convertibles and want 3" exhaust tubes
427Stang replied to Rich Ackermann's topic in 1969-70 Technical Forum
Modified my plate with sections of pipe to clear. 3" all the way out. -
Lack of weld penetration from the back side pic, grind the cracks and weld the backside. Shock tower stress cracks are common, metal work hardens and cracks, weld it up and enjoy unless you are planning massive power upgrades later.
-
I'll let you know.
-
I will have to look this weekend but I think I have 2 non tach 69's floating around.
-
I installed an entire rear clip. Support everything and take plenty of measurements before you make the first cut.
-
I made my own rotisserie. Its a 427 stroked to 482. Triangulated 4-bar rear suspension. Richmond trans, I fabbed the headers and exhaust.
-
I modified the plate to give more room. 3" all the way out
-
The ride wasn't earth shaking but you can feel the difference. The Del-Alum bushings have a very snug fit to control side to side movement. Make sure you lube them well when installing or you will hear them.
-
I used Del-Alum bushings on my 68 coupe. They were form Pro Motorsports (this was back in the early 1990's). The ride was rougher than normal but they did improve cornering quite a bit.
-
I have used Muggy Weld Super Alloy 1 to repair broken studs to convertible well trim. It works great. Just practice a bit first. http://muggyweld.com/super-alloy-1
-
Years of saving and not revealing the true cost to my wife! Build thread will be coming when I get more consistent time to work on it.
-
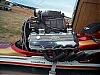
I don't have pics of the tires and wheels under it but here is the reason for the meats out back. A bit of engine porn for you.
-
The side panels fit with no modifications. The seat has been narrowed to fit with the mini tubs (325-40-17 out back). Just make sure the top mechanics clear in all positions.
-
I welded my bar in. It's a Tony Branda One piece bar. .
-
70 Conv Rear Quarter Glass Measurement
427Stang replied to rmarks's topic in 1969-70 Technical Forum
There is a difference between coupe and convertible quarter glass in spite of some claims to the contrary. Link http://www.1969stang.com/mustang/forum/showthread.php?t=9151&highlight=convertible+glass I took the pics in the link above and there is a difference. I am not saying that you can't interchange them but you may have a hard time making them line up properly -
1969 Covertible Quarter panel replacement
427Stang replied to Lenb's topic in 1969-70 Technical Forum
Convertibles make the work hard but more rewarding in the end. Take your time. My car had extensive damage due to a poor repair done years before. I got lucky and found a wrecked convertible for the donor quarter panel. -
Nice work! Save your patterns. I'm sure someone here will need these made in the future.
-
I got lucky and found a wrecked convertible and I transferred the parts I needed. Chances are you won't find a 69-70 ragtop in a junkyard. You will probably have to fabricate something.
-
Any difference between coupe and convertible door glass size?
427Stang replied to rmarks's topic in 1969-70 Technical Forum
"As others said, '69 Coupes & Convertibles shared the same side glass ... same for '70, just with the switch to the bolt in style and moving the vertical gasket between the two from the door glass to the qtr. glass." The convertible use a specific rear quarter window that is different than a coupe. Door glass is the same for coupe or convertible. Just depends on if you have bolt in or glue in. Link to photos of the quarter glass differences. http://www.1969stang.com/mustang/forum/showthread.php?t=9151&highlight=convertible+glass -
PM sent
-
Great discussion on the topic here: http://fepower.net/simplemachinesforum/index.php?topic=201.0
-
The pod inlet isn't the problem, it's the tight radius 90 degree turn the exhaust gas has to make once it enters it. After the turn the internal volume is reduced for clearance between the fuel tank and valence. I sold the pod I had otherwise I could show you a close up photo. The restriction would only pose a problem when racing or with a large displacement engine hence the motorized cutouts. Just watch out for the law if you crack them open on the street. The pic is of one of the mounting bolts from inside the trunk area. I have a piece of angle welded to the trunk brace as a base for the sheet metal liner so disregard it. The holes are there and all you have to do is drill them all the way through for the mounting bolt (7/16" NC if I remember correctly).
-
True but my rear subframe is narrowed also. The pic shows the original rail stubs in the rear that are tied into the subframe. The real issiue is the distance between the fuel tank and the rear pod. It is tight with a stock tank and 2-1/2" tubing. Not to say it can't be done but it may hang down a bit further than the cast pod. The cast pod is worthless in my opinion unless you have cutouts. Too much restriction.
-
The plate uses the same mounting hardware and points as the stock Shelby cast pod does. It basicly sandwitches two rubber bushings between the body panel. Positive retention with some vibration dampening. I can take some pics with more detail if you are interested.
