


Chelby-Ann
-
Content Count
502 -
Joined
-
Last visited
-
Days Won
3
Reputation Activity
-

 Chelby-Ann reacted to Vicfreg in Tilt Wheel Rebuild
I thought I would post this, as I can't really find any good reference material on the "how to".
I have a 1970 tilt wheel which had a few minor issues, so I decided to take it apart and refurb it. I have done several non-tilt columns, and they at least always need a top bearing replacement. So, I am going to start documenting by adding some pics of the dis-assembly, and then re-assembly. .
1st pic - unique allen bolts and retainers that are under the lower section that hold it on. 2nd pic - directional switch assembly removed. 3rd pic is the cleaned upper housing. 4th pic is a reminder where the snap ring goes. It sits on top of the upper shaft bearing and hold the upper column section on. 5th pic - standard (long) and tilt (short) inner column tubes side by side. 6th to 8th pic - directional switch and wiring harness. Note the "D2" date code. This must be a service/replacement switch. 9th and 10th pic - the directional switch. These are totally different than the standard column switch. In the 10th pic which shows the underside of the switch, you can see the green thing sticking out with a little knob on the end. This is what the turn signal lever screws into, and it is used as the fulcrum point for the tilt mechanism. In picture no 9, there is a little black wire with a plastic thing on the end and a piece of copper. This is another great idea, which is a switch to monitor if your key is still in the ignition....the famous key "buzzer". 11th pic is the locking actuator pin. This is used in both tilt and non-tilt columns. It is hooked to the actuator rod gear "rack" which is meshed with the ignition switch gear. When the ignition switch is in lock, the pin pops up and will lock the steering wheel. This whole key switch/gear/actuator rod set up is a major pain in the neck to set up. But, you can't really delete it, because the actuator rod goes to the column mounted ignition switch.. 12th pic is the dust/air seal that sits on the inner column tube. There are 2 seals, one on the outside of the column tube, pictured here, and one on the inside, which goes over the inner shaft. These prevent air from running up the steering column tube when you are driving down the road. Last 2 pics are of the directional switch harness connector. I did a continuity check to make sure all the connections were good. You can see some discoloring of the wiring due to age and heat.
More to come, as I start assembling this....
-
Chelby-Ann reacted to 69RavenConv in door hinge
Replacing the OEM style pins and bronze bushings is also an option for less money. That's what I did.
https://secure.cougarpartscatalog.com/bush.html
Granted, it's not nearly as robust as the grease filled zerk kits but it is a lot cheaper. When these cars were daily drivers and the doors were getting opened and closed a dozen times a day, 365 days a year, the hinges wore out. I figure my car is now a toy that gets driven a a couple dozen times a year so the OEM style should last me a lifetime.
The zerk style would probably last 5 lifetimes but that's more than I'm going to need. :)
-
Chelby-Ann reacted to Mike65 in door hinge
I would rebuild the ones you have & contact MUSTANGSTEVE about getting the parts to have greasable door hinges with the zerk fittings. Either you can DIY or have MUSTANGSTEVE do it. Here is a link to his page.
https://www.mustangsteve.com/hinge.html
-
 Chelby-Ann got a reaction from mwye0627 in December Snow in NC
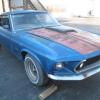
Had a photo op this morning and took it. Back under the cover.
-
Chelby-Ann reacted to Mike65 in AAW Harness Under Dash Pictures
Vic, I just started installing mine today & my dash is out to so unfortunately not much help, but here is where I am at now.
-
 Chelby-Ann got a reaction from unilec in Custom Center Console 69Coupe
11/20/2017 CCC UPDATE
They say the 3rd times a charm. Well I agree. Very happy with my newly designed center console. One thing I could not do was incorporate some cup holders into the existing frame work, so Mich'l, my beautiful wife and I brainstormed a bit and she came up with the cup holder design you see in the photos. Great idea!! No more cold water bottles between the legs on long cruses. The cup holder fits snug enough yet can be put away during car shows. The 4 way stretch vinyl was easy to work with and the adhesive the real deal. She's already for next weekends AmeriCarna Live Car Show in North Carolina. Last car show for the year for me.
-
 Chelby-Ann got a reaction from Shep69 in Custom Center Console 69Coupe
11/20/2017 CCC UPDATE
They say the 3rd times a charm. Well I agree. Very happy with my newly designed center console. One thing I could not do was incorporate some cup holders into the existing frame work, so Mich'l, my beautiful wife and I brainstormed a bit and she came up with the cup holder design you see in the photos. Great idea!! No more cold water bottles between the legs on long cruses. The cup holder fits snug enough yet can be put away during car shows. The 4 way stretch vinyl was easy to work with and the adhesive the real deal. She's already for next weekends AmeriCarna Live Car Show in North Carolina. Last car show for the year for me.
-

 Chelby-Ann got a reaction from Mike65 in Electric/Electronic E-Brake
I found a way to design some cup holders that did not require me to eliminate the parking brake handle in the center console.
-
Chelby-Ann reacted to Vicfreg in Custom Center Console 69Coupe
Wow, nice woodworking......
But....you gotta love the console and the contact cement on the dining room table, next to the salad dressing....
You rock! So does your family. It is amazing what they get used to with having a car guy in the house...
After the carburetor re-build on the kitchen table, I thought I was in trouble. The real trouble started with the low mileage wire wheel hubcaps in the dishwasher..... oops.... Or the dirty red shop cloths in the washing machine, or.....
-
Chelby-Ann reacted to RPM in ~ 1969 Idler arm bushings
Why not order them all? Or better yet, get the roller idler from Opentracker. I'm happy with mine.
-
Chelby-Ann reacted to 69volunteer in Rear Side Marker Bezel.
There was a member on here that was trying to sell these. He sent me a set for free to try but I never heard where this ended up. They work great
-
Chelby-Ann reacted to Kris in ~ 1969 Cowl Cover Supports
They are available from muscle car research. I got mine from them. They make quite a few parts that no one else has too. I've ordered quite a few things from them.
https://www.musclecarresearch.com/69-70-mustang-cowl-pad
-
Chelby-Ann reacted to Mike65 in New complete car wiring harness.
Thanks, I forgot the electric fuel pump & EFI as mods also. I think that is the way I will go with the AAW.
-
Chelby-Ann reacted to JayEstes in Front End Alignment - BAD NEWS
This may be due to poor/cheap "new" repro parts. I have been amazed at how many parts you can get for these cars at really inexpensive prices. Unfortunately, I think the competition for lowest price drives some places to deliver substandard equipment. So in more cases that I ever expected, I found the "new parts" were fine when I brought them, but they wear out super fast, or don't work as well as originals. I wonder if you inadvertently bought inexpensive ball joints when you put them in, and they just weren't a good product? Makes me wanna go check mine - they have about 3K on them now...
-
-
Chelby-Ann reacted to larryc94 in Front End Alignment - BAD NEWS
The reason he needs a roller arm as opposed to a bushing is because of his non standard wheel package with wrong, back space and offset. To get them to work he added 2" spacers. That lets the wheel put a lot more stress on suspension components (especially the idler arm) causing it to toe out under driving
-
 Chelby-Ann got a reaction from Mach1 Driver in Front End Alignment - BAD NEWS
Afternoon Folks. Happy Memorial Day Weekend. I was able to have my front end aligned this morning at a Ford Dealership. The fellah that does the alignments comes with high regards so I thought that I would try him. We spent 3 hours on her and worked at getting it right. In the end she needed shims added to the Upper Control Arms. I measured them to be .110" thick. I had no idea how involved aligning this car was. Next up is to buy new tires and keep an eye on the wear on the tires. I look forward to having this issue behind me. No worn, loose or broken parts.
-
Chelby-Ann reacted to barnett468 in Front End Alignment - BAD NEWS
its likely junk then . have someone turn the wheel back in forth 1/2 revolution while you look at the idler arm . if it moves more that around 1/4" up and down, it is worn . if it moves around 1/2" or more it is wasted.
.
-
Chelby-Ann reacted to RPM in Front End Alignment - BAD NEWS
I can't imagine any original suspension or steering part being in good condition. I'm happy with my roller idler arm from Opentracker.
-
Chelby-Ann reacted to Mike65 in Front End Alignment - BAD NEWS
X2 When I rebuilt the steering & front suspension in my Coupe I used the roller idler arm from Opentracker also.
-
 Chelby-Ann got a reaction from grendi in Front End Alignment - BAD NEWS
Afternoon Folks. Happy Memorial Day Weekend. I was able to have my front end aligned this morning at a Ford Dealership. The fellah that does the alignments comes with high regards so I thought that I would try him. We spent 3 hours on her and worked at getting it right. In the end she needed shims added to the Upper Control Arms. I measured them to be .110" thick. I had no idea how involved aligning this car was. Next up is to buy new tires and keep an eye on the wear on the tires. I look forward to having this issue behind me. No worn, loose or broken parts.
-
Chelby-Ann reacted to JayEstes in Front End Alignment - BAD NEWS
That wear on new front-end tires has to imply that it wasn't set right when you had it aligned the first time. That or some part(s) you put in were put in wrong and/or are now damaged. The shelby (arning) drop should NOT be the issue.
I'd bet $ the guy that originally aligned it, put it at max adjustment on the eccentric bolts, and said "damn - I can't do any better than that, just call it good". If they told you it was in spec when it left the shop the first time, I would be very suspicious.
Like Barnett says - go somewhere else - I suspect you are going to wind-up at shims on the uppers due to lowering, shelby-drop won't cause this problem. I have stock spring lengths with shelby-drop and its fantastic.
Bottom-line: I doubt it's your work or your car, it's likely that it was never aligned right to begin with.
-
Chelby-Ann reacted to qtrmoon in Brake parts in not so original 69 coupe
Thanks much for the replies! Ill check out Mustang Steve and take a look at the Tuff Stuff line.
-
Chelby-Ann reacted to RPM in Brake parts in not so original 69 coupe
Check out Mustang Steve's page on power brake conversions:
http://www.mustangsteve.com/BRAKES.html
-
Chelby-Ann reacted to Max Power in Stupid Question of the Day
Well, even though you don't have a big problem, the scotch and a cigar is a perfect solution. ;)