


stangs-R-me
-
Content Count
989 -
Joined
-
Last visited
-
Days Won
22
Everything posted by stangs-R-me
-
I would guess a place that rebuilds automotive gauges (Instrument Services comes to mind) can properly repair problems like this. I think the '69/70 non-tach speedo's are now being reproduced, so that could be an option too if you've got a non-tach car. Doug
-
Heater box case rebuild questions...
stangs-R-me replied to cobra460jet's topic in 1969-70 Technical Forum
YES, this was the factory sealer. I used Universal Black Firm Seam Sealer (4323) from NAPA. Doug -
Why does my clutch pedal stick to the floor?
stangs-R-me replied to prayers1's topic in 1969-70 Technical Forum
You may want to check the push rod adjustment again. When I put mine back together, I had to adjust the nuts way out (from where the prior 3-finger clutch was) to get it to spec and it just did not seem right. Got in the car and actuated the pedal and there was a "pop" ... went back under car and had to re-adjust back to about where it was originally and it felt normal again. So I'm guessing the TOB was not completely seated on the PP diaphram fingers and that was the "pop". Doug -
Jay, I'll see if I can get a pic with it in the car and give you some rough measurements. Doug
-
Why does my clutch pedal stick to the floor?
stangs-R-me replied to prayers1's topic in 1969-70 Technical Forum
Since you have a Diaphram type clutch, I've been told that the assist spring (that you have not yet removed) can cause this. Any possible binding due to "the likely to be worn out" pedal shaft bushings will also add to the force of the assist spring holding it to the floor. Doug -
After reading your added post, I just noticed I never followed up on how it all went back together. I ended up fabricating my own "7347" inner tube-to-shaft seal retainer from a white PVC coupling. Don't remember exactly what I used but the o.d. needed some very light sanding to fit snuggly inside the tube end and I added a small hole on the bottom side for a screw so it would not slip out. It's purpose is only to keep the foam seal from slipping out the end of the tube and I'm assuming the factory one being molded snapped into some notches to keep it in place. I have it protruding slightly from the end of the collumn and since it is white it somewhat replicates the visible portion of the correct Ford retainer. Using some sort of permanent bearing interference paste to fix my upper bearing slop scared me so I ended up wrapping a strip of adhesive backed S.S. 0.005" shim stock around the steering shaft where the bearing rides to take up the slop. Slop is gone and steering wheel feels much better now ... hopefully the factory snap rings on either side of the bearing will keep my custom shim in place. Searched my pictures and somehow I never took pics of the finished collumn ... sorry !! Doug
-
Sweet beautiful plastic (gauge bezel)
stangs-R-me replied to dzahm's topic in 1969-70 Technical Forum
1969 vs. 1970 Woodgrain Dash: 1969: 72,458 Mach 1 22,182 Grande' 857 Boss 429 3,150 Shelby --------------- 98,647 definite total plus: 2,550 Deluxe Sportsroof (est., see note below) 1,669 Deluxe Convertible (est., see note below) ---------------- 102,866 estimated grand total out of 299,824 total 1969 production (34.3%) vs. 1970: 40,970 Mach 1 13,581 Grande' 499 Boss 429 5,965 Luxury Sportsroof (all but Boss 429) 5,408 Luxury Hardtop 1,474 Luxury Conv ----------------- 67,897 total out of 190,727 total 1970 production (35.6%) NOTE: Some but not all 1969 (Deluxe) Interior Decor Group equipped Sportsroofs (5,958; incl. the 857 Boss 429) & Convertibles (3,339) had the wood grain dash if ordered with the "Deluxe Interior Decor Group" option. My estimates are based on "HALF" of these cars having woodgrain dashes, which is probably conservative. They also built 5,714 Interior Decor Group Hardtops but for some silly reason you could not order the "Deluxe" Woodgrain Dash version ... probably because of the Grande' ... you could however get it "dealer installed". The dual level interior decor group was dropped in 1970 ... probably realized it looked goofy having the black dash with the deluxe door panels. So to answer your question, there were around 50% more 1969's than 1970's equipped with the woodgrain dash. Doug -
That was also used on 1969 Torino / Fairlane with 351W. Doug
-
Did a little searching for you and here they are used at West Coast Cougars ... http://www.cougarpartscatalog.com/c9zb-65223a00-a.html In my parts I found 7 of them ... 3 have smaller threads for mounting bolts (appear to be 1/4-20) and 4 have larger threads (appear to be 5/16-18). Some of the guide bushings are missing, but would swap around so there is a complete set. Might be able to dig up the correct mounting screws as well. These don't appear to be reproduced yet ... if interested in any of mine send me a PM. Doug
-
I'm assuming you mean item "222A56" shown in the upper right of the exploded view below. CJ Pony shows the "21496" plastic bushings as being available, but not the pot metal guide ... http://www.cjponyparts.com/PLASTIC-WINDOW-GUIDE-CLIPS-SET-OF-16-1969-1970/p/HW998/ I may have a couple of these ... don't know if I have a complete set of "4" though. Would likely need to replace the bushings. CJ also shows the guide rods as being available new ... search for their #'s DGRL & DGRR. These typically break at the top mount, but can be easily be fixed by a little weld. Doug
-
There is a hole in the pedal support that the bumper goes in. Location is pretty obvious when pedal is all the way up. There is a generic 70-?? bumper and a concours correct '69 bumper. The '69 one is "red" and more expencive, but they are otherwise interchangable. Doug
-
Here's the 4-Speed Cable Bracket on the firewall (figure "W") from that diagram in the other thread. This bracket does NOT come with cable, must purchase separately ... http://www.cjponyparts.com/SPEEDOMETER-CABLE-RETAINER-AT-FIREWALL-4-SPEED-1967-1970/p/HW772/ I had not seen this diagram before so I just guessed at it's location and mounted it to the same hole as the brake line bracket ... hard to really tell from the diagram, but I think I got it right because prior to having this bracket, my cable rubbed on the steering shaft and now it no longer does. Doug
-
Need an Education on Power Steering
stangs-R-me replied to prayers1's topic in 1969-70 Technical Forum
BTW, I crawled under my '69 and the MS pitman arm on it looks nothing like the PS one which has C9ZA-3590-A cast in it. See pic below of MS arm on my car vs. arm with PS parts. Doug -
Need an Education on Power Steering
stangs-R-me replied to prayers1's topic in 1969-70 Technical Forum
Here are the pics of the complete 1969 Cougar 351W 2V system I've got. The Pump mounting brackets were not with it, but I probably have them in a different box (car was non-AC). Doug -
Need an Education on Power Steering
stangs-R-me replied to prayers1's topic in 1969-70 Technical Forum
My experience with this system was on a '67 Fairlane 289 and I added headers. I went through 2 sets of pressure & return hoses and always had leaks ... that is until I finally broke down and replaced both the cylinder & control valve and the control valve to cylinder hoses. At the same time I ditched the headers and got a set of repro 289 HI-PO Exh Manifolds and had a complete new dual exhaust system put on the car. Finally I had a leak-free PS system ... and taught myself to avoid turning the wheel hard right or left to avoid stressing the return hose at the control valve. So good to go for a while, but certainly did not change the very un-sporty over-assisted feel of this style set up. Prior to purchasing this Fairlane, I was debating on putting this system from the Cougar on my Mustang. However after dealing with the Fairlane PS, I decided I don't drive the '69 enough to warrant all the effort & frustation of getting it right, especially on a car already equipped with Power Disc Brakes & Manual Transmission of which all the components are already packed tight enough on the driver's side of the engine compartment ... with stock exhaust manifolds (could not imagine headers too !!). Plus it would have also taken away a big chunk of the sporty feeling that makes this '69 what it is. Doug -
Need an Education on Power Steering
stangs-R-me replied to prayers1's topic in 1969-70 Technical Forum
Only thing that would be different between engine sizes (I6 / SB / BB) would be the power steering pump brackets and maybe the pump itself. I've got a complete P.S. set up from a 1969 351W 2V Cougar that I parted out in the late 80's. All that is missing is the steering box, but since the box in your car is STILL the quicker ratio PS box you don't need it. Whole system has been in a box in dry storage since. However it was off of a car that sat along a garage in Chicago for a number of years prior ... would guess you definitely need to replace the 4 hoses (bare minimum), but it would be a good idea to send the cylinder & control valve out for rebuilding as well. Pump might be ok as-is and is the easiest part of the system to remove and service later if needed. IMO ... the prior to 1971 Mustang Power Steering has got to be the worst system ever put on a car and is why my car still has MANUAL STEERING. 1. There are ugly hoses that you can see hanging down under the front of the car. 2. There is no steering feel (way over-assisted). 3. With all the hoses, there are a lot of leak points. 4. Pressure & return hoses move back & forth with steering linkage, fiber braid return hose gets stressed at either end of travel and needs to be watched carefully. 5. Having headers complicates it as the driver's side gets real close to pressure & return hoses & cylinder which shortens the life expectancy. If you are still interested in what I've got let me know. Doug -
Toploader clutch adjustment help!!
stangs-R-me replied to prayers1's topic in 1969-70 Technical Forum
To get it out, you need to remove the whole pedal support ... which means the steering column too. And while you got it out, you may as well replace the shaft bushings with a ball bearing kit from Mustang Steve. There are roller bearing kits out there too (Scott Drake & maybe others), but these require a perfect un-blemished shaft. Reason this is is the rollers ride right on the shaft surface where Steve's kit has an inner race so the ball bearings are enclosed and the hardened inner race is against the shaft. The roller type kits can be bought with a replacement shaft which is not too difficult to replace, provided it has not already been replaced in the past ... factory shafts are staked into place, so a little grinding will get it out. A replacement shaft is normally welded in so it can be quite a bit more work to replace a 2nd time. This was the case with mine, so I opted for the Steve's kit ... blemishes on the shaft surface just need to be smoothed out with emory cloth until the bearing slides over. You will need a welder either way, as the bearing retainers must be welded to the existing clutch pedal support. When I put the 4-speed in my car 30k miles ago or so in the mid 80's (originally was C4), I used a pedal support that had never been used with a clutch pedal. The 4-spd was out of a '69 Torino and I grabbed the clutch pedal support from it as well. The support & pedal ended up being different, so I found a Mustang one. Support & Shaft of the Mustang one was shot, so I used my old AT support and luckily the Torino shaft was ok and interchangeable. Anyway, when I took mine out this Summer, one of the bushings was split in half after only 30k miles !! So if your car is a factory stick, it is highly likely one or both of your bushings are shot. These bearing kits are a permanent solution (should never need servicing again) to this common Mustang problem. Good luck, Doug -
Toploader clutch adjustment help!!
stangs-R-me replied to prayers1's topic in 1969-70 Technical Forum
You said your clutch is not the O.E. 3 finger type but multi finger ... do you mean DIAPHRAM type like a Centerforce ?? If so, the upper pedal assist spring (big coil spring under the dash at the top of the pedal) MUST be removed when you swap in a Diaphram type clutch ... Centerforce for sure, but I'd assume this is the case with other brands too. I just swapped in a Centerforce Dual Friction this summer (kept al the rest of the stock linkage as you have). Had the factory 3-finger type for 25+ years and YES this Diapham type feels completely different. I adjusted the push rod to factory '69 specs and IF it is grabing at a different spot than before I got used to it. Having the lighter pedal effort more like an 80's Mustang rather than an old truck was a welcome change though !! Doug -
Thanks ... the mach 1 lettering was there in the stripes for a few years but I got tired of people at car shows coming up to me and saying "that's not a real mach 1". No kidding I'd always say; what gave it away the hardtop body style ?? After it was painted, I went a year with NO stripes and it just needed something plus at the time the GT stripes were NLA. I then realized that the still available mach 1 stripes would line up perfectly with the center of the quarter ornaments ... plus I just liked them sooo much better than the simple & non-reflective GT stripes so I just had to get a set. The hood imperfections have been there along with this paint job for almost 30 years and have never really bothered me. At shows the hood is always up anyway so no sees it. With the hood closed, I think the showy hood pins, scoop, etc. have always been visual distractions so no one has ever commented on my distorted hood !! Now if the hood issues caused the front molding to not line up that would be a problem !! Doug
-
I don't know but I guess I had a brain fart ... Seat Belt light IS NOT part of the Visibilty Group it is a completely separate option ... 69Raven's got it right. Your Marti Report makes no mention of the Deluxe Seat Belts (chrome bezels on buckles) with Reminder Light option so you are not going to find that relay or the seat belt light harness !! Doug
-
I am 99% sure that the Sports Appearance Group was just the Hood Scoop & Color-Keyed Racing Mirrors (no stripes or other trim). If you have just a drivers side racing mirror, your passenger door was probably replaced at one time and the mirror was not transfered over or was broken and not useable ... pot-metal bases crack & break rather easily just from slamming the door, so any kind of accident that wrecked a door would likely of broken the mirror. Seat belt light is in the dash cluster in the fuel & temp gauge pod (since your car did not have a Factory Tach). It is a separate bulb socket on the end of green/purple wiring that runs over to the fuse box area. A time delay relay should be at the end of this wiring and is screwed to the firewall ... relay is the elongated silver box in the lower left of the pic. Doug
-
I made them. Bought some 1 in. wide gold stripe tape and hand cut to perfectly accent stripe style. Carefully peeled off the original Mach 1 gold lettering and put these GT logos in their place. The only clues that it is not O.E. is the gold color is off slightly and it is not reflective. Also stole the single pin stripe out of the Mach 1 Deck lid stripe and modified it to fit the wider coupe trunk lid. Had seen a stripe like this on a non-Mach 69/70 (think it was a Boss 302) and thought it looked good. http://www.1969stang.com/gallery/stangs-R-me-Deluxe-GT-Hardtop Doug
-
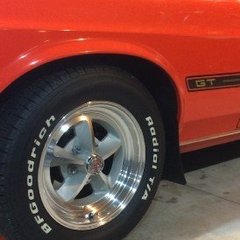
Mine too ... 225/70-14 BFG Radial T/A's are going to spin before a 28 spline axle will twist !! Doug
-
I've got that too, but more forward on the drivers side ... but on the passenger side in about the same spot the hood dips "down". My car had a rough and unknown life priror to my purchase in 1981 and when I stripped it down to bare metal, we found all sorts of repaired body damage. Some was along the front of the hood, so I always just assumed my hood issues were due to this minor accident in it's past. Drives side is pretty obvious in the pic, passenger side less so but it is there. Doug
-
YES, the 31 Spline is a slightly larger shaft and there for can handle more torque. Don't remember what the diameter difference is though. If you've got a small block and are running stock width tires (225 or narrower), 28 Spline axles are just fine. If you are running wider / sticker tires or drag radials and have a built small block or stock (or built) big block then you probably should have the 31 Splines. FYI / interesting factoid ... Ford has been putting 31 Spline axles and 8.8" T-Lok differentials in all 2011-up V6 Mustangs !! Main reasons being the wider & stickier tires from the factory and the car is quite a bit heavier than a classic Mustang ... 305 HP & 280 ft-lbs of torque has a little to do with it too. Weak link now is the 2-pc telescopic stamped-steel drive shaft. Doug