


stangs-R-me
-
Content Count
988 -
Joined
-
Last visited
-
Days Won
22
Everything posted by stangs-R-me
-
I ran 225/70-14's all around on my car for the past 35 years. No problem with fit ever. As of last fall, I upgraded to 225/60-15's on 15x7" rims all around that are an inch wider but 0.77" shorter. I was tempted to go with 235/60-15's all around (0.3" shorter than 225/70-14) but decided against it due to the fact that I still have manual steering and thought this may be too wide. 255/60-15 is going to be a 27.05" tall tire (approx. 1" taller than 235/60-15) and is the maximum recommended width for a 7" wide rim. Whether it will fit out back with a 4.25" back space (or even different backspacing), I can't help you there. Doug
-
Wow, excellent job and in such short time considering what you started with. Paint and panel fit is exceptional as others mentioned ... o/a very well done. Doug
-
On the Scott Drake Set, the trans tunnel mount bracket is flat:
-
I'm on FB, but have never been active. It was someone on a late model Mustang forum that abandoned the forum and started a FB page instead that got me to join. I find his page really annoying, and not at all useful / functional like a forum. As others have said, too many idiots posting dumb comments or inaccurate information. I don't have the spare time to follow the lives of FB friends nor do I have the time or even feel compelled to post anything about my daily life. So back to the FORUM … how do I fix my avatar ?? See that some of you have already done so, but don't see how to do it in my settings. Doug
-
Did not mention this in my earlier post on June 19th, but the Scott Drake 3-PT Kit is also made by Seatbelt Solutions also. Still no complaints, absolutely love them. Doug
-
My drivers side retractor squeaked quite a bit too when new. Sprayed WD40 on both sides of the mechanism and has been perfectly quiet ever since. Doug
-
I'm sure having the insert in there helps a bit, but having a new neck and cap is even more important. I went one step further and tested the cap & neck for leakage with water prior to installing. Obviously blew it out real good with compressed air afterward then let it air dry for a few days before actually installing. As I filled it likely fuller than it had been in years, I hammered on it a bit between the gas station and home and did not see or smell any gas around or below the cap when I got back home. So I'm really pleased with that as well. Doug
-
Well it took me a while, but I finally burned my full tank of gas from last fall down enough to go to the gas station and try this thing out first hand. Certainly did not help that I had my driver's seat out for rebuilding until early May, then was out of town for 4 weekends between then and now. So …. put unleaded nozzle in and locked it in at 2nd from max flow as I normally do on all my modern cars and stood back. Pumped in 13+ gallons and nozzle shut off like it does on a modern car with absolutely no drama … I.E. any splash or even the slightest amount of fuel past the insert that I could see. Had only driven 106 miles, so obviously was not as full on last fill up, and probably has not been for many years. Always figured it got around 10 MPG's so it will be interesting to see what it really gets now that I've got consistent shut-off at the pump. As much as I dreaded filling this car up (before yesterday), I can now say this has got to be one of ... if not THE MOST SATISFYING RESULT(s) of ANY MOD I've ever done to this car !! Doug
-
Does your car have or did it have factory A/C ?? If so, that metal spacer spaces the horn out so it does not hit the A/C dryer. Do not discard this spacer, they are not being reproduced and go for decent $$ on e-bay. Doug
-
My brother in law had this bumper sticker on a few of his cars … HORN BROKE, WATCH FOR FINGER … always got a kick out of that. As far as troubleshooting your horns, I think everyone else pretty much covered that. Doug
-
Put the Scott Drake / Seatbelt Solutions 3-point kits in my '69 Hardtop and used "as supplied" (no drop link) and the stock 3 mounting points. Buckles will even reach the holsters in the console when fully extended (last pic SD is on left / OE Ford Deluxe on right … even look similar). Other bonus is the SD buckles do not RATTLE in the console holsters while driving like my OE ones did. Only mod was I had to ream out the ends on both the retractors and the inner belts to fit the O.E. shoulder mounting bolts. Both my wife and I have no problem adjusting them for similar fit / comfort compared to our daily driver's. Interestingly, my '70 Mach 1 sourced seats in my Hardtop do not hit the retractors like Shep69 and other fastback owners have stated. They are close, but no interference when all the way back (seat is FULL BACK in 1st pic). This really makes no sense since the FB & HT are supposed to use the same floor & rockers where the CV is different and even the OE Ford HT/FB retractors will not fit a CV. Doug
-
Legendary Wheel Alloy version of '69-70 Shelby Wheels
stangs-R-me replied to stangs-R-me's topic in 1969-70 Technical Forum
Here's the "Charcoal" version ... I'd be torn between this and the Silver one (a few posts up) And I suppose I should also post the Black version ... -
Legendary Wheel Alloy version of '69-70 Shelby Wheels
stangs-R-me replied to stangs-R-me's topic in 1969-70 Technical Forum
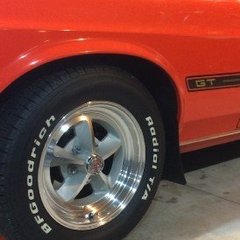
Prior to the change I drove my 30 year old tires 180 miles round trip to a car show in August ... including a stretch of 70 MPH interstate !! I'm very happy with the quality of the Legendary GT9 wheels, Lug Nuts, and Center Caps. They ARE made in China, and Legendary is a division of Scott Drake as you thought. I'm kinda glad the LW60 wheels were not yet available when I ordered the GT9's. I would have likely gone with them, especially now that I've seen actual pictures of all the color variations on vendor sites. But having the GT9's mounted for 6 months, I am so glad I tried something new. Totally changed the look of the car that I've been used to for the past 35 years and everyone that has seen it is impressed / thinks I made a great choice, especially vs. plain ol' Magnums that I also was considering Back to the LW60's ... The polished / clear coated aluminum rim is a better match to the OE trim rings than a "Chrome rim" which is what you get in a 15x7" Steel Repro 10 slot wheel ... just ends up being too much chrome IMO. But since these LW60 wheels are not offered with a Chrome Center, it will be more of an appearance change on your Mach 1 that did not offer a painted center option. I don't think any of the LW60 options have fully painted centers though, the 10 hole openings are polished making them kinda like the optional body color painted wheels that came with the chrome trim around each opening (which was a rare option available on all '69 Mustangs including Mach 1). With some matching paint and some tedious masking, this "body-color" look could be applied to a set of these LW60's. Suppose someone could also re-paint the whole wheel center Argent to duplicate the GT wheel look too. Legendary does not state if either the 'silver" or "charcoal" options is actually a match to Ford Argent or not ... kinda looks to me that Argent would fall somewhere between these two colors. Doug -
Legendary Wheel Alloy version of '69-70 Shelby Wheels
stangs-R-me replied to stangs-R-me's topic in 1969-70 Technical Forum
Looking at your pics, It certainly looks like those 275's will be rubbing on the quarters once you get some weight in the car. YES, the tire needs to fit up inside the wheel wells ... that is unless you are putting old school AIR SHOCKS on which was the cheap way to avoid rubbing in the 70's. Whether 275's with the right offset can be made to fit your car without any kind of body or suspension mods, that I can't help you with. Doug -
Legendary Wheel Alloy version of '69-70 Shelby Wheels
stangs-R-me replied to stangs-R-me's topic in 1969-70 Technical Forum
225/60-15 = 5.31" Section Height & 25.63" Dia. (stock '69 Shelby) 235/45-17 = 4.16" Section Height & 25.33" Dia 245/45-17 = 4.34" Section Height & 25.68" Dia. 255/45-17 = 4.52" Section Height & 26.04" Dia. 265/40 or 265/45 do not exist on Tire Rack so likely do not exist at all 275/50-15 = 5.41" Section Height & 25.83" Dia. (your existing rears) 275/40-17 = 4.33" Section Height & 25.66" Dia. but needs a 9-11" Wide rim so not an option for use with the 17x8" GT9. However if you can find a 9" rim with the right offset, I'd guess it would fit as it is slightly shorter than your 15's that you say DO fit. As far as the front's, CJPP offers the 245/45-17's as an option, so they must have experience with these fitting something ... most likely a '69-70. Doug -
Interesting in that the aftermarket Hurst shifter lays back on an angle and the OE 1970 Ford-Hurst version is basically upright … never noticed this difference before. Doug
-
That is looking nice. As far as the ignition switch, mine switch lights up with the marker lights so you can find the key hole. I've seen some harnesses without it, but the two A/C harnesses I've messed with (Tach & Non-Tach) both had it. Non-tach harness was base model with A/C and Tach harness came out of a Mach 1 with A/C. So I don't know if it is an A/C only thing or if all deluxe without A/C also had it. Doug
-
Good to hear. How close are you to getting your car on the road ?? From your build thread and other posts it sound like you are getting close !! I finally got my car out of storage this past weekend ... now I just got to burn the full tank of fuel in it so I can officially try the MOD out myself. Weather for next weekend by me does not look too promising at the moment though ... Thursday-Saturday Rain / Storms !! Doug
-
That's how I envisioned doing it too and also wondered whether holes should be drilled first. I'll have to bring a neck to my buddy that does a lot of TIG welding to see how he would do it. To avoid re-plating or painting I was thinking a 1-2" wide band of heat shrink tubing around the area may be a way to pretty it back up and protect the bare steel where the plating or paint burned away. Doug
-
Optical Illusion I suspect ... sent the SD one back to Summit yesterday so can't re-look at them side by side again. If they were that much different as they appear in the pic I think I would have noticed when I was comparing the two. Other one will be going back once I get the OK from the e-bay seller. Good to hear and thanks for posting. Actual welding is really the ideal method, but not everyone has the equipment or skill set to do it. I've got MIG Welders at both home & work (110V import at home 3-phase Miller at work), but my self taught welding skills are more functional than pretty. I'd think a skilled TIG welder could do a very clean and neat job. Can you share some pics of how you welded it in place to share with everyone ?? Thanks, Doug I think the JB Weld method is more than adequate though if done properly. Key is to clean both the insert and the neck with Lacquer Thinner or Acetone prior to inserting and having it tipped in the neck towards the bottom so you get a nice horseshoe shaped WEDGE of epoxy around the top. On the more recent ones I've been sticking a loop of wire up the neck between the insert and top wall along side my retaining stick to make sure it is tipped this way before adding the stakes behind the insert. Once secured in place I yank the wire out, then keep driving the retaining indents in deeper until there is no insert movement. Once satisfied with the retainment, I then test neck for leaks (screw-on cap or duct tape over opening then fill with water), blow out with compressed air / allow to thoroughly air dry, then add the JB Weld.
-
Bought another 1970 Dynacorn / Corvex T01D neck off of ebay this week because it really looked to be galvanized / plated in picture. Being e-bay, I even asked the seller before buying to be sure and they came back saying YES it is GALVANIZED ... not painted. Received it yesterday and no it is NOT galvanized or plated it is indeed PAINTED. It drop-shipped right from Dynacorn in Leetsdale, PA. and has a date code of 2017 (vs. the 2009 date code on the Scott Drake Corvex I received last week). Much better PAINTED finish than the old stock SD one that looks "brush-painted". This newer neck is on par with all the other painted necks in quality and finish / possibly powder coated. Other than being painted, other issue with these Corvex necks is an "as-crimped insert" does not want to slip right up into place so they would require extra work to do so (unlike the painted CJP FFP4 that insert goes past bend without any issue and costs less). So it looks like there really is no "PLATED 1970 NECK" available from anyone. Only possibility would be if the current Scott Drake neck is from the same supplier as the other SD Plated necks I've seen / bought, but that would require further research. comparison pic of the two T01D Necks; SD / Corvex 2009 dated ... vs ... Dii / Corvex 2017 dated:
-
Sounds like fun ... welcome to the states and Happy B-Day !! Doug
-
THIS ... I added a Holley Electric Choke Kit to my 4150 carb back in 2012. Ran the power wire to the STATOR terminal on the alternator and it works just fine. My 1985 5.0L Mustang with factory Holley 4180 carb had the choke hooked up to the STATOR terminal too. Why not try the SIMPLEST SOLUTION before reinventing the wheel ?? You are not going to damage the choke or the alternator giving it a shot ... a few feet of wire, some terminals, electrical tape wrap and maybe an hour of time and you can duplicate what I did. Could probably rig something up temporarily to test it out in less than 10 minutes. Not the best pic, but you can see my custom wrapped harness with black & red wires (ground & stator) attached to the back of the alternator. It then snakes up over the intake and back to the choke. Doug
-
Export brace reinforcement plate?
stangs-R-me replied to Stangboy's topic in 1969-70 Technical Forum
I put mine on the bottom as this was the only way I could get it to simply fit without any modification to the car. Looks fine and likely adds some rigidity but not as much as it would were it welded in place with the flange at the firewall. -
I ordered 1 each of the '65-66 & '67-68 22 Gallon Tank conversion necks from CJP yesterday and should have next Thursday. Hopefully they are both PLATED (as shown in the CJP video) and the insert goes up and past the bend without extra effort. Doug
