

shelbyshelby
-
Content Count
296 -
Joined
-
Last visited
-
Days Won
3
Everything posted by shelbyshelby
-
Factory Front Disc Brake Questions
shelbyshelby replied to Machspeed's topic in 1969-70 Technical Forum
I would call or email them, that looks like a generic stock photo to me. I have some on the front of my car from there that came as 1 piece rotors. -
-
Well I think both of my doors are original to my January 1969 built car. The drivers door should at a minimum be the original latch, least it had the original door tag in place with tight rivits. Also I ordered them for a 69, so i assume they are correct. Both sides were worn or shrunk maybe. I’ll post a pic later as I’m away at work. I can try to describe the location. If looking at your latch mechanism on the door side, where the latch grabs the striker. Look behind the latch (fingers that grab the striker), it should be right behind it nestled in the small area behind it. The only thing that holds it in is a single rubber tit on the end that sticks out of the latch. Simple install, a smallish straight screw driver pries out the old one. Hope I don’t confuse anybody. Pics coming in a few hours.
-
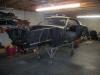
To start with, I want to say I appreciate the sincerity of the folks on this forum. I get the vibe that the 69Stang family is here to help others. I can read sarcasm and get advice from other forums but prefer to come to 69Stang for information and good reads. So I’d like to contribute in a small way. I have been slowly restoring my 69 from a total disassembly. It’s always had this hesitation for the doors to pop open when the button is pushed. Even after thorough cleaning and lubing them. I always figured some of pop came from the rubber door seals. I saw a rubber bumper in the back of the door latch that looked worn, light bulb went off that piece may help pop the door. I guess before I thought it was a merely a door slam bumper. Sure enough I installed new ones from npd. Pretty simple to put in and now both doors pop open with authority even without the rubber seals installed (currently getting ready for paint). Pic shows the difference in the worn and the new bumper.
-
Any chance any of those metal ones are oem? The repo’s won’t fit the floor pans tapered area on my car. They are 3/8-1/2” too wide, requiring a floor pan mod. This is reason I ask.
-
I need just 1 drain plug if anybody has just 1 nice one they could spare. Need this so I can put down some carpet and sound deadner. I need several screws also but can order those. The repo plugs don’t fit or look like oem. I’ll gladly pay you for the part and shipping to 42518 Ky with PayPal or however you’d like payment. Thanks for considering.
-
I need 1 floor drain plug if you have a nice one and don’t care to ship it to me
-
American Racing vs Legendary magnum 500's?
shelbyshelby replied to 69scj's topic in 1969-70 Technical Forum
Might help as reference, I’m adding a picture of the legendary magnum 500. It is 17x8. Iirc it’s 4.5 back space. I needed a roller and had some good used 235/55-17. It’s on an unfinished car so I’m hoping the body will squat some after assembly. This tire is 27 in diameter. -
Fabbing some spacers from 1” square tubing to go between the seat and the tracks comes to mind. Never seen it done though. Most complaints from sportsroof owners involve lowering the seats for headroom and leg room under the steering wheel. Do you have access to a mig welder?
-
Can you buy the spring for the hood latch?
shelbyshelby replied to smh00n's topic in 1969-70 Technical Forum
I didn’t find a new one when mine broke, though you can several company’s that sell similar springs new. For me I never found the exact one. Something was always different, leg length, wound backward etc. I was meandering in a junk yard and noticed a F150 from the 70’s had a nearly the same latch assembly. They charged me $5. It was an easy fix. Required welding the washer back on. -
Rear shock access hole cracks
shelbyshelby replied to Perry Weaver's topic in 1969-70 Technical Forum
Mostly what I have read is the air shocks folks used in the day caused cracking in this area. From my experience though it’s usually the top layer of metal where the shocks rubber plugs mount. So I’m thinking it’s more to do with unibody flex rather than air shocks. I’ve seen more than a few drag cars both coupe and Sports roofs with cracks around the rear window area. I think the back half of these unibody cars are taking a beating when used any other way except a 230 hp daily driver. This is just another opinion of course. -
Head gasket issue? (No it was a wiped cam)
shelbyshelby replied to Cantedvalve's topic in 1969-70 Technical Forum
I’d recommend to roll the pushrods on glass as you remove them. It’s fairly common to find them not straight which changes the lash. -
best Distributor Brand / Carb whistle Questionnaire
shelbyshelby replied to rwcstang's topic in 1969-70 Technical Forum
I’ve had that before on an older street driven Holley. Could try wiggling the the throttle shaft whiles it’s whistling, to see if it changes. Likely the front 2 barrels. -
From my understanding the GL5 oil is more slippery than the GL4. Thus not letting the tapered part of the synchro grab the gear and speed it up to make a grind free shift. I think the GL5 will cause shifting issues but I can’t be certain, I’ve always used the GL4. I have the sta lube in one toploader at the moment it’s never had an issue.
-
I don’t have any pics of mine but I’m pretty sure the harness you speak of goes on the drivers side of the bracket. It also has a good sized plastic shield wrapped around it , right at the bracket and bolts to it with 2 bolts iirc. That’s a stolen pic from the web
-
More help needed - Back-Up light Switch
shelbyshelby replied to Jack Wheeler's topic in 1969-70 Technical Forum
You mentioned “when shifted into neutral”. It doesn’t have a neutral feature, it’s only for reverse lights. Only the automatics had the neutral safety feature. If the trans is in reverse in your pics, I think I might try just putting a vacuum cap or similar piece over button that would effectively make the button a little longer and maybe turn the reverse lights on. Also, it seems like I remember maybe the 1st 3rd shifter stops can be adjusted to deep into shifter causing reverse to not fully shift. Just throwing out a couple ideas to check. -
I have 2 of these clocks, both have the white second hand. That’s not to imply they’re all like that. Maybe somebody with more intel will be able to confirm one way or the other.
-
Wanted update this thread in case it’d help anybody in the future. I have 3 sets of deluxe door panels. Only my original door panels line up to the lower holes. So the intel must be correct about the original installer using an awl to drive the holes at random is at least plausible. I’m guessing that’s why the new door panels aren’t pre-drilled in the lower location.
-
Per casyrhe’s experience with no predrilled holes, in 2 different brand panels, I’m going to wait til later to do the lower holes. I’ll finish my door skin for now and do the lower holes after paint, when new panels are bought. Thanks casey
-
I can see that being a + in a way caseyrhe. Especially if the doors were just randomly punched with an awl from ford. Did you drill all new holes panel/door or manage somehow to get the new panels drilled close enough to reuse the prior holes in the metal door shell?
-
Couple of questions regarding prep for a door. Preparing a door shell for epoxy before putting on a new skin and want to get all the prep before epoxy or indtalling my nos skin. One of my last areas of concern is this weather strip area. Wondering if the wavy metal needs to be straightened some to install the rubber later or if the rubber installs, leaving the strip as is? Also, I’m converting this standard shell to deluxe. In so, notice the standard shell I’m prepping doesn’t have screw holes at the doors bottom for the deluxe door panel. Curious if those who have bought new door panels, if the new panels line up with existing door shell holes? Got some advice on vmf to use an awl to replicate these concave screw holes, any advice/tips on when or how to do this? I’m favoring using my old door panel to position the lower deluxe panel attaching screws so I can do it before the new skin goes on. Thanks for sharing any tips that may help me....Jeff
-
What year pump do you have? Is it known to be good?
-
What seems to be better mig the seam shut and grind it flush or braze it back? Anybody have a pic of the seam mig’d shut?
-
Speaking of the deck lid, where the tail panel meets quarter extension, where the deck lid gasket would lay if the lid is closed, mine had brazing in there. Is that something ford did or a previous owner? Looking at mike65’s pic, it would be about where his welding cable is laying
-
Unbearable squeaking coming from the front
shelbyshelby replied to Johns Summer of 69's topic in 1969-70 Technical Forum
What Barnett said. My experience from the by gone days, were the upper control arm shafts drying up. That’s why these cars often got holes torched in the shock towers to install grease fittings there or else the shaft would get tight, then the shock tower stress cracked all to pieces. Putting new parts on is the best way to maintain the mustangs, but money was tougher to get back then I suppose.
