Leaderboard
Popular Content
Showing content with the highest reputation since 04/19/2023 in all areas
-
3 points

Mustang Factoids
smh00n and 2 others reacted to Mach1 Driver for a post in a topic
A lot of these are for 69/70: https://anghelrestorations.com/mustang-factoids/ -
3 points

Vibration at about 45MPH
Mach1 Driver and 2 others reacted to aslanefe for a post in a topic
I made a set from aluminum long time ago for a set of wheels I had. And made a set from steel for the Magnum 500s I currently have on the car. Can't remember the alloy I used (6061 possibly) but aluminum was fine. Used whatever material I had laying around. If you find the right size of steel tubing, you do not need to remove a lot of material (especially from the inside) and should be able to machine it on a mini lathe with small passes. Or you can get 2 different sizes of tubing and slip and weld them before machining. That is what I had done with the Aluminum one, the lip was welded/machined. -
3 points

Dang it anyway!
Grabber70Mach and 2 others reacted to Ridge Runner for a post in a topic
Picked up another one of these things! This one is a 2006 GT with 120,000 miles on it ,black with black and red interior . These kids just keep messing them up and i just happen to have the parts to fix them good as new !already has new brakes all the way around and he just did the full front suspension . He fried the tranny but i just happen to have one here. I have everything to fix it ,even the black paint ...my new stable is growing ! Problem is i have enough parts to build one more ,damn it ! -
3 points

Please help, brake booster question
bigmal and 2 others reacted to Brian Conway for a post in a topic
Generally speaking for an original system; the curved arm is for a 69 and the straight arm is for the 70. The brake switch fits onto the brake pedal post. The switches can be for manual brakes or power brakes. Brian -
3 points
Trunk wiring routing.
Maynard and 2 others reacted to Mach1 Driver for a post in a topic
Thanks Dave, I'm working on it, but had a few setbacks. I much prefer the days when I was young and invincible... and too dumb to know better. -
3 points

1970 Convertible Restoration
Grabber70Mach and 2 others reacted to Vicfreg for a post in a topic
Visited the body shop last week, making good progress. I got my NPD Ford tooling shaker hood and am happy to report that it only needed minor tweaking to get aligned. I also have billet hood hinges, apparently they needed some tweaking, I will report back on that after I go back there on Wednesday. The current work is focused on getting my Maier Racing one piece front spoiler fitted up. That is a very nice piece of work heavy fiberglass, and fits really well. Just a few things to do and it will fit fine. I was at Carlisle Ford show this weekend, and searched for a decent 1970 hood trim piece. As you know, the NOS ones are hard to find and expensive. I did have a good friend offer to let me use his to make sure the hood and headlight trim line up correctly, will be bringing that up there to the body shop on Wednesday. I also will bring my front bumper, and the associated mounting brackets up there to ensure that they clear the spoiler/valence combination and that the bumper lines up correctly. To answer the other questions.... the car will be in the paint booth twice. The first trip will be very soon, and will be the initial prime coat over the body work that has been done. Then, out of the booth, and back into the shop to be block sanded. After that back into the paint booth do do the base coat, hood stripe, and first clearcoat. In the end we will end up with 3 layers of clearcoat. The place that is doing the work is the same shop that painted my '68 coupe. The main business is called Klassic Rides. The shop where my car is located is called GunnerZ, which is a sister business to Klassic Rides. Both are located in Newton, North Carolina. Klassic Rides painted my '68, it needed a lot of work. GunnerZ is primarily paint and body for cars that don't need an extensive amount of work. My car has been "waiting in line" for 8 months to get started. The current wait time is approaching a year. But, my '68 was painted 15 years ago, and the paint job is still flawless. PIcs below of my '68 coupe in 1967 Marina Blue Metallic, a '63 Corvette in my final color of "Sebring Silver", and the ongoing work on the '70 convertible. My guess is that I will have the car back sometime in July or August. -
2 points
Russian Bots Again
Mike65 and one other reacted to Vicfreg for a post in a topic
Thanks to all who got the site up and running again. This is a great group and we need to find a way to keep it going. Every time the site goes out, I feel like we just got kicked out of the Fraternity house and have no where else to go.... I hate being on Double Secret Probation... https://youtu.be/1tfK_3XK4CI?si=mbh_qhTDTzUe1CUa -
2 points
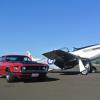
Missing my 1935 Ford pick up .
Grabber70Mach and one other reacted to Ridge Runner for a post in a topic
Made a new end for the rear of the frame, made it out of square tube instead of c channel like the original ,the old one had seen better days . I drilled all the holes including the bumper bracket on the end ,i have the bumper brackets here some where. -
2 points

1969 Coupe with 302 transmission?
Mach1 Driver and one other reacted to RPM for a post in a topic
The simplist and without mods would be that C4, if he rebuilt it correctly. While it may not be the optimal transmission, I'll all for getting these Mustangs on the road without necessarily building the perfect car. -
2 points

Which pin for solenoid S terminal?
RPM and one other reacted to 69Mach1 M code for a post in a topic
While we're on the subject of solenoids, I would recommend to anyone who has an older Ford vehicle with the solenoid mounted on the inner fender to occasionally have someone start the vehicle while you observe the solenoid. This should be done with the ambient lighting low enough to visually observe an electrical arc if one is present, preferably at night. I had an older Mustang with the original solenoid still in it, no problems with starting at all. My Dad started the vehicle while I just so happened to be looking into the engine bay and sure enough, a large arc of electrical current ran from the housing to one of the mounting screws. After close examination I could see a small fracture had formed in the housing after about 50 years of age and heat cycling. -
2 points
Please help, brake booster question
bigmal and one other reacted to Mach1 Driver for a post in a topic
Many places sell brake boosters but they are the wrong ones for our cars. There are several videos by West Coast Classic Cougar on the correct boosters and where to get them rebuilt, or you can buy a rebuilt from them. I would recommend a rebuilt over a new one. He discusses the differences here also: https://www.youtube.com/watch?v=MbW_v_DdEuU&t=50s Here are some resources: 1. Boosterdeweyexchange.com 2. Chockostang is a highly recommended rebuilder of steering components and he recommends: Midwest Remanufacturing 3. The old Global West GM recommends: Karps Power Brake Service 4. Harmon Classic Brakes -
2 points

Bandwidth issue
Grabber70Mach and one other reacted to Midlife for a post in a topic
Apparently, a BOT was using enough bandwidth that the system ran out of allotted bandwidth. The service provider has apparently blocked that from happening again. But yes, more money paid to the provider would allow more bandwidth to be used per month. -
2 points
Attaching the chrome strip to the front of the Bonnet
RogerC and one other reacted to bigmal for a post in a topic
Hi all, I recently bought a replacement chrome strip for the front of my bonnet and being after-market rubbish it needed to be pulled in a fair bit at the center. As soon as I pulled it in with the lugs supplied, they pulled straight out of the soft metal. I thought I'd share the brackets I made which made life a lot easier and holds it in place nice and tight. I had to use a little bit of silastic to hold them while positioning. If they were 1/16" wider that wouldn't be necessary. -
2 points

Pie-Cut Hood
DocWok and one other reacted to ThePoose for a post in a topic
Pardon the crude drawing. Took all measurements from the center of the pie cuts. Meaning that 22 1/4 is from the center of the pie cut on the cuts closest to the front of the hood. It was just getting messy. Mirrored measurements are all the same. All the pie cuts are the same size, the lengths of the two sides shown are if the lines continued straight instead of curving. The shapes of the forward two cuts are different on the radius, which you can see on the photo Ridge sent. If you have to cut the underside of the hood for the turn signals, those rear two oval measurement will be different from the top of the hood shown here. -
2 points
1970 Convertible Restoration
Grabber70Mach and one other reacted to Vicfreg for a post in a topic
Oh...the pictures of the front spoiler make it look pretty large. That is because the front bumper is not on. I will post an update once the bumper is on and correctly fitted. -
2 points
Attaching the chrome strip to the front of the Bonnet
bigmal and one other reacted to Ridge Runner for a post in a topic
Remember ,the nut tightens to the right so if the clip is in wrong the clip will pop out when tightened -
2 points
1970 Mustang Retromod - Boss 351
69RavenConv and one other reacted to stangs-R-me for a post in a topic
IIRC ... 140 MPH Speedometers were only used on 1969 Shelbys, so pretty much the rarest 1969-70 cluster out there. That cluster is probably worth a whole lot more than a Deluxe 120MPH 1970 Tach Cluster. May as well try and find the correct cluster and re-sell that one. Doug -
2 pointsThank you and so true on what you say, done 250 miles with another 70 miles today with 30 mins traffic and loved every minute of driving her.
-
1 pointMachspeed, I did this a couple of weeks ago. In order, the two bolts with J-nuts at the wheel opening. The captured nut that goes in the valance from the inside, then from the outside through the bracket that attaches to the bumper. Top center of the valance, attaches to the center support with a J-nut on the support. (a couple of these I couldn't get to focus) The bolt that goes through the valance in the front and attaches to the headlight extension with a J-nut on the extension. And from the back Last is the bottom of the main support that attaches to the core support. Usually there's a J-nut on this, but the new spoiler came with a nut and bolt I used instead. No spoiler then it's definitely a J-nut. Reverse for the other side.
-
1 pointMy trunk lid is OEM as is the spoiler, both original to the car. Unfortunately, my car is an early 69 build and does not have the oval cutout. I do have a bracket but it is not like that and does not protect the deck from what has transpired in the pictures above. If I recall correctly, the owner that bought the car new had the dealership install all the spoilers and window louvers. Anyway, bought an aftermarket lid tonight that has the correct cut out for that bracket. Keeping my fingers crossed that the aftermarket lid is a good one.
-
1 pointI heated up a rod for the different sized holes. Worked pretty well.
-
1 point
-
1 point
2024 MustangSteve Bash Info in Bakersfield.
Ridge Runner reacted to RPM for a post in a topic
https://fyi.boardhost.com/viewtopic.php?id=13701 Here's a link to the host hotel booking page. The official Bash is Saturday October 5th, but guys start showing up Thursday afternoon to catch up with friends. There will be updates on the MustangSteve site up until the event. -
1 point
Missing my 1935 Ford pick up .
Grabber70Mach reacted to Ridge Runner for a post in a topic
Trying to drill out those rivets in the cut up radiator brackets ,i broke off a drill bit! The metal is like drilling a lead steel mix and it grabs drill bits ,kind of like stainless steel ! After a few good cuss words ...did i say a few ? I got the last rivet out with a diamond grinder bit -
1 point
Missing my 1935 Ford pick up .
RPM reacted to Ridge Runner for a post in a topic
I got the two frame ends blasted and primed ,not a lot of pitting ,mainly where it had a hitch bolted over the frame but still nothing bad . The rest of the frame is heavily painted ,it was hard to blast off the ends so i am thinking the main rails will be in great shape! He cut these ends with what looks like a chop saw blade about 1/8 inch think so i will have to leave a gap when i weld them back on ,i will use a chop saw blade to space it -
1 pointDamn. Sorry to hear that, and hope things work out for you.
-
1 point
2024 MustangSteve Bash Info in Bakersfield.
Mach1 Driver reacted to RPM for a post in a topic
Pretty sure that was Zray on VMF. After a few overnight hotel stays with your Mustang parked in the lot, your level of anxiety drops considerably. -
1 pointOver the past few days I started making up the new fuel lines. I got the one from the fuel tank to where the inline fuel filter will be & cut a section of line that I just have to bend from the inline filter to the hole in the torque box.
-
1 pointPut the Mustang up on jack stands so I can get under it & start running the fuel lines.
-
1 point
Ma light and switch
Mach1 Driver reacted to Vicfreg for a post in a topic
Old switch, note exposed copper contact material New switch from EBay US parts seller UL listed industrial switch -
1 pointwhen I did mine I wire brushed it the best i could and used a primer made just for rust. I believe it was Mastercoat series . It is sand able and u can top coat it with most any kind of paint. worked really well for me.
-
1 point
Quarter Panel Drain Plug Installation
Mach1 Driver reacted to ThePoose for a post in a topic
NPD and all the others sell them. If your car has the holes still, I'd put them in to keep the dirt out. That's why I'm doing it. If you replaced the panels and the holes aren't there, personally, I wouldn't bother. I don't think any of us are doing the heavy, everyday driving or letting them sit outside where we'd have to worry about the trunk needing to drain. But that's one person's opinion. -
1 point
1970 Convertible Restoration
Mach1 Driver reacted to Vicfreg for a post in a topic
Quick note about using powder-coat/painted parts that are relied on for chassis grounding to complete lighting and other electrical circuits. I had to add a separate ground wire to my parking/turn signal lights that mount to the front bumper. The bumper is powder-coated, and the parking light housings are painted in black epoxy. My screws are also coated black. When I tested the lights, one side was very dim. The other side flickered. Ground wire fixed the issue so both sides have a consistent level of illumination. -
1 point
Please help, brake booster question
Mach1 Driver reacted to ThePoose for a post in a topic
Repeating some of the same here. The booster shouldn't affect the switch, but maybe you got a manual switch for an auto (or vice versa)? The price difference between the two is pretty significant if I remember right. Even though it works, the booster you have will likely fail sooner than later. How soon will likely depend on how much you drive your car. Definitely watch that WCCC video to understand why, or just for all around knowledge. Brakes will still work, so no worries. And if you do decide on a rebuild of one, thumbs up for Booster Dewey. -
1 pointI don't know the length off the top of my head. Each year seems to be different as well. This whole problem does not seem to have an easy solution at all. Basically, one is measuring the difference in voltage across an approximately 2-3 foot section of #12 or #10 gauge wire, whose resistance is on the order of 0.05 ohms or so. Corrosion at contact points are well above this level. Unfortunately, this is not a precision system. Attempts to make the ammeter respond in a more aggressive manner by adding extra length wires between alternator and battery (starter solenoid) is asking for reliability degradation as well.
-
1 pointModified cowl panel. Tacked 1/8 rod around perimeter on the bottom, cut away the slots, tacked 1/4-20 studs on the bottom side, welded shut washer nozzle mount holes, drilled new washer nozzle holes on top, sanded, skim coat of bondo, sanded smooth, primed, wet sanded, primed again. It'll get aluminum or SS mesh and the studs trimmed if too long. I have 3 more of these if it doesn't workout.
-
1 point
69 Fastback: First car in 1985 - Bought it back in 2011
TexasEd reacted to EastYorkStang for a post in a topic
Those blocks are hard to get. Been looking for my Zephyr for a while. Great find ! -
1 pointI posted pics of my wiring and folks pointed out I had the LHS reverse light run thru the floor improperly. I found out where it should be routed and fixed it!
-
1 point
Trunk wiring routing.
Mach1 Driver reacted to stangs-R-me for a post in a topic
NPD shows the '70 System: 5210-29: use with turn downs 5210-27A: use with Mach 1 Tips There is also the concours correct option, but you need to buy all the pieces separate. Doug -
1 point
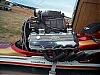
For those with Convertibles and want 3" exhaust tubes
Grabber70Mach reacted to 427Stang for a post in a topic
Thanks, the toughest part was fabricating the exhaust pod in the rear. the stock Shelby pod is a massive restriction to flow. -
1 pointMy new window finally came in. I gave it a quick measure and its 15" and some change tall, so shouldn't be another fastback one. :D I got all the different parts glued to the window. Then a couple hours later realized I managed to somehow put the front one on backwards. Despite checking it a dozen times and telling myself not to do it, I somehow did it. :D Luckily I caught it while the glue was still not fully cured. I was able to get the bracket off and cleaned up and glued on the correct direction. Something I noticed the first time gluing the bracket on is it was a bit of a chore keeping them from tilting. This time around, I used a couple stakes and a clamp to hold the brackets so they're at least on the same plane with each other. Whether or not that makes a difference, I'll know after the glue dries and I go to put this thing in.
-
1 pointSounds good to me!
-
1 pointI cut a slot out of a 2x4 such that the pinch weld wasn't touching the bottom of the slot. Then, I used that 2x4 with a 2 post lift when I needed to access frame rails and other areas normally used as a lift point.
-
1 pointI couldn't get the video to play. I've never had new gears, but I don't think shavings are normal. Are they shavings or powder like?For the price of what stuff costs today, I wouldn't put up with a loud whine. I had a set of used 3.70 gears that were very loud, and no amount of adjustment could quiet them. That rear rebound situation sounds goofy. What did Shaun say about it? Can you post pics of your car ride height and rear coil overs?
-
1 point
Subframe connector installation question
RPM reacted to Rich Ackermann for a post in a topic
Did my tinman connectors while the car was on the body cart. I would not do it the way I did on a convertible since there is a lot of body flex, but on a hardtop I had no concerns. Outside of the floor pans and front torque boxes my car was solid and all went well. -
1 pointDamn I knew there would have been an easier way.
-
1 point
1969 Flashback
TexasEd reacted to Jesse 69 Fastback for a post in a topic
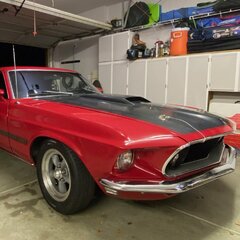
While I was in high school, i stumbled across a red 1969 Mustang Fastback for sale. The asking price was $6K and it was in pretty decent shape. The downside is that as a high school student I didn't have the $6K. But I was able to secure a personal loan from a family friend, with the agreement that I had to pay it off within 1 year. I worked my ass off that year and made the final payment just before the 1 year mark. Later that same year, I enlisted in the Marine Corps, and after several months of basic training and then technical training for my job within the military, I went home on leave and picked up the Mustang. I drove it to Virginia, and then several months later I crossed the country with it to San Diego, CA. I planned to be in San Diego for at least 3 years (I never left), so I decided to take the opportunity to go through the car, restoring and repairing what I could. Unfortunately, I bit off more than my wallet could handle at the time (hey, who hasn't with these things?), so the project ended up taking much longer than I had originally planned. So much that I eventually, and very reluctantly, decided to sell the car to an older gentlemen that was planning on finishing the restoration with his son. I have no idea what ever happened to that car, but I hope it's still on the road and not sitting in a junk yard somewhere. I always regretted selling that car, and over the years I'd looked casually at picking up another one but it never seemed like the right time. That is until last year, when I was window shopping online and found another red 1969 Mustang Fastback for just the right price. Not perfect, but not a bucket of junk either, which is exactly what I wanted. So after a few exchanges with the seller, I took a road trip to Vegas to see the car in person. I test drove it and it was like a freaking time machine. As soon as I sat behind the wheel I felt 18 again. I bought it on the spot. So that was a year ago, and I've been slowly going through the car making upgrades and improvements. I replaced the cooling system, swapped in a completed MSD system, and upgraded the stock dash instrument cluster with one from Dakota Digital. Then earlier this year I came across a local body shop that does absolutely amazing work (Sylvester's Customs). I drove out to see the owner and spent a few hours learning about his shop, his employees, and his process. At the end of the conversation he agreed to put my car on the waiting list and I couldn't be more excited! Now it seems that I'm all in on a restoration/rejuvenation. I'm not planning on going all original, since I like the idea of taking advantage of the 50 years of auto advancements since the car was launched, but I'm mostly keeping with the original look of the 69 Mach 1. I'll be using this thread to keep track of all the work that I do to the car over time. Right now I'm in the middle of swapping out the Ford 8inch rearend with a 9inch from Currie, and replacing the C4 with a Tremec TKX swap from SST. My original Mustang from high school: My new Mustang: -
1 point

69 mach 408w build
Grabber70Mach reacted to TexasEd for a post in a topic
Where's the drool emogi when you need it. -
1 point

Brake Light Switch
RPM reacted to Project 69 for a post in a topic
As mentioned before the switch for power brakes is more sensitive that the one for manual brakes, there is thread about this somewhere on the forum. A more drastic solution could be installing a proportioning valve combo unit that has an integrated fluid pressure switch like the one attached. I'm Installing one of these while I replace brake lines and plan to try it. -
1 pointWe had an extra space in our garage for the car but it was full of stuff from my dad's old house and all my hunting gear so I waited for a weekend in July when my wife was out of town and cleaned up everything and epoxy coated the garage floor. It was a lot of work but definitely worth it. I also had to sell my table saw and radial arm saw. Before: Kitchen while this was in progress (Don't tell my wife): After: I guess you could say I was nesting.