
Leaderboard


Popular Content
Showing content with the highest reputation on 12/31/2020 in all areas
-
3 pointsSeems like most of my pictures are with the hood open. :)
-
3 points
Covid vaccine
Machspeed and 2 others reacted to LoneWolf2U for a post in a topic
Fully agree with this point. As the CDC has made the choice of who is first and seems that I am in the last to get section, Over 60 and white male. But that is fine with me as its my body, My choice and they can keep the special sauce for the snowflakes. -
1 point
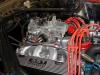
1969 Mustang Summit M2008 Series Carburetor Install ...
Kilizyrag reacted to stangs-R-me for a post in a topic
I had started a thread asking about repro O.E. ford 4BBL Throttle Cable Brackets, which started to morph into a thread about modding one to mount on one of these Summit carbs. Instead of continuing with that thread, I figured it would be best to start clean with a NEW thread on all that needs to be done to install this series of carburetors on a 1969 or 1970 Mustang / Cougar. I'm installing the 600 CFM Vacuum Secondary version (M08600VS) on my 1969 mustang with 351W and Offenhauser 360Deg Equa-Flow Dual Plane Intake. I'd guess the installation would be very similar on any 1969-70 Ford V8 that uses a square hole throttle cable & bracket that mounts to the rear carb studs. FIRST STEP ... Modding an O.E. Ford or reproduction 4BBL Throttle Cable Bracket to fit the back end of this carb. In my case, I bought the Clear Zinc Plated '69-70 Boss 302 bracket from NPD (9741-6A). The '69-70 302,351 & 390 with 4BBL (NPD 9741-5A) could also be used, but I bought the Boss one because they sell for the same price and it was plated and the other one appears to be bare steel, plus I was hoping maybe it had a little more "drop" in the section that goes under the rear of the carb. Well, the Boss 302 bracket only has 1/4" of drop to it and the Summit carb needs at least 11/16" so it needed to be modded to fit. The 12/26/20 post in the original thread has pics of how I planned to mod the bracket: '69-70 O.E. 4BBL Carb Accelerator Cable Brackets ... - 1969-70 Technical Forum - 69stang.com and 1969stang.com The 1969 and 1970 Mustang Supersite MODDING the BRACKET: I cut a 0.83" wide strip of steel out of a RACO 2-Gang Electrical Switch Cover using a 6" Drill Master Cut-Off Saw I bought from Harbor Freight. Had to put the back stop at the further back position and remove the clamp assembly as the cover was maybe an 1/8" too wide and just held it down by hand. Had to flip over to finish the cut, as it only went about 80-90% thru. A larger abrasive chop saw would be able to do in one cut or could also use a band saw. I used an old Holley carb base I had in my carb parts box as a "weld fixture", used a Ryobi 18V 3" cut-Off Saw to cut away the center section after welding the outside welds, then welded the inners after the piece was removed. A little grinding to clean up my welds then removed from fixture. Cleaned it up with Lacquer Thinner then Wax & Grease Remover and then masked off the ends and painted the center section with cold galvanize paint. Mod is pretty much unseen as mounted in the last pic. I'll post other steps for this carb installation as new posts. Doug -
1 point

1970 Fastback Restomod/Rebuild
RPM reacted to mustangstofear for a post in a topic
Very nice. -
1 point
Covid vaccine
mustangstofear reacted to LoneWolf2U for a post in a topic
Tell them it is against your spiritual beliefs to violate your body. Time to use their rules against them. -
1 point
California life
Caseyrhe reacted to LoneWolf2U for a post in a topic
This is just icing on the cake of why I left Cali after 36 years. The constant fees and taxes combined with agenda 21 rules made me look elsewhere. Straw that broke the back was them trying to tax the water I pumped from the well on my land and the regulations on my second amendment push me out. -
1 pointNow the revelation.... Have I been panicking over nothing ? Are these 4 bolts actually seat-belt mountings? it would make sense. There were no seat belts in the car when I bought it. Were they a standard fitting? If so, I will have to fit them to be 'legal' in South Australia. ... and the other conclusion based upon them being seat belt mounts... is that there are so seat-back bolt holes-- which would not be a problem as the back is secure once the bottom is in place. Your comments please?
-
1 point

Best way to prep interior for new paint
lalojamesliz reacted to JayEstes for a post in a topic
When I did my rebuild, I pulled out all carpet, seats, belts - everything I could unbolt. After vacuuming and just cleaning it with usual stuff, I didn't have a lot of rust to deal with. But there was a lot of seam sealer (which is like a semi-hardened tar that has body paint on most of it) around. I didn't want to sand everything off and besides, a lot of the paint was in decent shape - why remove it? So what I did was the following: I got a 1in putty knife, some really tough PVC gloves, some scotchbrite pads, and a 5 gallon bucket of "clean-up thinner" (Laquer Thinner) from a local paint supply store. After getting dirt off and isolating areas of rust, I used the putty knife to remove most of the seam sealer (60-70%% of which was either flaking off, or sticking to things it shouldn't be). Then, I used the scotchbrite dipped in a small bowl of thinner, to clean areas where the sealer had been removed and clean and rough up the painted areas. Laquer thinner will remove the paint if allowed to stay on there very long, so I used it lightly, and would clean the surface, and rough it up with the scotchbrite, and immediately wipe it off with a rag so it didn't wrinkle the remaining paint/primer. This left a really clean, primer ready surface. This worked great for getting the remaining seam sealer off, and it got the paint prepped to receive primer over the top, leaving the good original paint/primer in place. The use of a scotchbrite pad soaked in laquer thinner is the most effective cleaner I have ever seen, it cuts thru everything (oil/ grease, dirt grime, paint). It is pure hell on gloves and hands, so get a couple pair of gloves as even a pair of PVC gloves will harden after several sessions of use. Obvious caveats go with this process for respirators and fans. Laquer thinner is a strong chemical. After that, I just resealed the seams with orderly beads of paintable silicon caulk, and then I used rattle can automotive primer over everything. Making damn sure not to paint over anything resembling rust or its semi-hidden effects. I always ground any of that down and put the primer on bare metal once rust was gone. I put on at least 2 coats of primer everywhere, then put down dyna-mat for sound deadening everywhere. This was a fairly long process, but a lot better than trying to remove everything (remember, in my case most of the floor was in good shape). The floor looked great after this, and I think it was a nice medium restore option that left good parts of the car in place, but re-did everything else as best I could. Trying to remove everything with anything less than a full-body dip is a ton more work than it is worth. Hope this addresses your question, and you find some of these tips helpful. It wasn't super fast, but I was really happy with the results, and I felt like the effort was focused where it was needed. -
1 point
Life’s Challenges
Caseyrhe reacted to LoneWolf2U for a post in a topic
Thanks for the good news for a change in all of this swirling crap. Next step is keeping your support up as things move forward, Being a solid rock for her to lean on is very important so thumbs up to you! -
1 pointI used Global West tubular UCAs as they are offset for more camber. They call them +(3). I used open tracker modified LCAs, very high quality stuff. I also decided to use the Global West tubular outer shock tower braces. They have an adjustable bump stop, but mostly because they look cool...
-
1 pointMy hi-fi sound system needed some attention as the sound was scratchy when turning the volume up or down and the cassette player was not reading. So I opened it up to clean the volume potentiometer and see what was wrong with the cassette not reading. Looks like the tape head is burned out and I do not have a head to replace it with so I improvised and added auxiliary input and bluetooth to it. 3 way switch that switches between the radio/cassette (if/when I find a head to replace), Aux input and bluetooth. 1st picture is radio/cassette mode and 2nd picture is bluetooth mode; the switch is hidden in plain sight on these pictures, let's see who is going to find it first. 3rd picture are the parts I used.
-
1 point
What did you do to/for your Mustang today?
TexasEd reacted to lalojamesliz for a post in a topic
Finally pulled out the original I6 250 a day ago and I just ordered some convertible inner rockers with the convertible seat pan. I have a lot of support and motivation from my family to get this project done so Its all im focused on right now -
1 pointShe’s back home today. New steering rack, not perfect but much better. 5 speed trans,. Louder, cooler exhaust rumble. still have to get stereo working & clutch pedal sticks on bottom

